LDAP Import Configuration
The LDAP Import Configuration interface allows you to to configure CSEG to import users from the domain's Active Directory server.
We
recommend
you create a separate user account for CSEG to login to the AD
server,
and that this account be
given
read-only permissions.
Configure LDAP import
- Open the 'Domains' interface
- Select the domain to which you want to import users.
- Click the 'Manage Domain' button
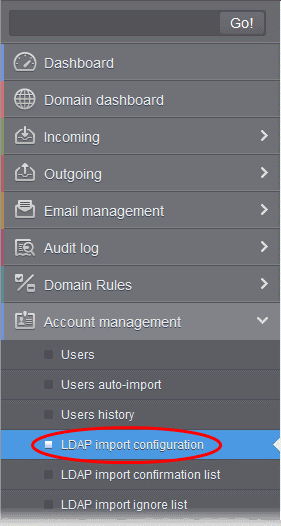
- Click 'Account management' > 'LDAP import configuration':

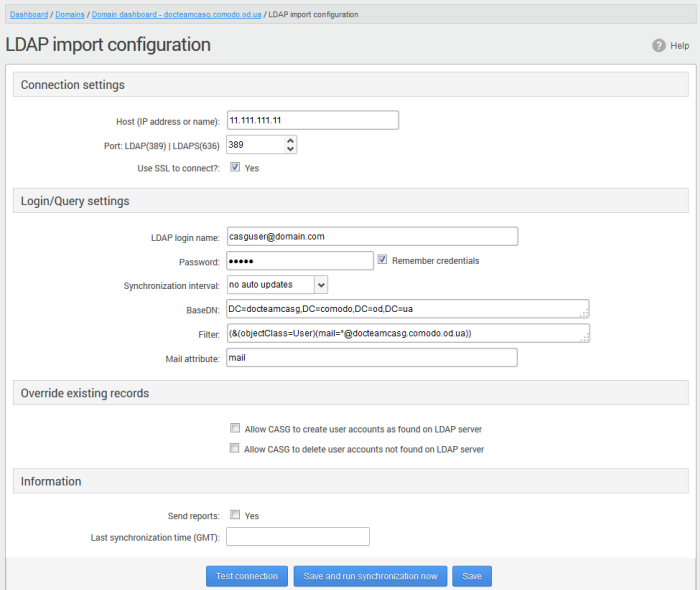
The 'LDAP import configuration' interface will open:

Connection Settings
- Host (IP Address or Name) - Enter the hostname or external IP address of the AD server. If your organization uses the same physical server for AD and mail, then enter the details of the mail server.
- Port - Enter the port number of the Active Directory server.
- 389 is the default port for non-SSL connections ('Use SSL To Connect?' box NOT checked)
- 636 is the default port for SSL connections('Use SSL To Connect?' box checked)
- Use SSL To Connect? - Select 'Yes' to use secure LDAP. You need to have an SSL certificate from a trusted certificate authority on your AD server. Self-signed certificates are not allowed.
|
Note: SSL access should have been enabled for AD Server before opting for SSL usage. |
Login/Query Settings
- LDAP login name - Account username which CSEG should use to login to the AD server. Preferably, a new user account should be created especially for the CSEG server. The user account should have 'read' privileges to the AD server. The username can be of the format 'username' or 'username@domainname.com'
- Password - Enter the password of the LDAP user account above.
- Remember Credentials - Enable if you want CSEG to store the username/password of the user account in order to automatically login.
|
Note: If you enable automatic synchronization, the 'Remember Credentials' option will not be visible because CSEG will store the username and password by default. This will allow CSEG to connect to the AD server at the set time interval to update the user base. The option will become visible if 'Synchronization Interval' setting is set as 'no auto updates'. |
- Synchronization interval - This is relevant if you want CSEG to connect to the AD server in order to synchronize the user base. Select the time interval at which the synchronization occurs from the drop-down. If not, select 'No auto updates'.
-
BaseDN - Distinguished Name of the user object in Active Directory. By default, the BaseDN field will contain the Domain Component (DC) values based on the domain name for which LDAP is configured. You can add/change the values of the strings 'Container Name (CN)', 'Organizational Unit (OU)' and 'domain name' depending on the users to be imported from the Active Directory.
Example: For adding users from Container 'Users', Organizational unit 'Organization' and domain 'example.com', the administrator has to enter the following:
CN=Users, OU = Organization, DC=example, DC=com
-
Filter - Enables the Administrator to specify filter parameters users/addresses to be imported from the AD server. Each filter parameter should be defined within parentheses. Common filter parameters are explained below:
(objectClass=) - Specifies the user accounts to look for from the domain's Active Directory. (Default = (objectClass=User))
(mail=*) - Instructs CSEG to import only the users that have a defined SMTP account within the domain. By default, the filter is pre-added with the parameter (mail=*@) to import the users that have email addresses on the current domain.
You can add any number of (mail=) filters if you wish to add several domain names
Example: (mail=*@domainname1.com)(mail=*@domainname2.com)
To import all email enabled users from the Active Directory irrespective of any specific domain name, enter the parameter as '(mail=*)'.
To modify a filter parameter to be exclusive rather than inclusive, add an exclamation mark (!) before the opening parenthesis of any parameter. This will instruct the query to ignore any users which fall into that category. For example, if one wanted to configure a query to find users with mail enabled at any domain EXCEPT domainname.com, the filter should include the following: (mail=*)!(mail=*@domainname.com).
To import all email enabled users from the Active Directory irrespective of any specific domain name, enter the parameter as '(mail=*)'.
|
Note:
|
- Mail attribute - Enter the LDAP display name of the contact email address attribute of the AD Server. By default, this attribute name will be 'mail' for AD servers or the distinguished name (DN) or common user login name for the AD server. On other servers like Novel or OpenLDAP this attribute may be different and server specific.
- Allow CSEG to create user accounts as found on LDAP server - Select this checkbox if you wish new users added in the AD server to be automatically added to CSEG during synchronization. If you do not select this option, you can manually import the new users from the LDAP import confirmation page.
- Allow CSEG to delete user accounts not found on LDAP server - Select this checkbox if you wish users removed from AD server, to be automatically removed from CSEG during synchronization. If you do not select this option, you can manually remove users from the LDAP import confirmation page.
Information Settings
-
Send Reports - If enabled, CSEG will send email notifications to the administrator whenever new users are created or users are removed either automatically, (if 'Allow to create users?'/'Allow to delete users?' are enabled) or manually from the LDAP import confirmation page.
- Last synchronization time (GMT) - Displays the date and time of last manual or scheduled synchronization with AD server, in GMT.
- Notification area - Contains information about errors that occurred during synchronization. In most cases, this will contain the same information that is provided with the "Test connection" feature. Note - this area is only visible if errors occur.
- To check the configuration and connectivity, click 'Test Connection'. If the connection is established successfully then the success message will be displayed with the total number of users detected from the AD server.

- Click 'Save' to store your configuration.
- Click 'Save and run synchronization now' to store your configuration and synchronize the CSEG user base with the AD server.


