Comodo Help
Find the desired product help
Comodo Internet Security

Comodo Internet Security

Version 8.4

English

Print Help Download Help
Advanced Settings > Security Settings > Firewall Settings > Website Filtering > Creating And Modifying Website Filtering Rules
  • Introduction To Comodo Internet Security
    • Special Features
    • System Requirements
    • Installation
      • CIS Premium – Installation
      • CIS Pro - Installation And Activation
      • CIS Complete - Installation And Activation
      • Activating CIS Pro/Complete Services After Installation
        • Activating Your License
        • Activating Your Guarantee Coverage
        • Renewal Of Your License
    • Starting Comodo Internet Security
    • The Main Interface
      • The Home Screen
      • The Tasks Interface
      • The Widget
      • The System Tray Icon
    • Understanding Security Alerts
  • General Tasks – Introduction
    • Scan And Clean Your Computer
      • Run A Quick Scan
      • Run A Full Computer Scan
      • Run A Rating Scan
      • Run A Custom Scan
        • Scan A Folder
        • Scan A File
        • Create, Schedule And Run A Custom Scan
    • Instantly Scan Files And Folders
    • Processing Infected Files
    • Manage Virus Database And Program Updates
    • Manage Quarantined Items
    • View CIS Logs
      • Antivirus Logs
        • Filtering Antivirus Logs
      • Viruscope Logs
        • Filtering Viruscope Logs
      • Firewall Logs
        • Filtering Firewall Logs
      • Defense+ Logs
        • Filtering Defense+ Logs
      • Website Filtering Logs
        • Filtering Website Filtering Logs
      • Alerts Logs
        • Filtering Alerts Displayed Logs
      • Tasks Logs
        • Filtering Tasks Logs
      • Configuration Changes Logs
        • Filtering Configuration Changes Logs
    • Get Live Support
    • View Active Internet Connections
    • View Sandboxed Processes List
  • Firewall Tasks – Introduction
    • Allow Or Block Internet Access To Applications Selectively
    • Stealth Your Computer Ports
    • Manage Network Connections
    • Stop All Network Activities
    • Advanced Firewall Settings
  • Sandbox Tasks – Introduction
    • The Virtual Desktop
      • Starting The Virtual Desktop
      • The Main Interface
      • Running Browsers Inside The Virtual Desktop
      • Opening Files And Running Applications Inside The Virtual Desktop
      • Configuring The Virtual Desktop
      • Closing The Virtual Desktop
    • Run An Application In The Sandbox
    • Reset The Sandbox
    • View Active Process List
  • Advanced Tasks – Introduction
    • Create A Rescue Disk
      • Downloading And Burning Comodo Rescue Disk
    • Remove Deeply Hidden Malware
    • Submit Files
    • Identify And Kill Unsafe Running Processes
    • Manage CIS Tasks
  • Advanced Settings
    • General Settings
      • Customize User Interface
      • Configure Program And Virus Database Updates
      • Log Settings
      • Manage CIS Configurations
        • Comodo Preset Configurations
        • Importing/Exporting And Managing Personal Configurations
    • Security Settings
      • Antivirus Settings
        • Real-time Scanner Settings
        • Scan Profiles
        • Exclusions
      • Defense+ Settings
        • HIPS Settings
        • Active HIPS Rules
        • HIPS Rule Sets
        • Protected Objects
          • Protected Files
          • Blocked Files
          • Protected Registry Keys
          • Protected COM Interfaces
          • Protected Data Folders
        • HIPS Groups
          • Registry Groups
          • COM Groups
        • Sandbox
          • The Sandbox - An Overview
            • Unknown Files - The Scanning Processes
        • Configuring The Sandbox
        • Configuring Rules For Auto-Sandbox
        • Viruscope
      • Firewall Settings
        • Firewall Settings
        • Application Rules
        • Global Rules
        • Firewall Rule Sets
        • Network Zones
          • Network Zones
          • Blocked Zones
        • Port Sets
        • Website Filtering
          • Creating And Modifying Website Filtering Rules
          • Defining And Modifying Website Categories
      • Manage File Rating
        • File Rating Settings
        • File Groups
        • File List
        • Submitted Files
        • Trusted Vendors List
  • Comodo GeekBuddy
    • Overview Of Services
    • Activation Of Service
    • Launching The Client And Using The Service
    • Accepting Remote Desktop Requests
    • Chat History
    • Using Free Diagnostic Reports
    • Scanning My PC
    • Uninstalling Comodo GeekBuddy
  • TrustConnect Overview
  • Chromodo Browser
  • Appendix 1 CIS How To... Tutorials
    • Enable / Disable AV, Firewall Auto-Sandbox And Viruscope Easily
    • Set Up The Firewall For Maximum Security And Usability
    • Block Internet Access While Allowing Local Area Network (LAN) Access
    • Block/ Allow Websites Selectively To Users Of Your Computer
    • Set Up The HIPS For Maximum Security And Usability
    • Create Rules For Auto-Sandboxing Applications
    • Password Protect Your CIS Settings
    • Reset Forgotten Password (Advanced)
    • Run An Instant Antivirus Scan On Selected Items
    • Create An Antivirus Scanning Schedule
    • Run Untrusted Programs In The Sandbox
    • Run Browsers Inside Sandbox
    • Run Untrusted Programs Inside Virtual Desktop
    • Run Browsers Inside The Virtual Desktop
    • Restore Incorrectly Quarantined Item(s)
    • Submit Quarantined Items To Comodo For Analysis
    • Enable File Sharing Applications Like BitTorrent And Emule
    • Block Any Downloads Of A Specific File Type
    • Disable Auto-Sandboxing On A Per-application Basis
    • Switch Between Complete CIS Suite And Individual Components (just AV Or FW)
    • Switch Off Automatic Antivirus And Software Updates
    • Suppress CIS Alerts Temporarily While Playing Games
    • Renew Or Upgrading Your License
    • How To Use CIS Protocol Handlers
  • Appendix 2 - Glossary Of Terms
  • Appendix 3 - CIS Versions
  • About Comodo Security Solutions

Creating and Modifying Website Filtering Rules


The 'Rules' tab allows you to create, view, edit and specify exceptions to your website filtering rules. The powerful rule-configuration interface lets you create rules which are as sweeping or as granular as you require. Rules can be created on a per-user basis, allowing you to control exactly which websites certain people can or cannot visit. You can also disable or enable a rule as required at any time.

Comodo Firewall implements rules for the currently logged-in user based on the order they are in this list. Should a conflict exist between individual rules, then the rules at the top takes priority. Click the handle and use the 'Move Up' or 'Move Down' buttons to change a rule's priority.


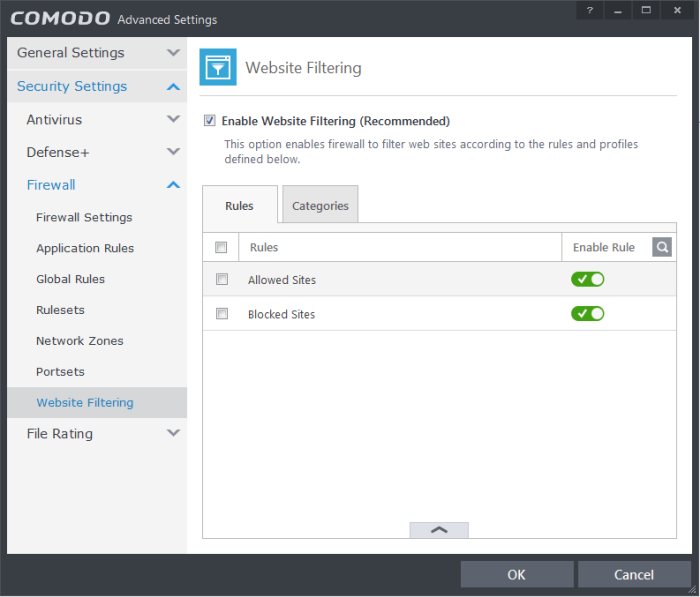
    • The switches in the 'Enable Rule' column enable you to quickly turn a rule on or off
    • The check-boxes next to a rule name allow you to select it for editing, removing or re-prioritizing using the controls at the bottom of the interface:


      You can search for a specific rule by clicking the search icon  at the far right in the column header.


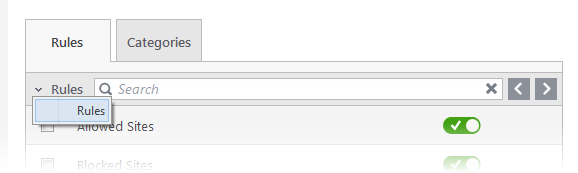
      • Enter full or part of  the name of the rule in the search field.
      • Click the right or left arrow at the far right to begin the search.
      • Click the  icon in the search field to close the search option.

      The Rules interface allows you to:

      • Create new URL filtering Rules

      • Edit existing rules

      • Change priority of the rules

      • Remove unwanted rules


      To create a new Website filtering rule

      1. Open the 'Website Filtering' Panel by clicking 'Security Settings' > 'Firewall' > 'Website Filtering' from the 'Advanced Settings' interface

      2. Click the handle at the bottom of the Rules interface and select 'Add':


      3. Enter a name for your new filter.

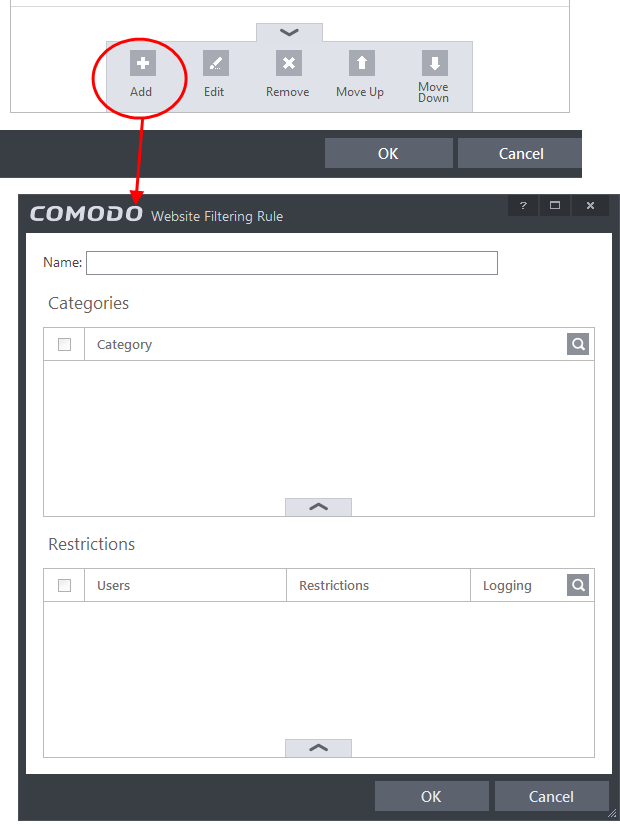
      4. Select the categories that should be added to the filter:
      • Click the handle at the bottom of the 'Category' pane and choose 'Add'.


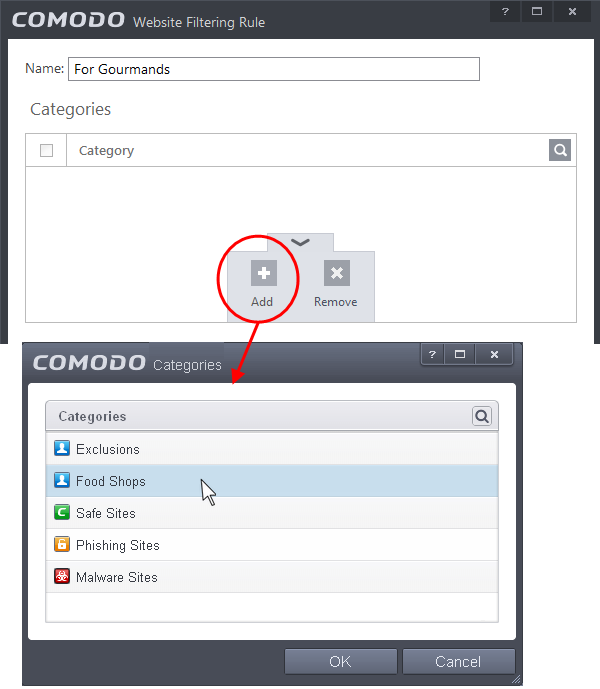
      Select a category and click 'OK' to add it to your rule. Repeat the process to add more categories. 


      The 'categories' window contains a list pre-defined Comodo categories and any user created categories. Comodo categories cannot be modified.  

      • Comodo Safe Category - URLs of websites that are considered safe according to global whitelist
      • Comodo Phishing Category - URLs of websites that lead to phishing websites, as per dynamically updated Comodo Blacklist
      • Comodo Malware Category - URLs of websites that may inject malware into your system, as per dynamically updated Comodo Blacklist
      For more details on creating and modifying user specified categories, Refer to the section Defining or Modifying Website Categories
      • Select the category to be included in the filter and click OK.
      • Repeat the procedure to add more categories.
      • To remove an unwanted category, select it, click the handle from the bottom and click 'Remove' from the options  
      5. Add Users or User Groups to whom the rule should be applied:
      • Click the handle at the bottom of the 'Restrictions' pane and click 'Add'. The 'Select User or Group' dialog will appear:


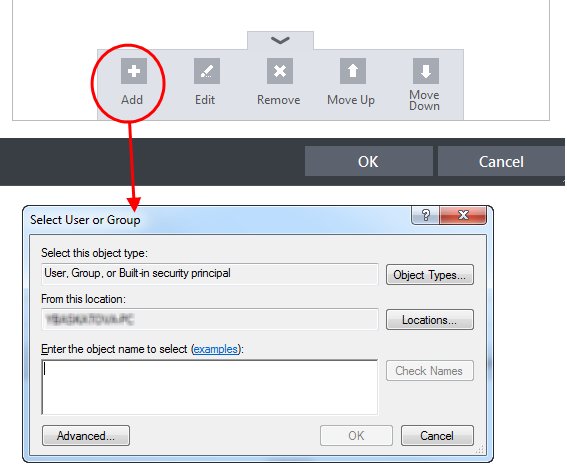
      • Enter the names of the users to whom the filter is to be applied in the 'Enter the object name to select' text box with the format or @. Alternatively, click 'Advanced' then 'Find Now' to locate specific users. Click 'OK' to confirm the addition of the users.


      After adding target users or groups, you next need to specify whether those users should be allowed or blocked from viewing the websites in the category or they should be asked if they want to continue. This is done by modifying the link in the 'Restrictions' column:


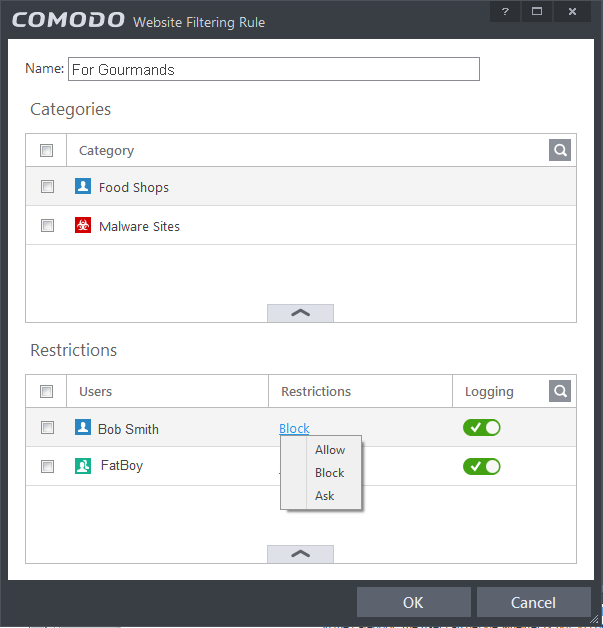
      • Allow - The websites in the categories can be accessed by the user.
      • Block  - The websites in the categories cannot be accessed by the user.
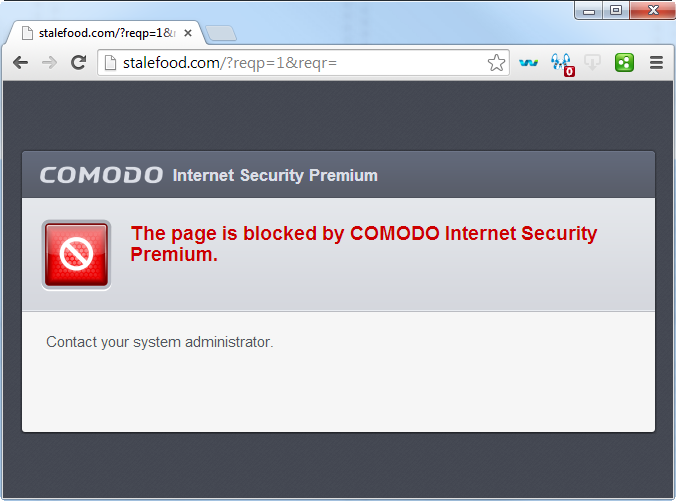
      • Ask -  An alert will be displayed in the browser (shown below) if the user tries to access any of the websites in the category. The user can decide whether or not  to continue.


      6. Use the 'Logging' switch to choose whether or not attempts to access a categorized website are logged.

      7. Click 'OK'  to save your new rule. The new rule will be added to the list of rules under the 'Rules' tab  

      8. Make sure that the rule is enabled using the toggle switch under the Enable Rule column for the rule to take effect.
      • You can disable or enable rules at any time using the switch under the 'Enable Rule' column.

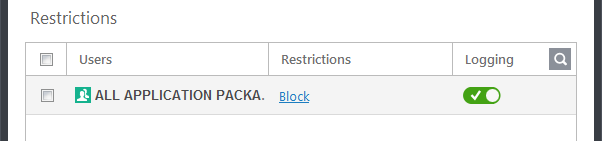
      Important Note to Windows 8 and Windows 8.1 users: If you are using Internet Explorer 11 version 11.0.9600.16384, it is mandatory to add the user group 'ALL APPLICATION PACKAGES' to the Restrictions list in addition to the intended users for each rule you create.

      If you or other users access websites using Internet Explorer 11 on Windows 8/8.1, then you must add this user group or your rules will have no effect. For example, users will still be able to access blocked websites.


      To add 'ALL APPLICATION PACKAGES' to the restrictions list
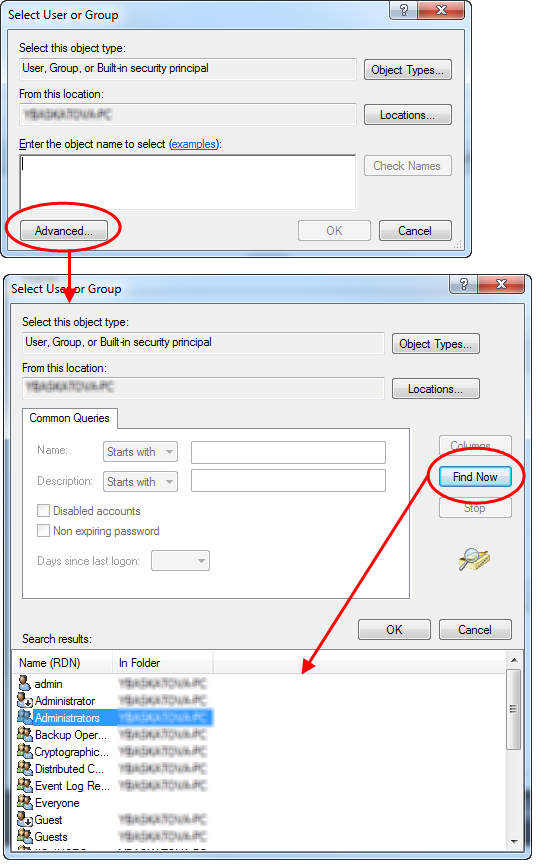
      • Click 'Advanced' in the 'Select User or Group' dialog


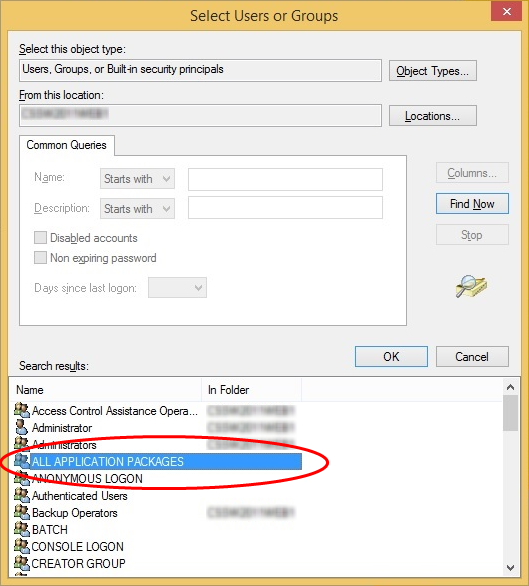
      • Click 'Find Now' and select 'ALL  APPLICATION PACKAGES' from the list of users and groups displayed in the list at the bottom
      • Click OK


      To edit existing rules

      1. Open the ' Website Filtering' Panel by clicking 'Security Settings' > 'Firewall' > 'Website Filtering' tab from the 'Advanced Settings' interface

      2. Choose the Website Filtering Rule to be edited under the 'Rules' tab by selecting the checkbox beside the rule.

      3. Click the handle from the bottom center of the Rules interface and choose 'Edit' from the options.

      The ' Website Filtering Rule' interface for the selected rule will open. You can add/remove categories, add/remove users or change the restriction for selected users from this interface. Refer to To create a new Website Filtering Rule for more details on this interface.

      To remove a Website Filtering Rule

      1. Open the ' Website Filtering' Panel by clicking 'Security Settings' > 'Firewall' > 'Website Filtering' tab from the 'Advanced Settings' interface

      2. Choose the Website Filtering Rule(s) to be removed under the 'Rules' tab by selecting the checkbox(es) beside them.

      3. Click the handle from the bottom center of the Rules interface and choose 'Remove' from the options.

      To change the priority of Website Filtering Rules

      1. Open the ' Website Filtering' Panel by clicking 'Security Settings' > 'Firewall' > 'Website Filtering' tab from the 'Advanced Settings' interface

      2. Choose the Website Filtering Rule to be moved under the 'Rules' tab by selecting the checkbox beside the rule.

      3. Click the handle from the bottom center of the Rules interface and choose 'Move Up' or 'Move Down' option to change the order of the rules in the interface.

        Our Products
        • Free Antivirus
        • Free Internet Security
        • Website Malware Removal
        • Free Anti-Malware
        • Anti-Spam (Free Trial)
        • Windows Antivirus
        • Antivirus for Windows 7
        • Antivirus for Windows 8
        • Antivirus for Windows 10
        • Antivirus for MAC
        • Antivirus for Linux
        • Free Endpoint Security
        • Free ModSecurity
        • Free RMM
        • Free Website Malware Scanner
        • Free Device Manager for Android
        • Free Demo
        • Network Security
        • Endpoint Protection
        • Antivirus for Android
        • Comodo Antivirus
        • Wordpress Security
        Cheap CDN
        • Bootstrap CDN
        • Semantic UI CDN
        • Jquery CDN
        • CDN Plans
        • CDN
        • Free CDN
        Enterprise
        • Patch Management Software
        • Patch Manager
        • Service Desk
        • Website Down
        • Endpoint Protection Solutions
        • Website Security Check
        • Remote Monitoring and Management
        • Website Security
        • Device Manager
        • ITSM
        • CRM
        • MSP
        • Android Device Manager
        • MDR Services
        • Managed IT Support Services
        • Free EDR
        Free SSL Certificate
        Support Partners Terms and Conditions Privacy Policy

        © Comodo Group, Inc. 2025. All rights reserved.