Comodo Help
Find the desired product help
Comodo One

Comodo One

CRM - Admin Guide

English

Print Help Download Help
Configure CRM Settings > Configure The Picklist Editor
  • Introduction To CRM
    • Login To CRM
  • The CRM Administrative Console
    • View And Manage The Home Console
    • Configure Your Preferences
    • Use Search Option And Filter Option In CRM
  • Marketing And Sales
    • Manage Marketing Campaigns
      • Add Campaign Records
      • Track Campaigns
      • Associate Records From Other Modules To A Campaign
      • Mass Management Of Campaigns
    • Leads
      • Create New Leads
      • Manage Leads
      • Associate Other Records With A Lead
      • Mass Management Of Leads
    • Organizations
      • Add A New Organization
      • Manage Organizations
      • Associate Records From Other Modules To An Organization
      • Mass Management Of Organizations
    • Contacts
      • Add A New Contact
      • Manage Contacts
      • Associate Records From Other Modules To A Contact
      • Mass Management Of Contacts
    • Opportunities
      • Add An Opportunity
      • Manage Opportunities
      • Associate Other Records With An Opportunity
      • Mass Management Of Opportunities
    • Quotes
      • Create Quotes
      • Manage Quotes
      • Associate Records From Other Modules To A Quote
      • Mass Management Of Quotes
    • Invoices
      • Create An Invoice
      • Manage Invoices
      • Associate Asset Records To An Invoice
      • Mass Management Of Invoices
    • Sales Orders
      • Add A Sales Order
      • Manage Sales Orders
      • Associate Records From Other Modules To A Sales Order
      • Mass Management Of Sales Orders
    • Import And Export Records
    • Emails
  • Inventory
    • Assets
      • Create An Asset Record
      • Manage Assets
      • Mass Management Of Assets
    • Products
      • Add A Product
      • Manage Products
      • Associate Records From Other Modules To A Products
      • Mass Management Of Products
    • Services
      • Add Services
      • Manage Services
      • Associate Records From Other Modules To Service
      • Mass Management Of Services
    • Price Books
      • Add Price Books
      • Manage Price Books
      • Mass Management Of Price Books
    • Vendors
      • Add A Vendor
      • Manage Vendors
      • Associate Records From Other Modules To Vendors
      • Mass Management Of Vendors
    • Purchase Orders
      • Add A Purchase Order
      • Manage Purchase Orders
  • Tools
    • Email Templates
    • Add Website Bookmarks
    • View And Manage Calendars
      • Manage Shared Calendar
      • Update And Manage Calendar Entries
      • Manage Calendar Settings
    • Recycle Bin
  • Analytics
    • Generate A Report
    • Manage Reports
  • Configure CRM Settings
    • Configure The Picklist Editor
    • Manage Company Details
    • Configure Miscellaneous Settings
      • Outgoing Email Server Settings
      • Edit Terms And Conditions
      • Manage Currencies
      • Manage Tax Calculations
  • Custom Views
  • About Comodo Security Solutions

Configure the Picklist Editor


  • Click the cog icon at the top right of the interface to open CRM settings.
  • Click 'Studio' on the left then 'Picklist Editor'

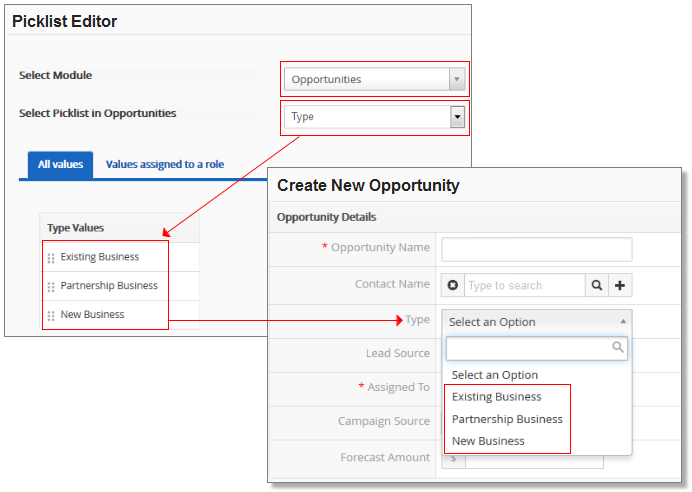
A picklist is a drop-down menu from which you can make a selection. The picklist editor lets you modify the contents of the drop-down menus shown when creating or editing a record.

  • The example below shows the picklist editor for the 'Type' drop-down shown in the new/edit 'Opportunity' page:


  • You can add new values, rearrange the order of values, assign values, rename values and delete values.
  • 'Values assigned to a role' lets you create custom drop-down menus for specific roles. For example, you may want 'Account Admins; to see all values in a drop-down, while 'Agents' are shown a limited selection.


Create a custom picklist

  • Click the cog icon at the top right of the interface to open CRM settings.
  • Click 'Studio' on the left then 'Picklist Editor'
  • 'Select Module' – Choose the module whose drop-down menus you wish to work on.
  • 'Select Picklist' – Choose the specific drop-down menu you want to modify.


You can add / assign / rename values to the drop down menu and assign the selected values to a particular role:

  • All values
  • Values assigned to a role


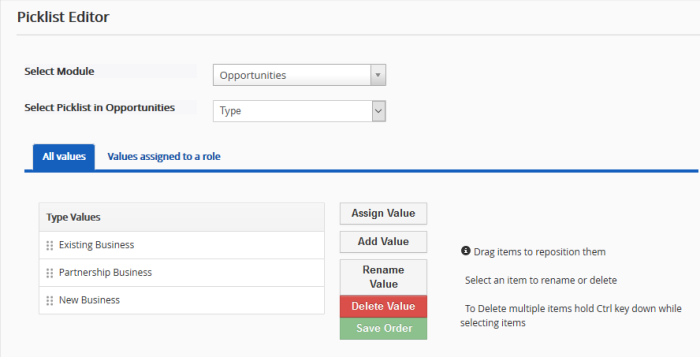
The 'All values' tab lets you modify drop-down menus shown to all users/role types. You can perform the following actions:

  • Assign a value
  • Add a value
  • Rename a value
  • Delete a value


Assign Value


Enables you to assign multiple picklist values to multiple roles in one shot. When you assign values to a role, all users under that role will be able to access the picklist values.


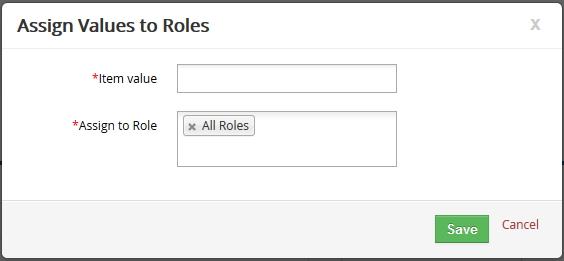
To assign values to role(s)

  • Select a module and desired picklist field
  • Select desired picklist values you wish to assign to selected role(s). To select multiple values, press and hold Ctrl key (Command key in Mac) and click on desired picklist values
  • Select role(s) from 'Assign to Role' drop-down to grant them access to selected values


  • Click 'Save' for your settings to take affect

To add new picklist values

  • Add a module and the picklist in module
  • Click the 'All values' tab
  • Click 'Add Value' to add a custom picklist value


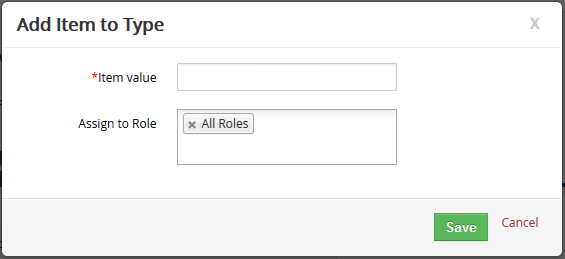
  • Enter a name in the 'Item value' and a role(s) form the 'Assign to Role' drop-down to grant them access to new picklist value
  • Click 'Save'

Edit existing values


You can edit existing picklist values in the selected picklist field.

  • Select a module and desired picklist field
  • Select desired picklist value you wish to edit
  • Click 'Rename Value'


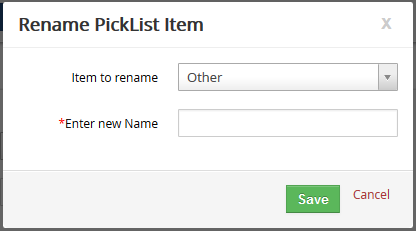
  • Enter the new name in the 'Enter new Name' drop-down
  • Click 'Save'

Delete existing values


You can delete existing picklist values in the selected picklist field. It also helps you select multiple values and delete them all at once.

  • Select a module and desired picklist field
  • Select desired picklist values you wish to delete. To select multiple values, press and hold Ctrl key and click on picklist values that needs to be deleted
  • Click the 'Delete Value' to delete selected values
  • Select a value in 'Replace it with' field to transfer responsibilities. The selected field will show up in place of deleted value(s).
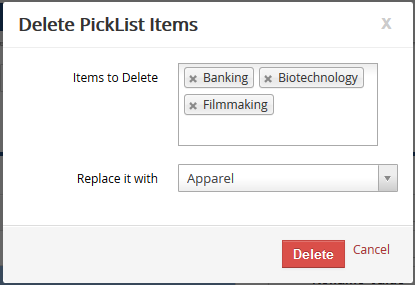


  • Click 'Save'


Values assigned to a role


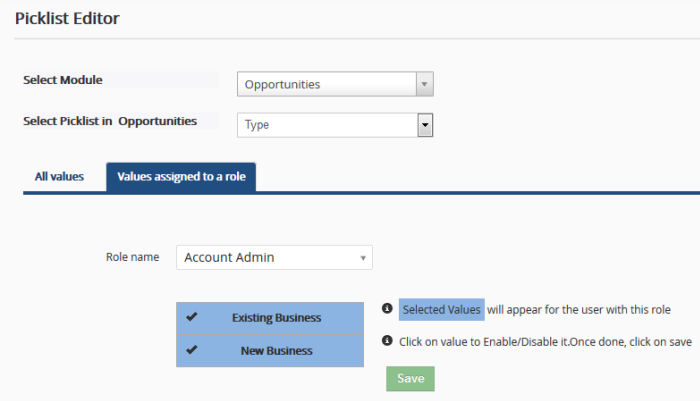
The 'Values assigned to a role' area lets you modify the contents of drop-down menus based on role. For example, you may wish to show a different set of options to an administrator than you would add an agent.

  • Values in blue are enabled for the role selected in the 'Role name' field.
  • Click on any value(s) to disable it. Values in white are disabled for the selected role.
  • Click 'Save' to apply your choice. You must click 'Save' before switching to another role in order to register your choice.


Our Products
  • Free Antivirus
  • Free Internet Security
  • Website Malware Removal
  • Free Anti-Malware
  • Anti-Spam (Free Trial)
  • Windows Antivirus
  • Antivirus for Windows 7
  • Antivirus for Windows 8
  • Antivirus for Windows 10
  • Antivirus for MAC
  • Antivirus for Linux
  • Free Endpoint Security
  • Free ModSecurity
  • Free RMM
  • Free Website Malware Scanner
  • Free Device Manager for Android
  • Free Demo
  • Network Security
  • Endpoint Protection
  • Antivirus for Android
  • Comodo Antivirus
  • Wordpress Security
Cheap CDN
  • Bootstrap CDN
  • Semantic UI CDN
  • Jquery CDN
  • CDN Plans
  • CDN
  • Free CDN
Enterprise
  • Patch Management Software
  • Patch Manager
  • Service Desk
  • Website Down
  • Endpoint Protection Solutions
  • Website Security Check
  • Remote Monitoring and Management
  • Website Security
  • Device Manager
  • ITSM
  • CRM
  • MSP
  • Android Device Manager
  • MDR Services
  • Managed IT Support Services
  • Free EDR
Free SSL Certificate
Support Partners Terms and Conditions Privacy Policy

© Comodo Group, Inc. 2025. All rights reserved.