


Managing Live Lists
The 'Live
List Management' interface allows administrators to create and manage
Live Lists and their types for different customers. Each 'Live List'
can be configured for a single field type and a single live list can
be made to have several 'Types' for defining different sets of values
for the same field for use in different 'Event Queries' and
'Correlation Rules'. You can also define the time period for which a
value entered in the list is valid.
For example, you can create a Live List 'IP Blacklist' with two types, 'Internal' ( containing IP addresses of infected internal hosts in a network) and 'External' ( containing IP addresses of external malware hosting domains). These two list types can be used separately as appropriate to different types of queries and rules.
|
Note: The Live List Management interface allows you to only create and manage lists for various fields. The values for the fields can be manually added from the Live List Content Management interface. Refer to the section Managing Live List Content. |
To open the 'Live List Management' interface, click the 'Menu' button from the top right, choose 'Lists' from the options and then click 'Live List Management'
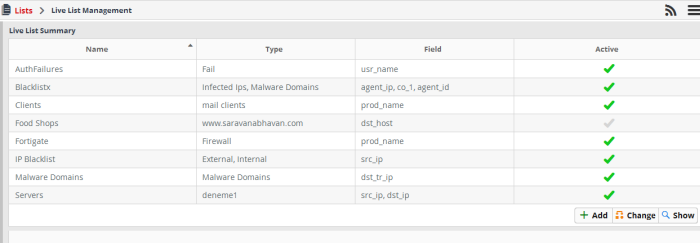
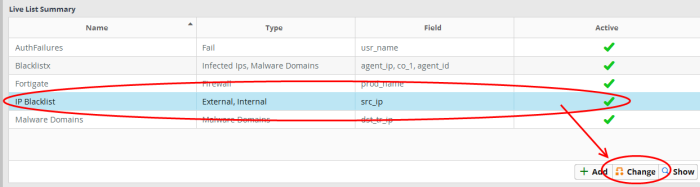
The interface displays a list of Live Lists added to NxSIEM with their details and controls for adding a new list, switching a list between active and inactive states and viewing the values added to a list.
|
Live List Summary Table – Column Descriptions |
|
|---|---|
|
Column Header |
Description |
|
Name |
Displays the name of the live list |
|
Type |
Displays the types available for the live list |
|
Field |
Displays the event log entry field for which the list contains the values. |
|
Active |
Indicates whether the list is active or not. |
Following
sections explain on:
A new live lists can be created by specifying a name, adding types and defining the field for which the values are to be populated in the list. The values for the field can be specified for each type only from the 'Live List Content Management' interface. Explanations on adding values to the list types are available in the section Managing Live List Content.
To create a new list
- Click the 'Add' button at the bottom right of the 'Live List Management' interface.
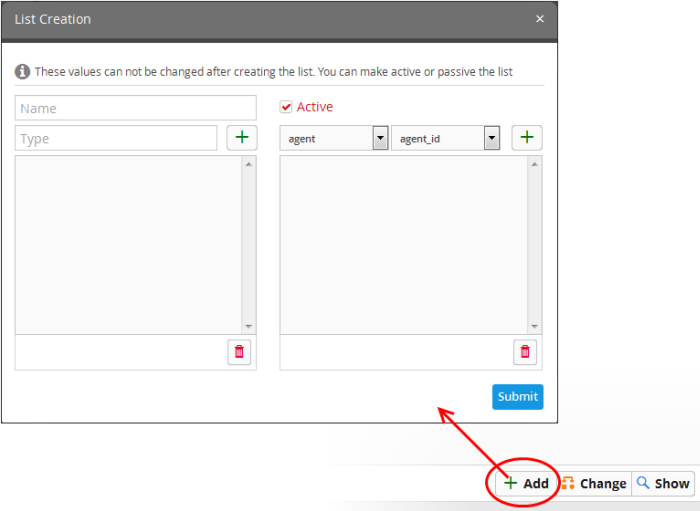
The 'List Creation' dialog will appear.
- Enter a name for the live list in the 'Name' field.
- Add
a name for a list type to be create in the Type text box and click
the
 button.
The Type will be added to the list of types in the left pane.
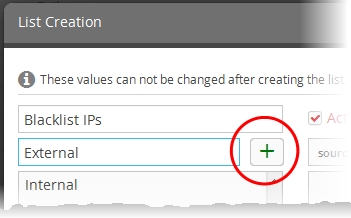
- Repeat the process to add more types for the types.
- To
remove a type added by mistake, select the type from the list and
click the thrash can icon
 .
.
- Specify the field for which the values are to be populated in the list by selecting the 'Field Group' and choosing the Field from the respective drop-downs above the left pane.
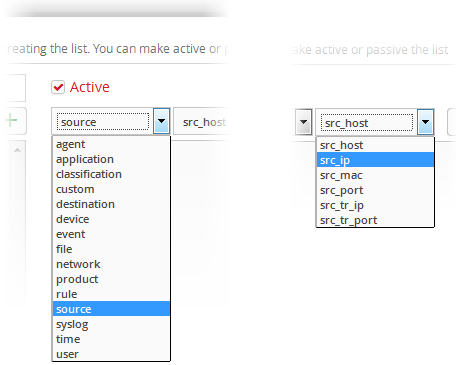
The field will be added to the list of fields in the right pane.
- Repeat the process if you want to add more fields.
- To
remove a field added by mistake, select the field from the list and
click the thrash can icon
.
- Leave the 'Active' checkbox selected if you want the list to be active on creation. If you want to turn the list active at a later time, clear this checkbox.
- Click the 'Submit' button.
|
Caution: The name, types and filed values once configured for a list cannot be changed or removed later. Please re-check these details before clicking 'Submit'. |
The List will be added to NxSIEM. The next step is to manage the values for the list. Refer to the section Managing Live List Content for more details.
Changing Activation State of Lists
The Live Lists can be switched between active and inactive states at any time. The inactive lists do not feed the values to the event queries and the correlation rules in which they are used.
To change the active/inactive state of a list
- Choose
the list from the 'Live List Summary' interface and click the
'Change' button
 at the bottom right.
A confirmation dialog will appear.
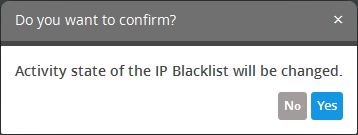
- Click 'Yes' to confirm the change.
The change in
the state of the list will be indicated under the 'Active' column in
the 'Live List Summary' interface.
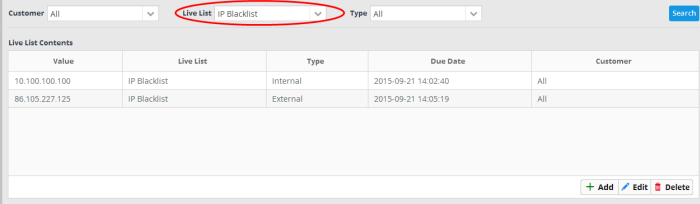
Viewing the Values Entered for a List
The administrator can view the values for all types, added for a live list and can edit them.
To view the values in a list
- Choose
the list from the 'Live List Summary' interface and click the 'Show'
button
 at the bottom right.

The 'Live List Content Management' interface will open with a list of values added to the list.
For more details on adding new values and editing existing values, refer to the following section Managing Live List Content.