Comodo Help
Find the desired product help
Comodo One

Comodo One

Service Desk - Admin Guide

English

Print Help Download Help
Service Desk Admin Panel > Manage Staff > Staff Roles
  • Introduction To Service Desk Module
    • Quick Start
    • Login To The Service Desk Module
  • Service Desk Admin Panel
    • Admin Panel Dashboard
      • View The Dashboard And Export Reports
      • View Alerts & Notifications
    • Service Desk Configuration
      • Company Profile And Support Portal Settings
      • Service Desk System Settings
      • Ticket Settings And Options
      • User Registration Settings
      • Email Settings And Options
      • Access Control Settings
      • Knowledge Base Settings And Options
      • Autoresponder Settings
      • Configure Alerts And Notices
      • Configure Two Factor Authentication
    • Manage Service Desk Components
      • Ticket Categories
      • Ticket Filters
      • Service Level Agreements (SLA)
      • API Keys
      • Client Portal Pages
        • Configure Your Support Center Page
      • Forms
      • Custom Lists
      • View And Manage Asset Types
      • Manage Materials And Expense Items
      • Manage Charging Plans
    • Email Management
      • Setup Your Support Email Addresses
      • Block User Email Addresses
      • Email Templates
      • Test Outgoing Email Settings
    • Manage Time Sheets
    • Manage Staff
      • Staff Members
      • Staff Roles
      • Departments
      • Time Sheet Templates
      • Material Approval
    • Manage Announcements
    • Generate Reports
      • Time Log Reports
      • Ticket Report
      • Asset Report
      • Service Types Reports
      • Department Ticket Reports
      • Agent Reports
      • Users Reports
      • Resource Appointment Reports
      • Scheduled Reports
    • Finance
      • Generate Cost Reports
      • Manage Contracts
  • Service Desk Staff Panel
    • Staff Panel Dashboard
      • View The Dashboard And Export Reports
      • View Staff Members
      • My Profile
    • Manage Users And Customers
      • Manage Users
      • Manage Customers
    • Manage Tickets
      • Ticket Details
    • Manage Knowledgebase
      • FAQs
      • Manage FAQ Categories
      • Canned Responses
    • Manage Projects
    • Manage Staff Time Sheets
    • Manage Calendars
  • Appendix 1 - Field Types In Custom Forms And Custom Lists
  • Appendix 2 - Ticket Priorities
  • Appendix 3 - How Charging Works In Service Desk
  • About Comodo Security Solutions

Staff Roles 


Click 'Admin Panel' > 'Staff' > 'Roles'

  • Roles determine the permissions and access rights that staff members have within the Service Desk interface.
  • Service Desk inherits three roles from Comodo One:
  • Account Administrator
  • Administrator
  • Technician
  • 'Account Administrator' and 'Administrator' cannot be deleted, but you can modify them. These roles initially have access to all areas and full control over all departments.
  • You can also create custom named roles with different permissions.
    • Staff added to C1 are imported to Service Desk with the same role they have in C1.
      • Admins can move staff to another role in the 'Staff Members' interface (‘Admin Panel’ > ‘Staff’ > ‘Staff Members’ > click on a staff member’s name). See Update details, role and department of a staff in the previous section if you need help with this.

      See the following for more help:

      • The roles interface
      • Create a new role
      • Edit a role
      • Remove roles

      The roles interface

      • Open the admin panel (see the last link on the left)
      • Click 'Staff' > 'Roles'


      Role Name: The role label.

      • Click the role name to update it. See Edit a role for more details.

      Status: Enable or disable the role.

      • Staff members with a disabled role cannot login to Service Desk.
      • Click the role name to activate / deactivate the role.

      Members: The number of staff members assigned to the role.

      • Click the number to view the member list.

      Departments: The number of departments that can be accessed by role members.


      Created On: The date and time at which the role was created.


      Last Updated: The date and time the role was last modified.


      Create a new role

      • Open the admin panel (see the last link on the left)
      • Click 'Staff' > 'Roles'
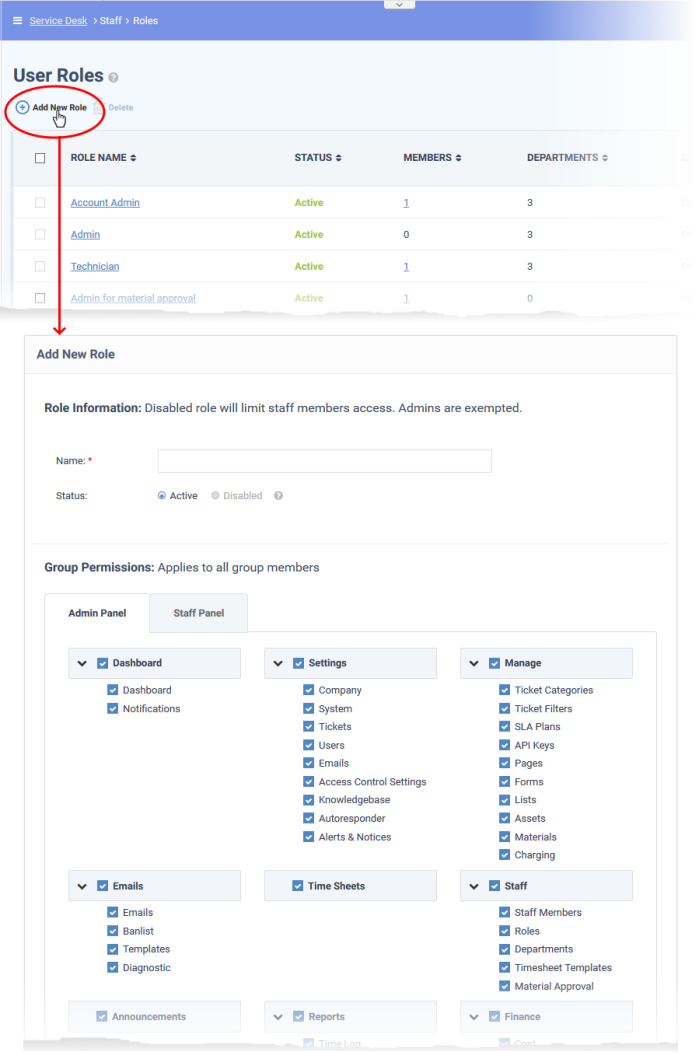
      • Click 'Add New Role' at the top:


      You can pick different permissions for the admin panel and the staff panel. From top-to-bottom, role permissions are split into three main groups:

      • Group permissions - which areas of the staff and admin panels are visible to role members.
      • Functional permissions - what actions role members can or cannot do.
      • Department access - which departments role members are allowed to access.

      The 'Add New Role' screen contains the following fields and options:


      Role Information

      • Name: Enter a descriptive label for the role.
      • Status: Select whether the role is active or disabled. If disabled, role members cannot login to Service Desk and will not receive department alert & notices.

      Group and Functional Permissions

      • Group permissions let you set access rights to specific features and areas of Service Desk. You can set different permissions for both the admin and staff panels.
      • Disabled features will not be visible to staff who have this role.
      • The area directly underneath lets you choose the functions that role members can perform:
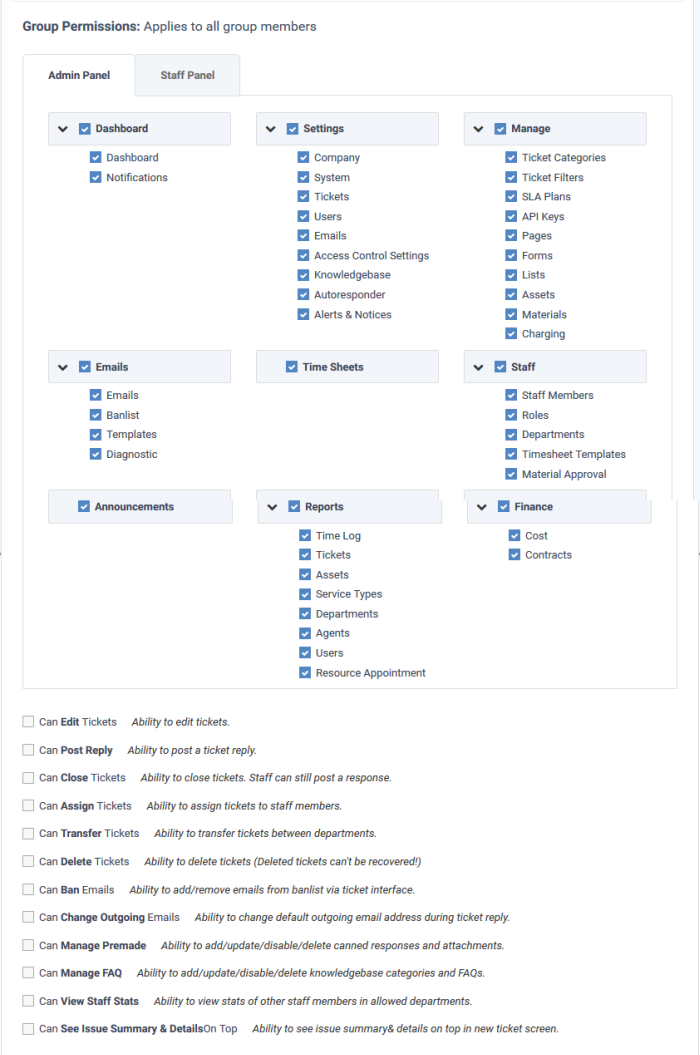


      Department Access

      • Select which departments can be accessed by role members. These departments are additional to the primary department to which the staff member belongs.

      Admin Notes

      • Add remarks regarding the role for the reference of other admins.
      • Click the 'Create Role' button to save your new role.


      Edit a role

      • Open the admin panel (see the last link on the left)
      • Click 'Staff' > 'Roles'
      • Click on the role you want to edit.


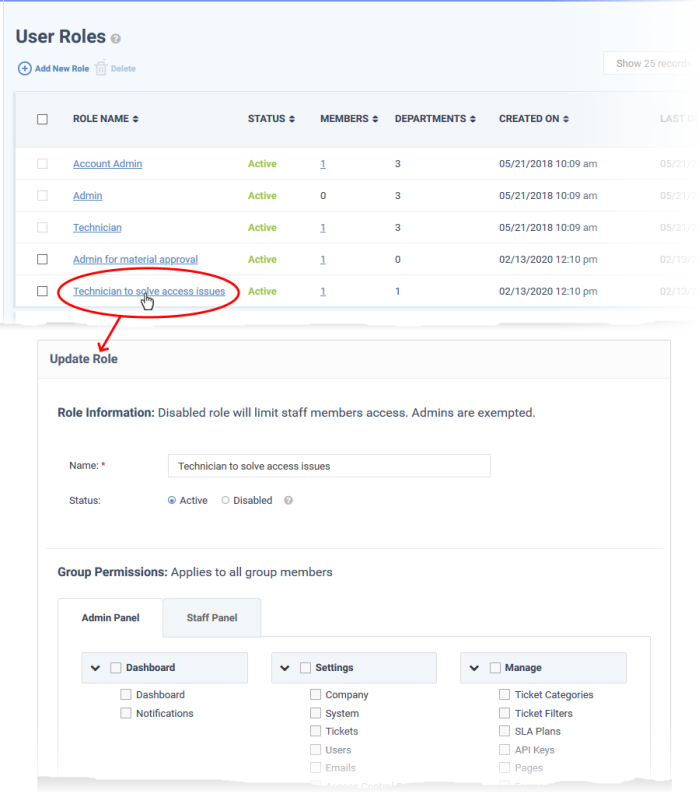
      The 'Update Role' interface lets you change the role name, enable/disable the rule and change role permissions. The interface is similar to 'Add New Role' interface. See the explanation above for help to do this.


      Remove roles


      You cannot delete roles inherited from C1, and you cannot delete roles that still have staff assigned to them. Remove all staff from a role before attempting to delete it.

      • Open the admin panel (see the last link on the left)
      • Click 'Staff' > 'Roles'
      • Select the role you want to remove
      • Click 'Delete':


      • Click 'Yes, Do it!' to confirm the removal.

      Our Products
      • Free Antivirus
      • Free Internet Security
      • Website Malware Removal
      • Free Anti-Malware
      • Anti-Spam (Free Trial)
      • Windows Antivirus
      • Antivirus for Windows 7
      • Antivirus for Windows 8
      • Antivirus for Windows 10
      • Antivirus for MAC
      • Antivirus for Linux
      • Free Endpoint Security
      • Free ModSecurity
      • Free RMM
      • Free Website Malware Scanner
      • Free Device Manager for Android
      • Free Demo
      • Network Security
      • Endpoint Protection
      • Antivirus for Android
      • Comodo Antivirus
      • Wordpress Security
      Cheap CDN
      • Bootstrap CDN
      • Semantic UI CDN
      • Jquery CDN
      • CDN Plans
      • CDN
      • Free CDN
      Enterprise
      • Patch Management Software
      • Patch Manager
      • Service Desk
      • Website Down
      • Endpoint Protection Solutions
      • Website Security Check
      • Remote Monitoring and Management
      • Website Security
      • Device Manager
      • ITSM
      • CRM
      • MSP
      • Android Device Manager
      • MDR Services
      • Managed IT Support Services
      • Free EDR
      Free SSL Certificate
      Support Partners Terms and Conditions Privacy Policy

      © Comodo Group, Inc. 2025. All rights reserved.