Quick Start
This tutorial explains how Comodo One administrators can configure Service Desk to manage their support ticketing infrastructure. The guide covers basic setup, user groups, staff, ticket routing, ticket categories, custom forms and the knowledge-base.
Step 1 – Login to the admin console
To access the Service Desk Module, login to C1 with your user name and password at https://one.comodo.com/app/login
- Once logged-in, click 'Applications' at the top then 'Service Desk'
By default,
Service Desk will open at 'Staff Panel' >
'Open Tickets'. You can switch between the staff panel and the admin panel by clicking the link at the bottom of the left menu:

Admins
can also setup two-factor authentication of users for additional
login security. See Set
up Two-Factor Login Authentication in the C1 admin guide for help with
this.
Step 2 – Create new user roles (optional)
Click 'Admin Panel' > 'Staff' > 'Roles'
- Roles determine the permissions and access rights that staff members have within the Service Desk interface.
- You can add new roles and change the role of a staff member at any time, so you may skip this step for now if required.
- However, before adding new support staff members, you may wish to create custom roles for them.
- Account Administrator
- Administrator
- Technician
- Staff members added through C1 are imported into Service Desk with the role assigned to them in C1. You can change this role as required.
- You can assign one of the default 'Administrator' or 'Technician' roles to your new Service Desk staff.
- You can also create custom named roles with different permissions:
Create a new role
- Open the admin panel (see the last link on the left)
- Click 'Staff' > 'Roles'
- Click 'Add New Role' at the top:
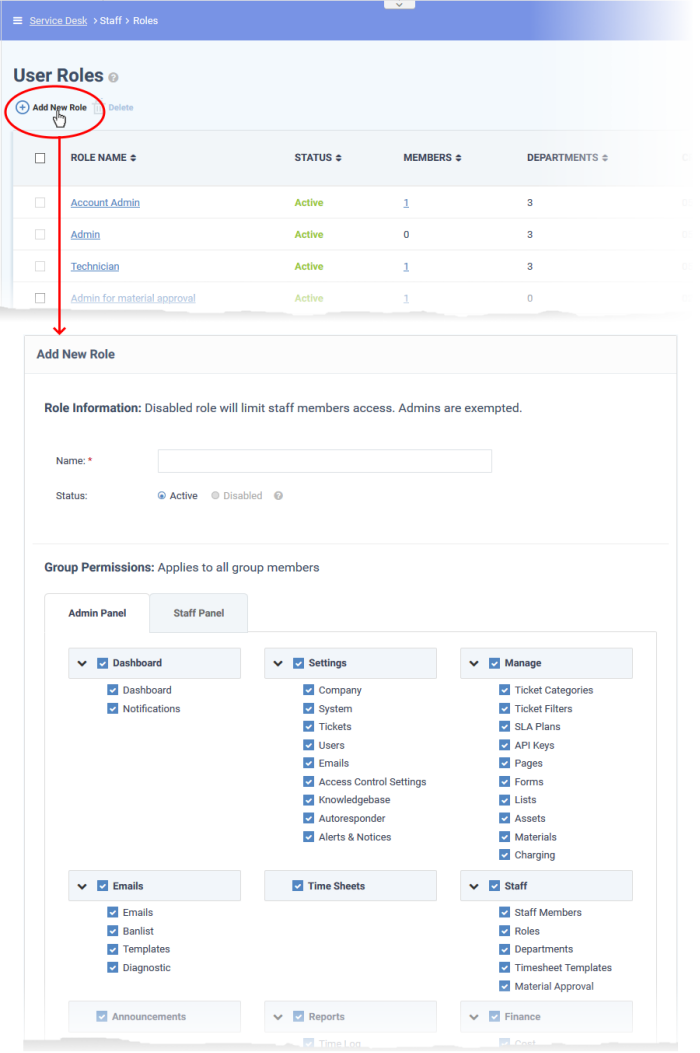
- Enter the name for your new role and specify the permissions that should apply to its members in the 'Admin Panel' and 'Staff Panel' tabs.
- The 'Department Access' section allows you choose which departments can be accessed by members with this role.
- Add admin notes if required then click 'Create Role' to add your new role.
- The new role is listed in the 'User Role' interface and can be applied to new staff members at any time.
Step 3 - Create new departments (optional)
- Service Desk ships with three default departments:
- Maintenance
- Support (default)
- Sales
- All new staff are initially assigned to the default, 'Support' department. You can change the default department at anytime in 'System Settings & Preferences' ('Admin Panel' > 'Settings' > 'System')
- Tickets are also assigned to the default department if they are not already routed to a different department. Tickets can be re-routed by a ticket category, by incoming email settings, or by ticket filter settings. See 'Ticket Settings and Options' for more details.
- You can create additional departments based on your requirements. For example, a department called 'Computer Maintenance' could be populated with staff who have the required skill set to deal with such tickets. Ticket Categories and Ticket Filters can be configured to route new tickets to staff members in the appropriate department.
- Open the 'Admin Panel' (see last link on the left)
- Click 'Staff' > 'Departments' in the left-hand menu
- Click the 'Add New Department' link:
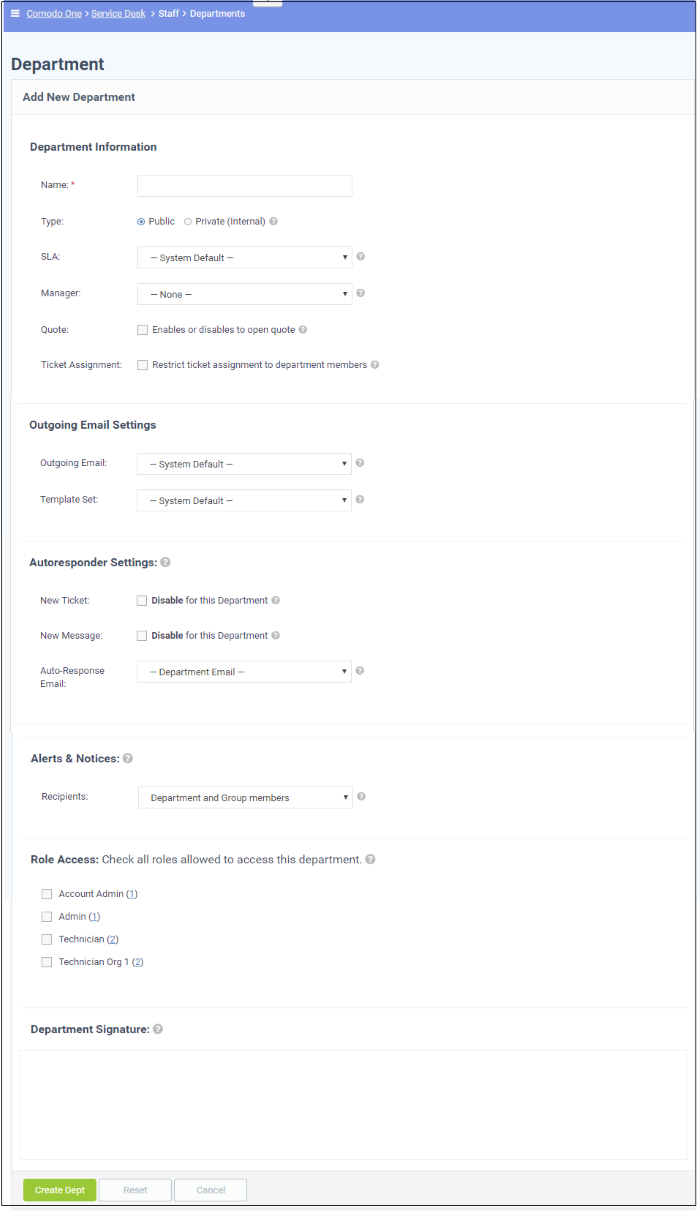
- Create a label for your new department. This is the minimum required to create a department to which staff can be assigned. You can accept the rest of the default settings and properly configure the department later if you wish.
Select whether the department should be 'Public' or 'Private'.
'Public' - Users can submit support tickets to public departments. Users can view the assigned department in the client portal.
'Private' - Users can submit support tickets to private departments, but cannot view the assigned department in the client portal. The department signature is not shown in email replies.
- SLA - Select the Service Level Agreement (SLA) for the tickets routed to this department.
- Outgoing Email Settings - Select the outgoing email address and email template set that should be used for this department's replies to users in response to their tickets. See Email Addresses and Email Templates to read more.
- Autoresponder Settings - Configure auto-response emails sent to users whose tickets are assigned to this department. See 'Autoresponder' for more details.
- Alerts & Notices - Select the recipients to whom alerts are sent. See 'Alerts & Notices' for more details.
- Role Access - Select the roles so that the staff with those roles can access the tickets assigned to the department, and to participate in departmental activity.
Step 4 - Add new support staff
The next step is to add new staff members. Staff are the personnel who will respond to support tickets from end-users.
- You can add staff in the Comodo One (C1) portal at https://one.comodo.com/app/login:
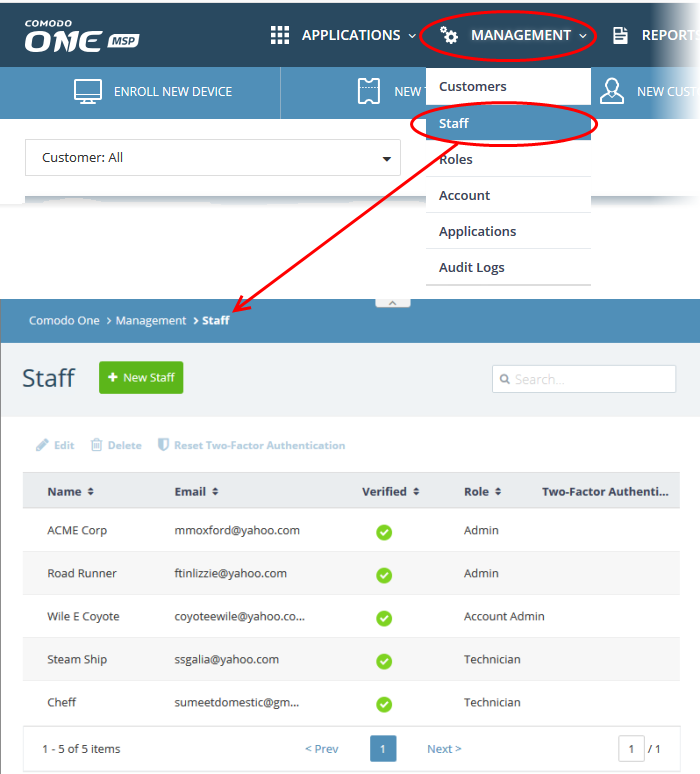
- Click 'Management' > 'Staff' > '+ New Staff' in the Comodo One interface.
- Staff created in C1 are available in Service Desk and all other C1 products (Endpoint Manager, Quote Manager etc).
- Staff created in C1 are assigned to the 'default department' in Service Desk. You can assign staff to different departments as required.
- There are two types of roles – Service Desk roles and Comodo One roles.
- Staff will initially be given the same role in Service Desk as they have in C1.
- You can change this role in Service Desk at any time.
- The role you assign to them in Service Desk will not affect their role in C1.
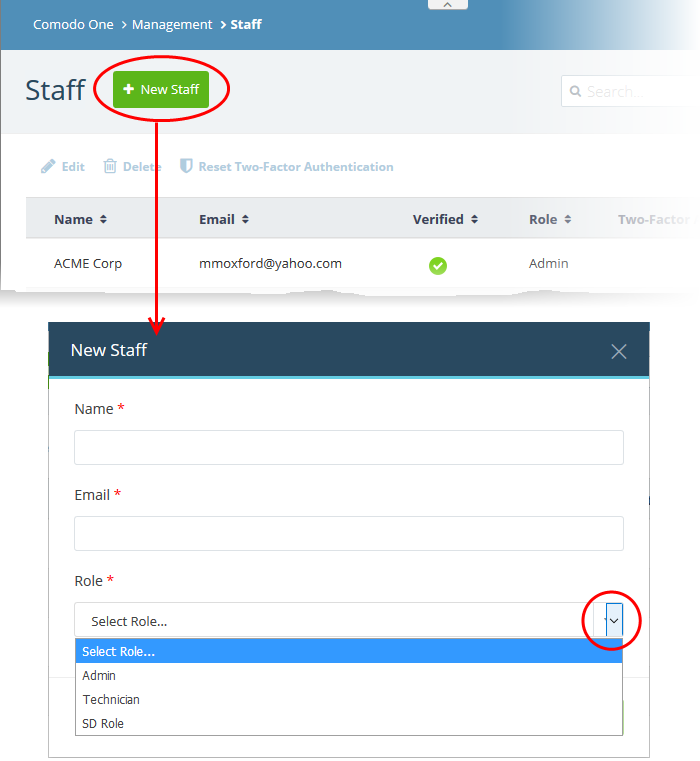
- Click 'Management' > 'Staff' > '+ New Staff' in the Comodo One interface to get started:
- Click the
'New Staff' at the top.
|
Note: Staff with 'Admin' privileges can only be added by the account administrator. |
- Name - First and last name admin/staff member.
- Email - The email address of the admin/staff member. The verification email for the admin/staff to activate their account will be sent to this email address.
- Role - Select the role of the staff from the drop down. You can always change this later if required.
- Click the 'Save' button.
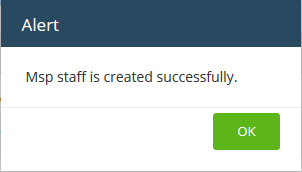
- Click 'OK'
A confirmation mail is sent to the user containing an account verification link. Users will click the link to verify their account then create a Service Desk password.
Change
staff role and department
- Open the 'Admin panel' in Service Desk (see last link on the left)
- Click 'Staff' on the left then choose 'Staff Members'
- Click the name of the staff member.
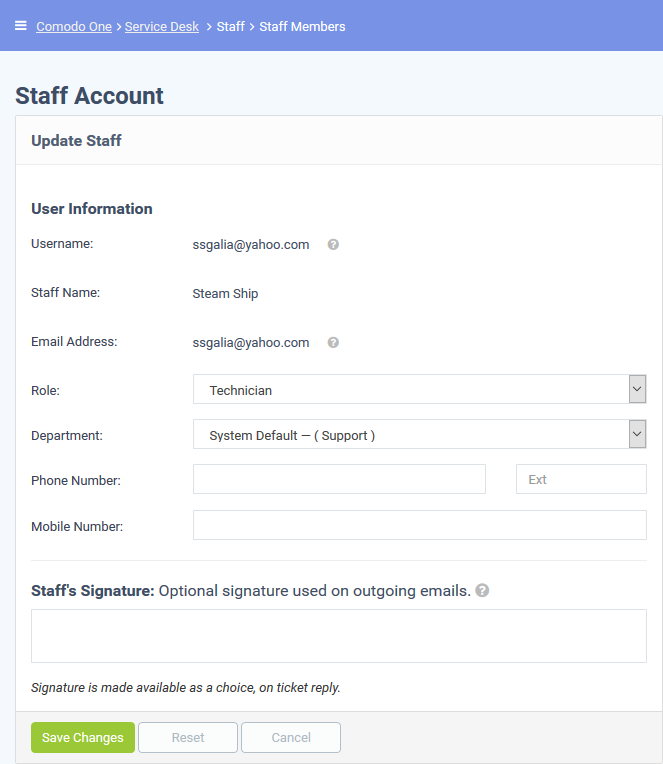
The 'Update Staff' screen allows you to edit staff details:
- Role - Service Desk role, as inherited from Comodo One.
- Select a new role if required from the drop-down.
- Click 'Admin Panel' > 'Staff' > 'Roles' to view and configure roles.
- Department - The department to which the staff member belongs.
- Staff members are initially added to the department set as 'System Default' in Service Desk.
- Select a new department for the staff member if required.
- Click 'Admin Panel' > 'Staff' > 'Departments' to view, add and edit departments.
- Click 'Save Changes' to update the staff member details.
Step 5 - Add ticket categories
Click 'Admin Panel' > 'Manage' > 'Ticket Categories'
- Ticket categories are support topics that are presented to users so they can more easily choose the area with which they need help. For example, your portal might have a menu which says 'Please choose the area we can help you with', and offer categories such as 'Billing', 'Account Changes', 'Technical Support', and so forth.
- You can associate a ticket category with a custom form to gather more targeted information from a user. For example, you may need different information from a user if they need help with an account question than you would if they have a problem with their printer.
- Ticket categories can be used to route tickets to a particular department or staff member if required. You can also create custom auto-responders and thank-you pages based on the ticket category chosen by your user.
Add a new ticket category
- Open the admin panel (see the last link on the left)
- Click 'Manage' > 'Ticket Categories'
- Click 'Add New Category'
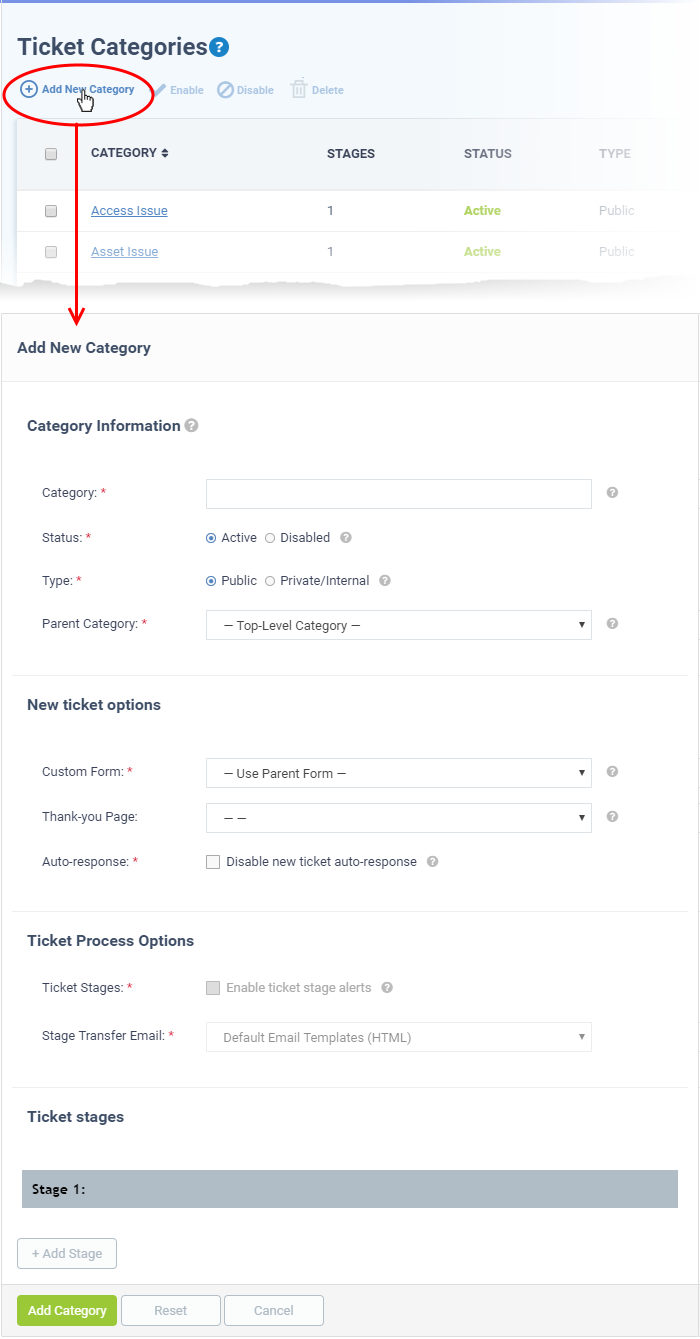
Category Information
- Category: Enter a unique name for the ticket category. This should be a support topic that you want to present to end-users for selection. For example, 'Billing Inquiries', 'Technical Support', ‘Printer Issue’, etc.
- Status: Choose whether the ticket category is active or not. Users and staff can only create tickets in active help categories. You can change the status at any time in the ‘Ticket Categories’ screen:
- Click ‘Admin Panel’ > ‘Manage’ > ‘Ticket Categories’
- Select a category using the check-boxes on the left
- Use the 'Enable'/ 'Disable' buttons above the table to active or deactivate the category.
- Type: Choose whether the category is visible to end-users or only available to staff.
- Public - The category is published to your customer-facing portal for users to select when they create a ticket. It is also available to staff to choose when they create a ticket.
- Private / Internal - The category is only available to staff. Staff can choose this category when creating a ticket in the staff panel.
- Parent Category: (optional). Choose a master category for this topic. Choosing a parent means this category becomes a child, or sub-section, of the parent. For example, ‘Hardware Issues’ could be your parent category, and ‘Printer Issues’ your sub-category.
- Custom Form: Choose the form that is presented to users if they pick this support category. Custom forms allow you to collect targeted information from a user about specific problems.
For example, the information you need to collect from a customer about a billing issue is likely to be different to the information you need for a printer issue.
- Click ‘Admin Panel’ > ‘Manage’ > ‘Forms’ to view, edit and create custom forms.
- See Forms if you want to learn more about forms
- Thank-You Page: Choose the confirmation page that users see after submitting a ticket in this category. The page is shown to guest users only.
- See Company profile and support portal settings for help to customize your support portal pages.
- Auto-response: Choose whether to send a confirmation email to the user after they submit a ticket to this category. This setting over-rules global and department-level auto-responder settings.
- See Autoresponder Settings for more.
- Enable ticket stage alerts: Sends a notification to the user when the ticket moves from one stage to the next. This setting only applies to multi-stage tickets.
- Stage Transfer Email: Select the template you want to use for the stage transfer email.
- The item you select here is a template 'set' rather than just an individual mail.
- You can view and edit the content of the individual mail as follows:
- Click 'Admin Panel' > 'Emails' > 'Templates'
- Click on 'Default Email Templates (System Default)'
- Scroll to the 'End User Templates' section.
- Click on the ‘Ticket Stage Template’
- Edit the content as required
- See Email Templates if you want more help with email templates.
- You can setup category tickets to have a single stage, or multiple stages. Multi-stage tickets let you create a 'step-by-step' process to resolve specific types of issue. Each stage defines the department, priority, SLA and assignee of the ticket.
- For example, an issue with your website might first go to the support department for verification then onto the web-dev dept. to deploy the fix. The ticket transitions to the appropriate department/staff member at the end of each stage.
- Stage Name: Create a label for the ticket stage
- Department: The department to which the ticket is assigned at this stage.
- Priority: Severity of the ticket at this stage. The options are Low, Normal, High and Critical. Please note that staff attending to the ticket can change the priority. See Appendix 2 - Ticket Priorities for general guidance on priority levels.
- SLA Plan: The service level agreement which applies to the ticket at this stage.
- Auto-assign To: The staff member to whom the ticket should be assigned at this stage. The assignee can re-assign the ticket to another staff member if required.
- Admin Notes: Add comments about the category. These are internal and not visible in the client portal.
Click 'Add Stage', to create a new stage for the ticket category.
- Click the 'Add Category' button to save the category.
Click > 'Staff Panel' > 'Users' > 'User Directory'
- 'Users' are the individuals who submit tickets to your support team. They can submit tickets via your support center, by email, or direct from an Endpoint Manager device.
- New users can self-enroll then submit tickets at your customer facing client portal
- Your client portal URL has the format https://company-name.servicedesk.comodo.com.
- Users that self-enroll will be sent an account activation mail
- Admins can also manually enroll new users:
- Click 'Staff Panel' > 'Users' > 'User Directory' > 'Add New User' OR 'Import'
- All users, whether self-enrolled or manually enrolled, can be added to customer company as explained in step 7
- You can set the default registration method for manually enrolled users in 'Admin Panel' > 'Settings' > 'Users'. See User Registration Settings for more details
Enroll new users
- You can add users individually or import them from a .csv file.
- Users must be registered in order for them to login Service Desk to create and track tickets.
- You can assign users to customers in the 'Customers' screen (‘Staff Panel’ > ‘Users’ > ‘Customers’).
- Open the 'Staff Panel'
- Click 'Users' > 'User Directory'
- Click the 'Add New User' link:
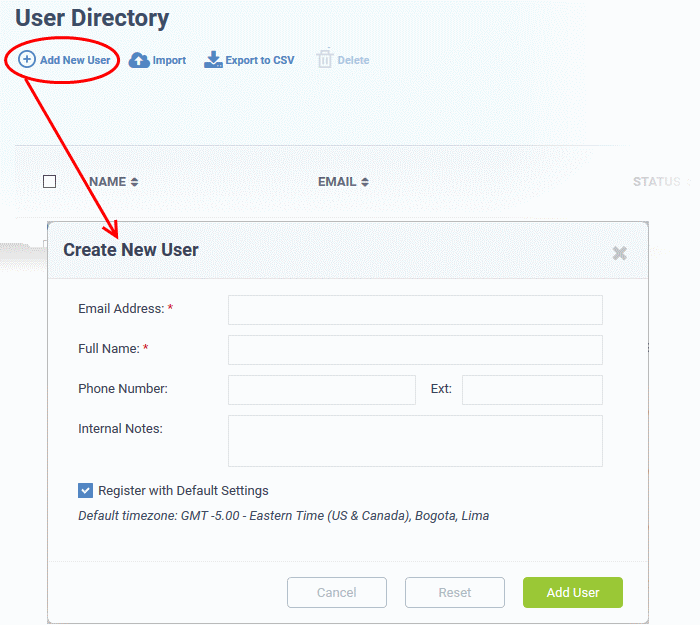
The fields available in the form shown above are fetched from the built-in contact information. Contact information can be configured in 'Admin Panel' > 'Manage' > 'Forms' > 'Contact Information'. See 'Forms' for more details.
Email Address: Enter the email address of the user. After registration, this email address acts as their username to log into your support portal.
Full Name: Enter the user’s first and last names.
Phone Number: Enter the user’s contact number.
Internal Notes: Type any remarks you feel you need to add about the user.
Register with Default Settings: Enable to enroll the user with the default registration method. Disable to register with a different method.
- You can view/change the default registration method at ‘Admin Panel’ > ‘Settings’ > ‘Users’. See User Registration Settings if you need more help with this.
- It may be ‘Register users manually’, ‘Register users with an activation mail’, or ‘Register with a temporary password’.
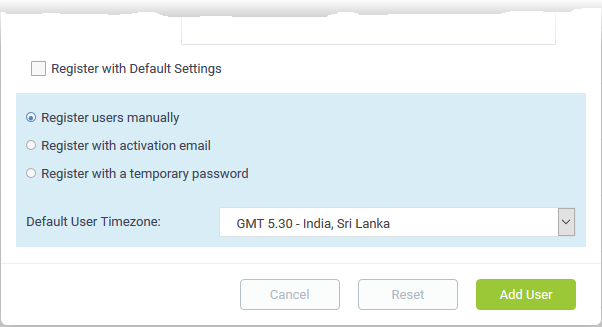
- Register users manually - The user is initially added a guest and needs to be manually registered afterwards. You can register a guest as follows:
- Click ‘Users’ > ‘User Directory’ > click on the name of the guest > Click the ‘Register’ button
- See Register a user for more details.
- Register with activation email - The user is initially added as a guest and sent a mail which contains a link to register their account.
- The link leads to your support web portal where the user will create a password and so register their account. After registration, the user can login and manage/view their tickets.
- Register with a temporary password - Create a temporary account password which registers the user immediately.
- You need to send the password and URL of your support portal to the user. This allows them to login and manage their tickets.
- 'Require password change on first login' - Enable to force the user to create a new password after first login (recommended):
- Default User Timezone - Select the time zone to which the user belongs from the drop-down
- Click 'Add User'.
Import users
- Open the 'Staff Panel' if it isn't open already (last link in the left-hand menu)
- Click 'Users'
- Click 'Import' at the top
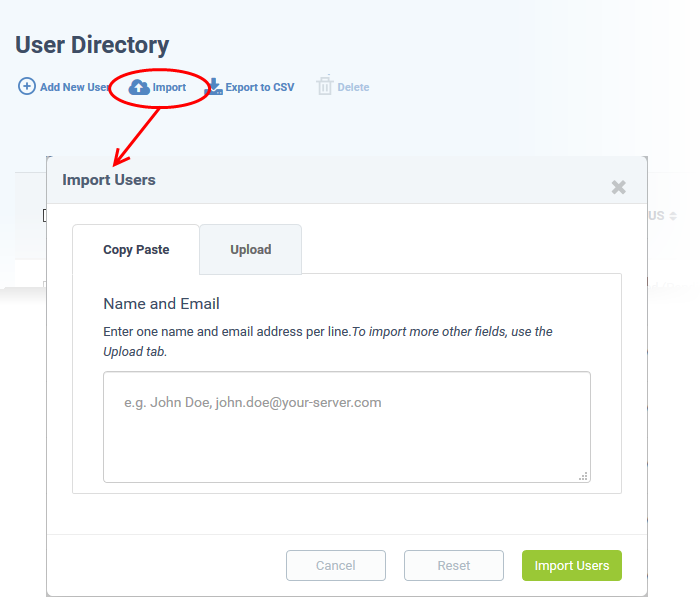
There are two ways to import users:
1. Copy Paste - Import users with name and email address only.
- Enter the user's full name, followed by a comma, then their email address.
- Add more users in subsequent lines.
- Click Import Users' to add the users as guests.
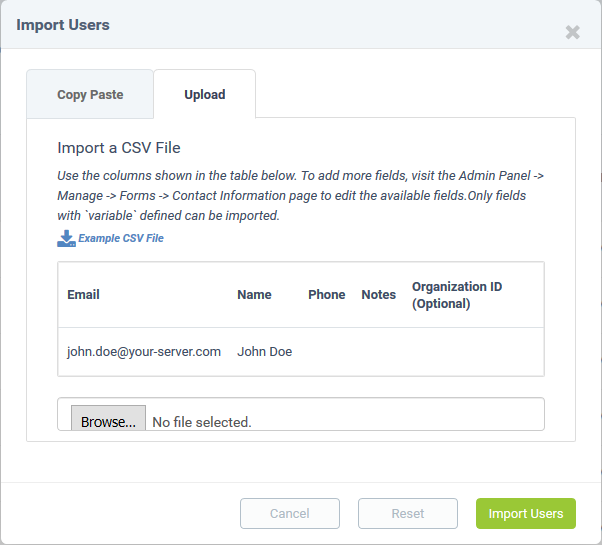
2. Upload - Import users
from a .csv file. More details can be added about a user with this
method.
- Create a .csv file of users that you want to import. The file should have the following column headers:
Email,Name,Phone,Notes,"Customer ID (Optional)
- Each line should contain the contact information of a single user
- Save the .csv, then click 'Browse' to upload the file to Service Desk:
|
Tip: Click 'Example CSV File' to download a sample file. |
Depending on your settings, imported users will be added as guests, or their account activation started.
You can configure default registration settings in 'Admin Panel' > 'Settings' > 'Users'. See User Registration Settings if you need further help with this.
Step 7 - Create new customers and assign users to customers
- A customer is an organization, usually a company or business from whom you will accept tickets. 'Users' are the people who actually submit the tickets.
- You can assign users to a customer in the 'User Directory' interface.
There are two options to add a customer:
- Create a customer in the Comodo One Interface (preferred)
Customers added to C1 are fully managed, which means they are also available in other C1 modules (Service Desk, Endpoint Manager, Dome Shield).
- Click 'Management' > 'Customer' > 'New Customer' to create a customer in C1.
- Create a customer in Service Desk
Customers added directly to Service Desk are 'standalone' customers. They are not visible in C1 nor available to other C1 modules.
- Click 'Staff Panel', > 'Users' > 'Customers' > 'Add New Customer' to add a customer to Service Desk.
You can also create a new customer directly from a user's details screen.
Add a new customer
Add a customer in the C1 interface
|
Note: Only C1 MSP users can add multiple customers. C1 Enterprise users can add standalone customers in the SD interface. |
- Log in at https://one.comodo.com/app/login
- Click
'Management' > 'Customer'
- The interface shows any existing customers added to Comodo One:
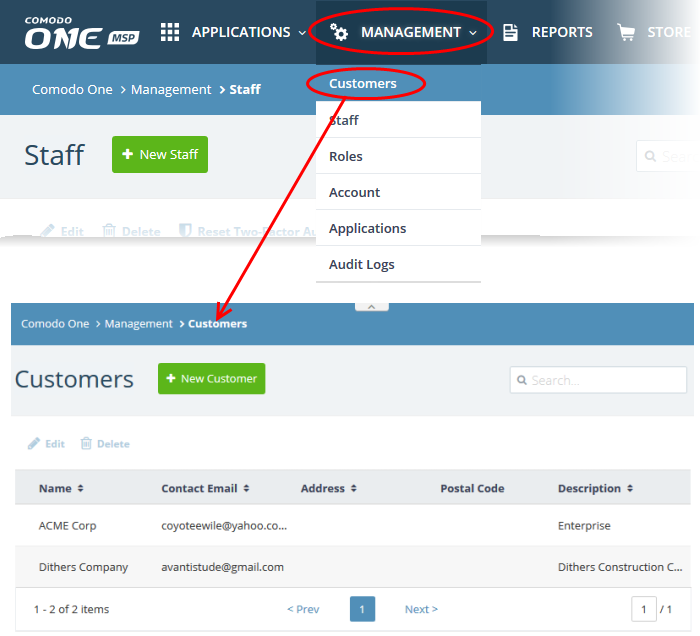
- Click the 'New Customer' button:
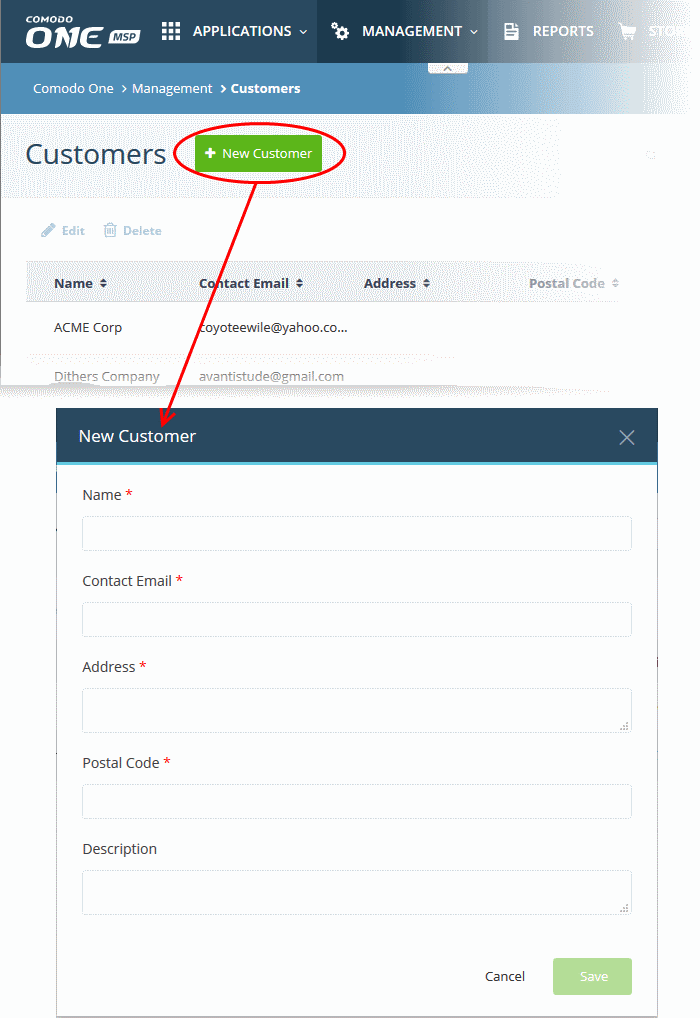
- Complete all mandatory fields then click 'Save'.
- Click the 'Customers' button in the main navigation to view your new customer.
Add a standalone customer to Service Desk
- Click 'Staff Panel' > 'Users' > 'Customers'
- Click 'Add New Customer' at the top
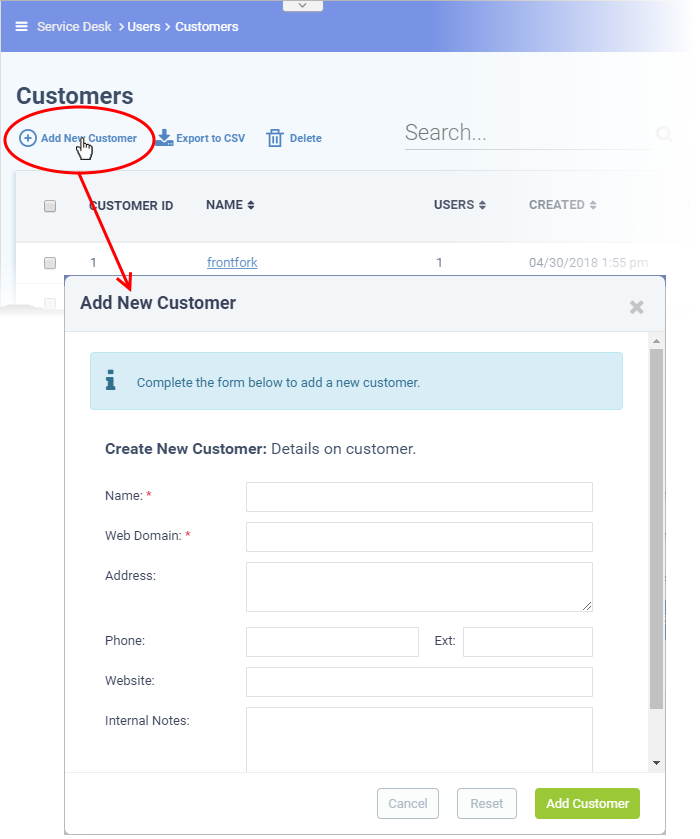
- Name: Enter a label for the customer company.
- Web Domain: Enter the name of the email domain used for employees of the company.
- Service Desk creates two new users with email addresses in this domain - 'Monitor Agent' and 'Patch Management Agent'. These accounts are used to receive automatically generated tickets from Endpoint Manager.
- They also assign to the customer any guests who submit tickets from an email at their domain.
- Address and Phone: Contact details of the company.
- Website: URL of the customer's public-facing / marketing website.
- Internal Notes: Enter any comments about the customer.
- Click 'Add Customer' after completing the form.
Staff can now configure customer settings, users and billing rates. See 'Manage Customers' later in this guide for help with this.
Assign users to a customer
- Open the 'Staff Panel'
- Click 'Users' > 'User Directory'
- Click on the name of a user to open their details page
- Click the 'Add Customer' link as shown:
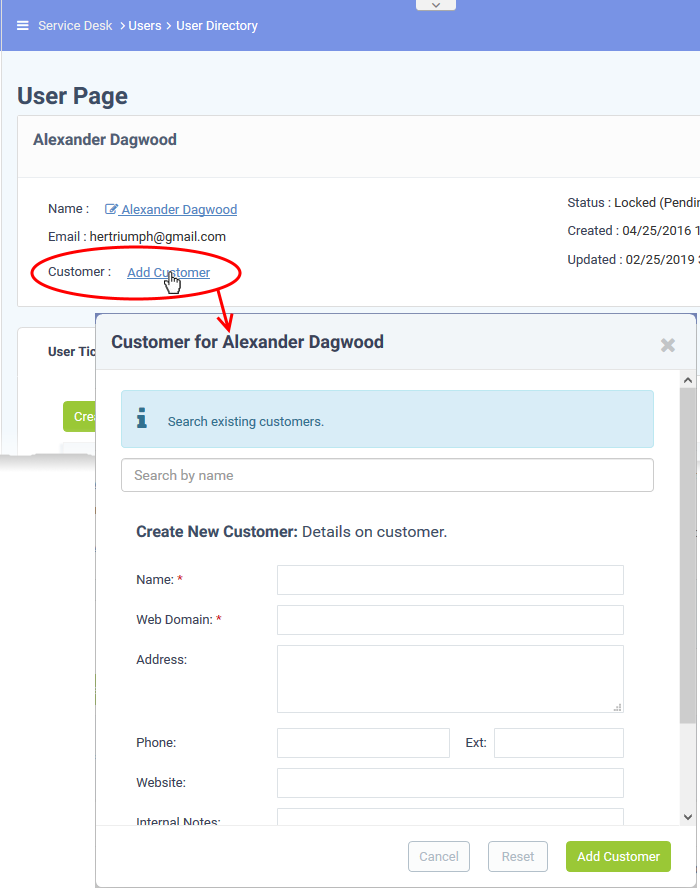
You can assign the user to an existing customer or to a new customer.
- Add
user to an existing customer - Type the first few
letters of the customer name in the search field. Select from the
suggestions.
A confirmation appears after choosing the customer:
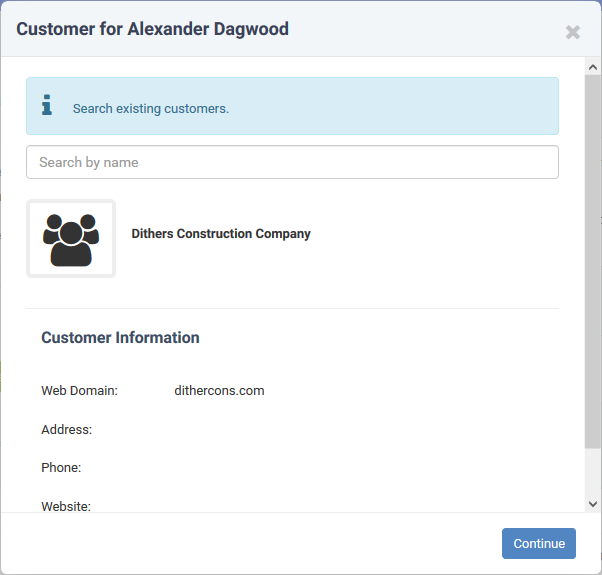
- Click 'Continue'.
The user will be added to the customer.
- Alternatively, complete all fields to create a new customer, then click 'Add Customer':
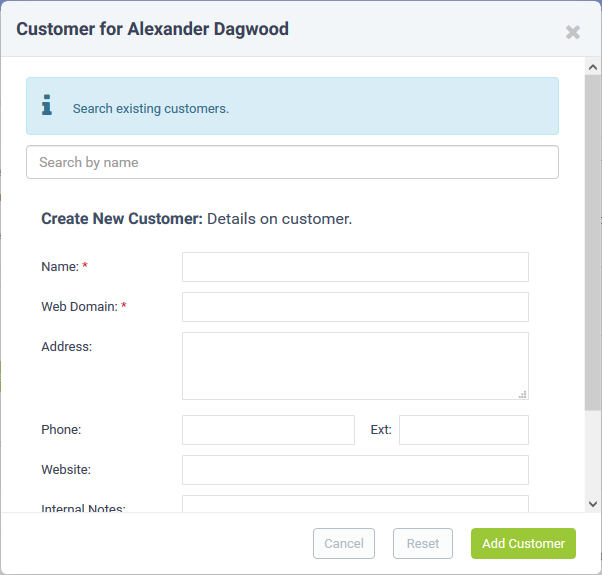
- See Manage Customers if you need help to create a new customer.
- Click
'Add Customer'.
The new customer and user are added to Service Desk.
Step 8 - Create service contracts for customers
Click 'Admin
Panel' > 'Finance' > 'Contracts'
Contract - An agreement between you and a customer which specifies the charges
you will levy for your services over a billing cycle.
You can configure the following in a Service Desk contract:
- Contract Fee (optional). A fixed charge for a billing cycle (weekly, bi-weekly, monthly or annual). The contract fee is always charged on top of any charging plans and/or global asset rates.
- Prepaid Hours (optional). The number of hours your company will provide at no charge under the contract fee. You can set different pre-paid hours for each type of service (telephone, remote, on-site). If the time spent exceeds the pre-paid hours, then only the excess time is subject to charge.
- Charging plan (optional). A template you can add to a contract which lets you define custom hourly rates for your services. Charging plan rates are only applied after prepaid hours have been used. You can add the following to a charging plan:
- Default Hourly Rate (mandatory). Hourly charge applied to work not covered by a variable rate.
- Variable Rates (optional). Special rates for specific types of work. For example, you might want to charge a different rate for on-site visits, or for work on a specific asset, or for work that exceeds a certain length of time.
- Global Asset Rates ('Admin Panel' > 'Manage' > 'Charging' > 'Default Charging') – While not part of a contract, per se, you should still consider global asset rates. Asset rates specify charges for work on items like workstations, servers, printers, routers etc. Global asset rates are only charged when prepaid hours and charging plans have been processed. For more details on global asset rates, see Default Charging Plan in Manage Charging Plans.
- See Appendix 3 - How Charging Works in Service Desk to read more on how charges are calculated for customers, based on contracts and charging plans.
- For more details on service contracts, see 'Manage Contracts'.
Create a contract:
- Open 'Admin Panel' > 'Finance' > 'Contracts'
- Click 'Add Contract' at the top of the 'Contracts' interface
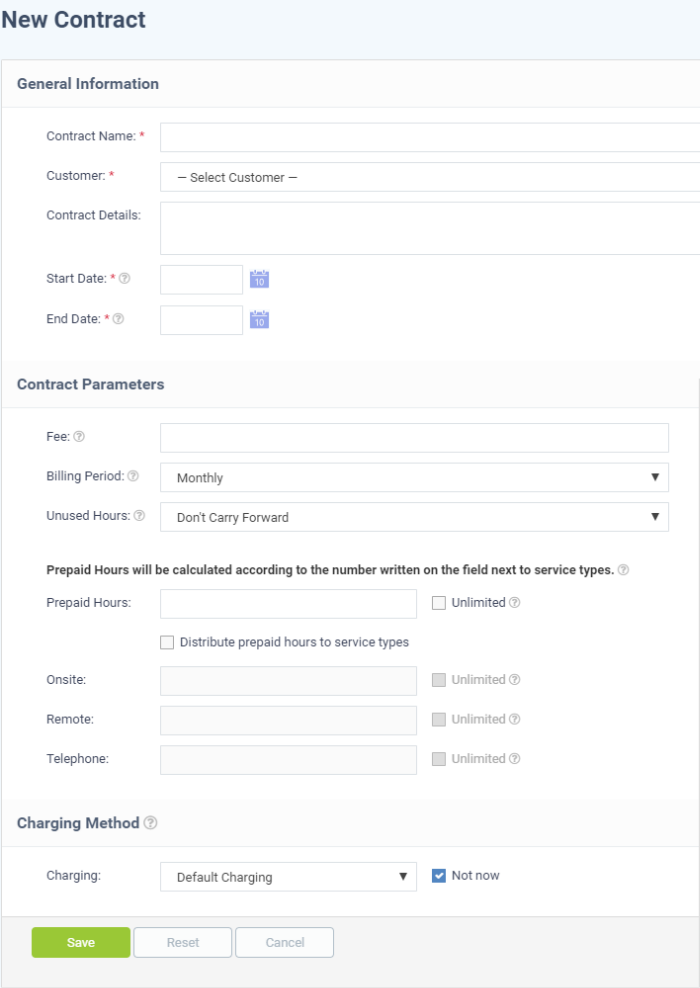
There are three main sections in the new contract form:
- Contract Name – Label to identify the contract
- Company – The customer organization to whom the contract applies
- Contract Details - Brief description of the contract
- Start Date - The date from which the contract is effective
- End Date - The date the contract expires
2. Contract Parameters
Fee - A fixed charge billed to the customer for the services you provide. The billing cycle determines how often the fee is charged.
- This fee will always be charged, regardless of other charges in charging plans and global asset rates.
- You may wish to set a fee then use 'Prepaid Hours' to specify the amount of work that will be covered by the fee.
- If no fee is specified, then charges for service sessions are calculated from other parameters in the contract.
Billing Period - How often the total charges in the contract will be billed to the customer
- Weekly
- Bi-Weekly
- Monthly
- Yearly
Unused
Hours - Choose whether or not any remaining pre-paid hours at the end of a billing cycle are carried over to the next cycle. Hours that are carried forward will be added to the pre-paid hours of the same service type in the next billing cycle.
Prepaid Hours - Hours worked by your staff during this period that will not be charged to the customer.
You have the option to spread prepaid hours over different services types - 'Onsite', 'Remote' and 'Telephone'.
Unlimited - You will not charge a fee for any hours worked by your staff on this service type.

- Prepaid Hours - Total hours you want to provide for the contract fee. Your customer can spend these hours on support of any type.
- Unlimited – Provide support of any type for free for the full billing period
OR
- Distribute prepaid hours to service types - Specify pre-paid hours for individual service types.
- Unlimited - Provide support of a specific type for free for the full billing period
3. Charging Method
Specify a
charging plan for the contract.
Charging
plans are templates which let you specify custom hourly rates for
your services.
- Click 'Admin Panel' > 'Manage' > 'Charging' to create a custom charging plan. See Manage Charging Plans if you need more help with this.
Charging plan rates are only applied after prepaid hours have been used.
- Charging - Select the plan you want to add to the contract from the drop-down.
- Default Charging - A plan which charges the global asset rates.
- Not Now - disable charging plans on this contract.
Click 'Save' to apply the contract to the customer.
Click 'Staff Panel' > 'Tickets' to view tickets sent in by users:
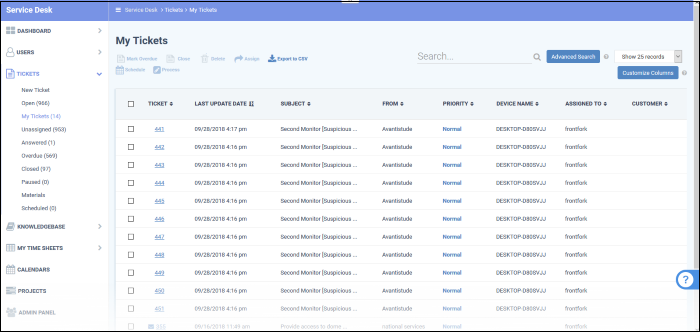
- Use the menu on the left to filter tickets by status. Filters include 'Open', 'Answered', 'Unassigned', 'My tickets', 'Overdue', 'Closed' and 'Paused'. You can customize the columns shown in each view. See 'Manage Tickets' to find out more.
- Click any ticket number to open the ticket's detail page.
- The details page lets you view ticket history, reply to the ticket, reassign it, add materials, and more.
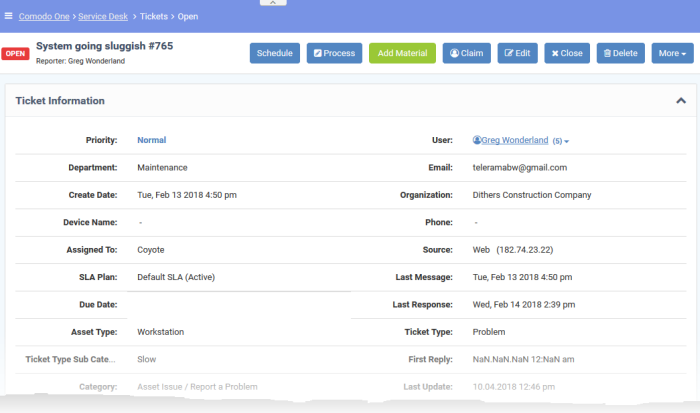
-
The structure of your tickets can be customized as required in 'Admin Panel' > 'Settings' > 'Tickets'. See 'Ticket Settings and Options' for more details.
Step 10 - Manage Knowledgebase
The 'Knowledgebase' allows you to:
- Create a set of FAQs which will be shown on your support portal to help users find answers to common problems.
- Create FAQ categories. FAQs must be placed in a category. For example, you can create a category called 'Hardware' and place all hardware related FAQs in it.
- Create canned responses. Canned responses are pieces of text which can be quickly pasted into ticket replies.
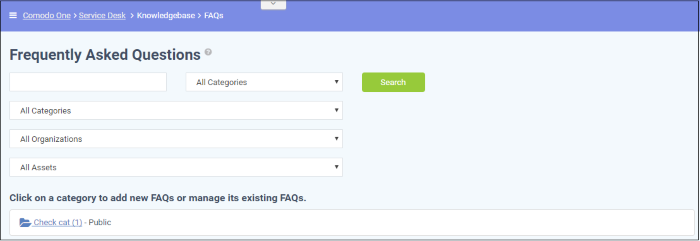
To publish an FAQ to the customer-facing web interface you need a public FAQ inside a public category:
1. Create an FAQ category.
- Individual FAQs must be assigned to a category.
- Go to 'Staff Panel' > 'Knowledgebase' > 'Categories' to view and edit available categories.
- If no suitable categories exist for your FAQ then you should create one.
- Make sure the category type is set to 'Public'.
- Go to 'Staff Panel' > 'Knowledgebase' > 'FAQs' > Click the category to which you wish you add your FAQ
- Click 'Add New FAQ' and write your FAQ into the form
- Select 'Public' as the 'Listing Type'
- Click 'Add FAQ' to publish to the customer portal.
Step 11 - Access control settings
To open the interface:
- Click 'Admin Panel' > 'Settings' > 'Access Control Settings'
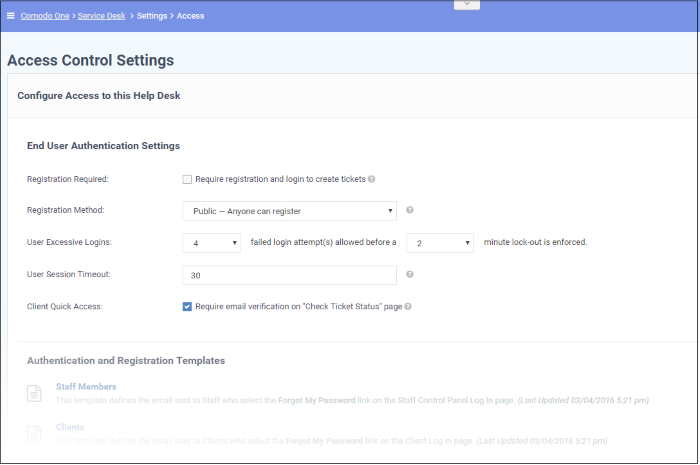
For more details, see 'Access Control Settings'.
Step 12 - Configure auto-response emails
- 'Email Settings and Options' lets you select the default emails that will be sent as notifications to end-users. Click 'Admin Panel' > 'Settings' > 'Emails' to view this interface
- You can add and configure new emails in 'Admin Panel' > 'Emails' > 'Emails'
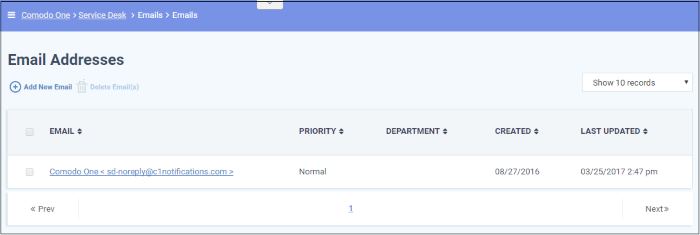
For more details, see 'Manage Emails'.
Click 'Admin Panel' > 'Reports' to open this interface
- The reports area lets you generate on-demand reports on a variety of topics.
- Reports can be exported to pdf or .csv and are available in the following categories:
- Time Log
- Tickets
- Assets
- Service Types
- Department Tickets
- Agents (admins/staff members)
- Users
- Resource Appointments
'Cost' and 'Contract' reports are available in a different area:
- Click 'Finance' > 'Cost' in the left-hand menu
- Select 'Cost by Customers' or 'Cost by Contracts' in 'Report Type' to generate the type of report you require.
- You can generate targeted reports by adding filters. Filters include date range, customer, department, agent, ticket status, asset type and much more.
- You can also set up scheduled reports which are automatically generated at a specific time and sent to recipients of your choice.


