


Creating an Antivirus Scanning Schedule
CAVS allows you to schedule Antivirus scans on your entire server or on specific areas according to your preferences. You can create a custom scan profile defining exactly which files and folders are to be scanned, when they are to be scanned and how they are to be scanned.
To
create an antivirus scanning schedule
- Click the 'Tasks' arrow on the home screen to open the main Tasks menu
- In 'General Tasks', click 'Scan'
- Select 'Custom Scan' then 'More Scan Options'
- The 'Advanced Settings' interface will be displayed with 'Scans' panel opened
- Click the handle at the bottom of the interface then select 'Add'
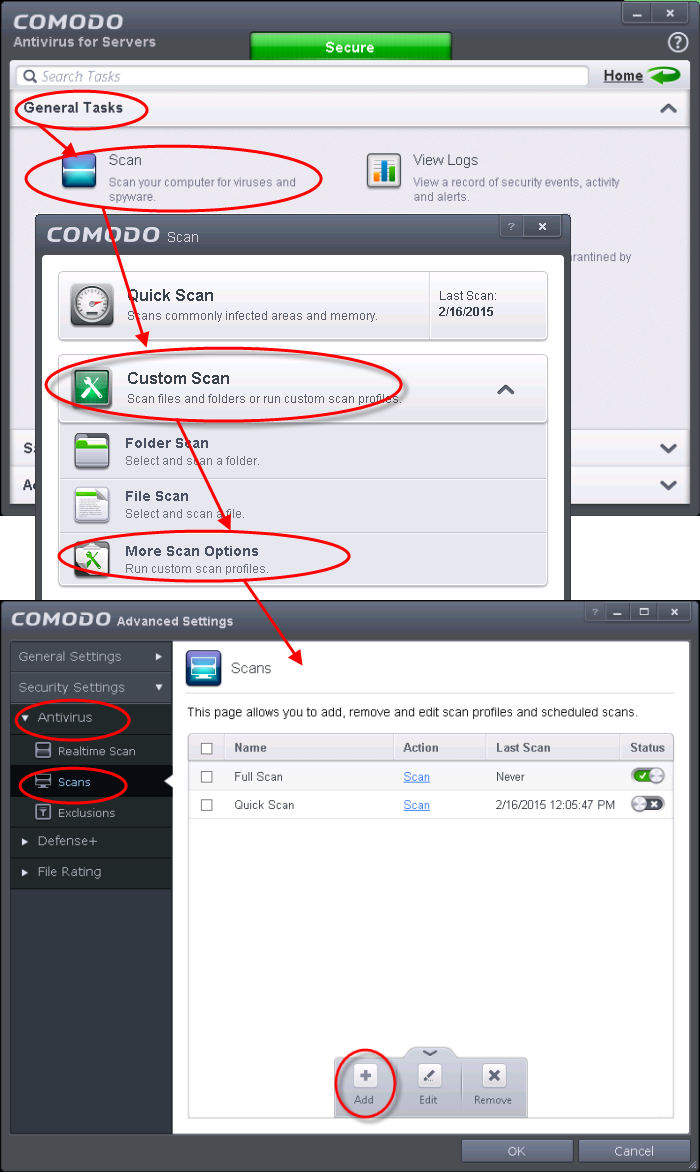
The scan profile interface will be displayed.
- Type a name for the profile in the 'Scan Name' text box
- Click the handle at the bottom of the interface to select items to be included in the profile:
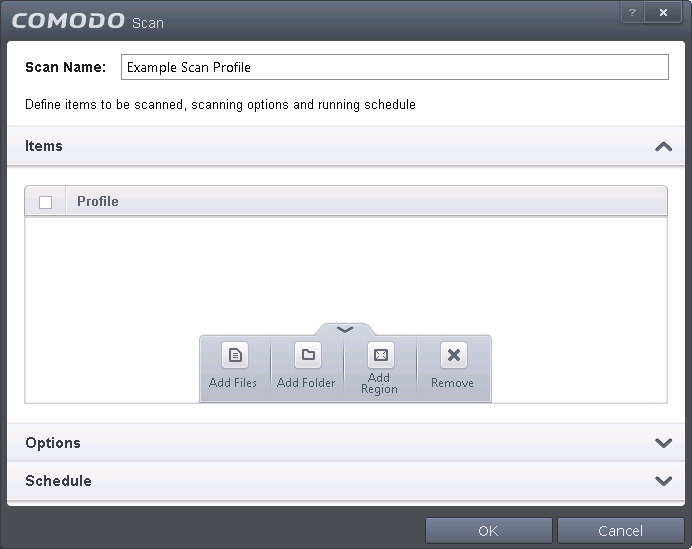
- Add File - Allows you to add individual files to the profile.
- Add Folder - Allows you to select entire folders to be included in the profile
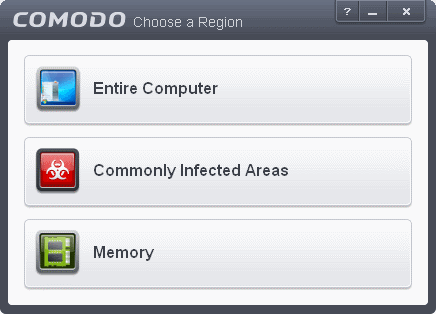
- Add Region - Allows you to add pre-defined regions to the profile (choice of 'Entire Computer', 'Commonly Infected Areas' and 'System Memory')
- Repeat the process to add more items to the profile. Click 'OK' to confirm your choice.
- Next, click 'Options' to further customize the scan:
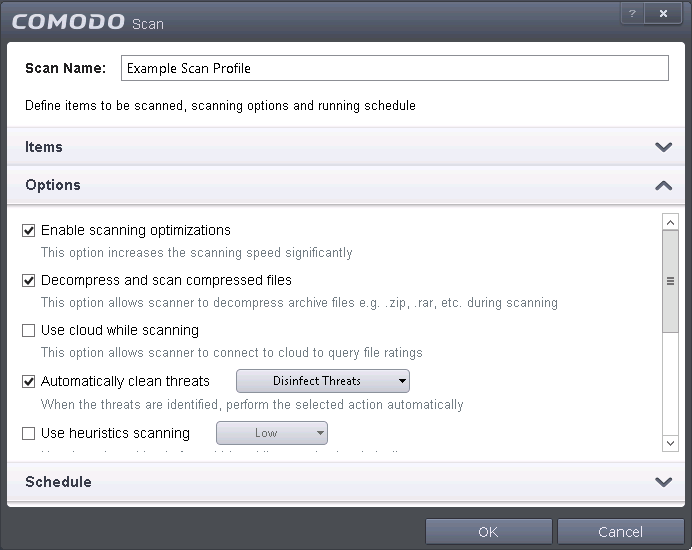
- Options:
- Enable scanning optimizations - On selecting this option, the antivirus will employ various optimization techniques like running the scan in the background in order to speed-up the scanning process (Default = Enabled) .
- Decompress and scan compressed files - When this check box is selected, the Antivirus scans archive files such as .ZIP and .RAR files. Supported formats include RAR, WinRAR, ZIP, WinZIP ARJ, WinARJ and CAB archives (Default = Enabled).
- Use cloud while scanning - Selecting this option enables the Antivirus to detect the very latest viruses more accurately because the local scan is augmented with a real-time look-up of Comodo's online signature database. With Cloud Scanning enabled your system is capable of detecting zero-day malware even if your local anitvirus database is out-dated. (Default = Disabled).
- Automatically clean threats - Enables you to select the action to be taken against the detected threats and infected files automatically from disinfecting Threats and moving the threats to quarantine. (Default = Enabled).
- Use heuristics scanning - Enables you to select whether or not Heuristic techniques should be applied on scans in this profile. You are also given the opportunity to define the heuristics scan level. (Default = Disabled).
Background Info: CAVS employs various heuristic techniques to identify previously unknown viruses and Trojans. 'Heuristics' describes the method of analyzing the code of a file to ascertain whether it contains code patterns similar to those in known viruses. If it is found to do so then the application deletes the file or recommends it for quarantine. Heuristics is about detecting 'virus-like' traits or attributes rather than looking for a precise virus signature that matches a signature on the virus blacklist.
This allows CAVS to 'predict' the existence of new viruses - even if it is not contained in the current virus database.
- Low- Lowest' sensitivity to detecting unknown threats but will also generate the fewest false positives. This setting combines an extremely high level of security and protection with a low rate of false positives. Comodo recommends this setting for most users.
- Medium - Detects unknown threats with greater sensitivity than the 'Low' setting but with a corresponding rise in the possibility of false positives.
- High - Highest sensitivity to detecting unknown threats but this also raises the possibility of more false positives too.
- Limit maximum file size to - Select this option if you want to impose size restrictions on files being scanned. Files of size larger than that specified here, are not scanned, if this option is selected (Default = 40 MB).
- Run this scan with - Enables you to set the priority of the scan profile. You can select the priority from the drop-down. (Default = Disabled).
- Update virus database before running - Instructs CAVS to check for latest virus signature database updates from Comodo website and download the updates automatically before starting the scanning (Default = Enabled) .
- Detect potentially unwanted applications - When this check box is selected, Antivirus scans also scans for applications that (i) a user may or may not be aware is installed on their server and (ii) may functionality and objectives that are not clear to the user. Example PUA's include adware and browser toolbars. PUA's are often installed as an additional extra when the user is installing an unrelated piece of software. Unlike malware, many PUA's are 'legitimate' pieces of software with their own EULA agreements. However, the 'true' functionality of the software might not have been made clear to the end-user at the time of installation. For example, a browser toolbar may also contain code that tracks a user's activity on the Internet. (Default = Disabled).
- To schedule the scan to run at set intervals, click 'Schedule':
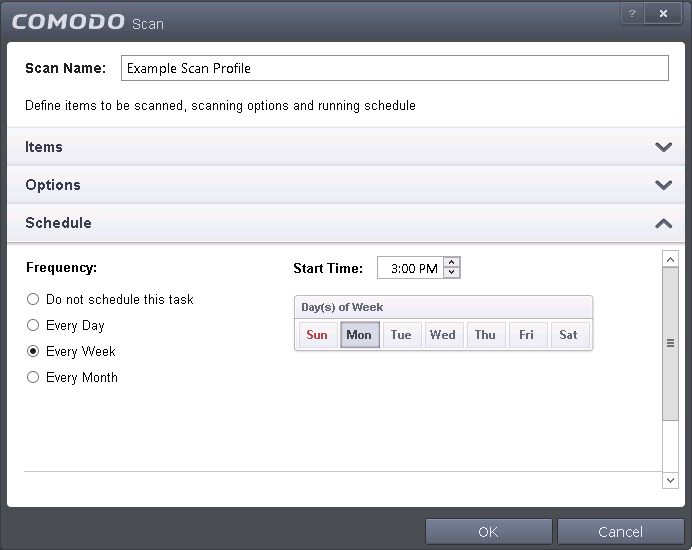
- Do not schedule this task - The scan profile will be created but will not be run automatically. The profile will be available for manual on-demand scanning
- Every Day - The Antivurus starts scanning the areas defined in the scan profile every day at the time specified in the Start Time field
- Every Week - The Antivurus starts scans the areas defined in the scan profile on the day(s) of the week specified in 'Days of the Week' field and the time specified in the 'Start Time' field. You can select the days of the week by directly clicking on them.
- Every Month - The Antivurus starts scans the areas defined in the scan profile on the day(s) of the month specified in 'Days of the month' field and the time specified in the 'Start Time' field. You can select the days of the month by directly clicking on them.
- Run only when computer is not running on battery - This option is useful when you are using a laptop or any other battery driven portable computer. Selecting this option runs the scan only if the system runs with the adopter connected to mains supply and not on battery.
- Run only when computer id IDLE - Select this option if you do not want to disturbed when involved in server related activities. The scheduled can will run only if the server is in idle state
- Turn off computer if no threats are found at the end of the scan - Selecting this option turns your server off, if no threats are found during the scan. This is useful when you are scheduling the scans to run at nights.
- Click OK to save the profile.
- The profile will be saved and the selected areas will be scanned repeatedly as per the set schedule.
| Note: The schedule scan will run only if it is enabled. Click the button under the Active column beside the respective profile row to toggle between on and off status. |