Comodo Help
Find the desired product help
SOCaaP

SOCaaP

Version 2.2

English

Print Help
Sensor Installation > Sensor Installation Steps
  • Introduction
    • Logging-in To The SOCaaP Console
  • Dashboard Overview
    • Summary
    • Alerts,Incidents And Website Vulnerabilities
    • Customer Health
  • SOCaaP Alerts/Escalations
    • Log-in To The Admin Console
    • The Home Screen
    • Service Summary
    • Incidents Overview
      • Incidents
      • Threat Summary
    • Log Collection Summary
    • Threat Communication Graph
    • Tickets
    • Reports
    • Notification Settings
    • Integrate Your Office 365 Account With SOCaaP
  • SOCaaP XDR
    • Log-in To The Admin Console
    • The Main Interface
    • Eveny Query
      • Configure Event Queries
    • Report Generation
    • Administration
      • Event Collection
      • Phantom Settings
      • Manage Users
    • Appendix 1 – Field Groups And Event Items Description
    • Appendix 2 –SOCaaP Supported Logs
  • SOCaaP Web Protection
    • Add Websites
    • The Main Interface
    • The Dashboard
    • Website Data And Settings
      • Website Overview
      • Security Scans
        • Website Scans
        • Website Files Security Scans
          • Malware Scan Settings
            • Automatic Configuration
            • Manual Configuration
          • Run A Scan And View Results
          • Notifications, Malware Removal And Scheduled Scans
        • Vulnerability Scans
          • CMS Vulnerability Scans
          • OWASP Top 10 Vulnerability Scans
      • Content Delivery Network
        • Activate CDN For A Website
        • CDN Settings
        • View CDN Metrics
      • Firewall
        • WAF Statistics
        • WAF Events
        • Configure WAF Policies
        • Manage Custom Firewall Rules
      • SSL Configuration
      • DNS Configuration
      • Add Trust Seal To Your Websites
      • Back Up Your Website
        • Backup Settings
        • On-Demand Backup
        • View Backup Records And File Statistics
        • Restore And Download Website Files
        • Delete Backups
    • Manage Your Profile
  • Sensor Installation
    • Requirements
    • (Option 1) Create Installation Media
    • (Option 2) Deploy Virtual Machine Environment
      • Create A New Virtual Machine
      • Configure Memory Size
      • Configure Hard Disk
      • Configure Hard Disk File Type
      • Configure Storage On Physical Hard Disk
      • Configure Size Of Virtual Hard Disk
      • Configure Network Settings
      • Select VM Startup Disk
    • Sensor Installation Steps
    • Sensor Configuration Steps
      • Login To The Web Portal
      • User Settings
      • Configure Network
      • Configure Timezone
      • Key Activation
      • (Optional) Valkyrie Key Verdict
      • (Optional) Forward Log
  • Frequently Asked Questions
  • About Xcitium Security Solutions

Sensor Installation Steps


  • Connect the interface with access to internet to eth0 and connect the mirrored port to eth1 of the sensor.

  • Install the sensor software:

    • Physical appliance - Insert the previously created USB media which contains the sensor ISO in bootable format. Boot the appliance with the USB installed.

    • Virtual Machine - Mount the .iso on the virtual optical drive and start the VM

      • Please make sure that the capture interface of the VM allows promiscuous mode

      • If you do not see 64-bit VM profiles you may wish to double-check that VT is enabled in the BIOS.

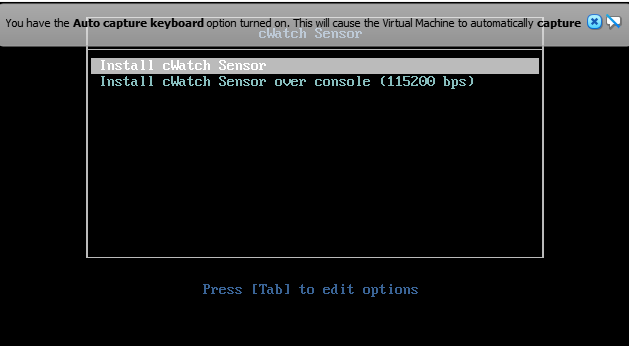
  • When the SOCaaP Sensor boot splash prompt is visible, please choose the appropriate option.

    • “Install SOCaaP Sensor” is the regular installation option on virtual devices and hardware devices with display output.

    • If you want to install the appliance on hardware over a console cable, please select “Install SOCaaP Sensor over console (115200 bps)” option.


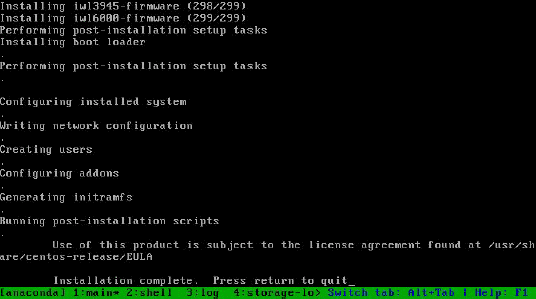
  • The following screen is shown when installation is complete. Press ENTER to finish installation.


  • You need to wait until the “System Halted” message appears:


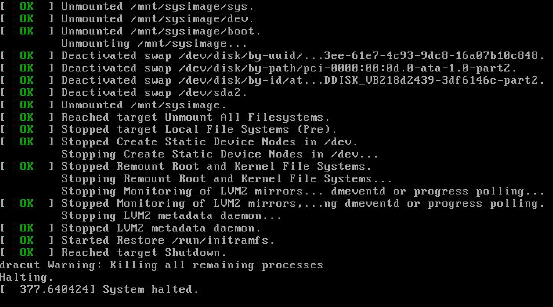
  • Installation is complete.

    • Remove the USB Flash media and reboot the physical device, or

    • Dismount the .iso and reboot the virtual machine

      • If required, take a snapshot to store the current status


Our Products
  • Free Antivirus
  • Free Internet Security
  • Website Malware Removal
  • Free Anti-Malware
  • Anti-Spam (Free Trial)
  • Windows Antivirus
  • Antivirus for Windows 7
  • Antivirus for Windows 8
  • Antivirus for Windows 10
  • Antivirus for MAC
  • Antivirus for Linux
  • Free Endpoint Security
  • Free ModSecurity
  • Free RMM
  • Free Website Malware Scanner
  • Free Device Manager for Android
  • Free Demo
  • Network Security
  • Endpoint Protection
  • Antivirus for Android
  • Comodo Antivirus
  • Wordpress Security
Cheap CDN
  • Bootstrap CDN
  • Semantic UI CDN
  • Jquery CDN
  • CDN Plans
  • CDN
  • Free CDN
Enterprise
  • Patch Management Software
  • Patch Manager
  • Service Desk
  • Website Down
  • Endpoint Protection Solutions
  • Website Security Check
  • Remote Monitoring and Management
  • Website Security
  • Device Manager
  • ITSM
  • CRM
  • MSP
  • Android Device Manager
  • MDR Services
  • Managed IT Support Services
  • Free EDR
Free SSL Certificate
Support Partners Terms and Conditions Privacy Policy

© Comodo Group, Inc. 2025. All rights reserved.