The Home Screen
You can switch the display between the 'Home' screen and the 'Tasks' interface by clicking the green arrow at the upper right of the interface: ![]()
The home screen itself is available in two formats, 'Compact' view and 'Advanced' view. Use the button at the top-left to switch between them.![]()
![]()
The following areas are common to both compact and advanced views:
Compact View presents a simple, easy to understand interface that allows users to quickly launch key tasks and gain an immediate overview of the security of their computer.The large 'security information' tile on the left provides at-a-glance information on overall system security and allows you to run an appropriate CIS task if threats are found.The four tiles on the right provide information from specific CIS security components and act as shortcuts to run an instant antivirus scan, run an update, view network traffic and to configure sandbox/host intrusion settings.
The security information tile on the left will inform you if any component is disabled or any if other problems are found:

You can easily rectify the issue by clicking the 'Fix it!' button. CIS will automatically take necessary actions to resolve the problem.
From the Compact View of the home screen you can:
Instantly scan objects / run a program in sandbox
Click the 'Antivirus' tile in the middle of the (compact) home screen to open the drag-and-drop scanner:
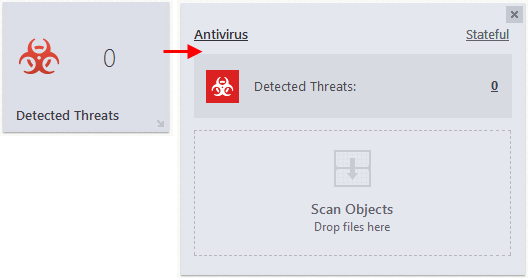
To run an instant scan, navigate to the file/folder that you want to scan and just drag-and-drop the file into the 'Scan Objects' box. The virus scan will commence immediately. Refer to 'Instantly Scan Files and Folders' for more details.
Enable or disable security components
The four tiles on the right can each be flipped to display more detailed information and options
- Antivirus - Click the 'Detected Threats' tile to flip open a more detailed tile which displays current antivirus settings, the number of detected threats and the drag-and-drop scanner.
- Click the link at the top-right to quickly switch AV modes between 'On Access', 'Stateful' and 'Disabled'. Refer to the section 'Real-time Scanner Settings' for more details.

- Click 'Antivirus' at upper-left to open the 'Realtime Scanner Settings' interface. Refer to the section 'Real-time Scanner Settings' for more details.
- Click the number of threats detected to open the Antivirus Log Viewer Module.
- Click the 'X' in the top right corner to return to the 4-tile view.
- Firewall - Click the 'Network Intrusions' tile to flip open a more detailed pane which displays the current firewall mode, the number of detected network intrusions, the number of current inbound and outbound connections and the share of network bandwidth used by internet-connected applications.
- Click the link at the top-right to view or modify the current firewall mode. Refer to the section 'Firewall Behavior Settings' for more details.
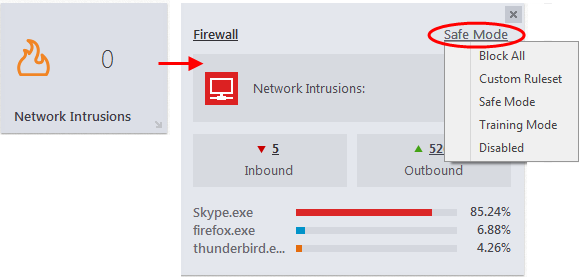
- Click 'Firewall' to open the detailed 'Firewall Settings' interface. Refer to the section 'Firewall Settings' for more details.
- Click the number of detected network intrusions to open the Firewall Log Viewer Module.
- Click the numbers over 'inbound' and 'outbound' to open the View Connections dialog. You can also do this by clicking the application names at the bottom of the pane.
- Click the 'X' in the top right corner to return to the 4-tile view.
- Defense+ - Click the 'Blocked Intrusions' tile to flip open a more detailed pane which displays the current Auto-Sandbox and HIPS modes and a statistical summary of events handled by Defense+.
- Click Auto-Sandbox to open the Auto-Sandbox Rules Settings interface. Refer to the section 'Configuring Rules for Auto-Sandbox' for more details.
- Click the link to the right of this to view and modify auto-sandbox security levels. Refer to the section 'Configuring Rules for Auto-Sandbox' for more details.
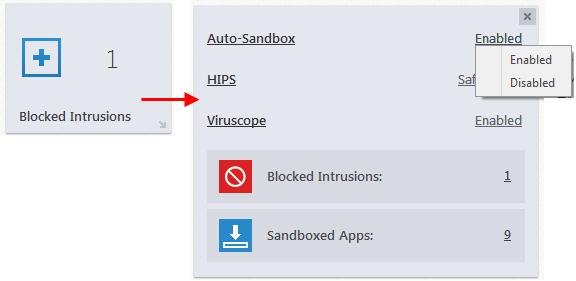
- Click HIPS to open the 'HIPS Settings' interface. Refer to the section 'HIPS Settings' for more details.
- Click the link to the right of this to view and modify HIPS security modes. Refer to the section 'HIPS Settings' for more details.
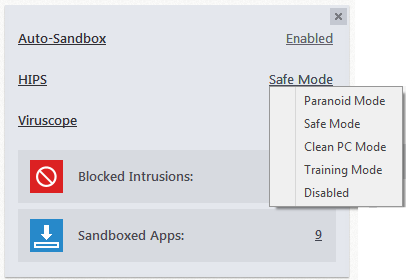
- Click Viruscope to open the 'Viruscope' interface. Refer to the section 'Viruscope' for more details.
- Click the link to the right of this to view and modify Viruscope security modes. Refer to the section 'Viruscope' for more details.
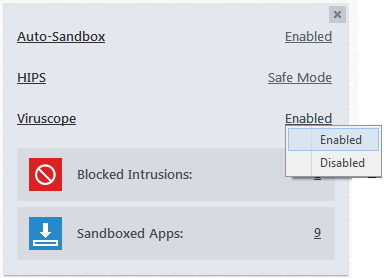
- Click the number of Blocked Intrusions to open the Defense+ Log Viewer module.
- Click the number of Sandboxed Apps to open the Active Process List (Sandboxed Only) dialog.
- Updates - Click the 'Updates' tile to open a more detailed pane which displays when the virus database was last updated, the database version number and the software version number.
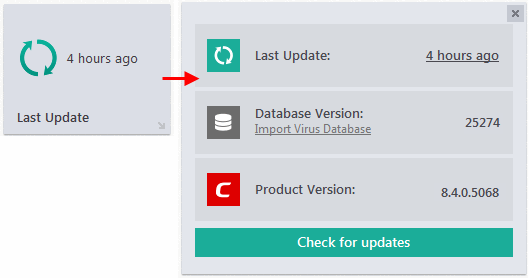
- Click on either the time of the last update or the 'Check for Updates' button to manually check for available updates. Refer to the section Manage Virus Database and Product Updates section for more details.
- Click the 'X' in the top right corner to return to the 4-tile view.
The 'Advanced View' provides a more finely-detailed view of the security status of each of the Antivirus, Defense+ and Firewall components.
Switch to advanced view by clicking the toggle button at the top-left of the home screen:
Click the following links to find out more:
The Antivirus pane allows you to configure antivirus mode, see when the virus database was last updated, view antivirus logs and instantly scan files and folders.
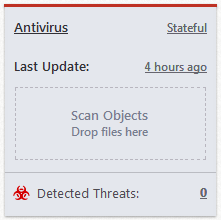
- Antivirus – Displays the current security level of the real-time antivirus scanner. Click on the security mode text to quickly switch between modes. Click 'Antivirus' to open the Realtime Scanner Settings interface. Refer to the section 'Real-time Scanner Settings' for more details.
- Last Update - Displays when the virus database was updated. Click the text link to start the updates again.
- Last Update - Displays when the virus database was updated. Click on the text link to start the updates again.
- Detected Threats - Displays the number of malware threats discovered so far from the start of current session as a link. Clicking this number will open the Antivirus Logs panel.
- Scan Objects - Drag-and-drop files, folders or even entire drives into this box to instantly scan them. Refer to the section Instantly Scan Files and Folders for more details.
The Defense+ and Sandbox Pane allows you to quickly configure Auto-Sandbox and HIPS settings, view Defense+ logs and easily view the number of blocked intrusions, unrecognized files and sandboxed applications.
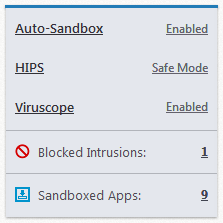
- Auto-Sandbox - Displays whether auto-sandbox feature is enabled or not. Click on the security level itself to change it. Click Auto-Sandbox to open the 'Auto-Sandbox Settings interface.' Refer to the section 'Configuring Rules for Auto-Sandbox' for more details.
- HIPS – Click the text of the current HIPS mode to view or modify the mode. Click the word HIPS to open the 'HIPS Settings' interface. Refer to the section 'HIPS Settings' for more details.
-
Viruscope - Displays whether Viruscope is enabled or not. Click on the security level to change it. Click Viruscope to open the 'Viruscope' interface. Refer to the section 'Viruscope' for more details.
- Blocked Intrusions - Displays the number of intrusions blocked by HIPS. Clicking on the numbered link will open the Defense+ logs. Refer to the section Defense+ Logs for more details.
- Sandboxed Apps – Displays the number of applications that are currently running inside the sandbox. Clicking the numbered link beside it will open the 'Active Processes List (Sandboxed Only)', which provides details of currently sandboxed applications. Refer to the section 'View Sandboxed Processes List' for more details.
The Firewall Pane allows you to configure Firewall settings, view the number of inbound and outbound connections and the number of network intrusion attempts blocked by Firewall since the start of current session of CIS.
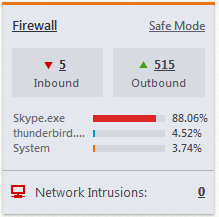
- Firewall - Displays the firewall's current security mode. Click on the level itself to quickly view and modify it. Click on 'Firewall' to open the Firewall Settings interface. Refer to the section 'Firewall Settings' for more details.
- Inbound / Outbound Connections - A numerical summary of currently active inbound and outbound connections to and from the system. Clicking on the numbered link will open the View Connections screen. Refer to the section 'View Active Internet Connections' for more details.
- Traffic - The Traffic area of the pane displays a bar graph showing applications that are currently connected to the internet and are sending or receiving data. Clicking on any application name will open the View Connections screen.
- Network Intrusions - Displays the total number of intrusion attempts blocked by firewall since the start of the current session. Refer to the section 'Firewall Logs' for more details.
The task bar contains a set of shortcuts which will launch common tasks with a single click. You can add any task you wish to this toolbar. Click the handles < > on the left and right sides of the task bar to scroll through all tasks.

- To add a task to the Task Bar, first open the tasks interface by clicking the curved arrow at the top right:

- Expand any one of the 'General', 'Firewall', 'Sandbox' or 'Advanced Tasks' menus.
- Right-click on the task you wish to add then click the message 'Add to Task Bar'.

-
The selected task will be added to the Task Bar.

|
Tip – Many will find it useful to add 'Open Advanced Settings' to the task-bar as it contains several areas important to the configuration of CIS. To do this, from the 'Home' screen, click the 'Tasks' arrow at upper-right, click 'Advanced Tasks' then right-click on 'Open Advanced Settings' and select 'Add to Task Bar'. |
- To remove a task shortcut from the Task Bar, right click on it and choose 'Remove from task bar'.

- Comodo Mobile Security app for Android phones and tablets.- Click the mobile icon
 and scan the QR code with your device to download the latest version of the app. You can also get the app from our website, https://m.comodo.com/ or from the Google Play app store at https://play.google.com/store/apps/details?id=com.comodo.cisme.antivirus
- Refer your Friends - Click the
 icon o open the 'Comodo Friends' website. Register an account for free, recommend CIS to your friends and get attractive rewards. Visit http://friends.comodo.com/ for more details.
- Get Help - Click the help
 icon for the following options:
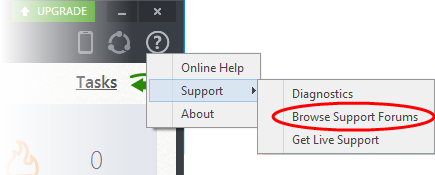
- Online Help - Opens Comodo Internet Security's online help guide at http://help.comodo.com/topic-72-1-522-6207-Introduction-to-Comodo-Internet-Security.html
- Support - Click this link for the following options:
- Diagnostics - Helps to identify any problems with your installation.
- Browse Support Forum - Links to Comodo User Forums.
- Get Live Support - Launches the GeekBuddy support client.
- About - Displays the product version, virus signature database version, website database version (website filtering URLs), details of active Viruscope Recognizers and copyright information. The 'About' dialog also allows you to import a locally stored virus database and to enter a license key for CIS Pro.
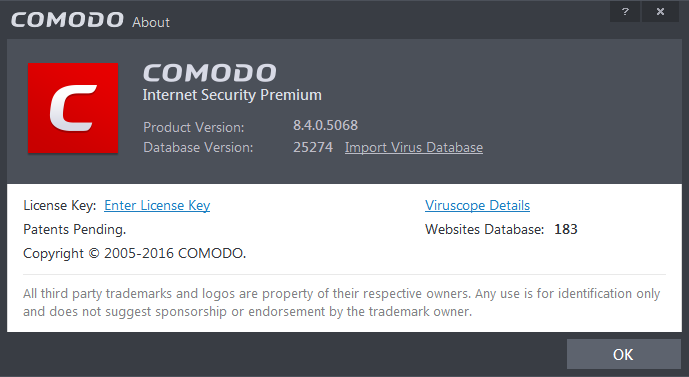
- Click 'Import Virus Database' to import a locally stored virus signature database into CIS.
- Click 'Enter License Key' to upgrade to CIS Pro or Complete. Refer to the section 'Activating CIS Pro/Complete Services after Installation' for more details.
- Click 'Viruscope Details' to open a dialog which shows the Viruscope Recognizers that are active on your system. Refer to the Viruscope section for more details.
Game Mode enables you to play your games without interruptions or alerts. Operations that can interfere with a user's gaming experience are either suppressed or postponed.
In game mode:
- Defense+/Firewall alerts are suppressed.
- AV database updates and scheduled scans are postponed until the gaming is over;
- Automatic isolation of unknown applications and real-time virus detection are still functional.
To switch to Game mode
-
Click the Game Mode switch at the bottom left of the Home Screen
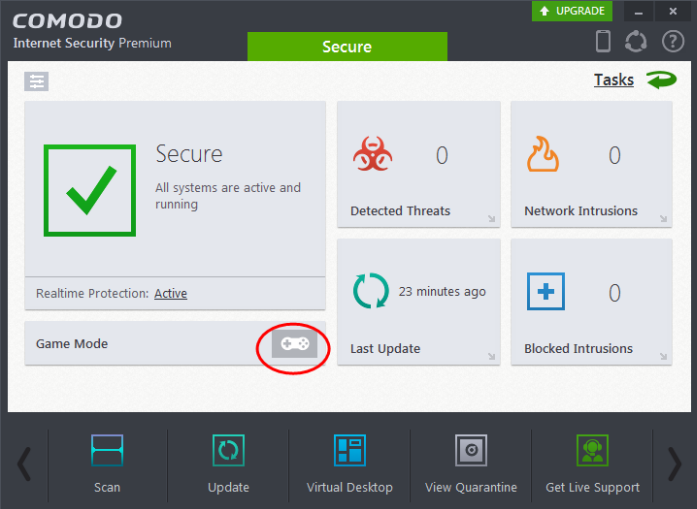
Deactivate Game Mode to resume alerts and scheduled scans.


