Scheduled Scans
- Click 'Antivirus' > 'Scheduled Scans' to open this interface.
- Comodo Antivirus features a highly customizable scheduler that lets you timetable scans according to your preferences.
- Comodo Antivirus automatically starts scanning the entire system or the disks or folders contained in the profile selected for that scan.
- You can add an unlimited number of scheduled scans to run at a time that suits your preference. A scheduled scan may contain any profile of your choice.
- You can choose to run scans at a certain time on a daily, weekly, monthly or custom interval basis.
- You can also choose which specific files, folders or drives are included in that scan.
- Comodo Antivirus gives you the power to choose, allowing you to get on with more important matters with complete peace of mind.
The detection settings for the 'Scheduled Scans' can be configured under the 'Scheduled Scanning' tab of the 'Scanner Settings' interface.
-
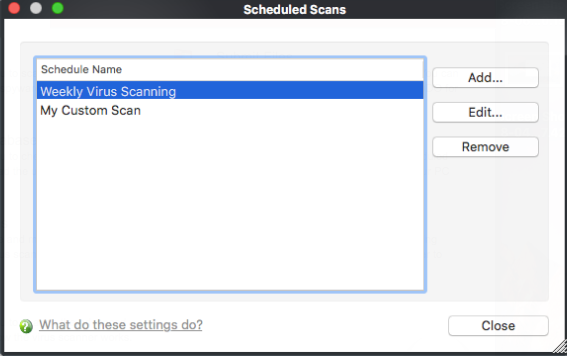
Click on the 'Scheduled Scans' link in the main 'Antivirus Task Manager' screen.

A default schedule 'Weekly Virus Scanning' is displayed. This schedule is set so that your computer is scanned on every day at 16:00 pm. You can edit this schedule by selecting it and clicking the 'Edit' button.
-
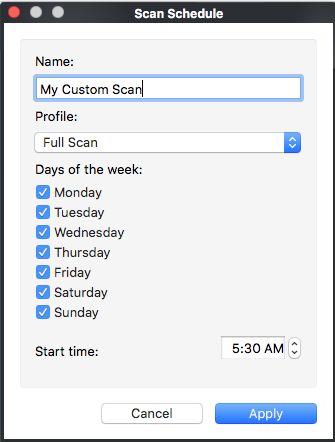
Click 'Add'. The 'Scan Schedule' panel opens.

-
Type a name for the newly scheduled scan in the 'Name' box
-
Select a scanning profile from the list of preset scanning profiles by clicking at the drop-down arrow, in the 'Profile' box. (For more details on creating a custom Scan Profile that can be selected in a scheduled scan, see 'Antivirus Tasks' > 'Scan Profiles')
-
Select the days of the week you wish to schedule the scanning from 'Days of the Week' check boxes
-
Set the starting time for the scan in the selected days in the 'Start time' drop-down boxes
-
Click 'Apply'.

8. Repeat the process to schedule other scans with other predefined scan profiles.
-
Select the schedule from the list.
-
Click 'Edit' in the 'Scheduled Scans' setting panel.
-
Edit the necessary fields in the 'Scan Schedule' panel.
-
Click 'Apply'.
To cancel a pre-scheduled scan
-
Select the scan schedule you wish to cancel in the 'Scheduled Scans' settings panel
-
Click 'Remove'.


