Comodo Help
Find the desired product help
Comodo Antispam Gateway

Comodo Antispam Gateway

Admin Guide ver 2.12

English

Print Help Download Help
Domain Management > Manage A Domain > Domain Rules > Sender Whitelist
  • Introduction To Comodo Antispam Gateway
    • Release Notes
    • Purchase License
    • License Information
  • Get Started
    • Incoming Filtering Configuration
      • Configure Your Mail Server
      • Configure MX Records
        • Update MX Records In Windows 2003/2008 Server
        • Update MX Records On A Host Using BIND
        • Update MX Records For Comodo DNS
        • Update MX Records For GoDaddy
        • Update MX Records For Enom
        • Update MX Records For Network Solutions
        • Update MX Records For Yahoo! Small Business
        • Update MX Records For 1and1
        • Update MX Records For 4D Web Hosting
        • Update MX Records For DNS Park
        • Update MX Records For DreamHost
        • Update MX Records For DynDNS
        • Update MX Records For IX Web Hosting
        • Update MX Records For No-IP
        • Update MX Records In CPanel
    • Outgoing Filter Configuration
      • Per-User Authentication
      • Outgoing Smarthost Setup
        • Configure QMail To Use A Smarthost
        • Configure PostFix To Use A Smarthost
        • Configure Sendmail To Use A Smarthost
        • Configure Exchange 2000/2003 To Use A Smarthost
        • Configure Exchange 2007/2010 To Use A Smarthost
        • Configure Exchange 2013/2016 To Use A Smarthost
        • Configure Office 365 To Use A Smarthost
        • Configure Exim To Use A Smarthost
          • Configure Exim / CPanel To Use A Smarthost
          • Configure Exim / Directadmin To Use A Smarthost
      • DNS Configuration
  • Login To The Admin Console
  • The Dashboard Area
  • The Admin Console
  • Domain Management
    • Add A Domain
    • Delete Domains
    • Edit Domains
    • Validate Domains
    • Manage A Domain
      • Domain Dashboard
      • Incoming
        • Quarantine
        • Manage Archived Mails
        • Incoming Spam Detection Settings
        • Report Spam
        • Delivery Queue
        • Destination Routes
        • Local Recipients
        • Clear Incoming Cache
        • Log Search
        • Domain Aliases
        • Domain Settings
        • Manage Report Subscriptions For Selected Domain
        • Relay Restrictions
        • Geolocation Restrictions
        • SPF Control Settings
      • Outgoing
        • Clear Outgoing Cache
        • Log Search
        • Users
        • Office 365 Activation
      • Email Management
        • Email Size Restriction
        • Blocked Extensions
        • Released Requests
        • Blacklisted Requests
        • Whitelisted Requests
      • Domain Audit Log
        • Audit Log Configuration
        • View Domain Log
      • Domain Rules
        • Rules
        • TLD And GTLD Rules
        • Recipient Whitelist
        • Sender Whitelist
        • Recipient Blacklist
        • Sender Blacklist
        • Whitelist Senders Per User
        • Blacklist Senders Per User
      • Account Management
        • User Account Management
        • Manage User Auto-import
        • View User History
        • Import Users From LDAP
          • LDAP Import Configuration
          • LDAP Import Confirmation List
          • LDAP Import Ignore List
  • Audit Log
  • Administrator Account Management
    • Administrators
    • User Groups & Permissions
    • Admin Groups & Permissions
    • My Comodo Account
    • My Profile
    • Users History
  • Customer Management
    • End User License And Subscriber Agreements
    • View License Information
    • Manage Report Subscriptions
    • Notification Email Settings
  • CASG Reports - An Overview
    • Quarantine Report
    • Domain Statistics Report
    • Auto-Imported Users Report
    • Quarantine Release Report
    • Reported Spam Report
  • Appendix 1 - CASG Error Codes
  • Appendix 2 - CASG Comparison Table
  • Appendix 3 -Troubleshooting LDAP
  • Appendix 4 - Useful Links
  • About Comodo Security Solutions

Sender Whitelist


  • All filtering is disabled on mail sent by white-listed senders to recipients at the selected domain.
  • The only exception is that mail from a white-listed sender which contains a suspicious attachment will still be blocked UNLESS the 'Suspicious attachment rule' is enabled. This may seem counter-intuitive on first reading.
  • The following table shows how the 'Suspicious Attachment' option affects a sender white-list rule:


Suspicious Attachment option

Suspicious file detected?

White-listing applied?

Rule Type 1

Enabled

Yes

Yes

No

Yes

Rule Type 2

Disabled

Yes

No

No

Yes


  • Use Type 1 if you want all mails from a sender to be whitelisted and received, including those that contain suspicious attachments.
  • Use Type 2 if you want to white-list all mails from a sender except those that contain suspicious attachments.
See the Rules if you need more details.

Comodo strongly recommends white-listing a sender only when the system wrongly blocks emails from a trusted sender. White-listing a sender over-rules 'Blacklist senders per user'. See Blacklist Senders Per User for more details.
  • Add users to Sender whitelist

  • Export the list to CSV file for use in future

  • Remove users from Sender whitelist

  • Reset the list - Delete all whitelisted senders and make the list empty by clicking the 'Reset to default' button

Configure sender whitelist

  • Click 'Domain Rules' > 'Sender Whitelist' in the left-hand menu.
The 'Sender whitelist' interface of the selected domain opens:


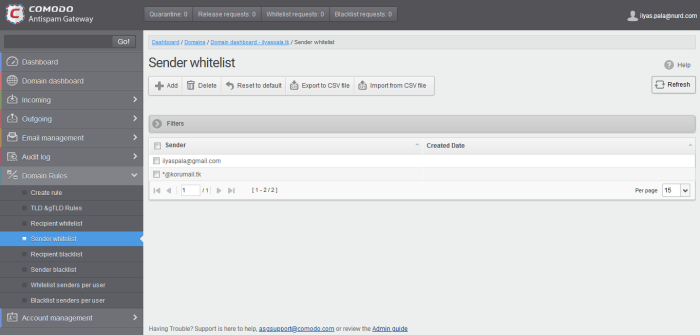
  • Sender - Whitelisted sender email address
  • Created date - Date and time the sender was added


Add Users to Sender Whitelist


You can add recipients to the white list in two ways:

  • Manually add senders

  • Import senders from a CSV file

Manually add senders

  • Click 'Add' to open the add whitelisted sender dialog:


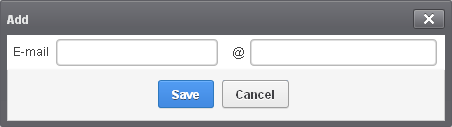
  • Enter the sender name in the 'E-mail' textbox and sender's email domain name after the @ symbol and click the 'Save' button. Repeat the process to add more whitelisted senders.
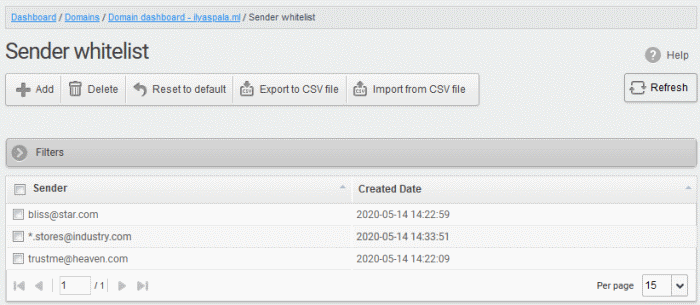
  • To add a particular set of senders to whitelist, prefix or suffix the wildcard character * in the 'E-mail' text field and senders' email domain name after the @ symbol. For example, enter *.stores@domainname.com for all the senders in stores to be whitelisted.

  • To add a specific username from any mail domain to the whitelist, enter the username in the mail text field and the wildcard character * after the @ symbol. For example, enter john@* for whitelisting the username 'john' with any email domain name.
  • To add a set of users or specific username from any email domain with a specific top level domain (TLD) name like .com, .org, enter the wildcard character * or username in the Email text field and enter * followed by the TLD after the @ symbol. For example, '*@*.com' will whitelist all the senders from all the email domains ending with '.com'
  • To add a whole domain to whitelist, enter the wildcard character * in the E-mail text field and email domain after the @ symbol and click the 'Save' button. Now all the senders with the entered domain name are whitelisted.

The senders are added to the whitelist:


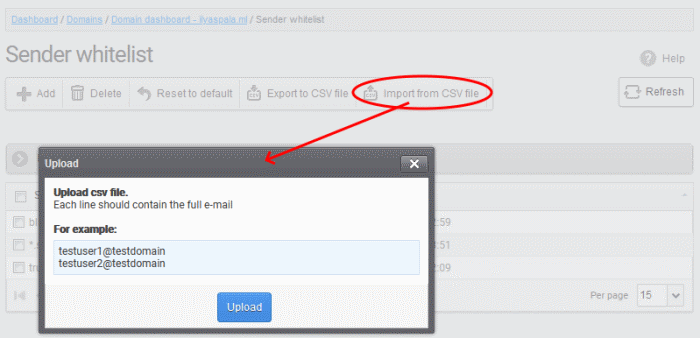
Import senders to whitelist from CSV file


Administrators can import multiple senders from a .csv file. The senders' addresses should be saved in the following format:


sender1@domainname1.com


sender2@domainname2.com


sender3@domainname3.com

  • Click the 'Import from CSV file' to import senders to whitelist from a CSV file.


  • Click 'Upload', navigate to the location where the file is saved and click the 'Open' button. The maximum size of the file that can be uploaded is 9 MB.
The upload is placed in import tasks queue and the progress of the upload is shown.


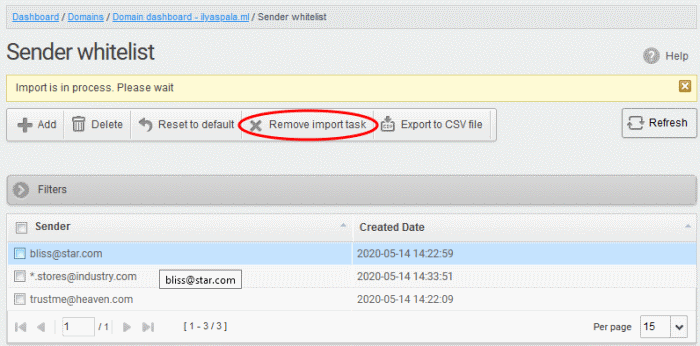
Remove the upload from the queue

  • Click the 'Remove import task' button. The 'Remove import task' deletes only a remaining part of not imported task.


On completion of the upload process, the result is displayed.


The sender whietlist from .csv file is uploaded and the administrator who carried out the task receives a notification about the import task completion.


Export the Sender Whitelist to CSV file

  • Click 'Export to CSV file' to save the list of whitelisted senders as a CSV file


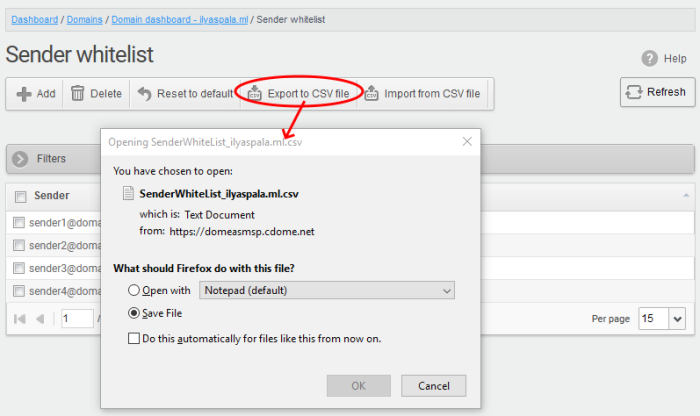
A file download dialog is displayed.

  • Click 'OK' to save the file in your system.


    Delete Users from the Sender Whitelist

    • Click ‘Reset to default’ to remove all whitelisted senders
    • To remove particular sender(s) from the whitelist, select them from the list and click the 'Delete' button.


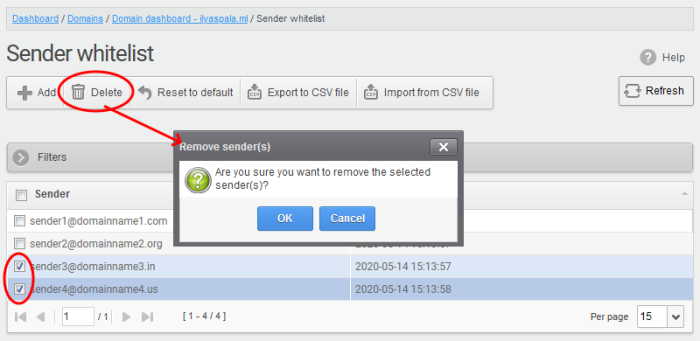
    • Click 'OK' to confirm your changes.

    Our Products
    • Free Antivirus
    • Free Internet Security
    • Website Malware Removal
    • Free Anti-Malware
    • Anti-Spam (Free Trial)
    • Windows Antivirus
    • Antivirus for Windows 7
    • Antivirus for Windows 8
    • Antivirus for Windows 10
    • Antivirus for MAC
    • Antivirus for Linux
    • Free Endpoint Security
    • Free ModSecurity
    • Free RMM
    • Free Website Malware Scanner
    • Free Device Manager for Android
    • Free Demo
    • Network Security
    • Endpoint Protection
    • Antivirus for Android
    • Comodo Antivirus
    • Wordpress Security
    Cheap CDN
    • Bootstrap CDN
    • Semantic UI CDN
    • Jquery CDN
    • CDN Plans
    • CDN
    • Free CDN
    Enterprise
    • Patch Management Software
    • Patch Manager
    • Service Desk
    • Website Down
    • Endpoint Protection Solutions
    • Website Security Check
    • Remote Monitoring and Management
    • Website Security
    • Device Manager
    • ITSM
    • CRM
    • MSP
    • Android Device Manager
    • MDR Services
    • Managed IT Support Services
    • Free EDR
    Free SSL Certificate
    Support Partners Terms and Conditions Privacy Policy

    © Comodo Group, Inc. 2025. All rights reserved.