Comodo Help
Find the desired product help
Comodo Antispam Gateway

Comodo Antispam Gateway

Admin Guide ver 2.12

English

Print Help Download Help
Domain Management > Manage A Domain > Domain Rules > Whitelist Senders Per User
  • Introduction To Comodo Antispam Gateway
    • Release Notes
    • Purchase License
    • License Information
  • Get Started
    • Incoming Filtering Configuration
      • Configure Your Mail Server
      • Configure MX Records
        • Update MX Records In Windows 2003/2008 Server
        • Update MX Records On A Host Using BIND
        • Update MX Records For Comodo DNS
        • Update MX Records For GoDaddy
        • Update MX Records For Enom
        • Update MX Records For Network Solutions
        • Update MX Records For Yahoo! Small Business
        • Update MX Records For 1and1
        • Update MX Records For 4D Web Hosting
        • Update MX Records For DNS Park
        • Update MX Records For DreamHost
        • Update MX Records For DynDNS
        • Update MX Records For IX Web Hosting
        • Update MX Records For No-IP
        • Update MX Records In CPanel
    • Outgoing Filter Configuration
      • Per-User Authentication
      • Outgoing Smarthost Setup
        • Configure QMail To Use A Smarthost
        • Configure PostFix To Use A Smarthost
        • Configure Sendmail To Use A Smarthost
        • Configure Exchange 2000/2003 To Use A Smarthost
        • Configure Exchange 2007/2010 To Use A Smarthost
        • Configure Exchange 2013/2016 To Use A Smarthost
        • Configure Office 365 To Use A Smarthost
        • Configure Exim To Use A Smarthost
          • Configure Exim / CPanel To Use A Smarthost
          • Configure Exim / Directadmin To Use A Smarthost
      • DNS Configuration
  • Login To The Admin Console
  • The Dashboard Area
  • The Admin Console
  • Domain Management
    • Add A Domain
    • Delete Domains
    • Edit Domains
    • Validate Domains
    • Manage A Domain
      • Domain Dashboard
      • Incoming
        • Quarantine
        • Manage Archived Mails
        • Incoming Spam Detection Settings
        • Report Spam
        • Delivery Queue
        • Destination Routes
        • Local Recipients
        • Clear Incoming Cache
        • Log Search
        • Domain Aliases
        • Domain Settings
        • Manage Report Subscriptions For Selected Domain
        • Relay Restrictions
        • Geolocation Restrictions
        • SPF Control Settings
      • Outgoing
        • Clear Outgoing Cache
        • Log Search
        • Users
        • Office 365 Activation
      • Email Management
        • Email Size Restriction
        • Blocked Extensions
        • Released Requests
        • Blacklisted Requests
        • Whitelisted Requests
      • Domain Audit Log
        • Audit Log Configuration
        • View Domain Log
      • Domain Rules
        • Rules
        • TLD And GTLD Rules
        • Recipient Whitelist
        • Sender Whitelist
        • Recipient Blacklist
        • Sender Blacklist
        • Whitelist Senders Per User
        • Blacklist Senders Per User
      • Account Management
        • User Account Management
        • Manage User Auto-import
        • View User History
        • Import Users From LDAP
          • LDAP Import Configuration
          • LDAP Import Confirmation List
          • LDAP Import Ignore List
  • Audit Log
  • Administrator Account Management
    • Administrators
    • User Groups & Permissions
    • Admin Groups & Permissions
    • My Comodo Account
    • My Profile
    • Users History
  • Customer Management
    • End User License And Subscriber Agreements
    • View License Information
    • Manage Report Subscriptions
    • Notification Email Settings
  • CASG Reports - An Overview
    • Quarantine Report
    • Domain Statistics Report
    • Auto-Imported Users Report
    • Quarantine Release Report
    • Reported Spam Report
  • Appendix 1 - CASG Error Codes
  • Appendix 2 - CASG Comparison Table
  • Appendix 3 -Troubleshooting LDAP
  • Appendix 4 - Useful Links
  • About Comodo Security Solutions

Whitelist Senders Per User


  • Admins can permit certain senders for specific recipients - even if those senders are blacklisted elsewhere for other users.
    • Senders can be manually whitelisted for a specific recipient, or can be imported from .csv. They can also be added after a user request.
    • All filtering is disabled for whitelisted senders to specific recipients
    • Comodo strongly recommends you only use this option after analyzing the request is genuine and warranted.


    Configure sender whitelist per user

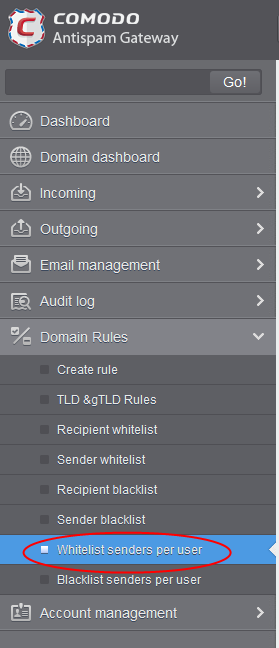
    • Click 'Domain Rules' > 'Whitelist senders per user' in the left-hand menu.


    The 'Whitelist senders per user' interface opens:


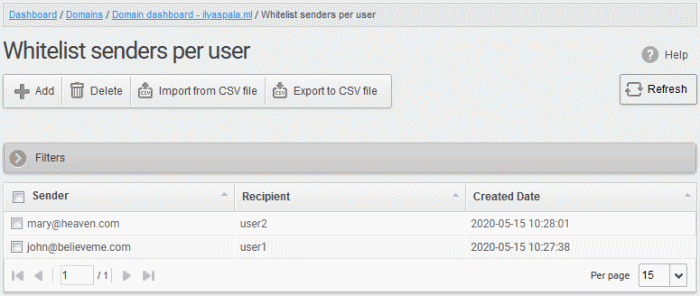
    • Sender – Whitelisted sender’s email address
    • Recipient – User name of the recipient
    • Created date – Date and time the whitelist sender was added
    From this interface administrators can:
    • Add senders to whitelist per user
    • Export the list to CSV file for use in future
      • Remove senders from Whitelist senders per user list


      Add Senders to Whiltelist Per User


      You can add senders to whitelist in the following ways:

      • Manually add senders
      • Import senders from a CSV file
      • Add from 'Whitelist requests' from a user

      Manually add senders

      • Click the 'Add' button

      The 'Add sender' dialog box opens:


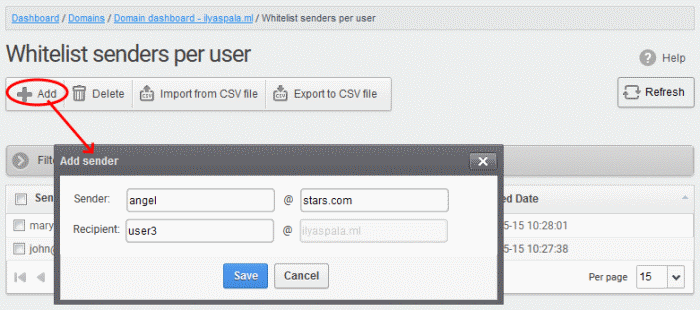
      • Sender - Enter the sender's username in the first text box and sender's email domain name after the @ symbol.
      • Recipient - Enter the recipient's name in the first text box in the second row. Note: The recipient should be a valid user.
      • Click 'Save'. Repeat the process to add more whitelisted senders for the user.


      Import senders from a CSV file


      Administrators can import multiple senders at a time from a comma separated value (CSV) file to sender whitelist per user. The list of whitelisted senders and respective recipients are created using notepad or a speadsheet application like MS Excel or OpenOffice Calc and saved in .csv format. Each line in the .csv file should contain the sender's email address and the username of the recipient or sender's email address and the recipient's email address, separated by a comma. An example is shown below:


      sender1@anydomain.com, recipient1


      sender2@anydomain.com, recipient2@domain.com


      sender3@somedomain.com, recipient3


      Import senders to whitelist from CSV file

      • Click the 'Import from CSV file' from the 'Whitelist senders per user' interface.

      The 'Upload' dialog appears:


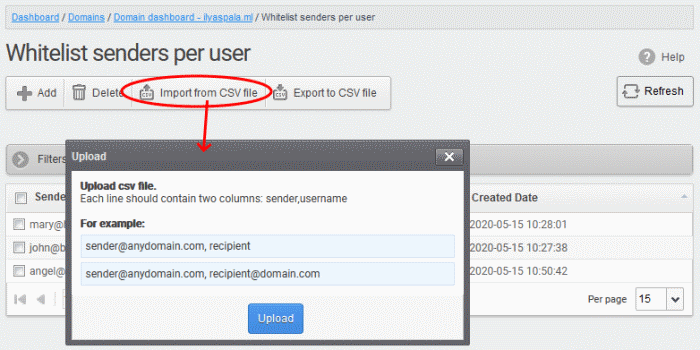
      • Click 'Upload', navigate to the location where the file is saved and click the 'Open' button. The maximum size of the file that can be uploaded is 9 MB.

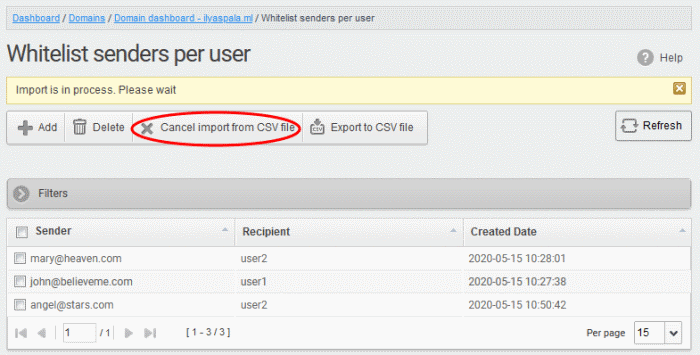
      The upload is placed in import tasks queue and the progress of the upload is displayed. If you want to remove the upload from the queue, click the 'Cancel import from the CSV file' button. The 'Cancel import from the CSV file' deletes only the remaining part of not imported task.


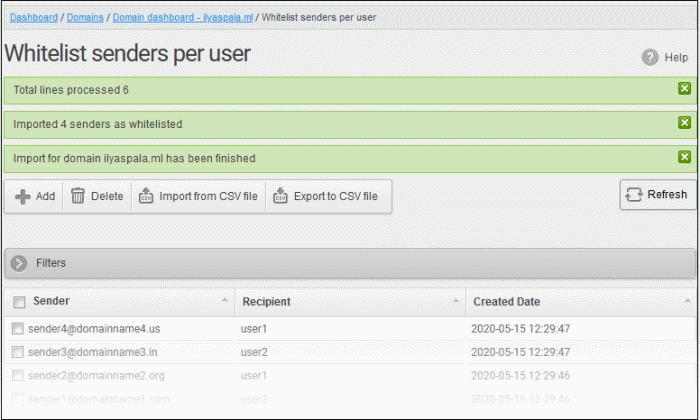
      On completion of the upload process, the result is displayed.


      The sender whitelist per user from the CSV file is uploaded and the administrator who carried out the task receives a notification about the import task completion.


      Add from Whitelist requests from users


      The administrator can add senders to whitelist based on the requests of the users. See Email Management > Whitelisted Requests for more details.


      Export the Whitelist senders per user list to CSV file


      The administrator can save the whitelist senders per user list by exporting it as a CSV file. If required in future, the administrator can import the users from the file, for example for a new account or after a reset.


      Export the list

      • Click the 'Export to CSV file' button to save the list


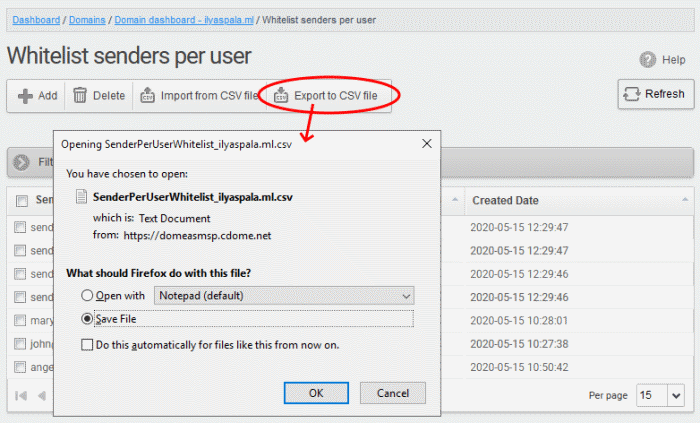
      A file download dialog is displayed.

      • Click 'OK' to save the file.


      Delete Senders from Whitelist

      • To delete sender(s) from the whitelist, select the sender(s) from the list and click the 'Delete' button.


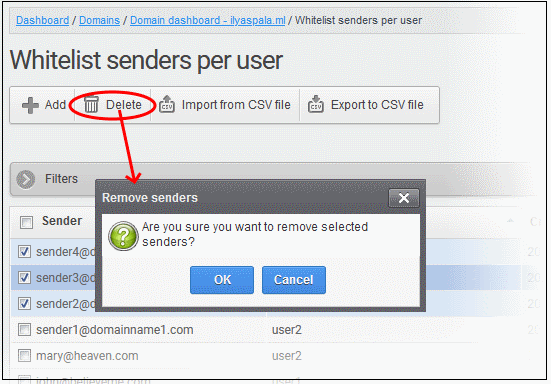
      • Click 'OK' in the confirmation dialog.
      Our Products
      • Free Antivirus
      • Free Internet Security
      • Website Malware Removal
      • Free Anti-Malware
      • Anti-Spam (Free Trial)
      • Windows Antivirus
      • Antivirus for Windows 7
      • Antivirus for Windows 8
      • Antivirus for Windows 10
      • Antivirus for MAC
      • Antivirus for Linux
      • Free Endpoint Security
      • Free ModSecurity
      • Free RMM
      • Free Website Malware Scanner
      • Free Device Manager for Android
      • Free Demo
      • Network Security
      • Endpoint Protection
      • Antivirus for Android
      • Comodo Antivirus
      • Wordpress Security
      Cheap CDN
      • Bootstrap CDN
      • Semantic UI CDN
      • Jquery CDN
      • CDN Plans
      • CDN
      • Free CDN
      Enterprise
      • Patch Management Software
      • Patch Manager
      • Service Desk
      • Website Down
      • Endpoint Protection Solutions
      • Website Security Check
      • Remote Monitoring and Management
      • Website Security
      • Device Manager
      • ITSM
      • CRM
      • MSP
      • Android Device Manager
      • MDR Services
      • Managed IT Support Services
      • Free EDR
      Free SSL Certificate
      Support Partners Terms and Conditions Privacy Policy

      © Comodo Group, Inc. 2025. All rights reserved.