Comodo Help
Find the desired product help
Comodo Antispam Gateway

Comodo Antispam Gateway

Admin Guide ver 2.12

English

Print Help Download Help
Domain Management > Manage A Domain > Email Management > Whitelisted Requests
  • Introduction To Comodo Antispam Gateway
    • Release Notes
    • Purchase License
    • License Information
  • Get Started
    • Incoming Filtering Configuration
      • Configure Your Mail Server
      • Configure MX Records
        • Update MX Records In Windows 2003/2008 Server
        • Update MX Records On A Host Using BIND
        • Update MX Records For Comodo DNS
        • Update MX Records For GoDaddy
        • Update MX Records For Enom
        • Update MX Records For Network Solutions
        • Update MX Records For Yahoo! Small Business
        • Update MX Records For 1and1
        • Update MX Records For 4D Web Hosting
        • Update MX Records For DNS Park
        • Update MX Records For DreamHost
        • Update MX Records For DynDNS
        • Update MX Records For IX Web Hosting
        • Update MX Records For No-IP
        • Update MX Records In CPanel
    • Outgoing Filter Configuration
      • Per-User Authentication
      • Outgoing Smarthost Setup
        • Configure QMail To Use A Smarthost
        • Configure PostFix To Use A Smarthost
        • Configure Sendmail To Use A Smarthost
        • Configure Exchange 2000/2003 To Use A Smarthost
        • Configure Exchange 2007/2010 To Use A Smarthost
        • Configure Exchange 2013/2016 To Use A Smarthost
        • Configure Office 365 To Use A Smarthost
        • Configure Exim To Use A Smarthost
          • Configure Exim / CPanel To Use A Smarthost
          • Configure Exim / Directadmin To Use A Smarthost
      • DNS Configuration
  • Login To The Admin Console
  • The Dashboard Area
  • The Admin Console
  • Domain Management
    • Add A Domain
    • Delete Domains
    • Edit Domains
    • Validate Domains
    • Manage A Domain
      • Domain Dashboard
      • Incoming
        • Quarantine
        • Manage Archived Mails
        • Incoming Spam Detection Settings
        • Report Spam
        • Delivery Queue
        • Destination Routes
        • Local Recipients
        • Clear Incoming Cache
        • Log Search
        • Domain Aliases
        • Domain Settings
        • Manage Report Subscriptions For Selected Domain
        • Relay Restrictions
        • Geolocation Restrictions
        • SPF Control Settings
      • Outgoing
        • Clear Outgoing Cache
        • Log Search
        • Users
        • Office 365 Activation
      • Email Management
        • Email Size Restriction
        • Blocked Extensions
        • Released Requests
        • Blacklisted Requests
        • Whitelisted Requests
      • Domain Audit Log
        • Audit Log Configuration
        • View Domain Log
      • Domain Rules
        • Rules
        • TLD And GTLD Rules
        • Recipient Whitelist
        • Sender Whitelist
        • Recipient Blacklist
        • Sender Blacklist
        • Whitelist Senders Per User
        • Blacklist Senders Per User
      • Account Management
        • User Account Management
        • Manage User Auto-import
        • View User History
        • Import Users From LDAP
          • LDAP Import Configuration
          • LDAP Import Confirmation List
          • LDAP Import Ignore List
  • Audit Log
  • Administrator Account Management
    • Administrators
    • User Groups & Permissions
    • Admin Groups & Permissions
    • My Comodo Account
    • My Profile
    • Users History
  • Customer Management
    • End User License And Subscriber Agreements
    • View License Information
    • Manage Report Subscriptions
    • Notification Email Settings
  • CASG Reports - An Overview
    • Quarantine Report
    • Domain Statistics Report
    • Auto-Imported Users Report
    • Quarantine Release Report
    • Reported Spam Report
  • Appendix 1 - CASG Error Codes
  • Appendix 2 - CASG Comparison Table
  • Appendix 3 -Troubleshooting LDAP
  • Appendix 4 - Useful Links
  • About Comodo Security Solutions

Whitelisted Requests

 
  • The 'Quarantine' interface lets users view emails intended for them but moved to quarantine.
  • The interface also lets users request that senders are added to the whitelist - usually because they think the mail is from a legitimate sender.

    • The whitelist request will be sent to you via email and also added to the Email Management > Whitelisted Requests interface. You can approve or reject the requests.
    • Senders added to the white-list after a request will only be white-listed for the requester.
    • Subsequent mails from the sender to the user in question will be allowed without antispam checks.
    • See Sender Blacklist and Whitelist Senders Per User for more details.


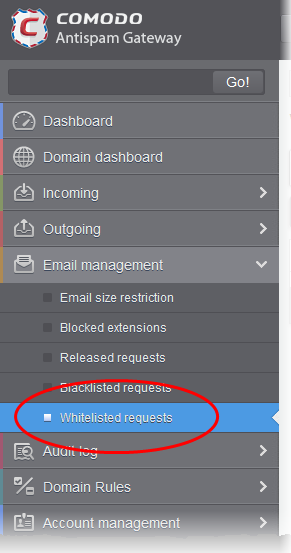
    Open the whitelisted requests interface

    • Click 'Email management' on the left then select 'Whitelisted requests'.


    The 'Whitelisted requests' interface will open:


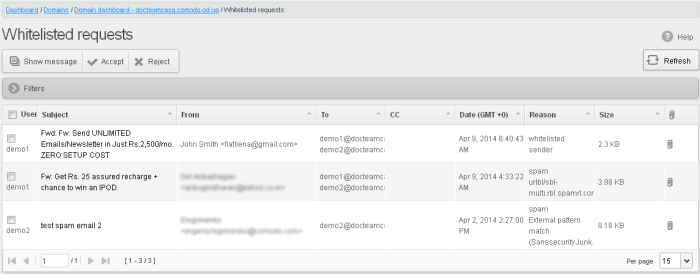
    The interface shows all white-list requests from users. The list has columns which show requesting user, subject, sender, recipients, CC list, date sent, the reason they were quarantined and the size of the email. The last column shows whether there is any attachment with the mail.


    View Details of Whitelisted Requests


    The details such as user, subject, sender, recipient , date, reason and size of the mails requested for whitelisting can be viewed in two ways:

    • In the same CASG window
    • In a new CASG window

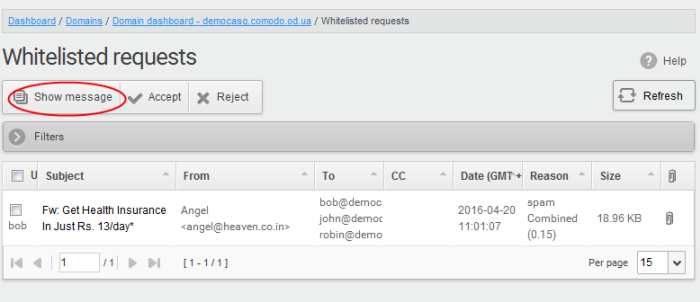
    View details of whitelisted requests in the same CASG window:

    • Select the mail that you want to view and click the 'Show Message' button.

    OR

    • Click on the email link in the subject column that you want to view its details.


    The details of the selected email will be displayed.


    • To view email headers, which contain the tracking information of the mail details about the path it has crossed before reaching the recipient, click 'All headers' tab.

    The headers give full details of the sender, route, recipient, sent date, mail type and so on and enable you to check the authenticity of the mail.


    Check the details of the mail and ascertain whether it is a spam mail or not. You can choose to either accept the mail or reject it. If the request is accepted, the sender will be added to 'Whitelist sender per user'. If it is rejected, the email will be no longer in the whitelisted requests list. Please note that emails will continue to remain in the Quarantined list irrespective of the action taken.


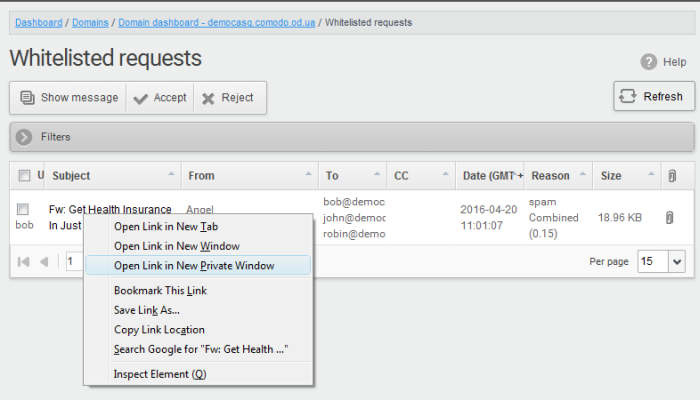
    View details of whitelisted requests in new CASG window

    • In the whitelisted requests area, select the mail that you want to view and click the 'Show message in new window' button  or right-click and select to open in a new tab or new window.


    The details of the selected mail will be displayed in a new CASG window.


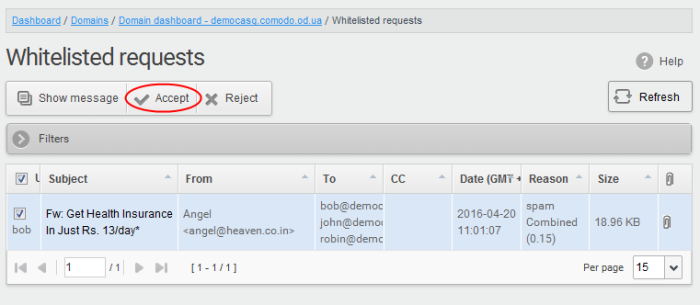
    Accept the whitelist request from users


    After viewing the details, you can choose to accept the request from user to add the sender to whitelist senders per user list.

    • Select the mail that you want to add the sender to whitelist and click the 'Accept' button.


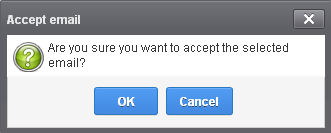
    An alert will be displayed to confirm adding the sender to 'Whitelist sender per user'.


    • Click 'OK' to confirm the acceptance.

    The sender of the email will be added to 'Whitelist sender per user'. See the section 'Whitelist Sender Per User' for more details.


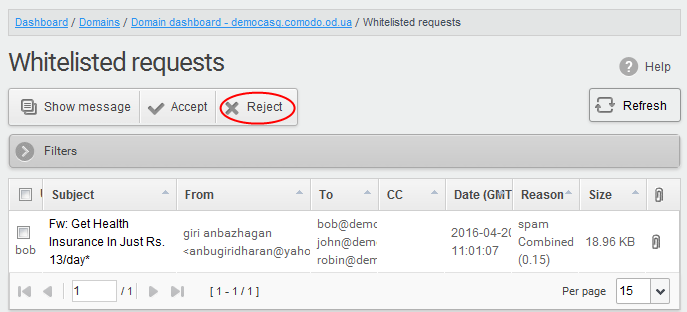
    Reject the whitelist request from users


    After viewing the details of the email, you can choose to reject the request from the user.

    • Select the mail that you want to reject and click the 'Reject' button.


    An alert will be displayed to confirm the rejection of user's request.


    • Click 'OK' to confirm the rejection.

    The sender will not be added to whitelist and the selected email will no longer be in the whitelisted requests list.


    Use filters to search whitelist requests

    • Click anywhere on the 'Filters' stripe to open the filters area.


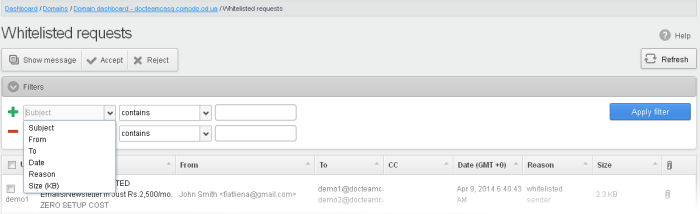
    • Choose the filter by which you want to search from the first drop-down, then a condition in the 2nd text box. Some filters have a third box for you to type a search string.
    • Click ‘Apply Filter’.

    You can filter results by the following parameters:

    • Subject: Type the email subject in the text box (column 3) and select a condition in column 2.
    • From: Enter the sender name or address in the text box (column 3) and select a condition in column 2.
    • To: Enter the recipient name or address in the text box (column 3) and select a condition in column 2.
    • Date: Search by date and time mails quarantined. Select the date (column 3) and select a condition in column 2.
    • Reason: Enter the quarantined reason in the text box (column 3) and select a condition 2.
    • Size (KB): Search quarantined mails by their size. Select or enter the mail size in column 3 and select a condition in column 2.

    Click anywhere on the 'Filters' tab to close the filters area. Click the 'Refresh' button to remove filters.

    You can add multiple filters to the same search by clicking .

    Our Products
    • Free Antivirus
    • Free Internet Security
    • Website Malware Removal
    • Free Anti-Malware
    • Anti-Spam (Free Trial)
    • Windows Antivirus
    • Antivirus for Windows 7
    • Antivirus for Windows 8
    • Antivirus for Windows 10
    • Antivirus for MAC
    • Antivirus for Linux
    • Free Endpoint Security
    • Free ModSecurity
    • Free RMM
    • Free Website Malware Scanner
    • Free Device Manager for Android
    • Free Demo
    • Network Security
    • Endpoint Protection
    • Antivirus for Android
    • Comodo Antivirus
    • Wordpress Security
    Cheap CDN
    • Bootstrap CDN
    • Semantic UI CDN
    • Jquery CDN
    • CDN Plans
    • CDN
    • Free CDN
    Enterprise
    • Patch Management Software
    • Patch Manager
    • Service Desk
    • Website Down
    • Endpoint Protection Solutions
    • Website Security Check
    • Remote Monitoring and Management
    • Website Security
    • Device Manager
    • ITSM
    • CRM
    • MSP
    • Android Device Manager
    • MDR Services
    • Managed IT Support Services
    • Free EDR
    Free SSL Certificate
    Support Partners Terms and Conditions Privacy Policy

    © Comodo Group, Inc. 2025. All rights reserved.