Apply Policies to Networks
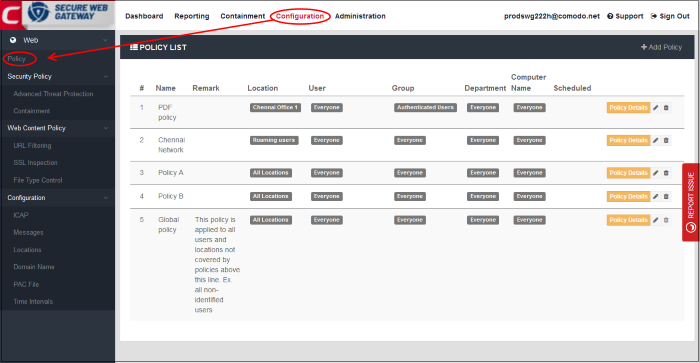
- Click 'Configuration' > 'Policy' to open the policy list.
- After enrolling networks as explained in 'Connect your Network to Comodo Secure Web Gateway', the default global policy is applied to your endpoints.
- You can configure new policies and deploy them to your networks as required. You can tailor polices and schedule them to specific users, groups, departments and computers.
- Note 1: To apply user specific policies, you must enable user authentication.
- Note 2: To apply computer specific policies, you must select 'Hosted DB' as user authentication method.
- Click 'Administration' > 'User Management' to add users/groups/departments/computers. See 'User Management' for help
- Click 'Administration' > 'Authentication Settings' to configure user authentication. See 'Configure User Authentication Settings' for help
|
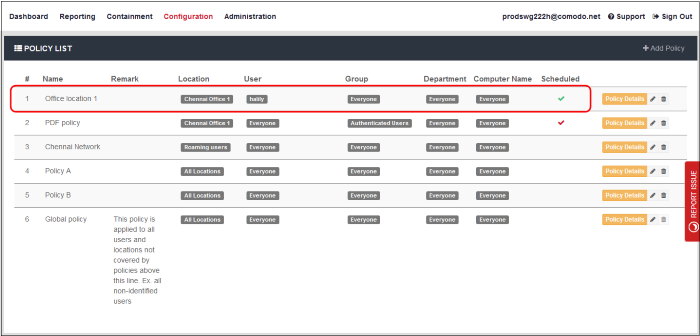
Policy List - Table of Column Descriptions |
|
|---|---|
|
Column Header |
Description |
|
# |
The priority of the policy. The policy that is nearer the top of the list will be implemented on matching objects. Tip – Put user/location specific policies above 'catch-all' policies like 'All locations', 'Everyone', 'All computers' etc. You want to make sure the targeted policy does not get over-ruled. |
| Name |
Label of the policy. The default 'Global Policy' cannot be deleted. This policy contains the default Security Policy and Web Content Policy. |
|
Remark |
Comments provided for the policy. |
|
User |
The name of the user that is applied the policy. See 'Manage Users' to learn how to add end users. |
|
Location |
The name of the network location to which the policy is applied. See 'Manage Trusted Networks' for more details on how to add Comodo SWG-connected networks /roaming users. |
|
Group |
The name of the group to which the policy is applied. See 'Manage Groups' to know how to add groups. |
|
Department |
The name of the department to which the policy is applied. See 'Manage Departments' to know how to add departments. |
|
Computer Name |
The name of the computer to which the policy is applied. Note – This will be available only if 'Hosted DB' is selected as user authentication method. See 'Manage Computers' for more information. |
|
Scheduled |
Check mark - The policy is
active only at specific times. Blank - The policy is active at all times. |
|
Policy Details |
Click to view policy rule settings. These include security rules, web content control rules and any schedules. |
|
Control buttons
|
|
How policy
deployment works
- Comodo SWG applies policy after analyzing the connection used by a device.
- It uses five criteria, or 'Objects', to determine whether it should apply a particular policy to a device. These are 'Location', 'User', 'Group' , 'Department' and 'Computer Name'. If a connection matches all five objects then SWG will apply the policy. SWG also checks if the policy is scheduled for specific days / time-period and applies it appropriately.
- Note – 'Computer Name' object will be available only if 'Hosted DB' is selected as user authentication method.
- Comodo SWG ships with a default 'Global Policy' that is applied to all connections. Its objects are set as 'Location' = 'All', 'Users' = 'Everyone', 'Group' = 'Everyone', 'Department' = 'Everyone' , 'Computer Name' = 'Everyone, 'Scheduled' = 'Always'
- You cannot modify the objects in the global policy as it is intended to be a catch-all if no other policy has been set. However, you can modify the settings that it implements (the 'Security' and 'Web Content' components).
- You can add as many new policies as you want for specific locations, users, groups, departments and computers.
- Policies are prioritized according to their rank the in the policy list ('Configuration' > 'Policy').
- The first policy from the top that matches all five objects for a connection will be applied. You can change the priority of a policy by clicking 'Edit' > 'Policy Order'.
- Note - The first policy with a schedule from the top that matches all the five objects will be applied during the scheduled times. During non scheduled times SWG will move down the policy list and apply the first matching policy. Make sure to place a scheduled policy above 'Always on' for an object(s).
- The 'Global Policy' is always last in the list. If a device is not covered by any custom policy then the global policy will be implemented.
- To deploy policies by 'Computer Name', you must install the SWG agent on the endpoints.
- To protect a device that is outside a trusted network, you must install the SWG agent on the device.
Examples
- If you want to create a specific policy for outside devices then you must set the 'Location' object as 'Roaming Users'. You can then set the 'Users', 'Group' , 'Department' and 'Computer Name' objects as required.
- FYI – 'All Locations' also covers 'Roaming Users' (if you want a policy to apply to both internal and external connection types).
a) A policy that apples to a single user, regardless of location:
- Location = All locations
- Users = < User Name >
- Group = Everyone
- Department = Everyone
- Computer Name = Everyone
- Scheduled = Always
b) A policy that only applies to members of a group, regardless of location:
- Location = All locations
- Users = Everyone
- Group = < Group Name >
- Department = Everyone
- Computer Name = Everyone
- Scheduled = Always
c) A policy that applies to any user connecting from outside the network:
- Location = Roaming Users
- Users = Everyone
- Group = Everyone
- Department = Everyone
- Computer Name = Everyone
- Scheduled = Always
d) A policy that applies to a specific endpoint, regardless of other objects
Tip:
- Location = All locations
- Users = Everyone
- Group = Everyone
- Department = Everyone
- Computer Name = < Computer Name > Note: The SWG agent should be installed on endpoints to deploy policies by computer names.
- Scheduled = Always
e) A policy that only applies to members of a group on specific days / time-period regardless of location:
- Location = All locations
- Users = Everyone
- Group = < Group Name >
- Department = Everyone
- Computer Name = Everyone
- Scheduled =[Time frame]
- Give policies which target a specific audience a higher rank than policies which cover large user bases. This is to ensure your targeted policies are not over-ruled by the policy above it. The 'All locations' and 'All Users' settings will over-rule every corresponding object below them if the policy has a high rank.
- Click 'Add Policy' at top-right.
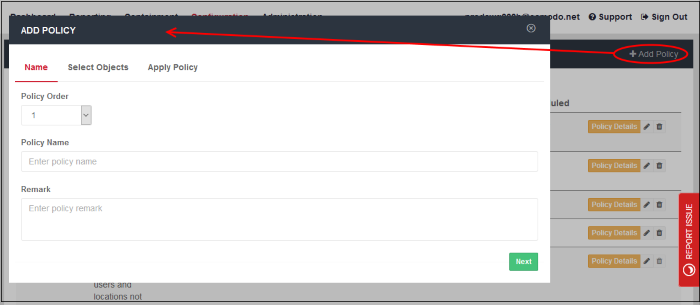
Step 1 - Policy Details
- Policy Order - Select where the rule has to be placed.
- The drop-down will display the number of rules that are currently available.
- Policies are prioritized according to their rank in the the policy list.
- The first policy from the top that matches all the five objects defined in step 2 for a connection will be applied.
- If you select '1', then the policy will be placed at the top of the list.
- Name - Create a label for the policy.
- Remark - Enter appropriate comments for the policy.
Click 'Next' or 'Select Objects' at
the top to process further.
Step 2 - Define Objects
In the 'Select Objects' section, you can specify the object(s) for which you want to apply the policy.
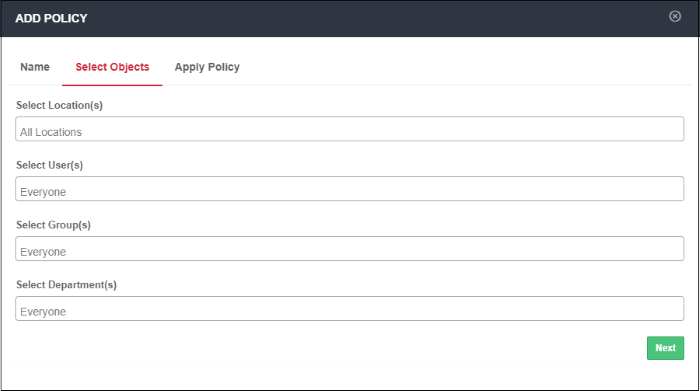
- Location - Select the required trusted network from the list. 'All Locations' is selected by default.You can add networks in the Locations area ('Administration' > 'Locations').
- User - Select the required users from the list. 'Everyone' is selected by default. You can add users in the User Management area ('Administration' > 'User Management').
- Group - Select any required user-groups from the list. 'Everyone' is selected by default. You can create user-groups in the User Management area ('Administration' > 'User Management').
- Department - Select any required department from the list. 'Everyone' is selected by default. You can create departments in the User Management area ('Administration' > 'User Management').
- Computer Name - ' Select required endpoints from the list. 'Everyone' is selected by default. You can add endpoints the User Management area ('Administration' > 'User Management').
Step 3 - Select Security, Web Content Policy and Schedule it
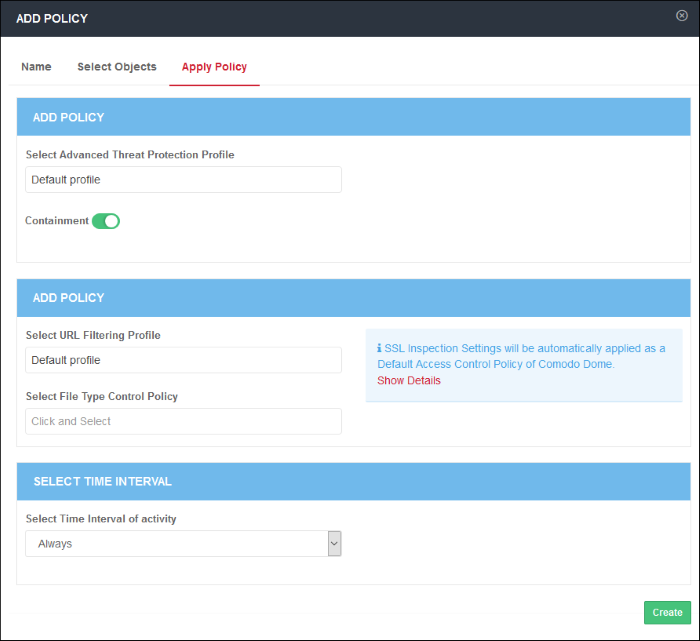
In the 'Apply Policy' section, specify the security and web content profiles that you want to add to the policy. Select the time interval that the policy should be active.
Add Security Profile
- Select Advanced Threat Protection Profile - Select the appropriate ATP profile from the list. The default profile is selected by default. The drop-down will display the ATP exception profiles that are available in the Security
Policy section.
- Containment – Select whether you want to run unknown files in the sandbox. See 'Configure Containerization Settings' for more details. Containment is enabled by default.
Add Access Control Profile
- Select URL Filtering Profile - The default profile will be selected. The drop-down will display the URL filtering profiles that are available in URL Filtering section. Select the appropriate URL filtering profile from the list.
- SSL Inspection Settings - Allows you to configure how Comodo SWG should act if SSL certificates for the visited websites are untrusted or revoked. Please note this is a global setting, meaning any modification done will apply for all the policies. Clicking the 'Show Details' link will open the 'SSL Inspection' page. See 'Configure SSL Inspection Settings' for more details.
- File Type Control Policy - Displays file download restriction rules that were created in 'Configuration' > 'Web Content Policy' > 'File Type Control'. See File Type Control Rules for more about this area. Select the appropriate file control rule you wish to apply.
Define Policy Schedule
- Select Time Interval of
Activity – By default it will be 'Always' meaning the policy will
be applied at all times. The drop-down lists the schedules that you
have configured in Configuration' > 'Configuration' > 'Time
Intervals'. See 'Configure
Policy Time-Schedules' for more
information about pre-defined schedules'. Select the schedule from
the drop-down list. Note – Make sure to place a scheduled policy
above a non scheduled policy.
- To update a policy, click the edit icon beside it. The 'Update Policy' dialog will be displayed.
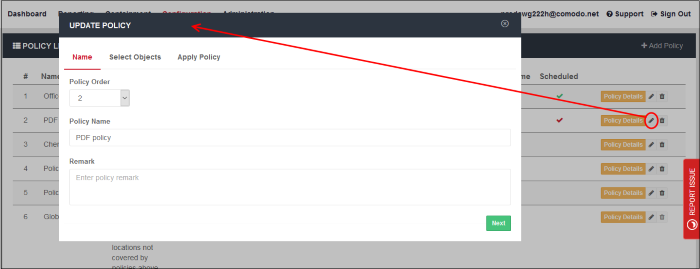
- Edit the name and other parameters as required. The process is similar to adding a policy as explained above.
Click 'Save' after modifying the policy. The policy will be updated for users to whom it is deployed.
- To view the details of a policy, click 'Policy Details' beside it. The 'Policy Detail' dialog will be displayed.
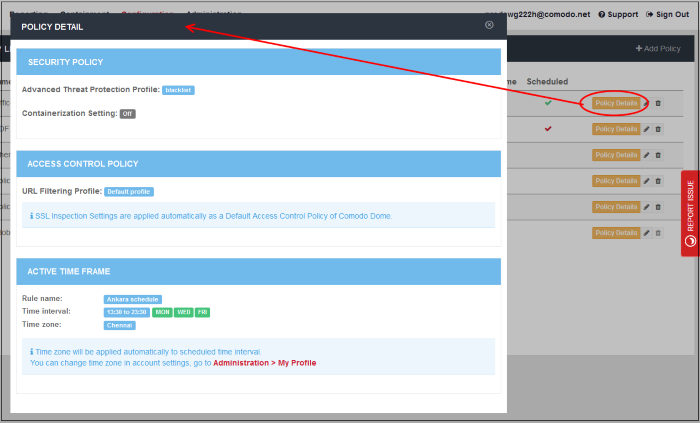
The 'Policy Details' dialog displays the details of profiles that are added for security and access control policy including containerization and SSL inspection settings.
- Click the 'X' mark at the top right to close the dialog.
- Click the trash icon beside a policy that you want to remove from the list. Please note you cannot remove the default Global policy.

- Click 'OK' to confirm
When a policy is removed, Comodo SWG will deploy other applicable policies for the affected users. If no other policy is applicable, then the default Global policy will be deployed.
Policy Deployment Examples
Example 1 - Deploy same policy
for all users, either roaming or inside the network
Step 1 - Name
- Name – Select policy order as 1
- Policy Name – Enter a name for the policy
- Remark – Comment for the policy
Step 2 - Select Objects
- Select Location(s) – Select 'All Locations'
- Select User(s) – Select 'Everyone'
- Select Groups(s) – Select 'Everyone'
- Select Department(s) - Select 'Everyone'
- Select Computer Name(s) - Select 'Everyone'
Step 3 - Apply Policy
- Select the Security component profile and Web Content component profiles
- Click 'Create'
In this example, all users will be
applied the same policy since 'All Locations' include 'Roaming users'
and 'Trusted Network'.
Example 2 - User specific and Location specific policy
- Create two trusted networks – Location A and Location B
- Add usernames in User Management
- Create four polices
- Policy 1 – Location = Location B, User = John Smith, Group = Everyone, Department = Everyone, Computer Name = Everyone
- Policy 2 – Location = Roaming Users, User = Everyone, Group = Everyone, Department = Everyone, Computer Name = Everyone
- Policy 3 – Location = All Locations, User = John Smith, Group = Everyone, Department = Everyone, Computer Name = Everyone
- Policy 4 – Global Policy (default profile), All Locations and Everyone
Scenario 1
- John Smith is out of trusted location – Policy 2 will be applied since it matches the current location (Roaming) and other objects are 'Everyone', which includes John Smith.
Scenario 2
- John Smith connects to Location A – SWG first checks first rule, then second and third. Policy 3 will be applied since 'All Locations' in rule 3 includes Location A and username John Smith is specified in that policy with other objects as 'Everyone'.
Scenario 3
- John Smith connects to Location B – Policy 1 will be applied since it matches location and other objects
Scenario 4
- Another user Angel is out of trusted location - Policy 2 will be applied since it matches the current location (Roaming) and other objects are 'Everyone', which includes Angel
Scenario 5
- Angel connects to Location B
- Policy 1 is matching on locations but not the username
- Policy 2 is for roaming users only and Angel is connected to Location B and hence will not be applicable
- Policy 3 is also not valid since username is different in that
- Policy 4 (Global Policy) will apply since it has 'All Locations' and 'Everyone'.


