Configure PAC File for
Exclusions
-
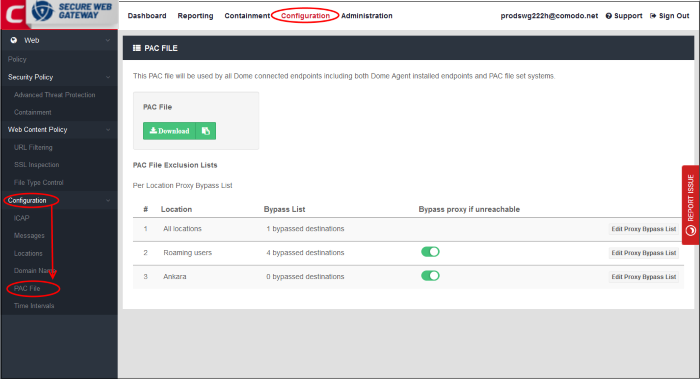
Click 'Configuration' > 'Configuration' > 'PAC File' to download the PAC file.
A proxy auto-config (PAC) file determines which proxy servers a browser or client should use to access a given URL.
- Your Comodo SWG node domain URL is automatically configured in the PAC file so it acts as the proxy server.
- If you add your own sub-domain as explained in the 'Configure Domain Name' section, then this will be configured in the PAC file. This automatically resolves to the SWG node IP address.
- You can configure exclusions (domains, IPs and networks) that can be reached directly without using the Comodo SWG proxy server. You can define different exclusions for each location and roaming agent.
- You have the option to bypass the proxy if the connection to SWG is lost, so users can access the internet directly.
- Click 'Administration' > 'How to Configure' > 'Set as Proxy' > 'PAC' to find the URL of the PAC file.
Exclude network locations
- Click 'Configuration' > 'Configuration' > 'PAC File'

|
PAC File Exclusions List - Table of Column Descriptions |
|
|---|---|
|
Column Header |
Description |
|
Location |
Trusted networks. 'All locations' and 'Roaming Users' are shown by default. You can add more locations as required. See 'Manage
Trusted Networks' for help to add trusted networks. |
|
Bypass List |
Number of destinations added to the exclusion list for the network. |
|
Bypass proxy if unreachable |
Choose whether users should connect to the internet directly if the connection to SWG gateway is lost.
|
|
Edit Proxy Bypass List |
Manage the exclusions list. See 'Manage Exclusions' for more information. |
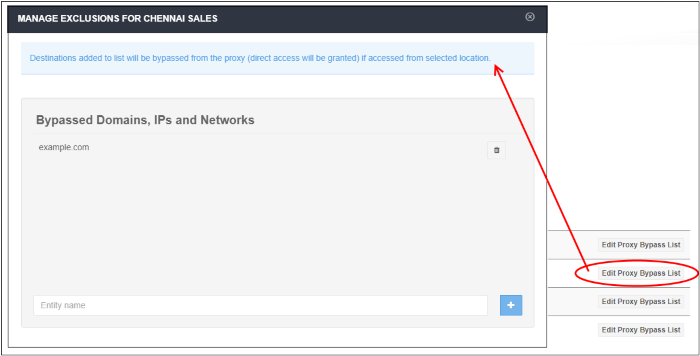
- Click 'Edit Proxy Bypass List' in the row of the network to which you want to add / remove exclusions.

Add a destination to the exclusions list
- Enter a valid domain name, IP or network in CIDR format in the 'Entity name' field. Click the '+' button
- You can use wildcards with domain names. For example, *.mydomain.com
- The
destination will be added to the list
Remove destination from the exclusions list
- Click the trash can icon beside an entry
- Click 'OK' in the confirmation dialog to remove the entry.


