


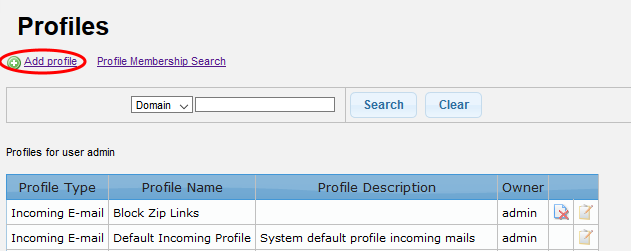
Add and Configure a New Profile
- Click the 'Add profile' link in the 'Profiles' screen:
- Profiles let you configure how Secure Email Gateway's scanners and filters should handle mail on your protected domains.
- The items that can be set in a profile include Anti-virus, Anti-spam, SMTP, Attachment Filter, Black List, White List, Header Filter, Archive and Quarantine, Data Leak Prevention (DLP) and Realtime Blackhole List (RBL).
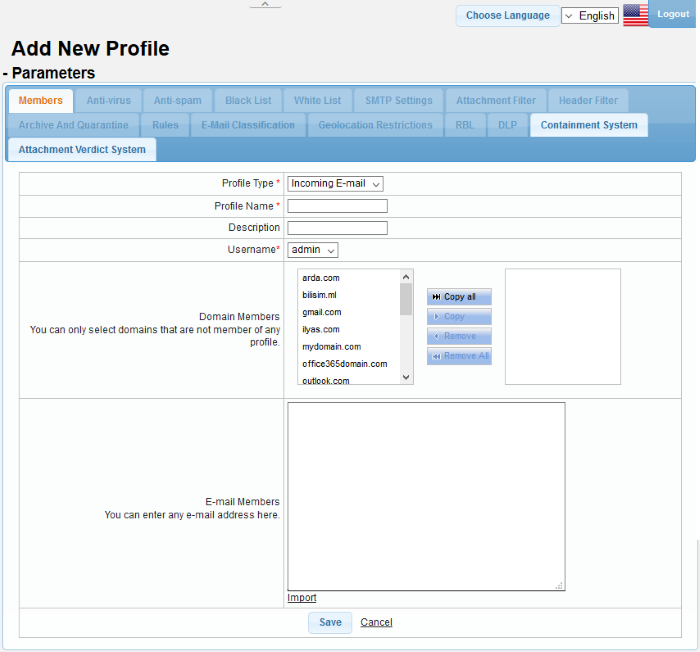
The 'Add New Profile' screen will
be displayed:
|
Profiles - Table of Parameters |
|
|---|---|
|
Parameter |
Description |
|
Profile Type |
Select whether you want to apply rules to incoming mails or outgoing mails. |
|
Profile Name |
Enter a name for the customized policy you rule set create. |
|
Description |
Provide an appropriate description for the profile. |
|
Username |
Select the username of the person who is adding the profile. Only users with appropriate privileges will be listed. |
|
Domain Members |
Allows administrators to add domains to the profile.
|
|
Email Members |
Allows administrators to add users to the profile.
|
|
Import |
Allows you to add users to the profile by importing them from a saved file. The same limitations mentioned above apply to imported users. |
- Click 'Save'
The profile will be saved and the
tabs for configuring other parameters will be enabled displayed.
The interface allows administrators to configure profile parameters for:
Note: All tabs except are disabled until you complete and save the details of the domain members.
- Click 'Profile Management' > 'Profiles'
- Locate the profile you want to work on and click the 'Edit' button on the right
- Click the 'Anti-virus' tab
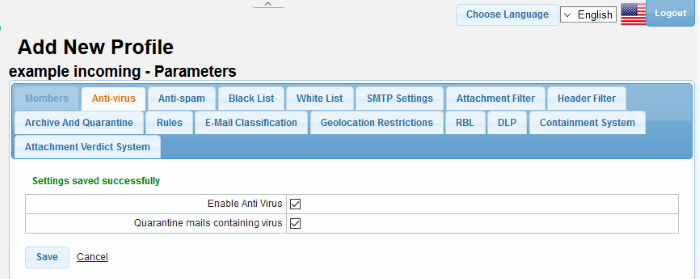
- Enable Anti Virus: Select the check box to enable the anti-virus engine for this profile. Please note the 'Anti-virus' module should be enabled for this parameter to become active.
- Quarantine mails containing virus: Mails detected with viruses will be quarantined. Users can log into the 'Quarantine Webmail' interface to view his/her mails that are quarantined.
- Click 'Save' to apply your changes.
- Click 'Profile Management' > 'Profiles'
- Locate the profile you want to work on and click the 'Edit' button on the right
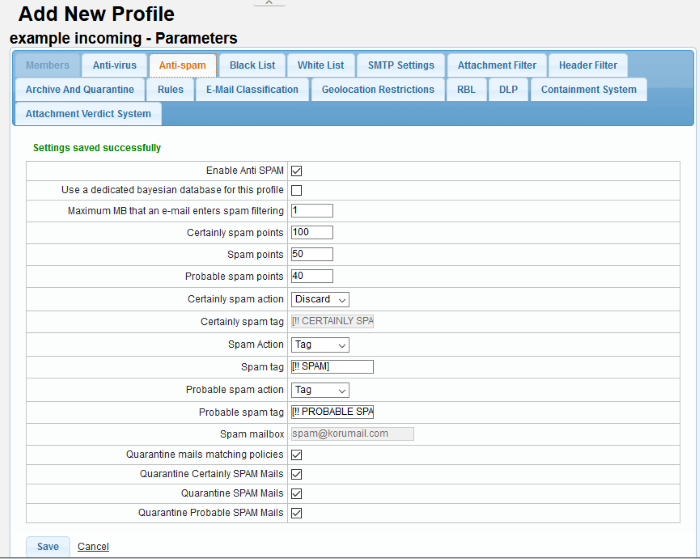
- Click the 'Anti-spam' tab
|
Profiles: Anti-spam Settings - Table of Parameters |
|
|---|---|
|
Parameter |
Description |
|
Enable Anti SPAM |
Select the check box to enable the anti-spam engine for this profile. Please note the 'Anti-spam' module should be enabled for this parameter to become active. |
|
Use a dedicated bayesian database for this profile |
Select the check box to enable the anti-spam engine to use Bayesian database also for detecting spam mails. Please note the 'Bayes Spam engine' in the 'Advanced Settings' section of 'Anti-spam' module should be enabled for this parameter to become active. |
|
Maximum MB that an e-mail enters spam filtering |
Enter the maximum size of emails for which spam filtering will be enabled. If the size of an email exceeds the entered value, then the email will not be scanned and placed in queue for delivery to the recipient. |
|
Certainly spam points |
Enter a value between 1 and 100 that will classify an email as definitely spam. Suggested values are between 90 - 100 points. |
|
Spam points |
Enter a value between 1 and 100 that will classify an email as spam. Suggested values are between 51 – 89 points. |
|
Probable spam points |
Enter a value between 1 and 100 that will classify an email as probable spam. Suggested values are between 40 – 50 points. |
|
Certainly spam action |
Select the action that has to be taken for
emails that are categorized as definitely spam. The options
available are:
|
|
Certainly spam tag |
Enter the tag text for emails that are categorized as definitely spam |
|
Spam Action |
Select the action that has to be taken for emails that are categorized as spam. The options available are:
|
|
Spam tag |
Enter the tag text for emails that are categorized as spam |
|
Probable spam action |
Select the action that has to be taken for emails that are categorized as probable spam. The options available are:
|
|
Probable spam tag |
Enter the tag text for emails that are categorized as probable spam |
|
Spam mailbox |
Enter the email address to which the forwarded and CCed spam emails configured in the 'Spam action' drop-down will be sent. |
|
Quarantine mails matching policies |
If enabled, emails that are matching the configured profile will be quarantined. |
|
Quarantine Certainly SPAM Mails |
If enabled, emails that are categorized as definitely spam will be quarantined. |
|
Quarantine SPAM Mails |
If enabled, emails that are categorized as spam will be quarantined. |
|
Quarantine Probable SPAM Mails |
If enabled, emails that are categorized as probable spam will be quarantined. |
- Click 'Save' to apply your changes.
- Click 'Profile Management' > 'Profiles'
- Locate the profile you want to work on and click the 'Edit' button on the right
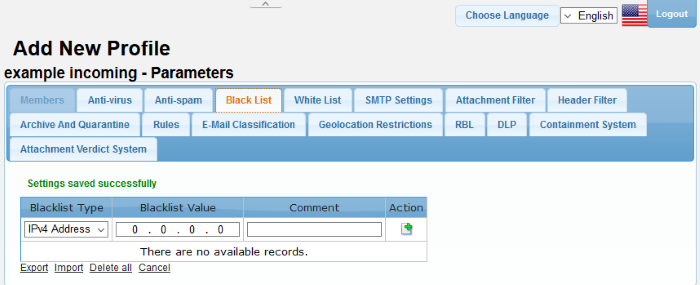
- Click the 'Black List' tab
|
Profiles: Black List Settings – Table of Column Descriptions |
||
|---|---|---|
|
Column Header |
Description |
|
|
Blacklist Type |
Select the type of source that has to be blacklisted. The options available are:
|
|
|
Blacklist Value |
Enter the details for the type of blacklist selected in the first column. |
|
|
Comment |
Provide an appropriate description for the blacklisted source. |
|
|
Action |
|
Allows you to add a blacklist type after filling the fields in the row. |
|
|
Allows you to delete a blacklist type from the list. |
|

- To save the list of blacklisted sources, click the 'Export' link and save it to your system.
- To import a list of sources to be blacklisted, click the 'Import' link
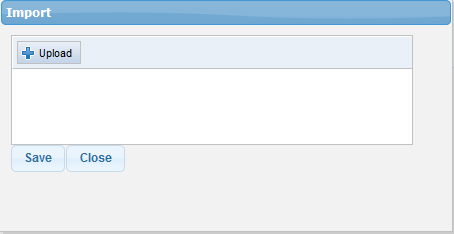
- Click the 'Upload' button, browse to the location where the file is saved and click 'Open'.
The file will be added.
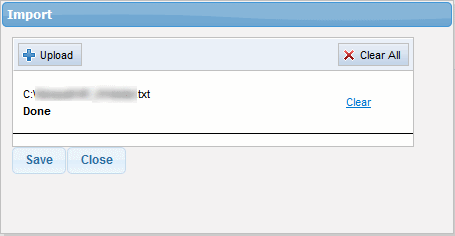
- Repeat the process to add more files.
- To remove a file, click the 'Clear' link beside it.
- To remove all the added files, click 'Clear All' button at the top right.
- To import the list from the files, click 'Save' button.
- To delete a blacklist type from the list, click the
 button under the 'Action' column header and click 'OK' in the
confirmation screen.
button under the 'Action' column header and click 'OK' in the
confirmation screen.
- To remove all the blacklisted sources, click the 'Delete all' link and click 'OK' in the confirmation screen.
- Click 'Profile Management' > 'Profiles'
- Locate the profile you want to work on and click the 'Edit' button on the right
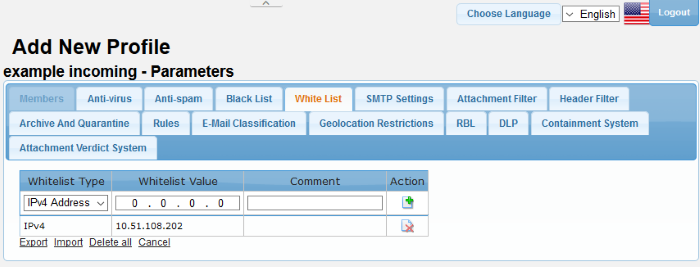
- Click the 'Whitelist' tab
|
Profiles: White List Settings – Table of Column Descriptions |
||
|---|---|---|
|
Column Header |
Description |
|
|
Whitelist Type |
Select the type of source that has to be whitelisted. The options available are:
|
|
|
Whitelist Value |
Enter the details for the type of whitelist selected in the first column. |
|
|
Comment |
Provide an appropriate description for the blacklisted source. |
|
|
Action |
|
Allows you to add a whitelist type after filling the fields in the row. |
|
|
Allows you to delete a whitelist type from the list. |
|
- To save the list of whitelisted sources, click the 'Export' link and save it to your system.
- To import a list of sources to be whitelisted, click the 'Import' link

- Click 'Upload', browse to the location where the file is saved and click 'Open'.
The file will be added.
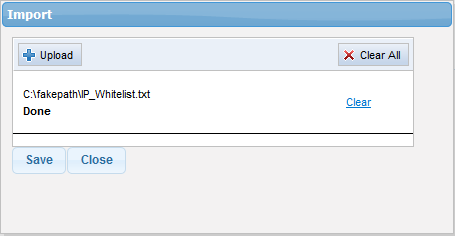
- Repeat the process to add more files.
- To remove a file, click the 'Clear' link beside it.
- To remove all the added files, click 'Clear All' at the top right.
- To import the list from the files, click 'Save'.
- To delete a whitelist type from the list, click under the 'Action' column header and click 'OK' in the
confirmation screen.
- To remove all the whitelisted sources, click the 'Delete all' link and click 'OK' in the confirmation screen.
- Click 'Profile Management' > 'Profiles'
- Locate the profile you want to work on and click the 'Edit' button on the right
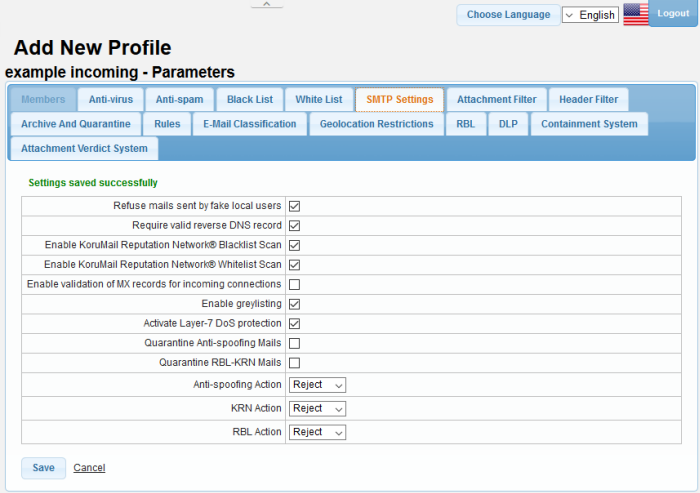
- Click the 'SMTP Settings' tab
|
Profiles: SMTP Settings - Table of Parameters |
|
|---|---|
|
Parameter |
Description |
|
Refuse mails sent by fake local users |
If enabled, Secure Email Gateway checks the 'From' details of an outgoing message with that of the added users and rejects if the users' details are not available. |
|
Require valid reverse DNS record |
If enabled, the added domains should have a valid reverse DNS record for the mails to be processed and delivered |
|
Enable Korumail Reputation Network® Blacklist Scan |
If enabled, mails are scanned for blacklist sources listed in the Korumail Reputation Network® (KRN) servers. Please note the KRN server setting should be enabled in the KRN module. |
|
Enable Korumail Reputation Network® whitelist Scan |
If enabled, mails are scanned for whitelist sources listed in the Korumail Reputation Network® (KRN) servers. Please note the KRN server setting should be enabled in the KRN module. |
|
Enable validation of MX records for incoming connections |
MX records maintain the entries of email server details to which the received emails for the protected domains are sent. If this check box is enabled, MX records for the protected will be checked and validated. |
|
Enable greylisting |
If enabled, Secure Email Gateway creates a Greylist of source IP address/domains from where emails are sent to recipients protected by its filtering engine. Mails received from a source for the first time is rejected by Secure Email Gateway and sends a command to the source to resend the email. Generally, spammers do not resend emails. If the email is sent again from the source again, Secure Email Gateway accepts the mail and initiates the filtering process. |
|
Activate Layer-7 DoS protection |
If enabled, Secure Email Gateway will activate the Layer 7 Denial of Service protection feature. |
| Quarantine Antispoofing Mails | If enabled, the spoofing mails will be Quarantined. |
|
Quarantine RBL-KRN Mails |
If enables, the RBL and KRN mails will be Quarantined. |
|
Anti-spoofing Action |
Select the action to be performed when the condition is met for a mail. The options available are: Reject - The mail will be rejected and a reject response will be sent to the sender's mail server. Discard – The mail will be rejected without notifying the sender. The user can view the email using the 'Quarantined Email' web interface. |
|
KRN Action |
Select the action to be performed when the condition is met for a mail. The options available are: Reject - The mail will be rejected and a reject response will be sent to the sender's mail server. Discard – The mail will be rejected without notifying the sender. The user can view the email using the 'Quarantined Email' web interface. |
|
RBL Action |
Select the action to be performed when the condition is met for a mail. The options available are: Reject - The mail will be rejected and a reject response will be sent to the sender's mail server. Discard – The mail will be rejected without notifying the sender. The user can view the email using the 'Quarantined Email' web interface. |
- Click 'Save' to apply your changes.
- Click 'Profile Management' > 'Profiles'
- Locate the profile you want to work on and click the 'Edit' button on the right
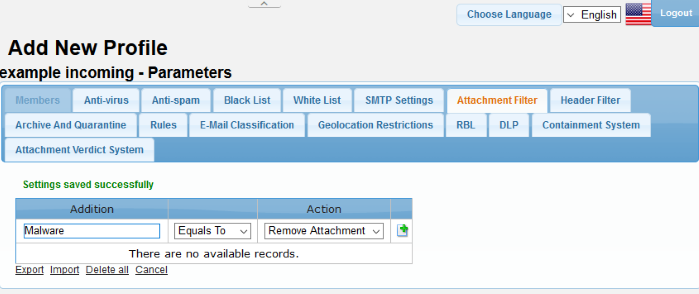
- Click the 'Attachment Filter' tab
|
Profiles: Attachment Filter Settings – Table of Column Descriptions |
||
|---|---|---|
|
Column Header |
Description |
|
|
Addition |
Enter the keyword that should be scanned for the attachments. |
|
|
Condition |
Select the condition from the drop-down. The options available are:
|
|
|
Action |
Select the action to be performed when the condition is met for an attachment in a mail. The options available are:
|
|
|
|
|
Allows you to add an attachment filter rule after filling the fields in the row. |
|
|
Allows you to delete attachment filter rule from the list. |
|
- To save the list of 'Attachment Filter' rules, click the 'Export'
link and save it to your system
- To import a list of 'Attachment Filter' rules from a saved file, click the 'Import' link
-
Click the 'Upload' button, browse to the location where the file is saved and click 'Open'.
The file will be added.

- Repeat the process to add more files.
- To remove a file, click the 'Clear' link beside it.
- To remove all the added files, click 'Clear All' at the top right.
- To import the list from the files, click 'Save'.
- To delete an 'Attachment Filter' rule from the list, click the button under the last column and click 'OK' in the confirmation
screen.
- To remove all the 'Attachment Filter' rules, click the 'Delete all' link and click 'OK' in the confirmation screen.
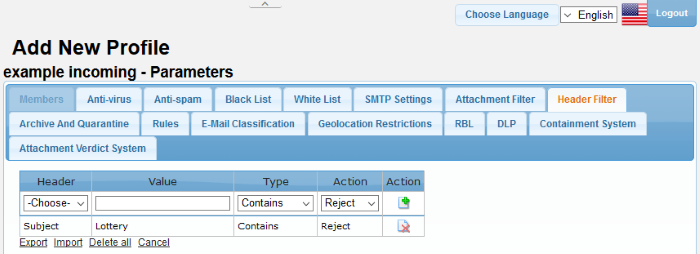
- Click the 'Header Filter' tab
|
Profiles: Header Filter Settings – Table of Column Descriptions |
||
|---|---|---|
|
Column Header |
Description |
|
|
Header |
Select the header type that you want to add a 'Header Filter' rule for. The choices available are:
|
|
|
Value |
Enter the keyword that should be scanned for the selected header type. |
|
|
Type |
Select the condition from the drop-down. The options available are:
|
|
|
Action |
Select the action to be performed when the condition is met for a 'Header Filter' rule in a mail. The options available are:
|
|
|
Action |
|
Allows you to add a 'Header Filter' rule after filling the fields in the row. |
|
|
Allows you to delete a 'Header Filter' rule from the list. |
|
- To save the list of 'Header Filter' rules, click the 'Export' link
and save it to your system
- To import a list of 'Header Filter' rules from a saved file, click the 'Import' link
- Click the 'Upload' button, browse to the location where the file is saved and click 'Open'.
The file will be added.

- Repeat the process to add more files.
- To remove a file, click the 'Clear' link beside it.
- To remove all the added files, click 'Clear All' at the top right.
- To import the list from the files, click 'Save'.
- To delete a 'Header Filter' rule from the list, click the button under the last column and click 'OK' in the confirmation
screen.
- To remove all the 'Header Filter' rules, click the 'Delete all' link and click 'OK' in the confirmation screen.
- Click 'Profile Management' > 'Profiles'
- Locate the profile you want to work on and click the 'Edit' button on the right
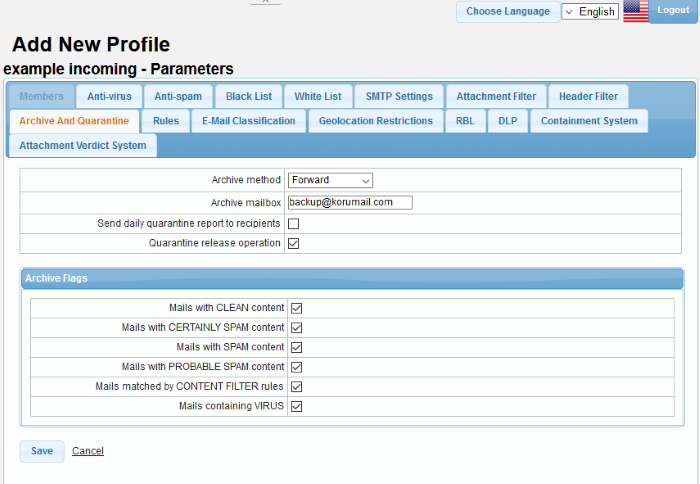
- Click the 'Archive and Quarantine' tab
|
Profiles: Archive and Quarantine Settings - Table of Parameters |
|
|---|---|
|
Parameter |
Description |
|
Archive method |
Select how the mails should be archived from the drop-down. The options available are:
Please note the archived and quarantined mails are removed from the disk as per the configuration done in the 'Quarantine & Archive Settings' interface. |
|
Archive mailbox |
This field becomes active only when an archive method is selected in the first row. Enter the mail address to which the archived and quarantined mails will be sent. |
|
Send daily quarantine report to recipients |
If enabled, the users will receive daily reports of their quarantined mails. Users can view their quarantined mails in the 'Comodo Secure Email Gateway Quarantine Webmail' interface by clicking the 'Quarantine Webmail' link in the 'Login' screen. |
| Quarantine Release Operation | Allows users to release their mails from quarantine. |
|
Archive Flags |
|
|
Mails with CLEAN content |
If enabled, mails that are categorized as safe will be archived as per the 'Archive method' setting done in the first row. |
|
Mails with CERTAINLY SPAM content |
If enabled, mails that are categorized as 'Certainly Spam' will be archived as per the 'Archive method' setting done in the first row. |
|
Mails with SPAM content |
If enabled, mails that are categorized as 'Spam' will be archived as per the 'Archive method' setting done in the first row. |
|
Mails with PROBABLE SPAM content |
If enabled, mails that are categorized as 'Probable Spam' will be archived as per the 'Archive method' setting done in the first row. |
|
Mails matched by CONTENT FILTER rules |
If enabled, mails that are filtered for content per the settings done in 'Content Filter' in the 'Anti-spam' module will be archived as per the 'Archive method' setting done in the first row. |
|
Mails containing VIRUS |
If enabled, mails that are categorized are with virus will be archived as per the 'Archive method' setting done in the first row. |
- Click the 'Save' button to apply your changes.
- Click 'Profile Management' > 'Profiles'
- Locate the profile you want to work on and click the 'Edit' button on the right
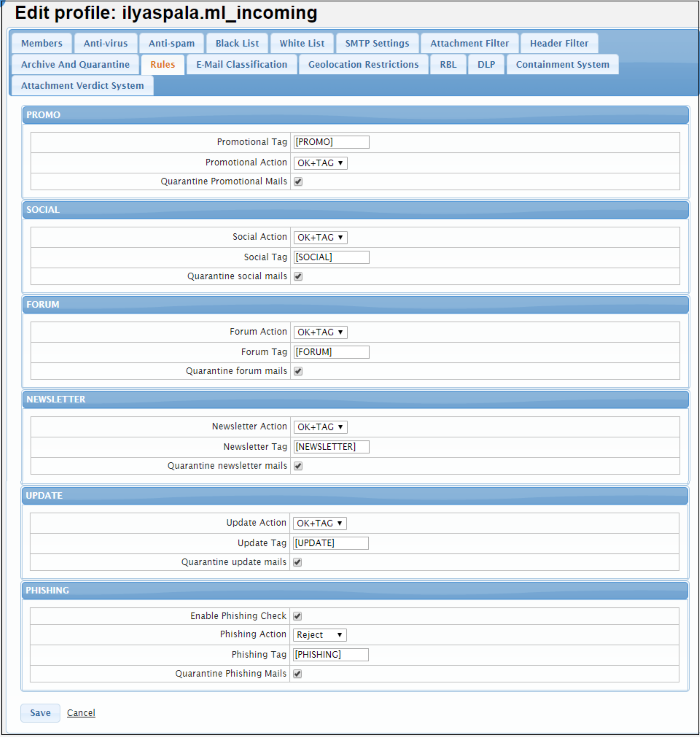
- Click the 'Rules' tab
|
Rules Settings – Table of Parameters |
|
|---|---|
|
Parameters |
Description |
| PROMO |
|
| Promotion Tag |
Promotional emails will be sent to the recipient with the a tag as entered in this field. |
| Promotional Action |
Select the action to be performed when the condition is met for a 'Rules' setting in a promotional mail. The options available are:
|
| Quarantine Promotional Mails |
If enabled, promotional mails are quarantined. |
| SOCIAL | |
| Social Action | Select the action when the condition is met for a 'Rules' setting in a social mail. The options available are:
|
| Social Tag | Social emails are sent to the recipient with the a tag as entered in this field. |
| Quarantine social mails | If enabled, social mails are quarantined. |
| FORUM | |
|
Forum Action |
Select the action to be performed when the condition is met for a 'Rules' setting in a forum mail. The options available are:
|
|
Forum Tag |
Forum based emails are sent to the recipient with the tag as entered in this field. |
|
Quarantine forum mails |
If enabled, forum mails are quarantined. |
|
Newsletter Action |
Select the action to be performed when the condition is met for a 'Rules' setting in a social mail. The options available are:
|
|
Newsletter Tag |
Newsletter emails are sent to the recipient with the tag as entered in this field. |
|
Quarantine newsletter mails |
If enabled, newsletter mails are quarantined. |
| UPDATE | |
|
Update Action |
Select the action to be performed when the condition is met for a 'Rules' setting in a update mail. The options available are:
|
|
Update Tag |
Update emails are sent to the recipient with the a tag as entered in this field. |
|
Quarantine update mails |
If enabled, update mails are quarantined. |
| PHISHING | |
|
Enable Phishing Check |
If enabled, checks for phishing emails. |
|
Phishing Action |
Select the action when the condition is met for a 'Rules' setting in a phishing mail. The options available are:
|
|
Phishing Tag |
Phishing emails are sent to the recipient with the a tag as entered in this field. |
|
Quarantine Phishing Mails |
If enabled, phishing mails are quarantined. |
- Click 'Save' to apply your changes.
- Locate the profile you want to work on and click the 'Edit' button on the right
- Click the 'Email Classification' tab

|
Category |
The type of mail received. |
|
Status |
Whether the rule is enabled or not. |
|
Tag |
The name prefixed to the email to show the email classification. For example, promotional email subjects are prefixed with [PROMO]. |
|
Action |
Select the action to be performed when the condition is met for a 'Rules' setting in a forum mail. The options available are:
|
|
Quarantine |
If enabled, the corresponding category of mails will be quarantined |
- Click 'Save' to apply your changes.
- Click 'Profile Management' > 'Profiles'
- Locate the profile you want to work on and click the 'Edit' button on the right
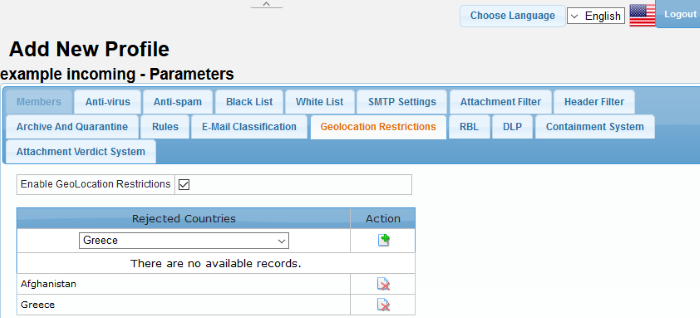
- Click the 'Geolocation Restrictions' tab
|
Profiles: Geolocation Restrictions Settings - Table of Column Descriptions |
||
|---|---|---|
|
Column Header |
Description |
|
|
Rejected Countries |
Select the country you want Secure Email Gateway to reject. Please note that you have to enable SMTP > General settings. |
|
|
Action |
|
Allows administrators to add a country after selecting it in the row. |
|
|
Allows administrators to delete the country from the list. |
|


Realtime Blackhole List (RBL)
- Click 'Profile Management' > 'Profiles'
- Locate the profile you want to work on and click the 'Edit' button on the right
- Click the 'RBL' tab
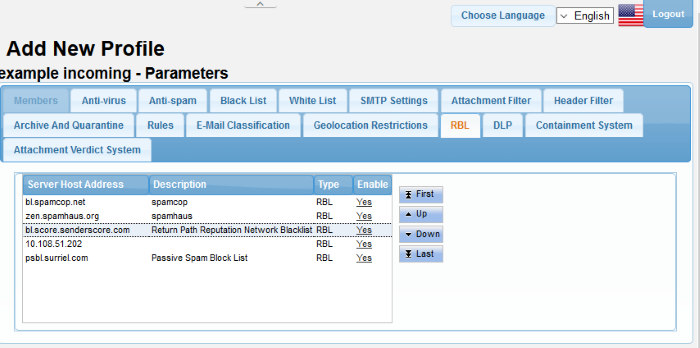
The screen displays the RBL servers that are available by default and added manually. See 'Manage RBL Servers' for more details.
|
RBL Servers – Table of Column Descriptions |
|
|---|---|
|
Column Header |
Description |
|
Server Host Address |
The address of the RBL server. |
|
Description |
The description provided at the time of adding the RBL server. |
|
Type |
The type of block list selected. |
|
Enable |
Allows you to activate or deactivate a RBL server in the list. If a server is disabled, Secure Email Gateway skips it and refers to the next server in line. |
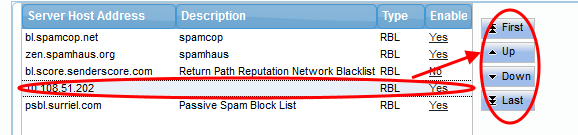
The control buttons next to the table allows to reorder the RBL server list for checking the blacklisted IP addresses available in the servers. The enabled RBL server listed first will be checked first and move down the order. Use the control buttons to move a server up or down the order.
The DLP feature is capable of scanning mails for important key words such as credit card, social security numbers, attachments and takes action as per the settings. Please note that the DLP module should be enabled for the settings configured here to take effect. See 'Data
Leak Prevention' for more details.
- Click 'Profile Management' > 'Profiles'
- Locate the profile you want to work on and click the 'Edit' button on the right
- Click the 'DLP' tab
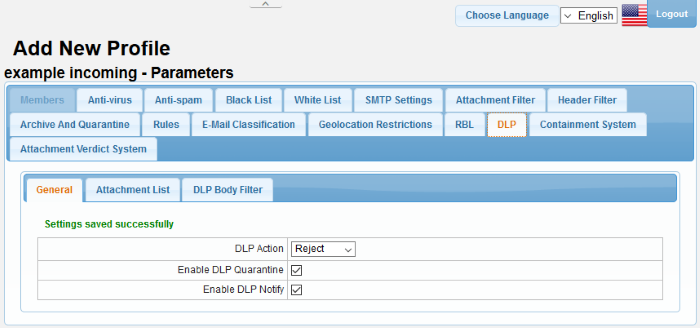
DLP General Settings
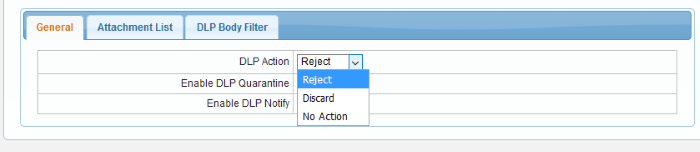
- DLP Action - These settings determine what action should be taken if Secure Email Gateway detects a message that could present a data leak.
The options available are:
- No Action - The mail will be allowed and the system admin will be notified if 'DLP Notify' is enabled.
- Reject - The mail will be rejected and a reject warning will be sent to the sender's email address.
- Discard - The mail will be deleted and if 'DLP Quarantine' is enabled, it will be quarantined and the system admin will be notified.
- Enable DLP Quarantine – If selected, SEG quarantines mails with data leak. Please note the setting in 'DLP Action' should be 'Discard' for mails to be quarantined.
- Enable DLP Notify – If selected, SEG alerts the system admin about DLP breaches.
Attachment List
- Click the 'Attachment List' tab
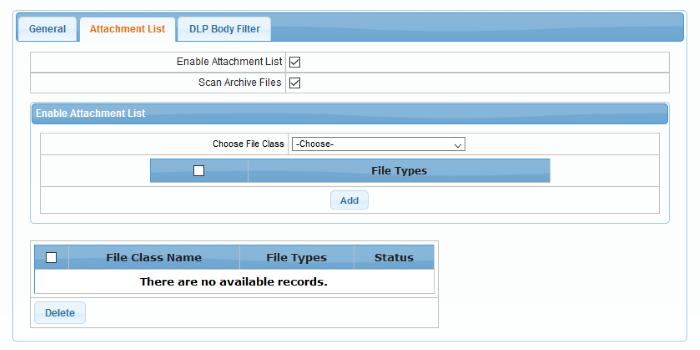
- Enable Attachment List – Select the check box to block emails with attachment file class defined below in the table.
- Scan Archive Files – Select the check box to scan the attached zip files and block emails with attachment file class defined below in the table.
Add a file class
- Select the file class from the 'Choose File Class' drop-down
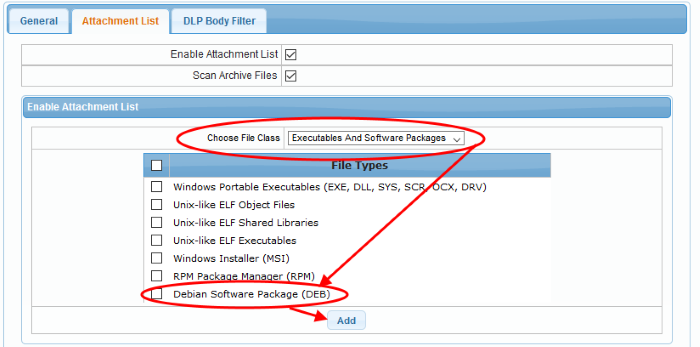
The file types for the selected file class will be displayed on the right side table.
- Select the file type or the check box above to select all the file types and click the 'Add' button beside it.
The added file types for the selected file class will be displayed in the table below the first table.
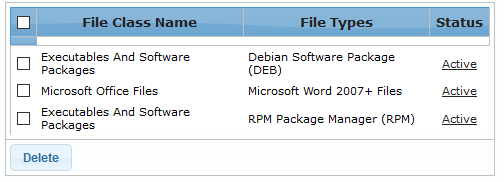
- Clicking the link beside a file type under the 'Status' column header toggles the status between 'Active' and 'Passive'. 'Active' status indicates emails with attached file type will be blocked.
- To delete a file type from the list, select it and click the 'Delete' button. To delete all file types, select the check box beside 'File Class Name' column header and click the 'Delete button.
DLP Body Filter
The 'DLP Body Filter' feature searches the content of an email for sensitive information such as credit card details, email address and so on and take action as per the settings done in 'DLP Action'. Secure Email Gateway comes with three predefined DLP Body Filters and allows the administrators to add more filters as required.
- Enable DLP Body Filter: Select the check box to apply the configured body filters

|
Profiles: DLP Body Filter Settings – Table of Column Descriptions |
||
|---|---|---|
|
Column Header |
Description |
|
|
Status |
Select the check box to enable the filter. |
|
|
Enable DLP Body Filter |
The name of the filter. |
|
|
Action |
|
Allows you to view the details of the body filter. |
|
|
Allows you to edit a body filter. |
|
|
|
Allows you to delete a body filter. |
|
-
Click the 'Add' button at the top of the table
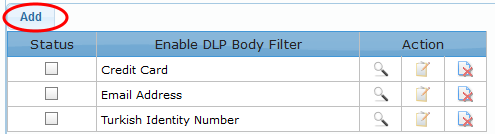
The filter 'Pattern' screen will be displayed.
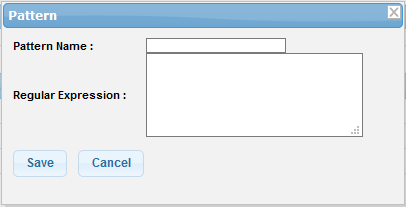
- Pattern Name: Enter the name of the filter pattern
- Regular Expression: Enter the regular expression to define the search pattern. To know more about Regular Expression, refer to Wikipedia at http://en.wikipedia.org/wiki/Regular_expression. You can also enter keywords in the field to search and block the email containing it.
View the details of a pattern
-
Click the
 icon beside a body filter that you want to view the details
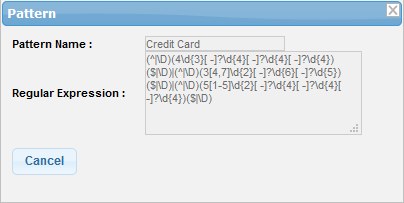
- Click the 'Cancel' button or close the dialog to return to main screen.
Edit a body filter
- Click the
 icon beside a body filter that you want to edit the details
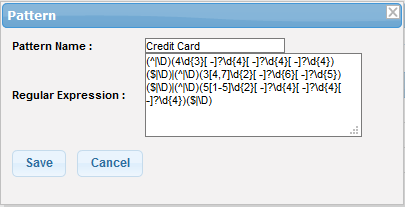
- Edit the details as required and click the 'Save' button
Delete a body filter
-
Click the
icon beside a body filter that you want to delete

- Click 'OK' to confirm the deletion.
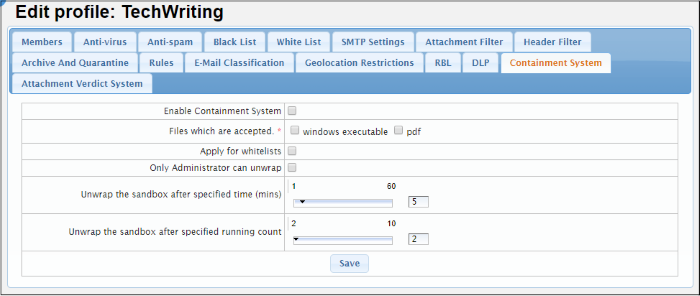
The 'Containment System' enables administrators to configure profile settings related to the containment analysis. If enabled, containment system will run email attachments in the containment environment (windows executable files and pdf files).
- Click 'Profile Management' > 'Profiles'
- Locate the profile you want to work on and click the 'Edit' button on the right
- Click the 'Containment System' tab
|
Containment System - Table of Column Headers |
|
|---|---|
|
Column Header |
Description |
|
Enable Containment System |
If enabled, email attachments (pdfs and windows executables) will be 'wrapped' with containment code before delivery. This means they will open in an isolated, virtual environment known as the container, instead of directly on the endpoint. The attachment will open as normal from the end-user's point-of-view, but it will not be allowed to access important system files, user data or to cause damage to the host system. |
|
Files which are accepted |
If enabled, will deliver files in the chosen format. |
|
Apply for whitelists |
If enabled, Secure Email Gateway will also analyze white-listed sources. |
| Only Administrator can unwrap | Safe files in the containment when run are unwrapped immediately for both users and admins. Malicious files are blocked. Contained files for which results are unsure (not safe nor malicious) are unwrapped if specified time or count (mentioned in rows below) is reached. If this setting is:
|
| Unwrap the sandbox after specified time (mins) | Unsure files (not safe nor malicious) when run are moved out of containment after the specified time. Move the slider to set the time. |
| Unwrap the sandbox after specified running count | Unsure files (not safe nor malicious) when opened ‘X’ times as specified here are moved out of containment. Move the slider to set the count. |
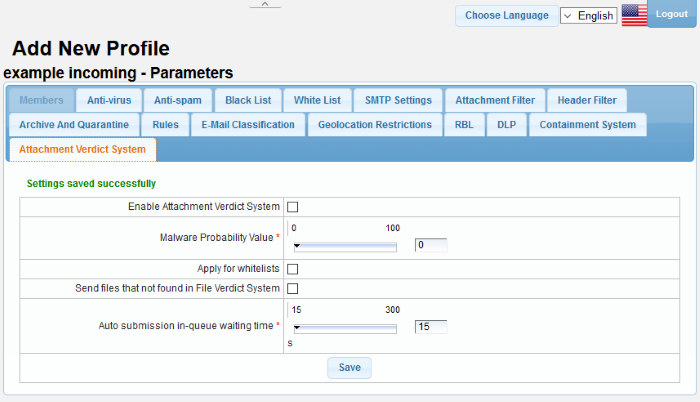
The 'Attachment Verdict System' settings area enables administrators to configure settings related to the analysis of email attachments. If enabled, the verdicting system will automatically submit email attachments (windows executable files and pdf files) with an 'unknown' trust rating to Comodo Valkyrie for analysis. Valkyrie will run a series of behavioral tests to find out whether or not the attachment is malicious.
- Click 'Profile Management' > 'Profiles'
- Locate the profile you want to work on and click the 'Edit' button on the right
- Click the 'Attachment Verdict System' tab
|
Attachment Verdict System - Table of Column Headers |
|
|---|---|
|
Column Header |
Description |
|
Enable Attachment Verdict System |
|
|
Malware Probability Value |
|
|
Apply for whitelists |
|
|
Send files that not found in File Verdict System |
If enabled, Secure Email Gateway will upload files rated 'Unknown', to the attachment verdict system for detailed behavior analysis |
|
Auto-submission in queue waiting time |
Define in seconds how long Secure Email Gateway should wait before the submission times-out. |
Please
note that, if the 'Enable Attachment Verdict System is enabled' and
the 'Send files that not found in File Verdict System' is disabled,
then the unknown files are not uploaded to Valkyrie for analysis. See Attachment
Verdict Reports to
view reports of attachment verdict system.