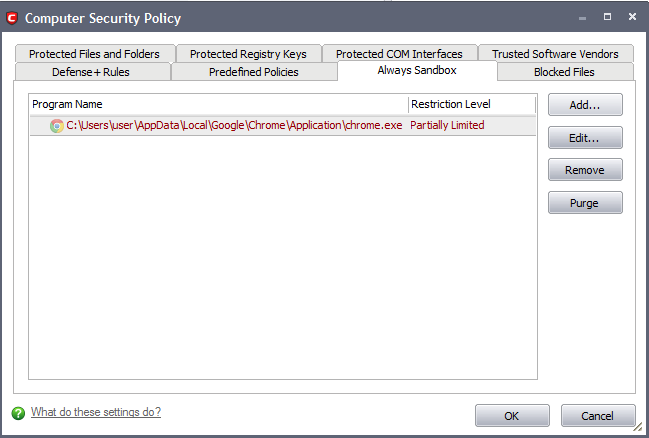
Comodo Help
Find the desired product help
Comodo Internet Security

Comodo Internet Security

Version 5.9/5.10

English

Print Help Download Help
Defense+ Tasks - Introduction > Computer Security Policy > Always Sandbox
  • Introduction To Comodo Internet Security
    • Special Features
    • System Requirements
    • Installation
      • CIS Premium Installation
      • CIS Pro-Installation And Activation
      • CIS Complete-Installation And Activation
        • Installing Comodo Internet Security 2012 Complete
        • Activating Online Backup, TrustConnect And Guarantee
        • Installing Comodo Backup
        • Installing Comodo TrustConnect
      • Activating Pro/ Complete Services After Installation
        • Activating Your License
        • Activating Your Guarantee Coverage
        • Renewal Of Your License
    • Starting Comodo Internet Security
    • Comodo Internet Security - Overview Of Summary Screens
      • Comodo Internet Security – Summary
      • Comodo Antivirus – Summary
      • Comodo Firewall – Summary
    • Comodo Internet Security - Navigation
    • Understanding Alerts
  • Antivirus Tasks-Introduction
    • Run A Scan
    • Update Virus Database
    • Quarantined Items
    • View Antivirus Events
    • Submit Files To Comodo For Analysis
    • Scheduled Scans
    • Scan Profiles
    • Scanner Settings
      • Real Time Scanning
      • Manual Scanning
      • Scheduled Scanning
      • Exclusions
  • Firewall Tasks-Introduction
    • View Firewall Events
    • Define A New Trusted Application
    • Define A New Blocked Application
    • Network Security Policy
      • General Navigation
      • Application Rules
      • Global Rules
      • Predefined Policies
      • Network Zones
      • Blocked Zones
      • Port Sets
    • View Active Connections
    • Stealth Ports Wizard
    • Firewall Behavior Settings
      • General Settings
      • Alert Settings
      • Advanced Settings
  • Defense+ Tasks - Introduction
    • View Defense+ Events
    • Trusted Files
    • Unrecognized Files
      • Unrecognized Files
      • Submitted Files
    • Computer Security Policy
      • Defense+ Rules
      • Predefined Policies
      • Always Sandbox
      • Blocked Files
      • Protected Files And Folders
      • Protected Registry Keys
      • Protected COM Interfaces
      • Trusted Software Vendors
    • The Sandbox - An Introduction
      • Unknown Files - The Sand-boxing And Scanning Processes
    • View Active Process List
    • Run A Program In The Sandbox
    • Defense+ Settings
      • General Settings
      • Execution Control Settings
      • Sandbox Settings
      • Monitoring Settings
  • More Options-Introduction
    • Preferences
      • General Settings
      • Parental Control Settings
      • Appearance
      • Log Settings
      • Connection Settings
      • Update Settings
    • Manage My Configurations
      • Comodo Preset Configurations
      • Importing/Exporting And Managing Personal Configurations
    • Diagnostics
    • Check For Updates
    • Manage This Endpoint
    • Browse Support Forums
    • Help
    • About
  • Comodo GeekBuddy
    • Overview Of Services
    • Launching The Client And Using The Service
    • Accepting Remote Desktop Requests
    • Registration
    • Activation Of Service
    • Uninstalling Comodo GeekBuddy
  • TrustConnect Overview
    • Microsoft Windows - Configuration And Connection
    • Mac OS X - Configuration And Connection
    • Linux / OpenVPN - Configuration And Connection
    • Apple IPhone / IPod Touch - Configuration And Connection
    • TrustConnect FAQ
  • Comodo Dragon
  • Appendix 1 CIS - How To... Tutorials
    • Setting Up Security Levels Easily
    • Setting Up The Firewall For Maximum Security And Usability
    • Blocking Internet Access While Allowing Local Area Network (LAN) Access
    • Setting Up Defense+ For Maximum Security And Usability
    • How To Password Protect Your CIS Settings
    • How To Reset Forgotten Password (Advanced)
    • Running An Instant Antivirus Scan On Selected Items
    • Creating An Antivirus Scanning Schedule
    • Running An Untrusted Program Inside Sandbox
    • Restoring Incorrectly Quarantined Item(s)
    • Submitting Quarantined Items To Comodo For Analysis
    • Enabling File Sharing Applications Like BitTorrent And Emule
    • Blocking Any Downloads Of A Specific File Type
    • Disabling Defense+ And Sandboxing For Specific Files Selectively
    • Switching Between Complete CIS Suite And Individual Components (just AV Or FW)
    • Switch Off Automatic Antivirus And Software Updates
    • Suppressing CIS Alerts Temporarily While Playing Games
  • Appendix 2 Comodo Secure DNS Service
    • Router - Manually Enabling Or Disabling Comodo Secure DNS Service
    • Windows XP - Manually Enabling Or Disabling Comodo Secure DNS Service
    • Windows 7 / Vista - Manually Enabling Or Disabling Comodo Secure DNS Service
  • Appendix 3 CIS Versions
  • About Comodo Security Solutions

Always Sandbox


The 'Always Sandbox' area lists those applications which the user has decided should be executed in the sandbox on a permanent or long term basis. This may include applications that the user suspects are not safe or has other concerns about (for example, you could test beta software by running it in the sandbox). These applications will appear as normal programs in your system but will be run in the sandbox under a restricted set of privileges. They will not be allowed to access files on your real system, alter operating system settings or alter the registry entries corresponding to other applications


To open the 'Always Sandbox' interface, Click Defense+ > Computer Security policy > Always Sandbox.


 To (permanently) add programs into the sandbox

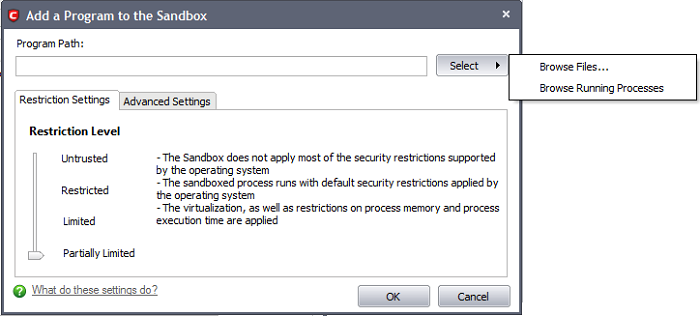
  1. Click 'Add...' from the 'Always Sandbox' interface. This will open the 'Add a Program to Sandbox' dialog.

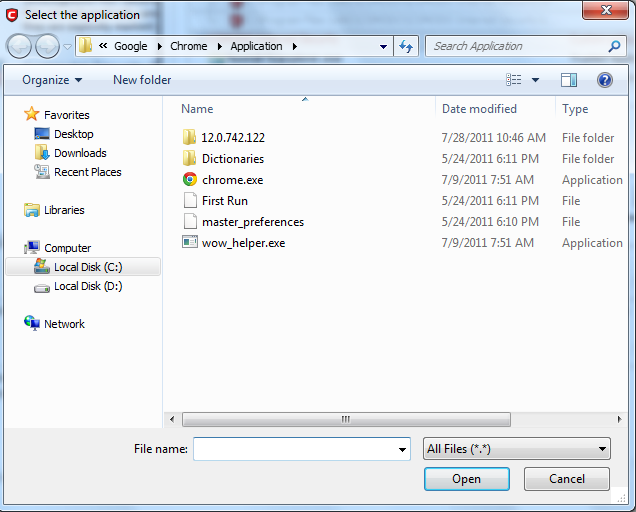
  2. Click 'Select' and browse to the file or currently running process that you wish to sandbox.


  1. Click 'Open'. In the example below, we are adding opera.exe.


  1. Choose 'Restriction Settings'

  1. Untrusted - The application is not allowed to access any of the Operating system resources. The application is not allowed to execute more than 10 processes at a time and is run with very limited access rights. The restrictions on usage of system memory, operation with virtual file system and registry and execution time defined in Advanced Settings are imposed.


Note: Some of the applications that require user interaction may not work properly under this setting.

  1. Restricted - The application is allowed to access very few Operating system resources. The application is not allowed to execute more than 10 processes at a time and is run with very limited access rights. The restrictions on usage of system memory, operation with virtual file system and registry and execution time defined in Advanced Settings are imposed.


Note: Some of the applications like computer games may not work properly under this setting.

  1. Limited - Only selected Operating System resources can be accessed by the application. The application is not allowed to execute more than 10 processes at a time and is run with out Administrator account privileges. The restrictions on usage of system memory, operation with virtual file system and registry and execution time defined in Advanced Settings are imposed.

  2. Partially Limited(Default) - The application is allowed to access all the Operating system files and resources like clipboard. Modification of protected files/registry keys is not allowed. Privileged operations like loading drivers or debugging other applications are also not allowed. The restrictions on usage of system memory, operation with virtual file system and registry and execution time defined in Advanced Settings are imposed.

  1. Choose 'Advanced Settings'  


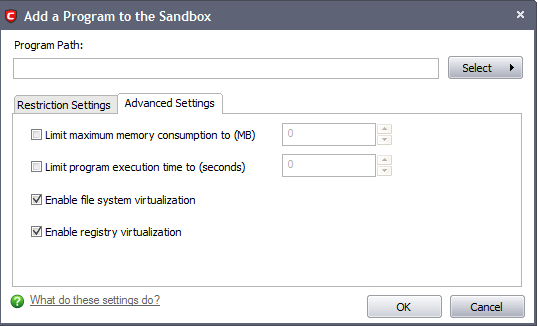
The Advanced Settings tab to configure the restrictions on system resource usage and access to other files. Available options are:

  1. Limit maximum memory consumption - You can define how much of the system memory can be allocated for the application on execution by selecting this checkbox and entering the memory (in MB) in the combo box beside it (Default = Disabled).

  2. Limit the program execution time - You can define how long the program can be allowed to run by selecting this checkbox and entering the time (in seconds) in the combo box beside it (Default = Disabled).

  3. Enable file system virtualization -The sandboxed applications are not permitted to modify the files in your 'real' file system. Enabling file system virtualization instructs the Sandbox to create a virtual file system in your system. The application added to the sandbox writes any data only into the created virtual file system, instead of affecting and potentially causing damage to your real file system. If you disable this option, the application may not function correctly because it is not be to create the entries that it needs too (Default = Enabled).


Note for advanced users: The virtual file system is created inside the Sandbox working folder (e.g. c:sandbox) to execute the application within this file system. The virtual file system is not created even on enabling this setting here, if file system virtualization is disabled in Sandbox Settings.

  1. Enable registry virtualization - The sandboxed applications are not permitted to access and modify the entries in your 'real' Window's Registry hives. Enabling registry virtualization instructs the Sandbox to create a virtual registry hive in your system. The application added to the Sandbox writes any entries pertaining to it only into the created registry hive, instead of affecting and potentially causing damage to your real registry hives. If you disable this option, the application may not function correctly because it is not able to create the entries that it needs too (Default = Enabled).


Note for advanced users: The virtual registry hive is created as HKEY_LOCAL_MACHINESYSTEMSandbox ... for the sandboxed applications to write their registry values. The virtual registry hive is not created even on enabling this setting here, if registry virtualization is disabled in Sandbox Settings.


  1. Click 'OK' for your settings to take effect.


From this point onwards the application will be run in the sandbox. If you wish to remove it at a later date, simply highlight it in the list and click 'Remove'. If you wanted to run an application in the sandbox on a 'one off' basis instead, then please use 'Run a Program in the Sandbox' instead.

  • To edit the restriction settings for an application included in the sandbox, select the application and click 'Edit'.

  • To remove an application from the sandbox, select the application and select 'Remove'. Next time you execute this application it will run outside of the sandbox. (presuming it is not then detected as malicious or automatically sandboxed as per the sandboxing process)

  • To remove invalid entries (programs/files that are not present or uninstalled from your computer) automatically, click 'Purge'.


Comodo Internet Security User Guide | © 2012 Comodo Security Solutions Inc. | All rights reserved
Our Products
  • Free Antivirus
  • Free Internet Security
  • Website Malware Removal
  • Free Anti-Malware
  • Anti-Spam (Free Trial)
  • Windows Antivirus
  • Antivirus for Windows 7
  • Antivirus for Windows 8
  • Antivirus for Windows 10
  • Antivirus for MAC
  • Antivirus for Linux
  • Free Endpoint Security
  • Free ModSecurity
  • Free RMM
  • Free Website Malware Scanner
  • Free Device Manager for Android
  • Free Demo
  • Network Security
  • Endpoint Protection
  • Antivirus for Android
  • Comodo Antivirus
  • Wordpress Security
Cheap CDN
  • Bootstrap CDN
  • Semantic UI CDN
  • Jquery CDN
  • CDN Plans
  • CDN
  • Free CDN
Enterprise
  • Patch Management Software
  • Patch Manager
  • Service Desk
  • Website Down
  • Endpoint Protection Solutions
  • Website Security Check
  • Remote Monitoring and Management
  • Website Security
  • Device Manager
  • ITSM
  • CRM
  • MSP
  • Android Device Manager
  • MDR Services
  • Managed IT Support Services
  • Free EDR
Free SSL Certificate
Support Partners Terms and Conditions Privacy Policy

© Comodo Group, Inc. 2025. All rights reserved.