How To Password Protect Your CIS Settings
This page explains how to password protect access to the CIS interface. Implementing the steps explained on this page means another user will not be able to access the CIS interface to modify or over-ride the security settings you have implemented.
Click here for more details on parental control.
To enable password protection
-
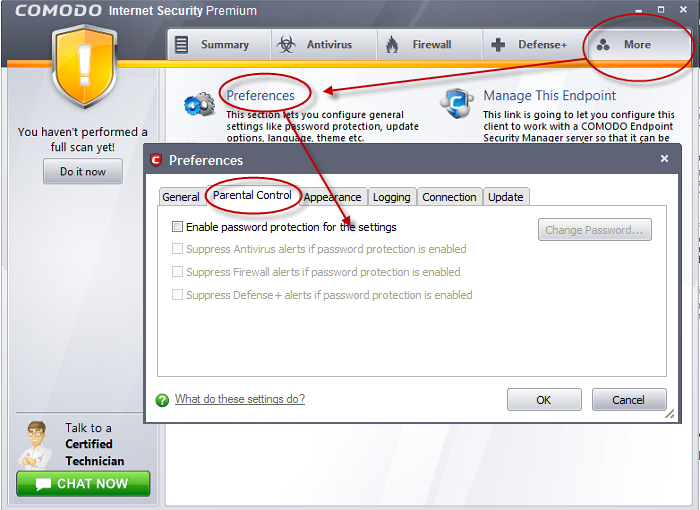
Click the ‘More’ button along the top navigation
-
Click 'Preferences' in 'More' menu
-
Click on 'Parental Control' tab

-
Select 'Enable password protection for the settings' checkbox to activate password protection
-
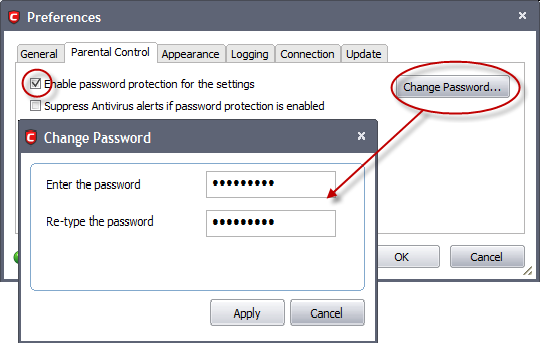
Click 'Change Password'
-
In the 'Change Password' dialog, type a password and retype the password in the respective text boxes

-
Click 'Apply'.
Enabling password protection will secure all of your important CIS settings and configurations. After setting a password, users will be asked for this password every time they try to access important configuration areas (e.g., in all the sections of the Antivirus Tasks, Firewall Tasks and Defense+ Tasks areas).
Suppressing alerts whilst under password protection
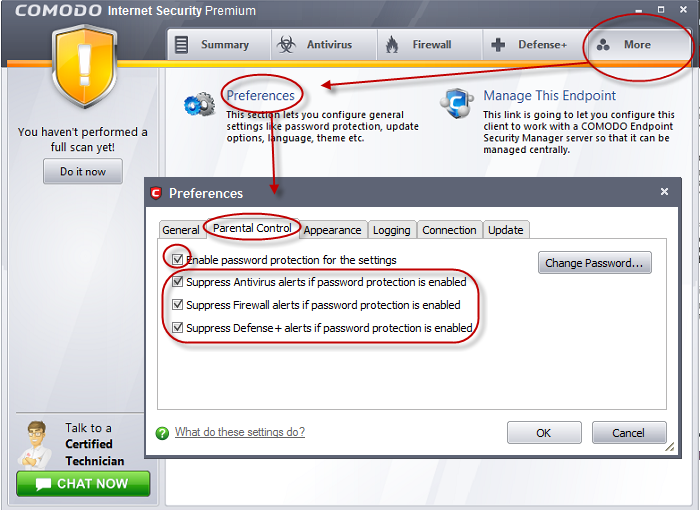
When you select the 'Enable password protection for the settings' checkbox the following options are enabled.
-
Suppress Antivirus alerts when password protection is enabled
-
Suppress Defense+ alerts when password protection is enabled
-
Suppress Firewall alerts when password protection is enabled
Selecting these options will suppress all Antivirus, Defense+ and Firewall alerts as well as automatically blocking the requested action. This is useful because it avoids the situation wherein an inexperienced user clicking ‘Allow’ simply to dismiss an alert (and inadvertently allowing a malicious action to proceed).

-
Select the component(s) that you want to suppress the alerts and click 'OK'
If you choose to suppress alerts, you must remember to de-suppress them next time you log on. If you don't, then CIS will continue to silently block certain actions without notification.
Important Notes:
-
Due to the fact that this configuration suppresses and blocks all alerts, certain software updates may be unable to run in this mode, unless the vendor of the application/updater is in COMODO's 'Trusted Software Vendors' list located in the Defense+ tab of CIS. A good idea is to create a preset configuration (called ''Updater Configuration" for example), and configure it to allow all of your updaters to install smoothly. This way, when switching to this configuration, you can perform maintenance on your PC, and afterward, switch it back to the parental configuration (which suppresses all alerts) so no one else can make changes. This method would prove very useful for tasks such as Microsoft Windows service pack updates, to ensure a proper installation is performed. Refer to 'Manage My Configurations' to know more about preset configurations.
-
It is also recommended to set CIS to Proactive Security before configuring CIS with this tutorial. With Proactive Security, everything is protected on your PC by CIS. This is a stronger, more aggressive configuration than the default CIS configuration, so your PC will be better protected, but users will not notice the difference because we will be configuring CIS for ZERO alerts anyway.
-
To make sure CIS is set to Proactive Security, navigate to More > Manage my Configurations > Select COMODO - Proactive Security and click 'Activate'.
-
It is also recommended to have the firewall in CIS set to Safe Mode with this configuration. With the firewall in Safe Mode, it will automatically allow and create rules for internet traffic related to applications that are certified as 'Safe' by Comodo. A non-certified, new application would normally generate an alert when attempting to access the network, but with this configuration, the firewall alerts are suppressed, so the attempt will automatically be blocked, preventing the establishment of any malicious or unwanted connections to your PC.
Comodo Internet Security User Guide | © 2012 Comodo Security Solutions Inc. | All rights reserved


