


Enabling File Sharing Applications like BitTorrent and Emule
This page explains how to configure Comodo Firewall for file sharing applications like Shareaza/Emule and BitTorrent/UTorrent. To allow these file sharing applications, you must:
-
Disable 'Do Protocol analysis' (disable, by default)
-
Create a 'Predefined Firewall Policy' for Shareaza/Emule
-
Create a 'Predefined Firewall Policy' for BitTorrent/Utorrent'
To Create a 'Predefined Firewall Policy' for Shareaza/Emule
-
Click 'Firewall' from the top navigation pane and click 'Network Security Policy' from the Firewall Tasks interface
-
In the Network Security policy interface, click 'Predefined Policies' tab...
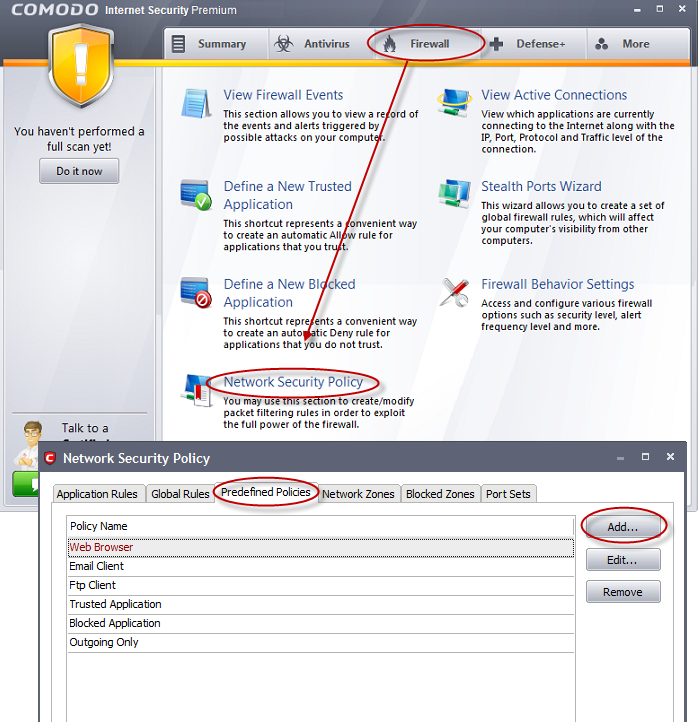
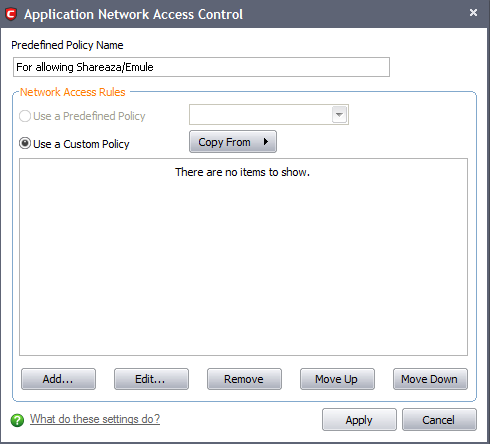
… and click 'Add'. The 'Application Network Access Control' interface will open for creating a new set of rules.
-
Enter a descriptive name for the new policy to be created in the 'Description' text box (for example: For allowing Shareaza/Emule).
-
Now you need to create six rules for the newly created security policy. To do so, click 'Add'. The 'Network Control Rule' interface will appear. For creating each rule, select the check box and choose the drop-down options under each tab as given below. After creating each rule, click Apply for the rule to be added and click 'Add' to create the next rule.
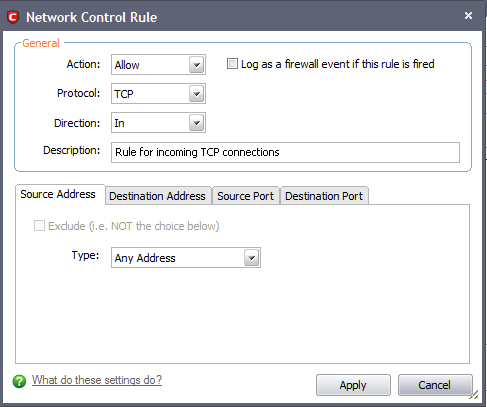
Rule 1
-
Action: Allow
-
Protocol: TCP
-
Direction: In
-
Description: Rule for incoming TCP connections
-
Source Address: Any Address
-
Destination Address: Any Address
-
Source port: A Port Range: (Start Port = 1025 / End Port = 65535)
-
Destination port: A Single Port: (Port : Your TCP port of Shareaza/Emule)
Rule 2
-
Action: Allow
-
Protocol: UDP
-
Direction: In
-
Description: Rule for incoming UDP connections
-
Source Address: Any Address
-
Destination Address: Any Address
-
Source port: A Port Range: (Start Port = 1025 / End Port = 65535)
-
Destination port: A Single Port: (Port : Your UDP port of Shareaza/Emule)
Rule 3
-
Action: Allow
-
Protocol: TCP or UDP
-
Direction: Out
-
Description: Rule for outgoing TCP and UDP connections
-
Source Address: Any Address
-
Destination Address: Any Address
-
Source port: A port range: (start port = 1025 / end port = 65535)
-
Destination port: A port range: (start port = 1025 / end port = 65535)
Rule 4
-
Action: Allow
-
Protocol: ICMP
-
Direction: Out
-
Description: Ping the server (edk network)
-
Source Address: Any Address
-
Destination Address: Any Address
-
ICMP Details: Message: ICMP Echo Request
Rule 5
-
Action: Ask (Also select the check box 'Log as a firewall event if this rule is fired')
-
Protocol: TCP
-
Direction: Out
-
Description: Rule for HTTP requests
-
Source Address: Any Address
-
Destination Address: Any Address
-
Source port: A port range: (start port = 1025 / end port = 65535)
-
Destination port: Type: Single Port; (Port : 80)
Rule 6
-
Action: Block (Also select the check box 'Log as a firewall event if this rule is fired')
-
Protocol: IP
-
Direction: In/Out
-
Description: Block and Log All Unmatching Requests
-
Source Address: Any Address
-
Destination Address: Any Address
-
IP Details: IP Protocol: Any
-
Click 'Apply' in the 'Application Network Access Control' interface.
The new policy will be created and added as a Predefined Security Policy. Start Shareaza or Emule. When Comodo raises a pop-up alert, choose 'Treat this application as', select the descriptive name you gave for this rule (e.g. For allowing Shareaza/Emule) from the options and select 'Remember my answer'.
To create a 'Predefined Firewall Policy' for BitTorrent/Utorrent'
-
Click 'Firewall' from the top navigation pane and click 'Network Security Policy' from the Firewall Tasks interface
-
In the Network Security policy interface, click 'Predefined Policies' tab and click 'Add'. The 'Application Network Access Control' interface will open for creating a new set of rules.
-
Enter a descriptive name for the new policy to be created in the 'Description' text box (for example: For allowing BitTorrent/Utorrent).
-
Now you need to create five rules for the newly created security policy. To do so, click 'Add'. The 'Network Control Rule' interface will appear. For creating each rule, select the check box and choose the drop-down options under each tab as given below. After creating each rule, click Apply for the rule to be added and click 'Add' to create the next rule.
Rule 1
-
Action: Allow
-
Protocol: TCP or UDP
-
Direction: In
-
Description: Rule for incoming TCP and UDP connections
-
Source Address: Any Address
-
Destination Address: Any Address
-
Source port: A Port Range: (Start port = 1025 / End port = 65535)
-
Destination port: A Single Port (Port: The port of BitTorrent/Utorrent)
Rule 2
-
Action: Allow
-
Protocol: TCP
-
Direction: Out
-
Description: Rule for outgoing TCP connections
-
Source Address: Any Address
-
Destination Address: Any Address
-
Source port: A Port Range: (Start port = 1025 / End port = 65535)
-
Destination port: A Port Range: (Start port = 1025 / End port = 65535)
Rule 3
-
Action: Allow
-
Protocol: UDP
-
Direction: Out
-
Description: Rule for outgoing UDP connections
-
Source Address: Any Address
-
Destination Address: Any Address
-
Source port: A Single Port: Port: the port of utorrent
-
Destination port: A Port Range: (Start port = 1025 / End port = 65535)
Rule 4
-
Action: Ask (Also select the check box 'Log as a firewall event if this rule is fired')
-
Protocol: TCP
-
Direction: Out
-
Description: Rule for HTTP requests
-
Source Address: Any Address
-
Destination Address: Any Address
-
Source port: A Port Range : (Start port = 1025 / End port = 65535)
-
Destination port; A Single Port (Port = 80)
Rule 5
-
Action: Block (Also select the check box 'Log as a firewall event if this rule is fired')
-
Protocol: IP
-
Direction: In/Out
-
Description: Block and Log All Unmatching Requests
-
Source Address: Any Address
-
Destination Address: Any Address
-
IP Details: IP Protocol: Any
-
Click 'Apply' in the 'Application Network Access Control' interface.
The new policy will be created and added as a Predefined Security Policy. Start BitTorrent or Utorrent. When Comodo raises a pop-up alert, choose 'Treat this application as', select the descriptive name you gave for this rule (e.g. For allowing BitTorrent/Utorrent) from the options and select 'Remember my answer'.
To create a 'Predefined Firewall Policy' for BitTorrent/Utorrent'
-
Click 'Firewall' from the top navigation pane and click 'Network Security Policy' from the Firewall Tasks interface.
-
In the Network Security policy interface, click 'Predefined Policies' tab and click 'Add'. The 'Application Network Access Control' interface will open for creating a new set of rules.
-
Enter a descriptive name for the new policy to be created in the 'Description' text box (for example: For allowing BitTorrent/Utorrent).
-
Now you need to create five rules for the newly created security policy. To do so, click 'Add'. The 'Network Control Rule' interface will appear. For creating each rule, select the check box and choose the drop-down options under each tab as given below. After creating each rule, click Apply for the rule to be added and click 'Add' to create the next rule.
Rule 1
-
Action: Allow
-
Protocol: TCP or UDP
-
Direction: In
-
Description: Rule for incoming TCP and UDP connections
-
Source Address: Any Address
-
Destination Address: Any Address
-
Source port: A Port Range: (Start port = 1025 / End port = 65535)
-
Destination port: A Single Port (Port: The port of BitTorrent/Utorrent)
Rule 2
-
Action: Allow
-
Protocol: TCP
-
Direction: Out
-
Description: Rule for outgoing TCP connections
-
Source Address: Any Address
-
Destination Address: Any Address
-
Source port: A Port Range: (Start port = 1025 / End port = 65535)
-
Destination port: A Port Range: (Start port = 1025 / End port = 65535)
Rule 3
-
Action: Allow
-
Protocol: UDP
-
Direction: Out
-
Description: Rule for outgoing UDP connections
-
Source Address: Any Address
-
Destination Address: Any Address
-
Source port: A Single Port: Port: the port of utorrent
-
Destination port: A Port Range: (Start port = 1025 / End port = 65535)
Rule 4
-
Action: Ask (Also select the check box 'Log as a firewall event if this rule is fired')
-
Protocol: TCP
-
Direction: Out
-
Description: Rule for HTTP requests
-
Source Address: Any Address
-
Destination Address: Any Address
-
Source port: A Port Range: (Start port = 1025 / End port = 65535)
-
Destination port; A Single Port (Port = 80)
Rule 5
-
Action: Block (Also select the check box 'Log as a firewall event if this rule is fired')
-
Protocol: IP
-
Direction: In/Out
-
Description: Block and Log All Unmatching Requests
-
Source Address: Any Address
-
Destination Address: Any Address
-
IP Details: IP Protocol: Any
-
Click 'Apply' in the 'Application Network Access Control' interface.
The new policy will be created and added as a Predefined Security Policy. Start BitTorrent or Utorrent. When Comodo raises a pop-up alert, choose 'Treat this application as', select the descriptive name you gave for this rule (e.g. For allowing BitTorrent/Utorrent) from the options and select 'Remember my answer'.
Comodo Internet Security User Guide | © 2012 Comodo Security Solutions Inc. | All rights reserved