Adding Websites for Daily Blacklist Monitoring and Malware Scanning
Major search engines including Google, Yahoo and Bing will blacklist a website if they determine that it is malicious. This can happen, for example, if the site is found to host malware or because the site has been used for fraudulent activities such as phishing. Blacklisted sites will not be listed in search results and website visitors will be shown a strongly-worded message of warning whenever they try to visit the site. This is especially significant when you consider hackers can infiltrate a legitimate website and use it to host their attacks without the owners knowledge. Innocent businesses can often find their websites blacklisted through no misdemeanor of their own.
Web Inspector checks all the major website blacklists for your websites on a daily basis. You will receive immediate notification if one of your sites is found, enabling you to take appropriate remedial action. Of course, the malware scanning component of Web Inspector will thoroughly check your website for viruses on a daily basis and will notify you before the search engines ever find out.
To add a website for daily blacklist monitoring and malware scanning
-
Click 'Setup Wizard'' at the top of the interface:

-
Step 1 - Enter the URL of the website that you want to add in the text box.

- Click the 'ADD SITE' button.
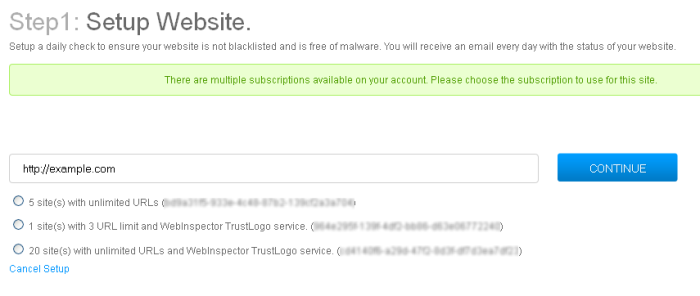
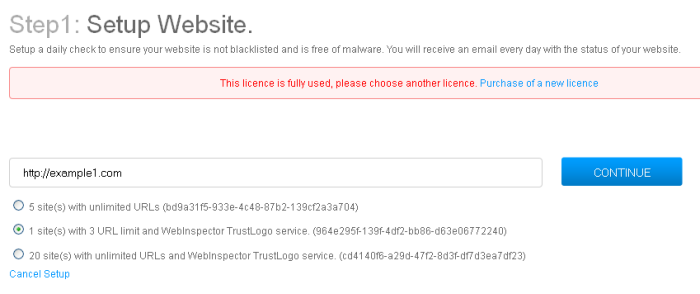
- If you have multiple Web Inspector account subscriptions, select the subscription package to which you want add the website and click the 'Continue' button.
- Step 2 – Enter the email address to which the Web Inspector reports and notifications will be sent daily.

- Click the 'ADD EMAIL' button or 'Next'.
You can review the entries or cancel the website add process by clicking 'Back' or 'Cancel Setup' respectively anytime during the process.
- Step 3 – Website ownership verification. You have to demonstrate ownership of the domain before WI can start scanning the website.
| Note: You can also choose to skip the website ownership verification at this moment by clicking 'Skip and Finish Setup' link at the bottom. Please refer to the section 'Validating your Website' if you want to validate your website at a later time. |
There are four methods available for authenticating your website:
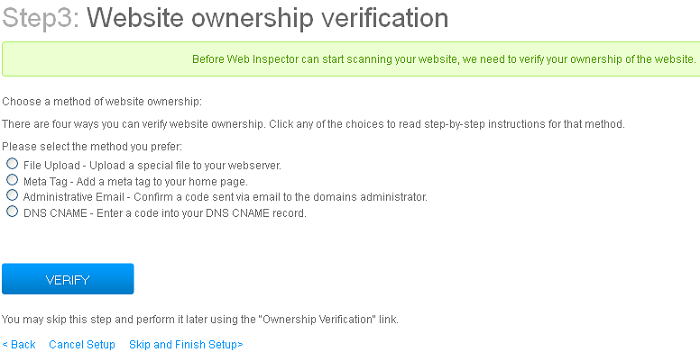
File Upload - You download a specific .txt file which is to be placed on the root of your web server. Comodo will run an automated check and verify domain control based on the presence of this file.
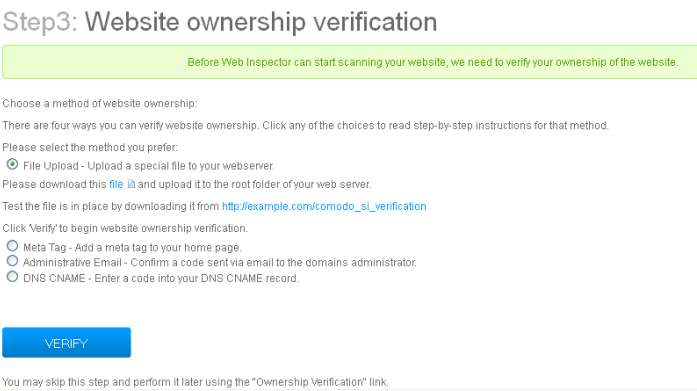
- Download the text file by clicking 'file'
- Upload it to root folder of your web server
- After the text file has been uploaded, click the 'VERIFY' button.
- Comodo will check for existence of this file to prove domain control
- After successful verification, 'Manage' and 'TrustLogo' links will become available for that domain (Note - the availability of 'TrustLogo' link depends on your subscription type).
Meta Tag- Web Inspector will generate a unique tag which must be inserted into the meta-data of your home page html. Web Inspector will check this page and validate domain control based on the presence of the tag.
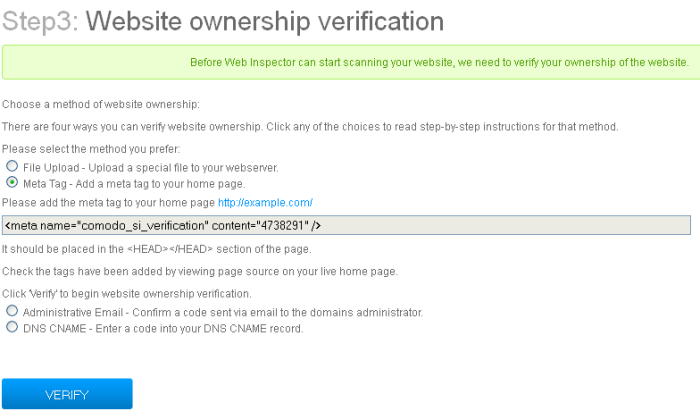
- Copy the meta tag from the text box and paste it into your website home page as a new line anywhere between and tag
- Once this is done, click the 'Verify' button to initiate the verification check.
- Comodo will check for existence of the tag to prove domain control
- After successful verification, 'Manage' and 'TrustLogo' links will become available for that domain (Note - the availability of 'TrustLogo' link depends on your subscription type).
Administrative Email - Web Inspector will check the WHOIS database and send a validation code to the email address of the domain administrator.
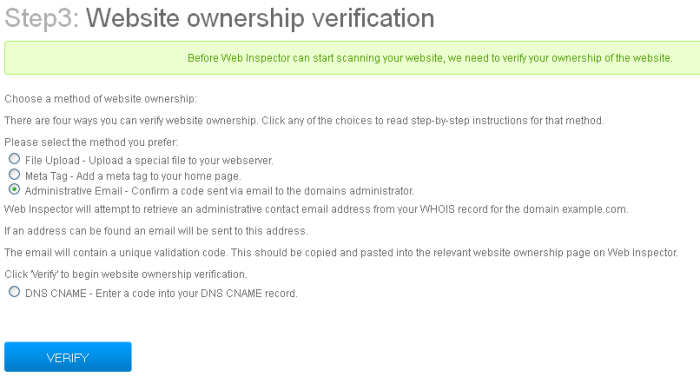
- Click the 'VERIFY ' button.
- Web Inspector will check for the administrative contact email address for the domain and if found in the WHOIS database, will proceed to Step 4.
- Click the 'SEND EMAIL' button. The verification code will be sent to the email address.
- Copy the code in the email and paste it in the text box in Step 5 and click the 'SUBMIT' button.
- After successful verification, 'Manage' and 'TrustLogo' links will become available for that domain (Note - the availability of 'TrustLogo' link depends on your subscription type).
DNS CNAME - Web Inspector will generate a unique code which must be added into your DNS CNAME record.
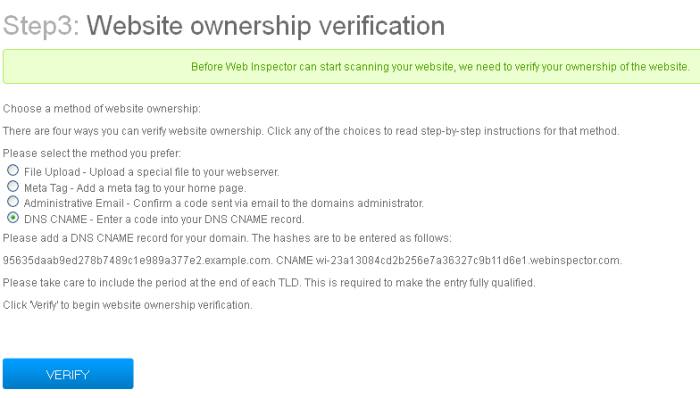
- Copy the hashes from the text box and paste it into a note pad. The hash values must be entered as a DNS CNAME record for your domain.
- Once this is done, click the 'Verify' button to initiate the verification check.
- Comodo will check for CNAME to prove domain control
- After successful verification, 'Manage' and
'TrustLogo' links will become available for that domain (Note -
the availability of 'TrustLogo' link depends on your subscription
type).
Once website(s) have been added, the daily blacklist monitoring and malware scanning will begin at a predetermined time. After the first scan is completed, 'Report' links will be displayed beside the respective websites list in the interface. See the section 'Web Inspector Scan Reports' for more details.
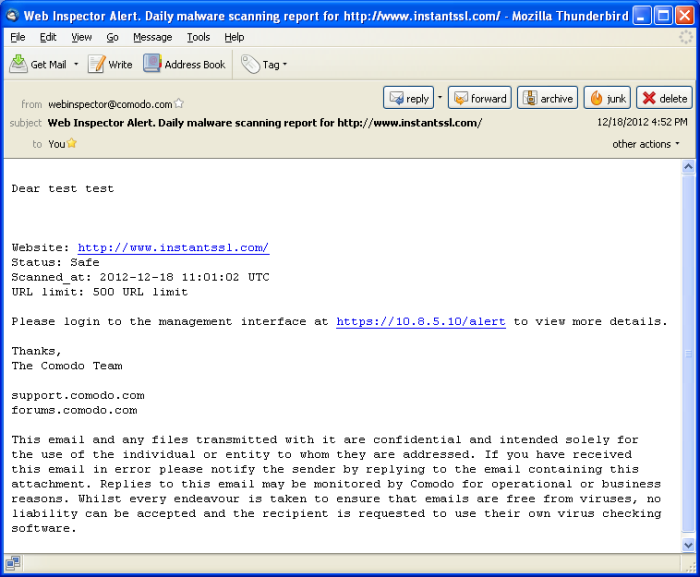
WI will be sending emails daily regarding the status of your websites, which will help you to take immediate remedial action in case of blacklisting any of your websites by major search engines. An example of a notification email is shown below.
