Comodo Help
Find the desired product help
Comodo Web Inspector

Comodo Web Inspector

Version 1.0

English

Print Help Download Help
The Administrative Interface > PCI Scanning > Internal Scanning > Using The Agent - Main Menu > Network Configuration
  • Introduction To Comodo Web Inspector
  • The Administrative Interface
    • Logging-in To The Administrative Interface
    • Adding Websites For Daily Blacklist Monitoring And Malware Scanning
    • Managing Websites In Web Inspector
      • Removing A Website From Daily Blacklist Monitoring And Malware Scanning
      • Viewing Last Scanned WI Reports
      • Adding The WI Logo To Your Website
      • Validating Your Website
      • General Website Configuration
        • Disabling / Enabling A Website
        • Changing WI Notification Recipient Email Address
        • Web Inspector Scan Reports
        • False Positives
        • Scanning Options
        • Adding Trust Logo To Your Website
    • Managing Your Account
      • Web Inspector Area
      • My Account
      • Help
      • Contacts
    • PCI Scanning
      • Starting Up With Web Inspector PCI Scanning Service
        • Introduction To The Interface
        • Running Your PCI Scan
        • Viewing Executive Report, Charts And Vulnerability Reports
        • Accessing The Self Assessment Questionnaire
      • PCI Scanning Service - Infrastructure
      • PCI Scan
        • Overview
        • List Of Devices
        • How To Create A New Device
        • Devices Management
        • Start Scanning
        • Viewing A Dashboard Summary Of Scan Results
        • Viewing Executive Report, Charts And Vulnerability Reports
      • Internal Scanning
        • How To Add A New Device
        • Internal Devices Management
        • How To Install The Agent
        • Configuring The Agent
        • Using The Agent - Main Menu
          • HackerGuardian Agent
          • Network Configuration
          • Select A Device For Session Profile
          • Diagnostic Console
          • Shutdown System
        • Start Device Scanning
        • Viewing A Dashboard Summary Of Scan Results
        • View Reports And Statistics
      • Account Preferences And Scan Settings
        • My Account Area
        • Configure Email Alert And Global Alert Options
        • Custom Settings
        • PCI Settings
      • Scheduled Scans
        • Adding A New Scan Schedule
      • Web Inspector PCI Reports
        • Viewing Scan Reports
          • Filtering Options
        • Executive Report
        • Charts Page
        • Vulnerability Report
        • Mitigation Plan
        • Reporting False Positives
        • Downloading Reports Pack
        • Tracking Status Of Submitted False Positives
      • Purchasing Additional IP Packs
    • Web Inspector PCI FAQs
      • Web Inspector PCI Services - General FAQ
      • Web Inspector PCI Services - Technical FAQ
      • PCI FAQ
  • About Comodo Security Solutions

Network Configuration


The network configuration menu allows you to reconfigure the network settings you made during the configuration of the agent.


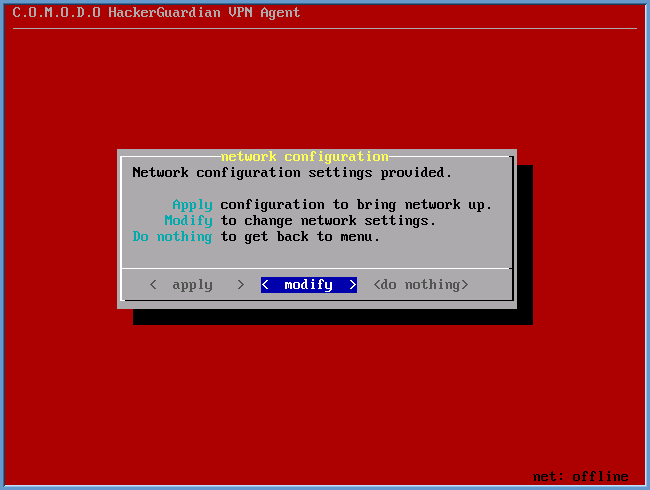
To change the existing network configuration, select 'Modify' in the network configuration dialog.


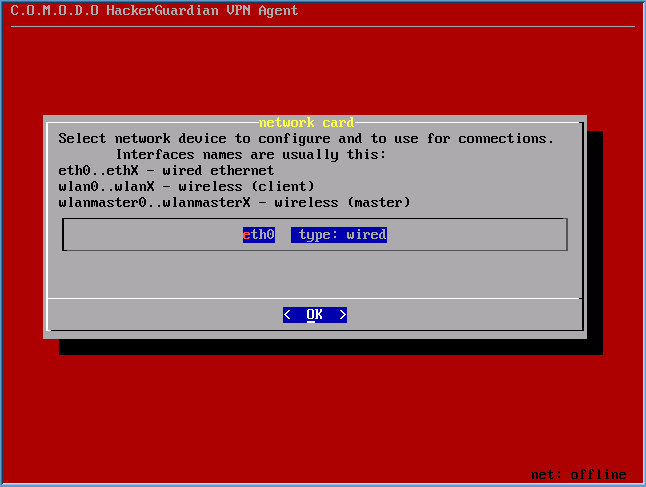
The network configuration wizard will be restarted. The available network adapters are detected and displayed as a list.


  • Select the network adapter through which you want the scan to be performed and select the connection mode.


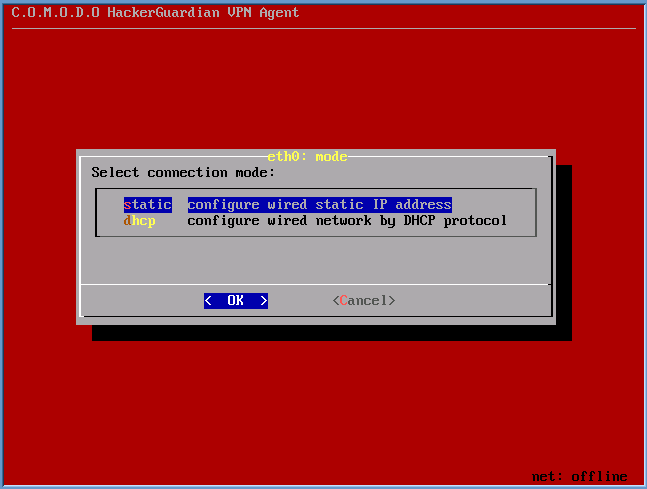
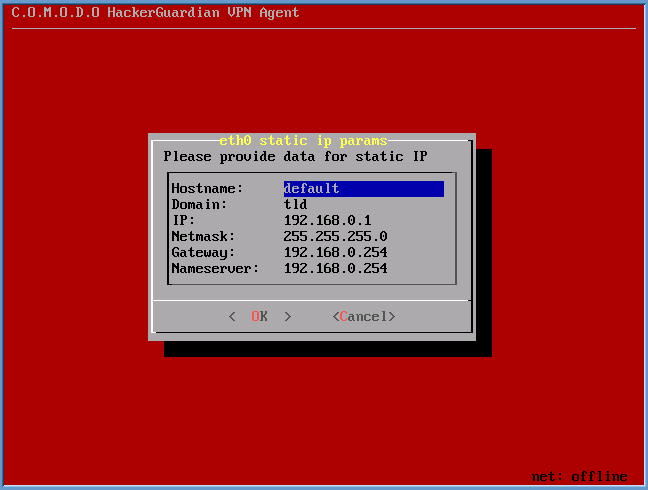
  • The available connection mode choices are Static IP address and DHCP. Select the mode in which the device is connected to the network. In the next dialog, set the parameters for the connection. (The agent detects the default parameters of the device and displays them. Only change the values you wish to change and select OK. Use up and down arrow keys and the tab key for navigation).


  • If you are satisfied with the above configurations, select Apply in the next dialog. The previously stored parameters are overwritten with the new values. If you want to edit the settings before saving, select Modify. The Network configuration will be restarted. If you do not want to save the settings, select Do nothing. The previously stored configurations will be retained and the new configurations will not be saved.


After successfully configuring the network adapter, the network state will appear green in the lower right corner of the screen. The network state will be displayed in black if any connection problems arise indicating that the network connection setting are to be reconfigured.

Our Products
  • Free Antivirus
  • Free Internet Security
  • Website Malware Removal
  • Free Anti-Malware
  • Anti-Spam (Free Trial)
  • Windows Antivirus
  • Antivirus for Windows 7
  • Antivirus for Windows 8
  • Antivirus for Windows 10
  • Antivirus for MAC
  • Antivirus for Linux
  • Free Endpoint Security
  • Free ModSecurity
  • Free RMM
  • Free Website Malware Scanner
  • Free Device Manager for Android
  • Free Demo
  • Network Security
  • Endpoint Protection
  • Antivirus for Android
  • Comodo Antivirus
  • Wordpress Security
Cheap CDN
  • Bootstrap CDN
  • Semantic UI CDN
  • Jquery CDN
  • CDN Plans
  • CDN
  • Free CDN
Enterprise
  • Patch Management Software
  • Patch Manager
  • Service Desk
  • Website Down
  • Endpoint Protection Solutions
  • Website Security Check
  • Remote Monitoring and Management
  • Website Security
  • Device Manager
  • ITSM
  • CRM
  • MSP
  • Android Device Manager
  • MDR Services
  • EDR Services
  • Ransomware Prevention
  • Managed IT Support Services
  • EDR
Free SSL Certificate
Support Partners Terms and Conditions Privacy Policy

© Comodo Group, Inc. 2023. All rights reserved.