Comodo Help
Find the desired product help
Comodo Web Inspector

Comodo Web Inspector

Version 1.0

English

Print Help Download Help
The Administrative Interface > PCI Scanning > Internal Scanning > Configuring The Agent
  • Introduction To Comodo Web Inspector
  • The Administrative Interface
    • Logging-in To The Administrative Interface
    • Adding Websites For Daily Blacklist Monitoring And Malware Scanning
    • Managing Websites In Web Inspector
      • Removing A Website From Daily Blacklist Monitoring And Malware Scanning
      • Viewing Last Scanned WI Reports
      • Adding The WI Logo To Your Website
      • Validating Your Website
      • General Website Configuration
        • Disabling / Enabling A Website
        • Changing WI Notification Recipient Email Address
        • Web Inspector Scan Reports
        • False Positives
        • Scanning Options
        • Adding Trust Logo To Your Website
    • Managing Your Account
      • Web Inspector Area
      • My Account
      • Help
      • Contacts
    • PCI Scanning
      • Starting Up With Web Inspector PCI Scanning Service
        • Introduction To The Interface
        • Running Your PCI Scan
        • Viewing Executive Report, Charts And Vulnerability Reports
        • Accessing The Self Assessment Questionnaire
      • PCI Scanning Service - Infrastructure
      • PCI Scan
        • Overview
        • List Of Devices
        • How To Create A New Device
        • Devices Management
        • Start Scanning
        • Viewing A Dashboard Summary Of Scan Results
        • Viewing Executive Report, Charts And Vulnerability Reports
      • Internal Scanning
        • How To Add A New Device
        • Internal Devices Management
        • How To Install The Agent
        • Configuring The Agent
        • Using The Agent - Main Menu
          • HackerGuardian Agent
          • Network Configuration
          • Select A Device For Session Profile
          • Diagnostic Console
          • Shutdown System
        • Start Device Scanning
        • Viewing A Dashboard Summary Of Scan Results
        • View Reports And Statistics
      • Account Preferences And Scan Settings
        • My Account Area
        • Configure Email Alert And Global Alert Options
        • Custom Settings
        • PCI Settings
      • Scheduled Scans
        • Adding A New Scan Schedule
      • Web Inspector PCI Reports
        • Viewing Scan Reports
          • Filtering Options
        • Executive Report
        • Charts Page
        • Vulnerability Report
        • Mitigation Plan
        • Reporting False Positives
        • Downloading Reports Pack
        • Tracking Status Of Submitted False Positives
      • Purchasing Additional IP Packs
    • Web Inspector PCI FAQs
      • Web Inspector PCI Services - General FAQ
      • Web Inspector PCI Services - Technical FAQ
      • PCI FAQ
  • About Comodo Security Solutions

Configuring the Agent


 To start the configuration, boot the device through the Live CD or the Live USB.


Step 1


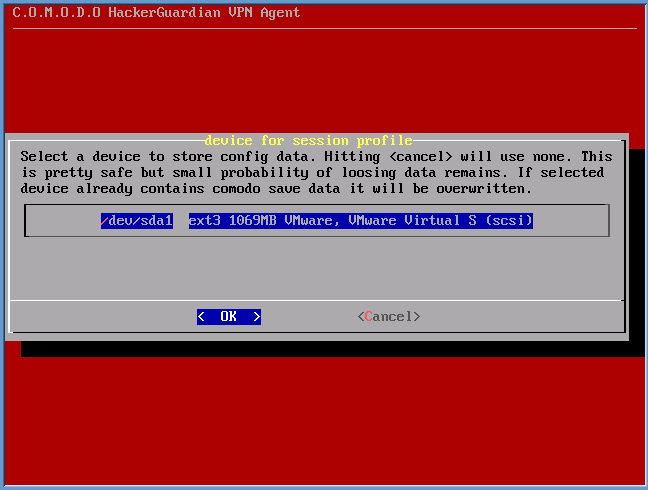
The agent starts building a list of block devices for storing the configuration files. The agent detects hard disks, USB memory drives and/or other available block devices containing with live file system (like FAT 12, FAT16, FAT 32, VFAT, ext2/ext3, XFS, reisrfs etc.) and proposes a list of valid devices for you to choose from. Select a device to store the configuration files.


Step 2


The agent asks for a short description of the saved configuration. You can give a short name/description for the configuration (Max 40 characters)


Step 3


The network configuration dialog appears to specify the network configuration settings. The available network adapters are detected and displayed as a list. Only one network adapter can be used at a time. Select the network adapter through which you want the scan to be performed and select OK.


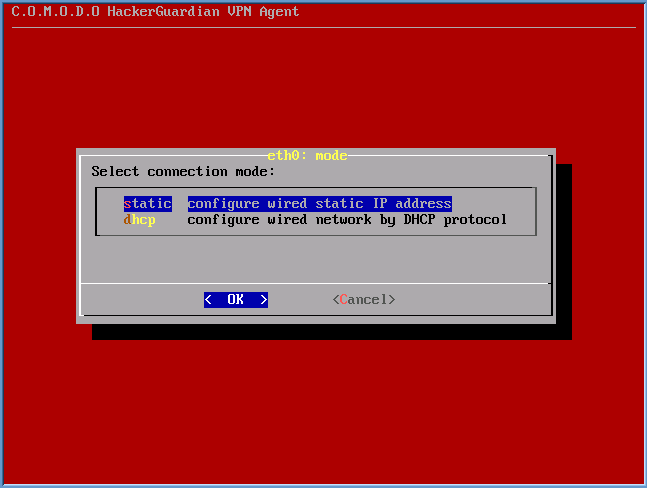
The connection mode configuration dialog appears. The available choices are Static IP address and DHCP. Select the mode in which the device is connected.


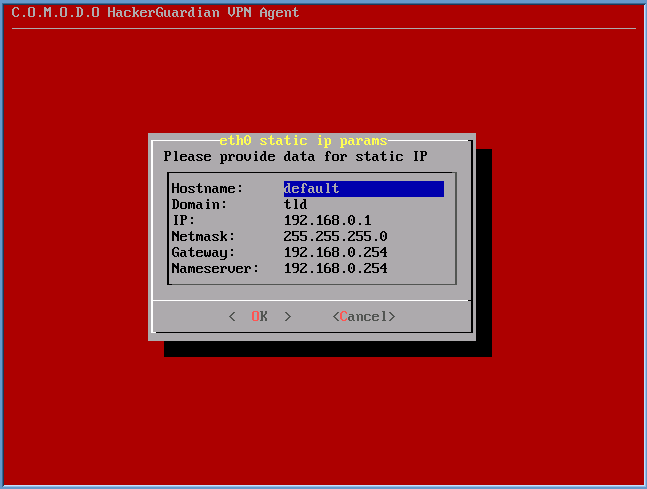
In the next dialog, set the parameters for the selected connection (The agent detects the default parameters of the device and displays them. Only change the values you wish to change and select OK. Use up and down arrow keys and the tab key for navigation).


If you are satisfied with the above configurations, select 'Apply' in the next dialog.


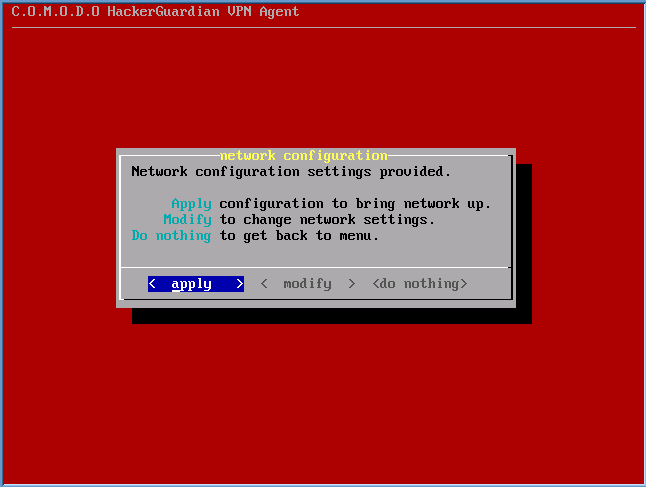
The configuration will be saved. If you want to edit the settings before saving, select Modify. The Network configuration will be restarted. If you do not want to save the settings, select Do nothing. The configuration will not be saved and the network configuration will be restarted.


The main menu will be displayed on completion of the configuration. You can modify the configuration at any time through the options in the main menu.

Our Products
  • Free Antivirus
  • Free Internet Security
  • Website Malware Removal
  • Free Anti-Malware
  • Anti-Spam (Free Trial)
  • Windows Antivirus
  • Antivirus for Windows 7
  • Antivirus for Windows 8
  • Antivirus for Windows 10
  • Antivirus for MAC
  • Antivirus for Linux
  • Free Endpoint Security
  • Free ModSecurity
  • Free RMM
  • Free Website Malware Scanner
  • Free Device Manager for Android
  • Free Demo
  • Network Security
  • Endpoint Protection
  • Antivirus for Android
  • Comodo Antivirus
  • Wordpress Security
Cheap CDN
  • Bootstrap CDN
  • Semantic UI CDN
  • Jquery CDN
  • CDN Plans
  • CDN
  • Free CDN
Enterprise
  • Patch Management Software
  • Patch Manager
  • Service Desk
  • Website Down
  • Endpoint Protection Solutions
  • Website Security Check
  • Remote Monitoring and Management
  • Website Security
  • Device Manager
  • ITSM
  • CRM
  • MSP
  • Android Device Manager
  • MDR Services
  • EDR Services
  • Ransomware Prevention
  • Managed IT Support Services
  • EDR
Free SSL Certificate
Support Partners Terms and Conditions Privacy Policy

© Comodo Group, Inc. 2023. All rights reserved.