Comodo Help
Find the desired product help
Comodo Web Inspector

Comodo Web Inspector

Version 1.0

English

Print Help Download Help
The Administrative Interface > Managing Websites In Web Inspector > General Website Configuration > Scanning Options
  • Introduction To Comodo Web Inspector
  • The Administrative Interface
    • Logging-in To The Administrative Interface
    • Adding Websites For Daily Blacklist Monitoring And Malware Scanning
    • Managing Websites In Web Inspector
      • Removing A Website From Daily Blacklist Monitoring And Malware Scanning
      • Viewing Last Scanned WI Reports
      • Adding The WI Logo To Your Website
      • Validating Your Website
      • General Website Configuration
        • Disabling / Enabling A Website
        • Changing WI Notification Recipient Email Address
        • Web Inspector Scan Reports
        • False Positives
        • Scanning Options
        • Adding Trust Logo To Your Website
    • Managing Your Account
      • Web Inspector Area
      • My Account
      • Help
      • Contacts
    • PCI Scanning
      • Starting Up With Web Inspector PCI Scanning Service
        • Introduction To The Interface
        • Running Your PCI Scan
        • Viewing Executive Report, Charts And Vulnerability Reports
        • Accessing The Self Assessment Questionnaire
      • PCI Scanning Service - Infrastructure
      • PCI Scan
        • Overview
        • List Of Devices
        • How To Create A New Device
        • Devices Management
        • Start Scanning
        • Viewing A Dashboard Summary Of Scan Results
        • Viewing Executive Report, Charts And Vulnerability Reports
      • Internal Scanning
        • How To Add A New Device
        • Internal Devices Management
        • How To Install The Agent
        • Configuring The Agent
        • Using The Agent - Main Menu
          • HackerGuardian Agent
          • Network Configuration
          • Select A Device For Session Profile
          • Diagnostic Console
          • Shutdown System
        • Start Device Scanning
        • Viewing A Dashboard Summary Of Scan Results
        • View Reports And Statistics
      • Account Preferences And Scan Settings
        • My Account Area
        • Configure Email Alert And Global Alert Options
        • Custom Settings
        • PCI Settings
      • Scheduled Scans
        • Adding A New Scan Schedule
      • Web Inspector PCI Reports
        • Viewing Scan Reports
          • Filtering Options
        • Executive Report
        • Charts Page
        • Vulnerability Report
        • Mitigation Plan
        • Reporting False Positives
        • Downloading Reports Pack
        • Tracking Status Of Submitted False Positives
      • Purchasing Additional IP Packs
    • Web Inspector PCI FAQs
      • Web Inspector PCI Services - General FAQ
      • Web Inspector PCI Services - Technical FAQ
      • PCI FAQ
  • About Comodo Security Solutions

Scanning Options


Web Inspector allows you to schedule your daily scans, change the user-agent name that will be used to scan your website and specify a particular page or pages that you want


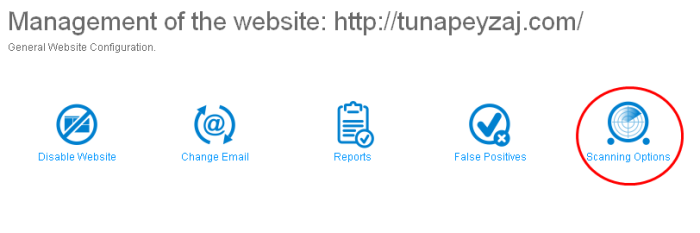
To configure scanning settings for a specific website, click the 'Manage' link at the right side in the row and click the 'Scanning Options' link in the 'General Website Configuration' interface.


The 'Website Scanning Configuration Options' screen will be displayed.


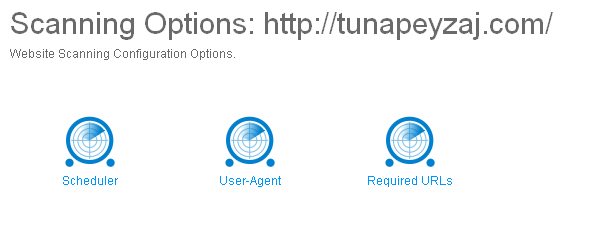
The scanning options available are:

  • Scheduling your daily WI scans
  • Changing the name of user-agent
  • Adding specific pages to be scanned manually


Scheduling your Daily WI Scans


Web Inspector allows you to set the time of the scans for your websites. To set the daily scan time, click the 'Scheduler' link in the 'Website Scanning Configuration Options' interface.


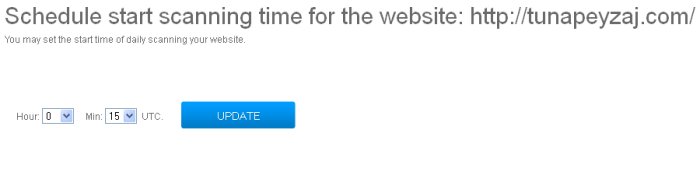
Select the hour and minute at which the scan should commence in the 'Hour' and 'Min' drop-down boxes and click the 'Update' button.


The 'Schedule has been successfully changed' message will be displayed.


The daily WI scan will commence at the newly scheduled time.


Click the 'Return to Scanning Options' link to go back to the 'Website Scanning Configuration Options' screen.


Changing the User-Agent's Name


This setting lets you determine the browser type that the Web Inspector agent uses to identify itself to your website. When making a request to download pages in order to scan them, Web Inspector identifies itself in much the same way that a regular browser identifies itself. In some cases, websites present different content based on the type of browser/user-agent that is making the request. By default, the Web Inspector agent identifies itself as ‘Mozilla/4.0 (compatible; MSIE 8.0; Windows NT 6.0)’. This setting covers the vast majority of browsers that your website visitors will use to visit your site. Therefore, Web Inspector is requesting, receiving and analyzing the precise content that your viewers see.


For a full list of user-agent strings, please visit http://user-agent-string.info/list-of-ua


To change the name of the user-agent,click the 'User-Agent' link in the 'Website Scanning Configuration Options' interface.
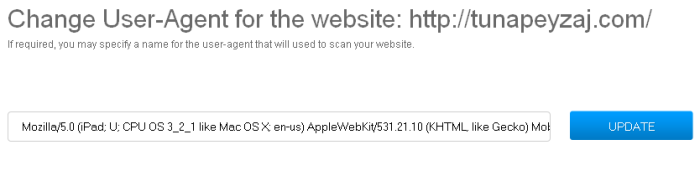


Enter the new name of the user-agent in the text box and click the 'UPDATE' button.


The 'User-Agent has been successfully changed' message will be displayed.


Click the 'Return to Scanning Options' link to go back to the 'Website Scanning Configuration Options' screen.


Adding Pages Manually for WI Scan


Web Inspector will browse your website and all the linked pages. If Web Inspector does not find a page that you need to be scanned, you can add the URLs of these pages manually.


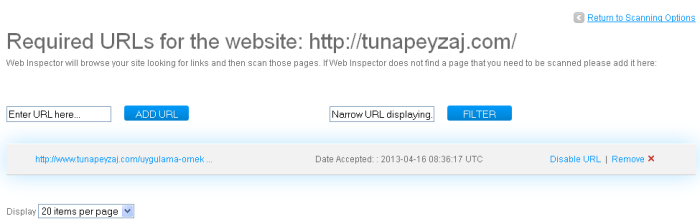
To add URLs of pages manually for WI scanning, click the 'Required URLs' link in the 'Website Scanning Configuration Options' interface.


The list of web pages already added will be listed.


  • Sorting Reports based on Search Keys - You can filter the entries in the list to show only the results of particular webpage(s) by sorting the results based on search keys. Enter the search key partially of fully in the text field beside 'Filter' and click the 'Filter' button.
  • Limiting number of entries per page - You can limit the number of items displayed in the screen by selecting the option from 'Display' drop-down.

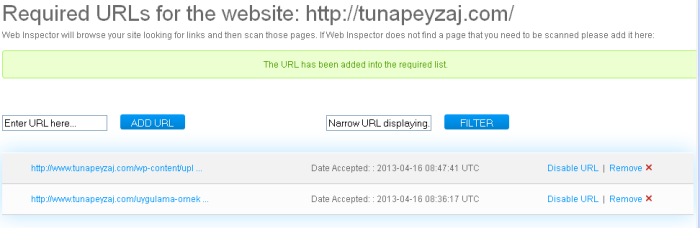
To add a web page manually, enter the full URLs of the webpage and click the 'Add URL' button. Web Inspector will add the webpage and display in the list.


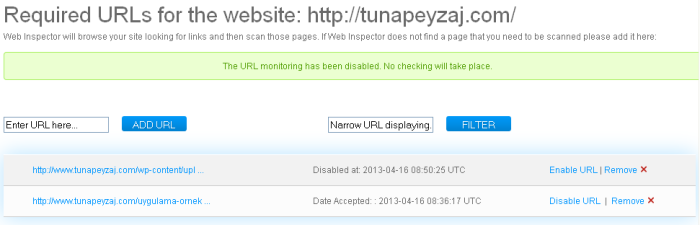
You can disable a webpage from being scanned by Web Inspector. Click the 'Disable URL' beside the page entry that you do not want to be scanned and click 'OK' in the confirmation dialog. A message will be displayed that the monitoring has been stopped for the selected page.


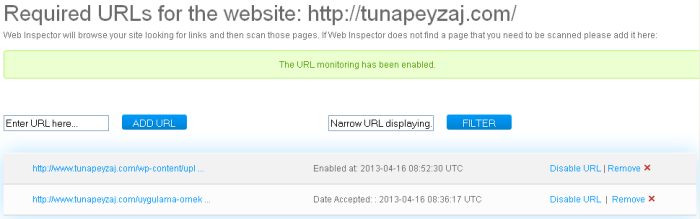
To enable it again, click the 'Enable URL' link and click' OK' in the confirmation dialog. Web Inspector will now start monitoring the enabled page also.


You can remove a page from this list by clicking the 'Remove' link beside it.


Our Products
  • Free Antivirus
  • Free Internet Security
  • Website Malware Removal
  • Free Anti-Malware
  • Anti-Spam (Free Trial)
  • Windows Antivirus
  • Antivirus for Windows 7
  • Antivirus for Windows 8
  • Antivirus for Windows 10
  • Antivirus for MAC
  • Antivirus for Linux
  • Free Endpoint Security
  • Free ModSecurity
  • Free RMM
  • Free Website Malware Scanner
  • Free Device Manager for Android
  • Free Demo
  • Network Security
  • Endpoint Protection
  • Antivirus for Android
  • Comodo Antivirus
  • Wordpress Security
Cheap CDN
  • Bootstrap CDN
  • Semantic UI CDN
  • Jquery CDN
  • CDN Plans
  • CDN
  • Free CDN
Enterprise
  • Patch Management Software
  • Patch Manager
  • Service Desk
  • Website Down
  • Endpoint Protection Solutions
  • Website Security Check
  • Remote Monitoring and Management
  • Website Security
  • Device Manager
  • ITSM
  • CRM
  • MSP
  • Android Device Manager
  • MDR Services
  • Managed IT Support Services
  • Free EDR
Free SSL Certificate
Support Partners Terms and Conditions Privacy Policy

© Comodo Group, Inc. 2025. All rights reserved.