


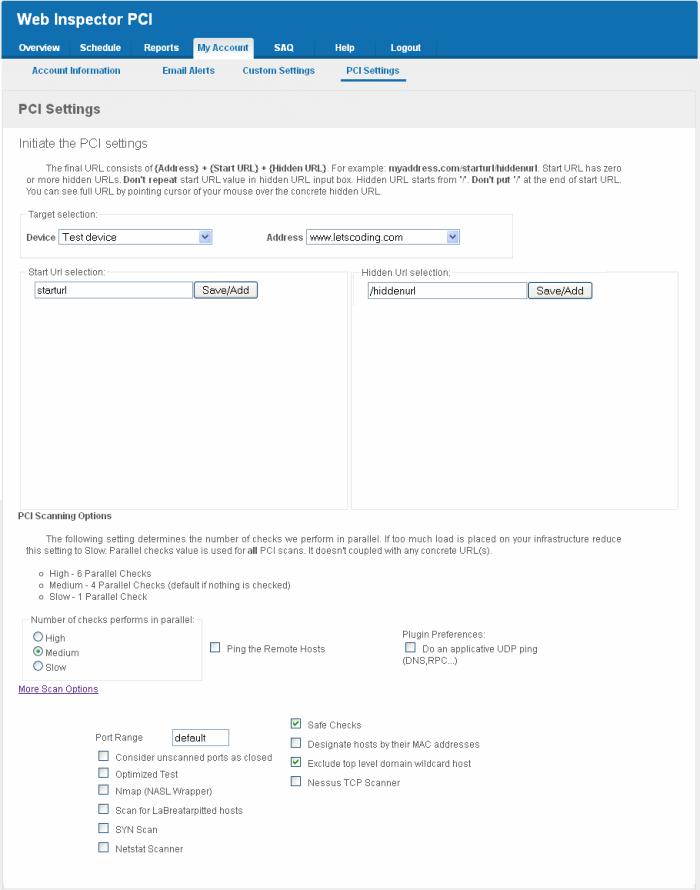
PCI Settings
The PCI Settings area enables the administrator to customize the scan start page and to include hidden urls to be scanned for a Device and to specify the maximum number of concurrent scans.
- By default, the scanning is started from the main website page. If the index page of the website is different from the main site page, the administrator has to specify the index page url as the Start url, in order to start the scanning from the index page.
- If the website(s) contained in the Device has hidden webpages, which are not linked from any other active page. Then the crawler will not be able to find them and include them for scanning. These hidden pages are to be scanned, Web Inspector PCI allows you to manually add them to the device for scanning.
To access the PCI Settings area
-
Switch to 'My Accounts' area of the Web Inspector PCI interface.
-
Click the 'PCI Settings' link in the 'My Accounts' area
This area allows the Administrator to:
Specifying Target URLs for Scanning
-
Select the Web Inspector PCI Device for which the PCI Settings are to be customized from the Device drop-down.
-
Select the IP Address/Domain contained in the Device.
-
Enter the start page or index page of selected domain in the StartUrl selection textbox and click Save/Add.
| Note: The domain name need not be repeated and the startpage should not
be ended with a “/” . If this field is left blank, the
scanning will be started from the main website page.
For example, if the index page of the domain testdomain.com is www.testdomain.com/starturl/index.html, just enter “starturl” in the Start Url selection textbox. |
-
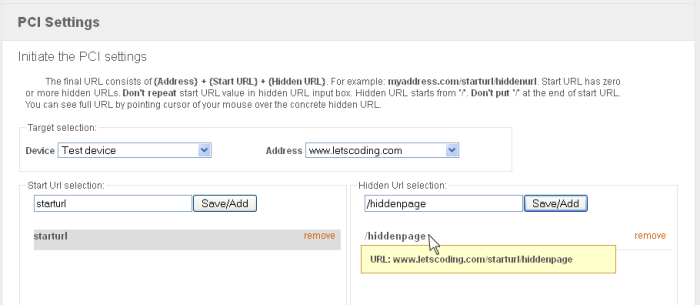
Enter the hidden url in the Hidden Url selection text box and click Save/Add.
| Note:
The start page url should be mentioned for each hidden url. The
hidden url should be prefixed with a “/” . The domain name and
the full path need not be repeated. For example, if the hidden page of the domain testdomain.com/starturl is www.testdomain.com/starturl/hiddenpage, just enter “/hiddenpage” in the Hidden Url selection textbox. Placing the mouse cursor over the added hidden url will display the full path. |
-
Repeat the process for adding the start url and the hidden url for each hidden page in the website.
Setting Maximum Number of Allowed Concurrent Scan and Scan Options
In the PCI Scanning Options section, select the High, Medium or Slow radio buttons to specify the maximum number of concurrent scans. The number of allowed parallel checks are as given below:
|
High - |
Six Parallel Checks |
|
Medium - |
Four Parallel Checks (default) |
|
Slow - |
One check at a time |
| Tip: Lower the number of concurrent scans, faster will be the process. |
Scanning Options
Click the 'More Scan Options' link to view all the scanning options available.
This area enables administrators to configure general options pertaining to the scans. The settings chosen in this area will apply to any scan performed on selected device in the 'Overview' and 'Scheduled Scans' areas.
| Scan Option | Element Type | Description |
|---|---|---|
|
Ping the Remote Hosts |
Check box |
Pings the remote hosts through TCP connection and reports to the plug-ins knowledge base on whether the remote host is dead or alive. This sends to the remote host a packet with the flag SYN, and the host will reply with a RST or a SYNACK. |
|
Consider unscanned ports as closed |
Check box |
Ports that are not specifically scanned will be assumed as in closed state. |
|
Do an applicative UDP ping (DNS,RPC...) |
Check box |
Performs a check if the host is up by sending a single UDP packet. The host is up if another UDP packet is returned or if an ICMP port unreachable message is returned. |
|
Port Range |
Check box |
Set the range of ports to be scanned. A special value of default is allowed which scans port 1-15000. To scan all TCP ports on the target host, enter '1-65535'. Enter single ports, such as "21, 23, 25" or more complex sets, such as "21, 23, 25, 1024-2048, 6000", or enter "default" to scan default ports. |
|
Optimized Test |
Check box |
Allows the scan to be optimized by only performing tests if information previously collected indicates a test is relevant. When disabled all tests are performed. |
|
Nmap (NASL Wrapper) |
Check box |
Runs nmap(1) to find open ports. |
|
Scan for La Breatarpitted hosts |
Check box |
Performs a labrea tarpit scan, by sending a bogus ACK and ACK-windowprobe to a potential host. Also sends a TCP SYN to test for non-persisting lebrea machines. |
|
SYN Scan |
Check box |
Performs a fast SYN port scan by computing the RTT (round trip time) of the packets moving back and forth between host and the target and using the value to quickly send SYN packets to the remote host. |
|
Netstat Scanner |
Check box |
Runs netstat on the remote machine to find open ports. |
|
Safe Checks |
Check box |
Some checks are potentially harmful to the target host being scanned. When this option is enabled scans which may harm the target host are not performed. This option should be disabled to perform a full scan. |
| Designate hosts by their MAC address |
Check box |
This option will identify hosts in the scan report by their Ethernet MAC address rather than their IP address. This is useful for networks in which DHCP is used. |
| Exclude top level domain wildcard hosts |
Check box |
Excludes the hosts whose addresses are returned by a wildcard on some top level domains or the web server. |
| Nessus TCP Scanner | Check box |
Enables classical TCP port scanner. It shall be reasonably quick even against a firewalled target. Once a TCP connection is open, it grabs any available banner for the service identifications. TCP scanners are more intrusive than SYN (half open) scanners. |