Configure Virus Database Updates
- Click 'Settings' > 'General Settings' > 'Updates'
- This
area lets you configure XCS program and database updates:

- Check for database updates every... - Set how frequently XCS should check for application updates. Updates are downloaded from Xcitium servers by default, but you can also set a local server to handle them if required. Select the interval in hours / days. (Default and recommended = every 1 hour)
- Do not check updates if am using these connections - XCS will not check for updates if you are using specific internet connections. For example, you may not wish to check for updates when using a wireless connection you know is slow or insecure. (Default = Disabled)
- Enable 'Do not check updates if am using these connections'
- Click the 'these connections' link
- Select the connection over which you do not want to check for updates
- Click 'OK'

- Do not check for updates if running on battery - XCS will not download updates if it detects your computer is on battery power. This is intended to extend battery lifetime on laptops. (Default = Disabled).
- Check for updates during Windows Automatic Maintenance - Allow XCS to receive updates when Windows is updating itself (Default = Disabled).
- Send
requests to COMODO online services only if internet connection is
present – By default, XCS automatically
connects to Xcitium servers for updates and essential services such as FLS, Xcitium Enterprise, and Valkyrie. This setting lets you
disable these connection requests if you are not connected to the
internet.
This is how XCS will proceed if you enable or disable this setting:
- Enabled + No internet connection - XCS will not make requests to Xcitium online services. A failure message is shown if you attempt a manual lookup, submit or update.
- Enabled + Connected to internet - XCS makes requests to Xcitium online services.
- Disabled + Connected to internet – XCS makes requests to Xcitium online services.
- Disabled + No internet connection - XCS will make requests to Xcitium online services, but will not be able to connect. An error message is shown.
- Proxy and Host Settings – Lets you specify (1) A proxy server through which XCS should connect to the update servers, and/or (2) Local hosts from which this computer should collect updates. The two are not dependent on each another. You can setup (1) without (2) and vice-versa, or enable both.
- By default, XCS connects to the internet directly, and downloads updates from Xcitium servers.
- You can specify a proxy through which XCS connects to the update servers. If you do not set a proxy then XCS will continue to use a direct connection.
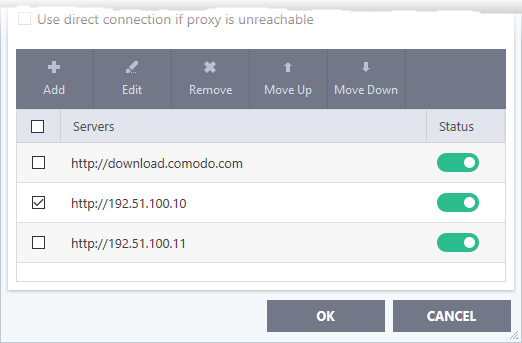
- You can also specify a local host to act as a staging server for the updates. Individual endpoints will then fetch updates from the staging server instead of from Xcitium servers. This can save bandwidth and accelerate updates in large networks.
Configure proxy and host settings
- Click 'Proxy and Host Settings' at the bottom of the updates interface:


- Use Proxy – XCS will connect to the update server through a proxy server
- Enter the host name or IP of the proxy and the connection port
- Use Authentication - Provide the username and password of the proxy if required
- Use direct connection if proxy is unreachable - Allow XCS to fallback to a direct internet connection if the proxy fails
- If you specify a proxy BUT disable direct connections, then XCS will not be able to connect to the download servers if the proxy fails.
|
Note: You need to install the 'ESM Update Mirror' utility to download updates to the local server.
|
- Click the 'Add' button in the lower pane

- Enter the IP address or hostname of the server (with 'http://' prefix) and click 'OK'
- Repeat the process to add more local update servers

- Use the 'Move Up' and 'Move Down' buttons to choose the order in which servers should be consulted. XCS will download from the first server that contains new updates
- Use the status switches to activate or deactivate individual servers
- Click 'OK' for your settings to take effect.


