

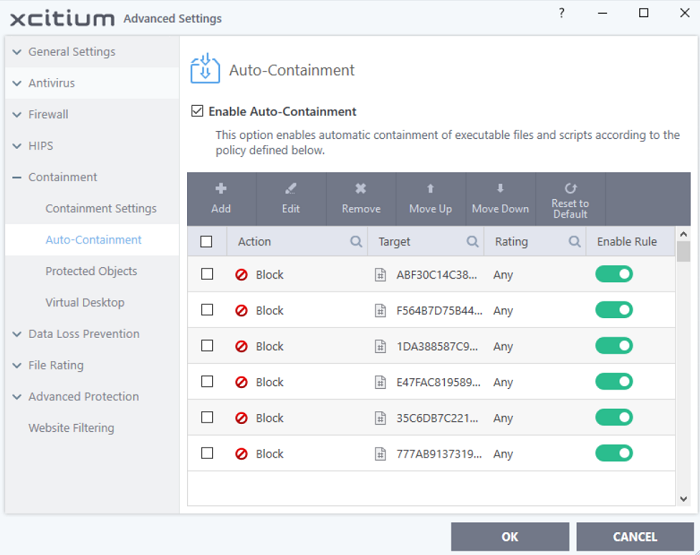
Auto-Containment Rules
- Click 'Settings' > 'Containment' > 'Auto-Containment'.
- Auto-containment rules determine whether a program is allowed to run as normal, run with restrictions, or run in the virtual environment.
- A contained application has much less opportunity to damage your computer because it is isolated from your operating system, important system files and personal data.
- XCS consults these rules whenever you open an application. Rules at the top of the list have a higher priority. You can re-prioritize rules using the 'Move Up' and 'Move Down' buttons.
- Programs running in the container have a green border around them.
- XCS ships with a set of pre-configured rules which provide maximum protection against unknown, potentially malicious applications. You can also create your own custom rules.
Click the following links for help on specific areas:
- Click 'Settings' on the XCS home screen
- Click 'Containment' > 'Auto-Containment'
- The higher a rule is in the list, the higher priority it has. Use the move up/down buttons to change a rule's priority. In the event of a conflict in settings, XCS will obey the rule that is higher in the list.
- You can also add new rules and manage existing rules from this panel.
General Settings
- Enable Auto-Containment - Enable or disable the containment system. If enabled, applications are run in the container as per the rules in this interface. (Default = Enabled)
A rule performs a specific action on targets which have a certain reputation.
|
Containment Rules – Column Descriptions |
|
|---|---|
|
Column Header |
Description |
|
Action |
The operation that the containment system should perform on the target if the rule is triggered. |
|
Target |
The file, file group, or location on which the rule should run. |
|
Rating |
The trust status of the target item - 'Malware', 'Trusted' 'Unrecognized' or 'Any'. The rule will apply to target items which have the reputation you choose here. |
|
Enable Rule |
Activate / deactivate the rule. |
- XCS ships with a set of pre-defined auto-containment rules which provide maximum protection for your system.
- There are five 'Block' rules, seven 'Run Virtually' rules, and one 'Ignore' rule.
- The rule numbers indicate their default priority in XCS. If there is a conflict, XCS implements the rule with the highest priority. You can, of course, rearrange priorities as required.
- The following tables show the settings of the pre-defined rules.
- Click the following links to view the details of each rule:
2 - Block any file in the ‘Suspicious locations’ file group (i.e. anything in CIS quarantine and recycle bin)
3 - Block any file in the folders Xcitium uses for the container (i.e. anything in the /vtroot/ folder)
9 - Block pseudo file downloaders which are downloaded by browsers. Example downloaders are wscript.exe, powershell.exe, perl.exe etc.
13 - Block any file in the 'File Transfer Protocols' file group (i.e. any file in a URL starting with 'http:// or https://'. This blocks installation of MSI packages via URL in a command line)
|
Rule Number |
1 |
2 |
3 |
9 |
13 |
||
|---|---|---|---|---|---|---|---|
|
Action |
Block |
Block |
Block |
Block |
Block |
||
|
Target |
File Group - All Applications |
File Group - Suspicious Locations |
File Group - Containment Folders |
File Group - Pseudo File Downloaders |
File Group – File Transfer Protocols |
||
|
File Reputation |
Malicious |
Any |
Any |
Any |
Any |
||
|
File origin |
Source of file creation |
Application |
Any |
Any |
Any |
Any |
Any |
|
Process(es) |
Any |
Any |
Any |
Web Browsers Rating = Any |
Any |
||
|
user(s) |
Any |
Any |
Any |
Any |
Any |
||
|
Downloaded from |
Any |
Any |
Any |
Any |
Any |
||
|
Vendor |
Any |
Any |
Any |
Any |
Any |
||
|
Age of file |
Any |
Any |
Any |
Any |
Any |
||
|
Log Action |
On |
On |
On |
On |
On |
||
|
Restriction Level |
N/A |
N/A |
N/A |
N/A |
N/A |
||
|
Limit Maximum Memory |
N/A |
N/A |
N/A |
N/A |
N/A |
||
|
Limit Program Execution Time |
N/A |
N/A |
N/A |
N/A |
N/A |
||
|
Quarantine |
On |
Off |
Off |
Off |
On |
||
|
Exclude child processes from the action |
N/A |
N/A |
N/A |
N/A |
N/A |
||
5 - Virtualize unrecognized files which are less than three days old.
6 - Virtualize unrecognized files downloaded from the intranet, internet or removable storage devices.
7 - Virtualize unrecognized files created by applications that belong to any of these file groups:
- Web Browsers
- Email Clients
- File Downloaders
- Pseudo File Downloaders
- File Archivers
- Management and Productivity Applications
- Browser Plug-ins
8 - Virtualize any unrecognized file in the 'Shared Spaces' file group.
- Media Players
10 - Virtualize 'msiexec.exe' if it was started by any process in the 'Management and Productivity Applications' group. The rule will search back ten parent levels of the process tree. 'msiexec.exe' is the MSI installer application.
11 - Virtualize 'cmd.exe' if it was started by 'eqnedt32.exe'
12 - Virtualize 'powershell.exe' if it was started by eqnedt32.exe
'cmd.exe' is the name of the command shell executable, and 'powershell.exe' runs the task automation framework in Windows. 'eqnedt32.exe' is Microsoft's Equation Editor program. Rules 11 and 12 block malware which is impersonating or using the editor to launch attacks.
|
Rule Number |
5 |
6 |
7 |
8 |
10 |
11 |
12 |
||
|---|---|---|---|---|---|---|---|---|---|
|
Action |
Run Virtually |
Run Virtually |
Run Virtually |
Run Virtually |
Run Virtually |
Run Virtually |
Run Virtually |
||
|
Target |
File Group - All Applications |
File Group - All Applications |
File Group - All Applications |
File Group – Shared Spaces |
File Location - *.msiexec.exe |
File Location - *cmd.exe |
File Location - *powershell.exe |
||
|
File Reputation |
Unrecognized |
Unrecognized |
Unrecognized |
Unrecognized |
Any |
Any |
Any |
||
|
File origin |
Source of file creation |
Application |
Any |
Any |
Web Browsers Email Clients File Downloaders Pseudo File Downloaders File Archivers Management and Productivity Applications Browser Plug-ins Media Players |
Any |
Any |
*EQNEDT32.EXE |
*EQNEDT32.EXE |
|
Process(es) |
Any |
Any |
Any |
Any |
File Group – Management and Productivity Applications Number of parent process levels to be analyzed = 10 |
Any |
Any |
||
|
user(s) |
Any |
Any |
Any |
Any |
Any |
Any |
Any |
||
|
Downloaded from |
Any |
Intranet Removable media Internet |
Any |
Any |
Any |
Any |
Any |
||
|
Vendor |
Any |
Any |
Any |
Any |
Any |
Any |
Any |
||
|
Age of file |
Less than 3 days |
Any |
Any |
Any |
Any |
Any |
Any |
||
|
Log Action |
On |
On |
On |
On |
On |
On |
On |
||
|
Restriction Level |
Off |
Off |
Off |
Off |
Off |
Off |
Off |
||
|
Limit Maximum Memory |
Off |
Off |
Off |
Off |
Off |
Off |
Off |
||
|
Limit Program Execution Time |
Off |
Off |
Off |
Off |
Off |
Off |
Off |
||
|
Quarantine |
N/A |
N/A |
N/A |
N/A |
N/A |
N/A |
N/A |
||
|
Exclude child processes from the action |
N/A |
N/A |
N/A |
N/A |
N/A |
N/A |
N/A |
||
4 - Do not auto-contain metro apps.
|
Rule Number |
4 |
||
|---|---|---|---|
|
Action |
Ignore |
||
|
Target |
File Group - Metro Apps |
||
|
File Reputation |
Any |
||
|
File origin |
Source of file creation |
Application |
Any |
|
Process(es) |
Any |
||
|
user(s) |
Any |
||
|
Downloaded from |
Any |
||
|
Vendor |
Any |
||
|
Age of file |
Any |
||
|
Log Action |
On |
||
|
Restriction Level |
N/A |
||
|
Limit Maximum Memory |
N/A |
||
|
Limit Program Execution Time |
N/A |
||
|
Quarantine |
N/A |
||
|
Exclude child processes from the action |
Off |
||
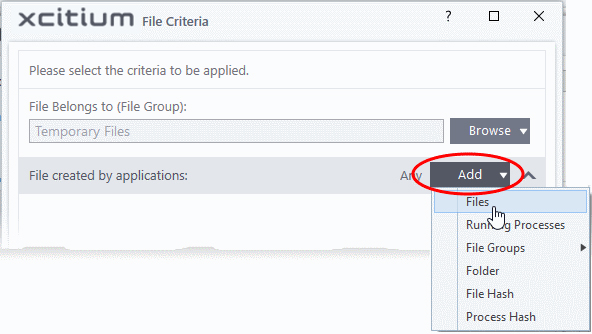
- Auto-containment rules can be created for a single application, for all applications in a folder/file group, for running processes, or for a file/process hash value.
- You can create precision rules by specifying 'file creation source', 'file rating of the source', 'file origin', 'file rating' or 'file age'.
- You can also create simple rules to run an application in the container just by specifying the action and the target application.
- Click the 'Add' button at the top of the list in the Auto-Containment panel:
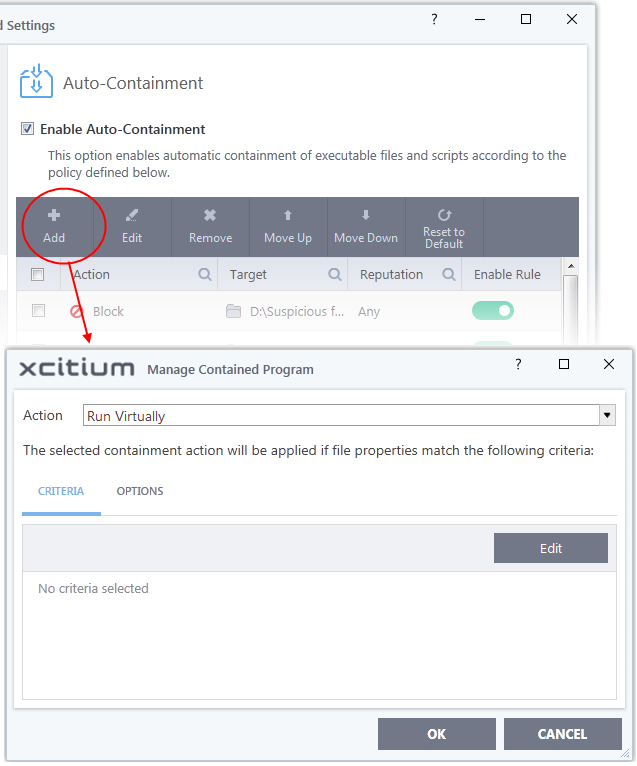
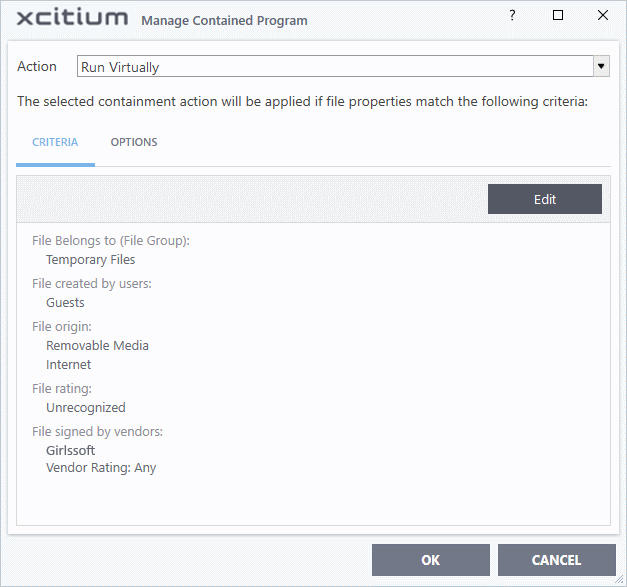
The 'Manage Contained Program' dialog will appear. The 'Manage Contained Program' displays the action at the top and contains two tabs:
- Criteria - Allows you to define conditions upon which the rule should be applied.
- Options - Allows you to configure additional actions like logging, setting memory usage and execution time restrictions.
Creating a new containment rule involves the following steps:
The settings in the 'Action' drop-down combined with the restriction
level in the 'Options' tab determine the privileges of an auto-contained
application. This determines what right it has to access other
processes and hardware resources on your computer.
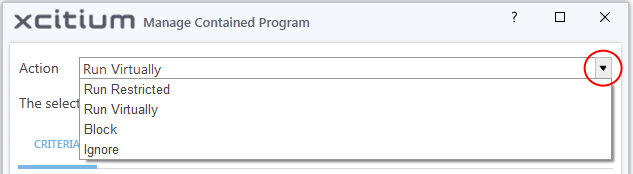
The options available under the 'Action' drop-down are:
- Run Virtually - The application will be run in a virtual environment completely isolated from your operating system and files on the rest of your computer.
- Run Restricted - The application is allowed to access very few operating system resources. The application is not allowed to execute more than 10 processes at a time and is run with very limited access rights. Some applications, like computer games, may not work properly under this setting.
- Block - The application is not allowed to run at all.
- Ignore - The application will not be contained and allowed to run with all privileges.
- Choose the action from the options.
Step
2 - Select the target file/group and set the filter criteria
- The next step is to select the target files and configure filters.
- You can filter a rule so it applies to specific types of file.
- For example, you can specify 'All executables' as the target, then add a filter so it only affects executables from the internet.
- Another example is if you want to allow unrecognized files created by a specific user to run outside the container. You would create an 'Ignore' rule with 'All Applications' as the target, then add 'Files created by a specific user' as the filter.
Select the target and set the filters
- Click the 'Criteria' tab
The target and the filter criteria, if any, configured for the rule will be displayed.
- To add new target and filter criteria, click the 'Edit' button at the far right

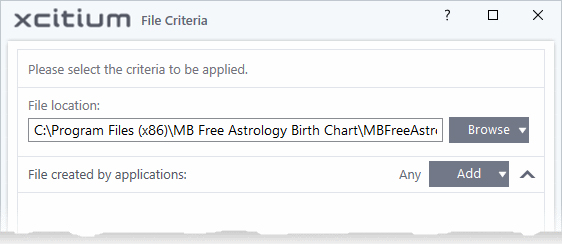
The 'File Criteria' dialog will open. The file criteria dialog allows you:
- To select the target, click the 'Browse' button beside the 'File Location' field
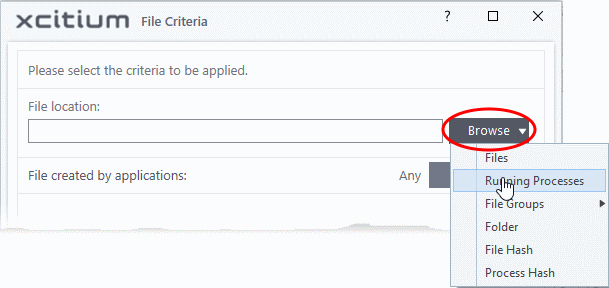
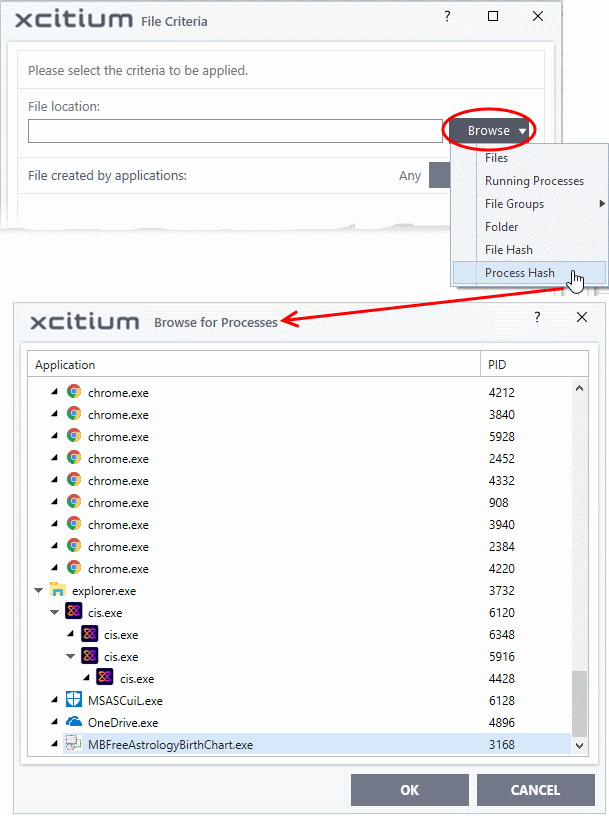
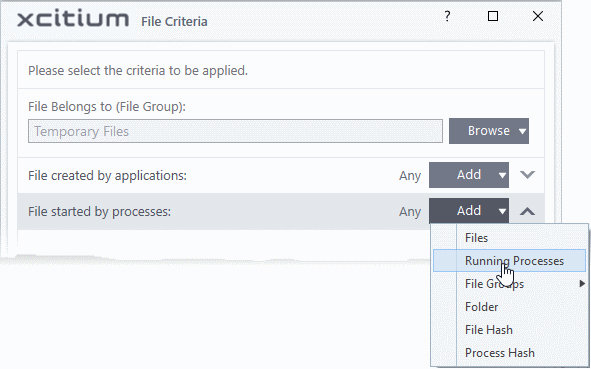
There are six types of target you can add:
- Files – Apply the rule to specific files.
- Running Processes – Apply the rule to a process that is currently running on your computer.
- File Groups – Apply the rule to predefined file groups. See File Groups for help to add or modify a file group.
- Folder – Apply the rule to a folder or drive.
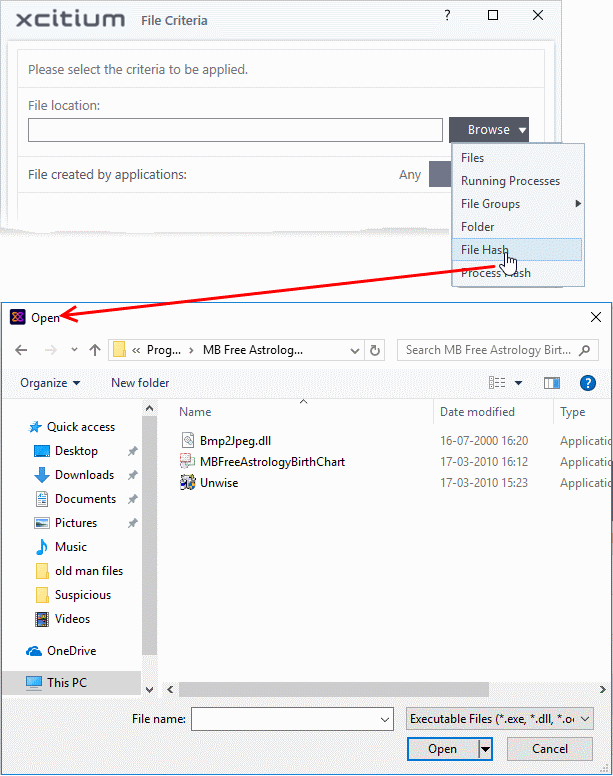
- File Hash – Create a hash value from a file and use it as the rule target. A hash value is a large number which is generated by passing the file through a hashing algorithm. The number uniquely identifies and represents the file, and it is extremely unlikely that two files will ever generate the same hash value. The benefit of using a file hash is that the rule will still work even if the file name changes.
- Process Hash – Create a hash value of a process and use it as the rule target. Please see description above if required.
- Choose 'Files' from the 'Browse' drop-down.

- Navigate to the file you want to add as target in the 'Open' dialog and click 'Open'
The file will be added as target and will be run as per the action chosen in Step 1.
- Click 'OK' if you want to just add an application for a particular action as selected in Step 1 without specifying any filters or options, then click 'OK'.
The default values for filter criteria and file rating will be 'Any'
and for 'Options' it will be 'Log when this action is performed'.
- If required you can configure filter criteria and file rating and Options for the rule.
Add a currently running application by choosing its process
- Choose 'Running Processes' from the 'Browse' drop-down.
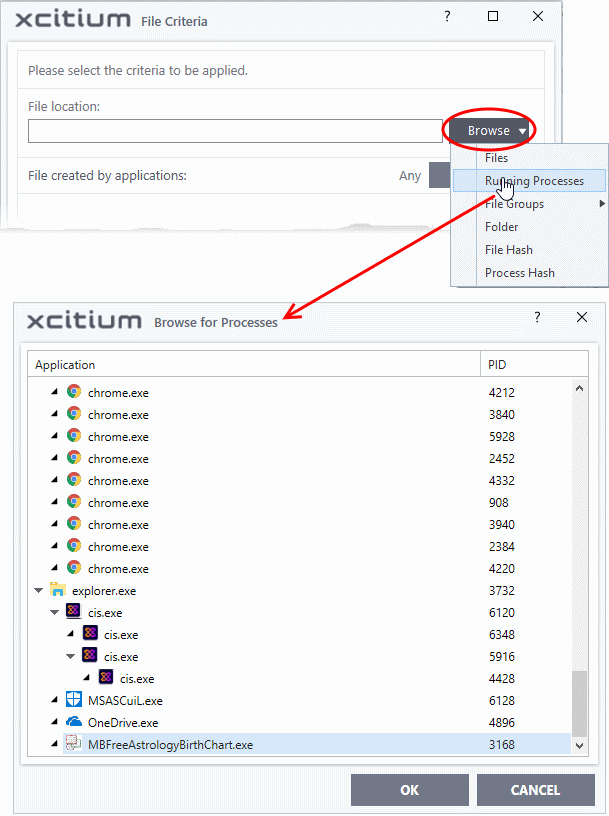
A
list of currently running processes in your computer will be
displayed.
- Select
the process, whose target application is to be added to target and
click 'OK' from the 'Browse for Process' dialog.
The parent application of the process is added as the target and run as per the action in Step 1.

- Click 'OK', if you want to just add an application for a particular action as selected in Step 1 without specifying any filters or options
- The default values for filter criteria and file rating will be 'Any' and for 'Options' it will be 'Log when this action is performed'.
- If required you can configure filter criteria and file rating and Options for the rule.
- Choose
'File Groups' from the 'Browse' drop-down. Choosing File Groups
allows you to include a category of files or folders configured as a
'File Group'. See File
Groups for more details on viewing and managing pre-defined
and user-defined file groups.
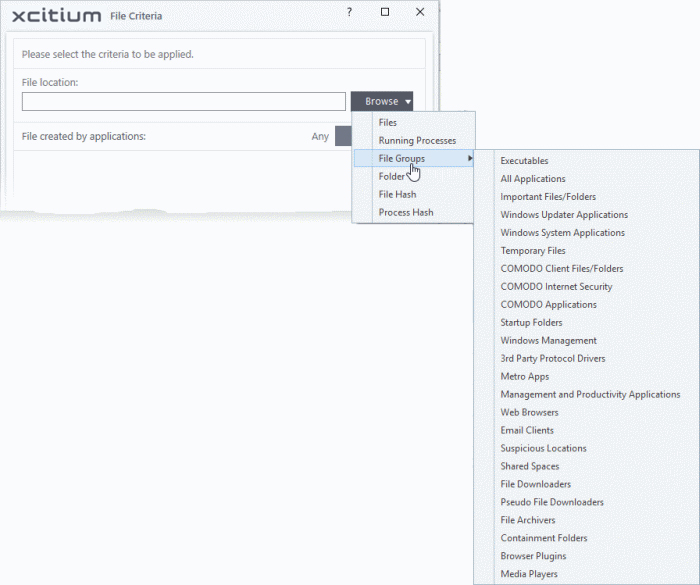
- Select the file group from the drop-down.
The
file group will be added as target and will be run as per the action
chosen in Step 1.
- Click 'OK', if you want to just add the file group for a particular action as selected in Step 1 without specifying any filters or options.
- If required you can configure filter criteria and file rating and Options for the rule.
- Choose 'Folder' from the 'Browse' drop-down.
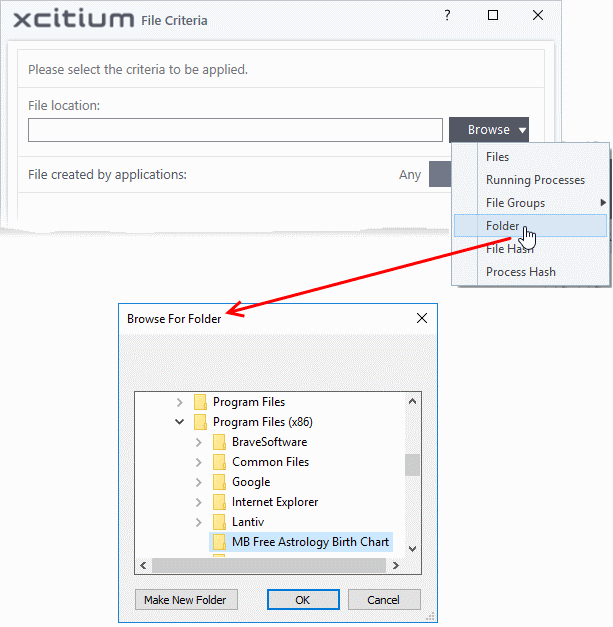
The
'Browse for Folder' dialog will appear.
- Navigate to the drive partition or folder you want to add as target and click 'OK'
The drive partition/folder will be added as the target. All
executable files in the folder will be run as per the action chosen in Step 1.
- Click 'OK', if you want to just add the applications for a particular action as selected in Step 1 without specifying any filters or options.
The
default values for filter criteria and file rating will be 'Any' and
for Options it will be 'Log when this action is performed'.
- If required you can configure filter criteria and file rating and Options for the rule.
Add a file based on its hash value
- Choose 'File Hash' from the 'Browse' drop-down
- Navigate to the file whose hash value you want to add as target in the 'Open' dialog and click 'Open'
- Click 'OK', if you want to just add the file for a particular action as selected in Step 1 without specifying any filters or options
- If required you can configure filter criteria and file rating and Options for the rule.
- XCS generates the hash value of the parent file and stores that as the target
- XCS uses this hash value to identify the file and apply the rule, so that the rule intercepts the target even if the file name changes.
Add an application from a running process based on its hash value
- Choose
'Process Hash' from the 'Browse' drop-down.
A list of currently running processes in your computer is shown.
- Select the process, to add the hash value of its parent application as the target and click 'OK'
- Click 'OK', if you want to just add the application for a particular action as selected in Step 1 without specifying any filters or options
- If required you can configure
filter criteria and file rating and Options for the rule.
- XCS generates the hash value of the parent file and stores that as the target
- XCS uses this hash value to identify the file and apply the rule,
so that the rule intercepts the target even if the process name changes.
Configure the Filter Criteria and File Rating
You can apply an action to a file if the file meets certain criteria.
The available criteria are:
Auto-contain a file if it was created by a specific application
- You can create a filter to apply an action to a file based on its source application.
- You can also specify the file rating of the source application. The rule will then only contain a file if its parent app has a certain trust rating.
Specify source application(s):
- Click
the 'Add' button in the 'File Created by applications' stripe.
- The
options available are same as those available under the 'Browse' button beside 'File location', as explained above. See the previous section for each of options for more details.
The selected source application, file group or the folder will be added.
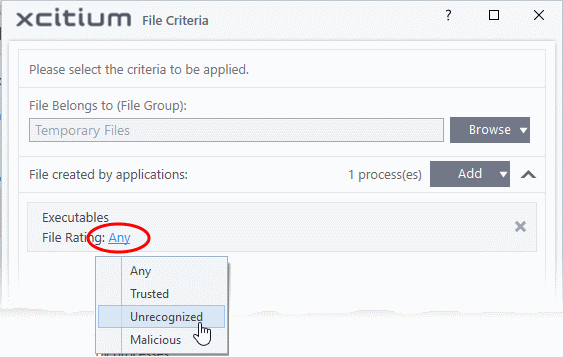
- Click the 'Any' link beside 'File Rating' and select the file rating of the source
- Repeat
the process to add more applications or groups/folders.
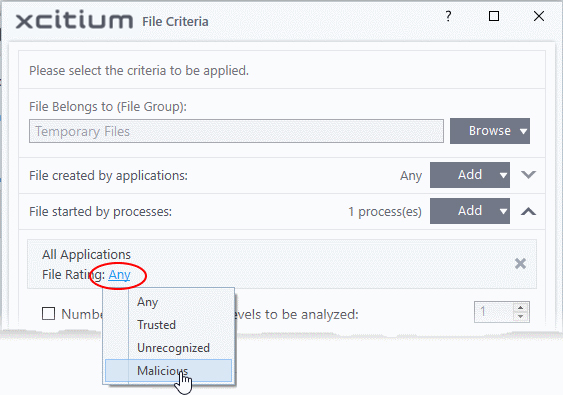
Auto-contain a file if it was created by a specific process
- You can create a filter to apply an action to a file based on its parent process
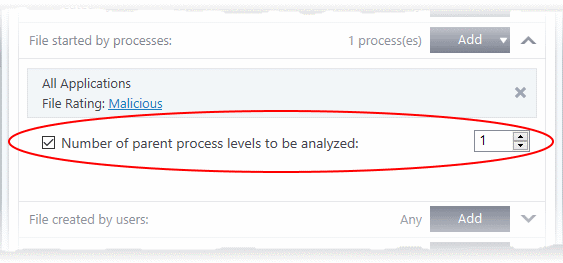
- Optionally, you can also specify:
- The file rating of the source. The rule will then only contain a file if its parent process has a certain trust rating
- The number of levels in the process chain that should be inspected
To specify source process(es)
- Click the 'Add' button in the 'File Created by Process(es)' stripe
- The options available are same as those available under the 'Browse' button beside 'Target', as explained above
- The selected source application, file group or the folder will be added. The file created / invoked by the process, started by the selected source will be added as the target for the rule
- Click the 'Any' link beside 'File Rating' and select the file rating of the source
- 'Number of parent process levels to be analyzed' - Specify how far up the process tree XCS should check when inspecting the file's sources. 1 = will only check the file's parent process. 2 = will check the parent process and the grand-parent process, etc., etc.
- Repeat the process to add more process(es)
Auto-contain
a file created by specific user(s)
- Click the 'Add' button in the 'File Created by User(s)' stripe.
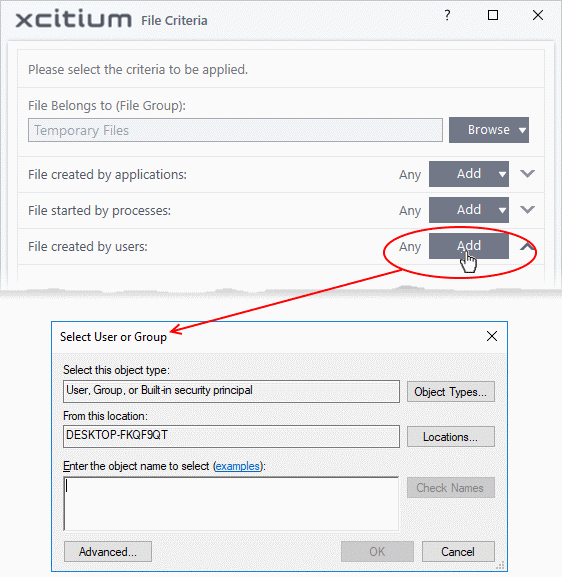
- The 'Select User or Group' dialog will appear.
- Enter the names of the users to be added to the rule in the 'Enter the object name to select' text box. Use the format [domain name]/[user/group name] or [user/group name]@[domain name].
- Alternatively, click 'Advanced' then 'Find Now' to locate specific users. Click 'OK' to confirm the addition of the users.
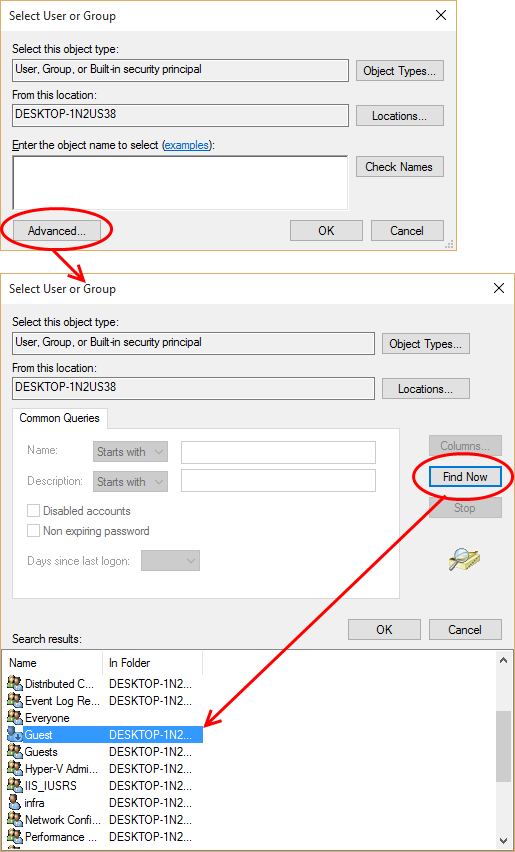
The user will be added to the list.

- Repeat the process for adding more users.
- To remove the user added by mistake or no longer needed in the list, click the 'X' icon at the right end of the user name.
Auto-contain
a file if it was downloaded/copied from a specific source
- Click the 'Add' button in the 'File Origin(s)' stripe
- Choose the source from the options:
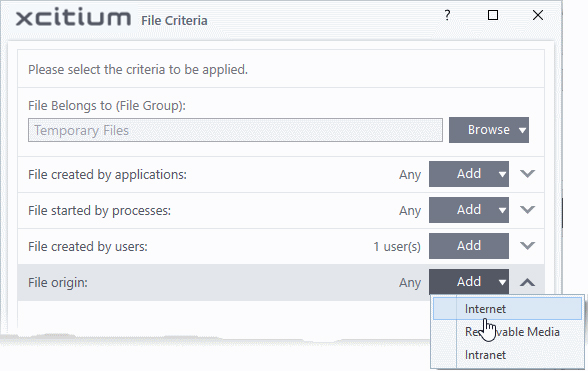
- Internet - The rule will only apply to files that were downloaded from the internet.
- Removable Media - The rule will only apply to items copied to the computer from removable devices like a USB drive, CD/DVD or external storage.
- Intranet - The rule will only apply to files that were downloaded from the local intranet.
- Repeat the process to add more sources
Select the file rating as filter criteria
- Click the 'Select' button in the 'File Rating' stripe:
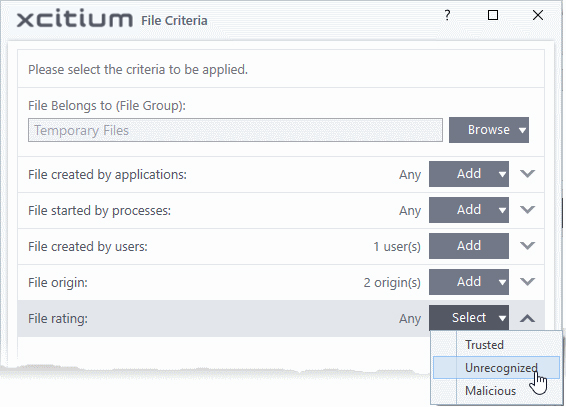
- This will apply the rule to files which match the trust rating you set. You can choose from the following trust ratings:
- Trusted - Applications are categorized as 'Trusted files' if:
- The file is on the global whitelist of safe files
- The file is signed by a trusted company in the Vendor List
- The file was installed by a trusted installer
- The file was given a trusted rating in the File List by a user
- See File Rating Settings for more information.
- Unrecognized - Files that do not have a current trust rating. The file is on neither the blacklist nor the safelist, so is given an 'unknown' trust rating. See File List for more information.
- Malware - Malicious files – those that are on the blacklist of known harmful files.
Auto-contain a file based on the software vendor
- You can apply an action to a file based on the vendor who digitally signed the file. The vendor is the software company that created the file.
- You can also specify the file rating of the vendor. The rule will only contain a file if its vendor has the stated trust rating.
Specify vendors
- Click the 'Add' button in the 'File signed by vendors' stripe.
- There are three ways you can add a vendor:
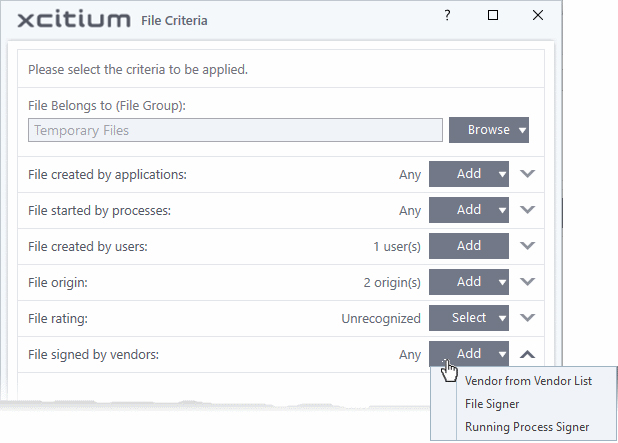
1. Directly select a vendor
- Choose 'Vendor from a Vendor List' from the drop-down
- The 'Add Vendor' dialog opens with a list of vendors in the Vendor List

- Use the sort and filter options in the column headers to search for the vendor to be specified
- Choose the vendor and click 'OK'. The vendor will be added as a criterion.
2. Specify an executable file on your local drive
- Choose 'File Signer' from the drop-down
- Navigate to the executable file whose publisher you want to add as the criteria and click 'Open'.
- XCS checks that the .exe file is signed by the vendor and counter-signed by a Trusted CA. If so, the vendor is added as a criteria
3. Select a currently running process
- Choose 'Running Process Signer' from the drop-down
- A list of all processes running at present on your computer is shown
- Select the process to specify the publisher of the application that started the process and click 'OK'
- XCS checks that the .exe file that started the process is signed by the vendor and counter-signed by a Trusted CA. If so, the vendor is added as a criteria
The selected vendor is added:

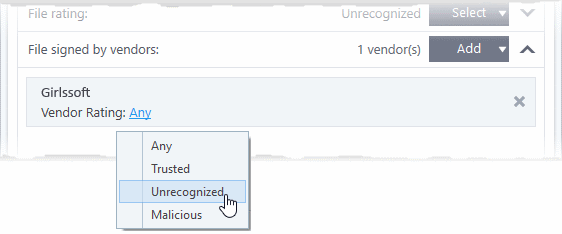
- Vendor Rating - The rule will only apply to the vendor’s files IF the vendor has this rating at the time the file is checked. Note, the rating you set here can be different to the actual vendor rating in ‘Settings’ > ‘File Rating’ > ‘File List’ > ‘Vendor Rating’.
- Example. If you select ‘Trusted’ here, then XCS will apply the rule if the vendor is trusted at the time the file is checked. If the vendor’s rating changes to ‘Malicious’ or ‘Unrecognized’, then the rule isn’t applied.
- Repeat the process to add more vendors
Set the file age as filter criteria
- Click the 'Select' button in the 'File age' stripe.
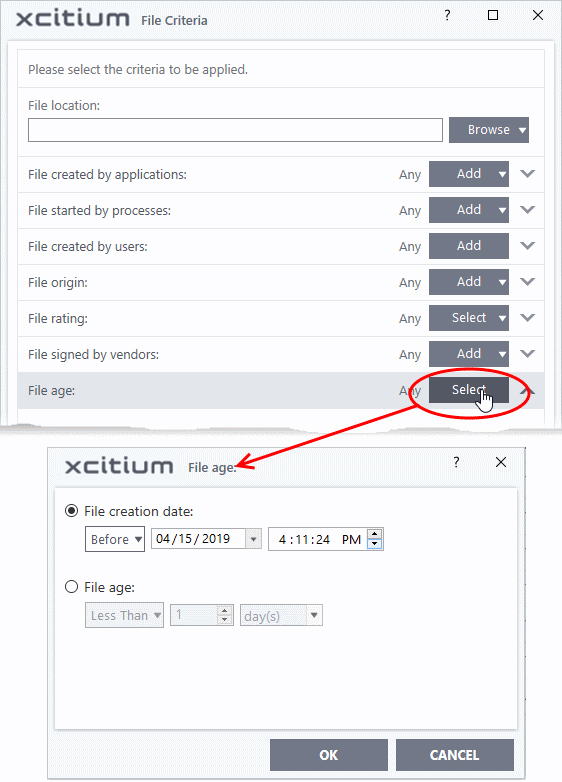
The 'File Age' dialog will appear. You can set the file age in two ways:
- File Creation Date – To set a threshold date to include the files created before or after that date, choose this option, choose 'Before'/'After' from the first drop-down and set the threshold date and time in the respective combo-boxes.
- File age – To select the files whose age is less than or more than a certain period, choose this option and specify the period.
- Less Than – XCS will check for reputation if a file is younger than the age you set here. Select the interval in hours or days from the first drop-down combo box and set hours or days in the second drop-down box. (Default and recommended = 1 hours)
- More Than - XCS will check for reputation if a file is older than the age you set here. Select the interval in hours or days from the first drop-down combo box and set hours or days in the second drop-down box. (Default and recommended = 1 hours)
- Click 'OK' in the File Criteria dialog after selecting the filters to save your settings to the rule. The list of criteria will be displayed under the Criteria tab in the 'Manage Contained Program' dialog.
The next step is to choose additional options and restrictions on items contained by the rule.
- Click the 'Options' tab

The options available depend on the 'Action' chosen in Step
1.
The 'Ignore' action has the following options:
- Log when this action is performed - XCS will create a containment log when the rule is triggered.
- Don't apply the selected action to child processes - Child processes are those started by the target application.
The 'Run Restricted' and 'Run Virtually' actions have the following options:
- This option is disabled by default, so the ignore rule also applies to child processes.
- If enabled, the ignore rule does not apply to child processes. Each child process will be inspected individually and all relevant rules applied.
- Log when this action is performed - Whenever this rule is applied for the action, it will be added to XCS 'Containment' logs.
- Set Restriction Level - If you choose ‘Run restricted’ or ‘Run virtual’ as the action, then you can also choose a restriction level. Here are the possible levels:
- Partially Limited - The application is allowed to access all operating system files and resources like the clipboard. Modification of protected files/registry keys is not allowed. Privileged operations like loading drivers or debugging other applications are also not allowed. (Default)
- Limited - Only selected operating system resources can be accessed by the application. The application is not allowed to execute more than 10 processes at a time and is run without Administrator account privileges.
- Restricted - The application is allowed to access very few operating system resources. The application is not allowed to execute more than 10 processes at a time and is run with very limited access rights. Some applications, like computer games, may not work properly under this setting.
- Untrusted - The application is not allowed to access any operating system resources. The application is not allowed to execute more than 10 processes at a time and is run with very limited access rights. Some applications that require user interaction may not work properly under this setting.
- Limit maximum memory consumption to - Enter the memory consumption value in MB that the process should be allowed.
- Limit program execution time to - Enter the maximum time in seconds the program should run. After the specified time, the program will be terminated.
- Prohibit SMB shared resources - Programs contained by the rule cannot access network resources over the server message block (SMB) protocol. This includes, for example, shared disks, printers, folders, data or storage devices.
- Don't allow access to other processes' memory – Available only if you chose ‘Run restricted’ or ‘Run virtual’ as the action in step 1.
- By default, contained applications are allowed to read the memory of other applications.
- Enable this option if you want block this read capability.
- This is useful, for example, to prevent unknown applications in the container from reading sensitive data loaded into memory by other programs. However, it may cause some contained programs to run incorrectly.
The 'Block' action has the following options:
- Log when this action is performed - Whenever this rule is applied for the action, it will be added to XCS Containment logs.
- Quarantine program - If checked, the programs will be automatically quarantined. See Manage Quarantined Items for more information.
- Choose
the options and click 'OK' to save them for the rule. The rule will
be added and displayed in the list.

You can move the rule up or down the list to change its priority.
Edit an Auto-Containment Rule
-
Select a rule from the list in the Auto-Containment panel and click 'Edit' from the top
- The edit procedure is similar to adding an auto-containment rule
- Click 'OK' to save the rule changes.
|
Important Note: Please make sure auto-containment rules do not conflict. In the event of a conflict, the setting in the rule that is higher in the list prevails. The 'Reset to Default' button lets you restore the original rules. |