Comodo Help
Find the desired product help
Xcitium Enterprise

Xcitium Enterprise

Xcitium Client Security for Windows 13.4

English

Print Help
Containment Tasks - Introduction > The Virtual Desktop > Start The Virtual Desktop
  • Introduction To Xcitium Client Security
    • Special Features
    • System Requirements
    • Install Xcitium Client Security
    • Start Xcitium Client Security
    • The Main Interface
      • The Home Screen
      • The Tasks Interface
      • The Widget
      • The System Tray Icon
    • Understand Security Alerts
    • Password Protection
  • General Tasks - Introduction
    • Scan And Clean Your Computer
      • Run A Quick Scan
      • Run A Full Computer Scan
      • Run A Rating Scan
      • Run A Custom Scan
        • Create, Schedule And Run A Custom Scan Profile
      • Automatically Scan Unrecognized And Quarantined Files
    • Instantly Scan Files And Folders
    • Process Infected Files
    • Manage Virus Database Updates
    • Manage Blocked Autoruns
    • Manage Quarantined Items
  • Firewall Tasks - Introduction
    • Configure Internet Access Rights For Applications
    • Stealth Your Computer Ports
    • Manage Network Connections
    • Stop All Network Activities
    • View Active Internet Connections
  • Containment Tasks - Introduction
    • Run An Application In The Container
    • Reset The Container
    • Identify And Kill Unsafe Running Processes
    • Open Shared Space
    • The Virtual Desktop
      • Start The Virtual Desktop
      • The Main Interface
      • Run Browsers Inside The Virtual Desktop
      • Open Files And Run Applications Inside The Virtual Desktop
      • Pause And Resume The Virtual Desktop
      • Close The Virtual Desktop
  • DLP Tasks - Introduction
    • Run Data Loss Prevention Scans
    • Manage DLP Quarantined Files
  • Advanced Tasks - Introduction
    • Create A Rescue Disk
      • Download And Burn Comodo Rescue Disk
    • Remove Deeply Hidden Malware
    • Manage XCS Tasks
    • View XCS Logs
      • Antivirus Logs
      • VirusScope Logs
      • Firewall Logs
      • HIPS Logs
      • Containment Logs
      • Website Filtering Logs
      • Device Control Logs
      • Autorun Event Logs
      • Alerts Logs
      • XCS Tasks Logs
      • File List Changes Logs
      • Vendor List Changes Logs
      • Configuration Changes Logs
      • Virtual Desktop Event Logs
      • Data Loss Prevention Event Logs
      • Search And Filter Logs
    • Submit Files For Analysis To Xcitium
    • View Active Process List
  • XCS Advanced Settings
    • General Settings
      • Customize User Interface
      • Configure Virus Database Updates
      • Log Settings
      • Manage XCS Configurations
        • Xcitium Preset Configurations
        • Personal Configurations
      • Manage Performance
    • Antivirus Configuration
      • Real-time Scanner Settings
      • Scan Profiles
    • Firewall Configuration
      • General Firewall Settings
      • Application Rules
      • Global Rules
      • Firewall Rule Sets
      • Network Zones
        • Network Zones
        • Blocked Zones
      • Port Sets
    • HIPS Configuration
      • HIPS Settings
      • Active HIPS Rules
      • HIPS Rule Sets
      • HIPS Groups
        • Registry Groups
        • COM Groups
    • Protected Objects
      • Protected Objects - HIPS
        • Protected Files
        • Blocked Files
        • Protected Registry Keys
        • Protected COM Interfaces
      • Protected Objects - Containment
        • Protected Files And Folders
        • Protected Keys
    • Data Loss Prevention
      • DLP Monitoring Rules
      • DLP Discovery Rules
      • DLP Keyword Groups
    • Containment Settings
      • Containment Settings
      • Auto-Containment Rules
      • Virtual Desktop Settings
      • Containment - An Overview
      • Unknown Files - The Scanning Processes
    • File Rating Configuration
      • File Rating Settings
      • File Groups
      • Submitted Files
    • Advanced Protection
      • VirusScope Settings
      • Scan Exclusions
      • Device Control Settings
      • Script Analysis Settings
      • Miscellaneous Settings
    • Web Filter Settings
      • Website Filtering Rules
      • Website Categories
  • Appendix 1 - XCS How To... Tutorials
    • Enable / Disable AV, Firewall, Auto-Containment And VirusScope Easily
    • Set Up The Firewall For Maximum Security And Usability
    • Block Internet Access While Allowing Local Area Network (LAN) Access
    • Block / Allow Specific Websites To Specific Users
    • Set Up HIPS For Maximum Security And Usability
    • Create Rules To Auto-Contain Applications
    • Run An Instant Antivirus Scan On Selected Items
    • Create An Antivirus Scan Schedule
    • Run Untrusted Programs Inside The Container
    • Run Browsers Inside The Container
    • Restore Incorrectly Quarantined Items
    • Submit Quarantined Items To Xcitium Verdict Cloud For Analysis
    • Enable File Sharing Applications Like BitTorrent And Emule
    • Block Any Downloads Of A Specific File Type
    • Disable Auto-Containment On A Per-application Basis
    • Switch Off Automatic Antivirus Updates
    • Suppress XCS Alerts Temporarily
    • Control External Device Accessibility
  • Appendix 2 - Xcitium Secure DNS Service
    • Router - Manually Enable Or Disable Xcitium Secure DNS
    • Windows - Enable Xcitium Secure DNS
  • About Xcitium

Start the Virtual Desktop


  • Click 'Tasks' on the home screen
  • Click 'Containment Tasks' > 'Run Virtual Desktop'

You can start the virtual desktop from the home-screen shortcut, from the widget, or from the 'Containment Tasks' screen. You can also configure the virtual desktop to start automatically after you login to Windows.


Note. If XCS is in Virtual Desktop mode, you can start the application by simply clicking the desktop shortcut.


See the following sections for more help:

  • Open the virtual desktop from CSS or the widget
  • Launch the virtual desktop at user logon
  • Start virtual desktop from the containment tasks screen

Start the virtual desktop from XCS or the widget

  • Click the virtual desktop icon on the XCS home screen, or on the XCS widget:


Note: The home screen and widget shortcuts are only available if you have added the 'Virtual Desktop' shortcut:

  • Click ‘Tasks’ on the home screen
  • Click ‘Containment Tasks’
  • Right-click on the virtual desktop tile
  • Select ‘Add to Task Bar’

See 'Add tasks to the home screen' if you need more help with this.


The virtual desktop opens at the session selection screen.


Launch the virtual desktop at user logon

  • You can configure the virtual desktop to start automatically whenever certain users login to Windows
  • This means the virtual desktop becomes the default operating environment for those users.
Add users
  • Click 'Settings' on the home screen
  • Click 'Containment ' > 'Virtual Desktop'
  • Select the 'Users' tab
  • Click 'Add'


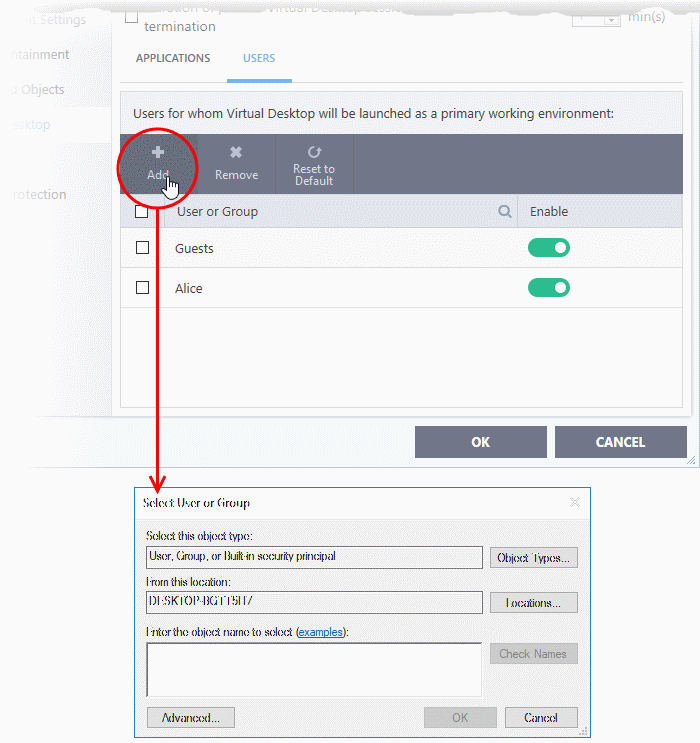
  • Select the users or groups to whom you want the rule to apply
  • Type the names of users or groups in the format [domain name][user/group name] or [user/group  name]@[domain name]

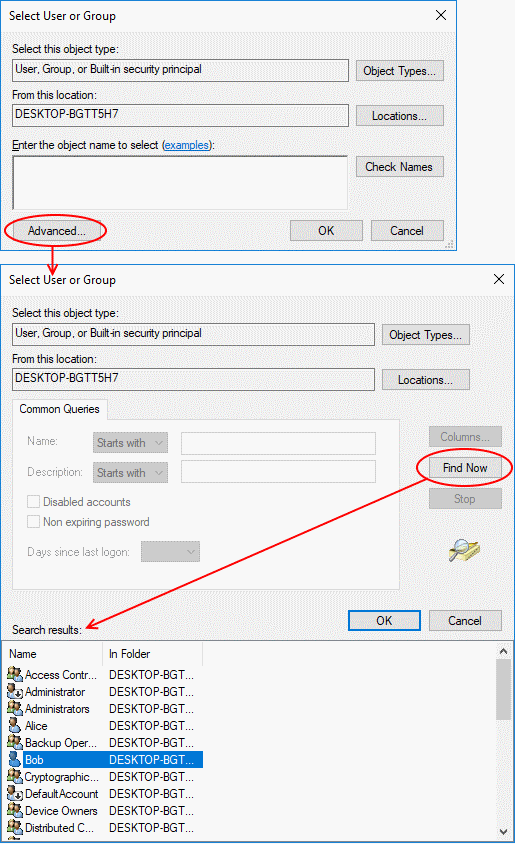
  • Alternatively, click 'Advanced' then 'Find Now' to locate specific users/groups
  • Click 'OK' to confirm:


The user / user group will be added to the list.


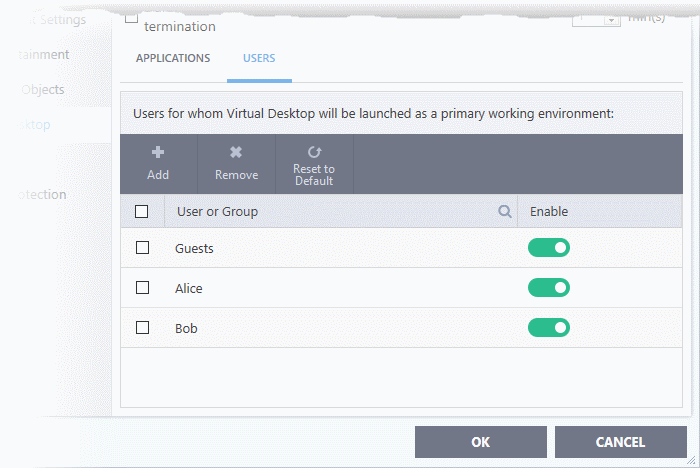
  • Repeat the process to add more users.
  • Click 'OK' to save your settings
  • Click 'OK' in the 'Advanced Settings' dialog for your changes to take effect
  • See 'Virtual Desktop Settings' if you need more help with this

The virtual desktop opens at the session selection screen when the selected users log-in.


Start the virtual desktop from the containment tasks screen

  • Click 'Tasks' > 'Containment Tasks' > 'Run Virtual Desktop'


The virtual desktop opens:


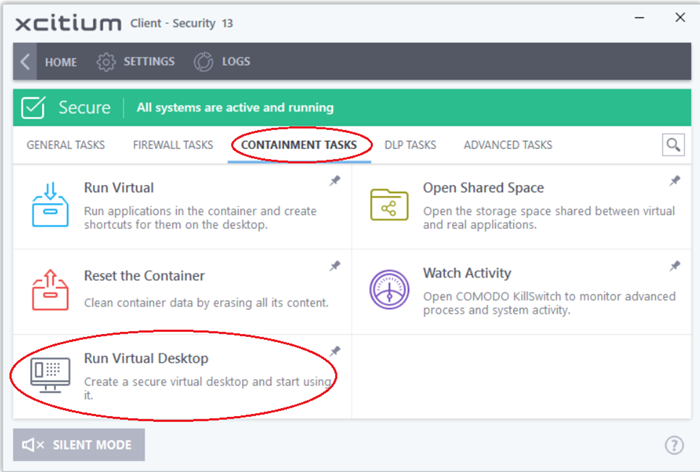
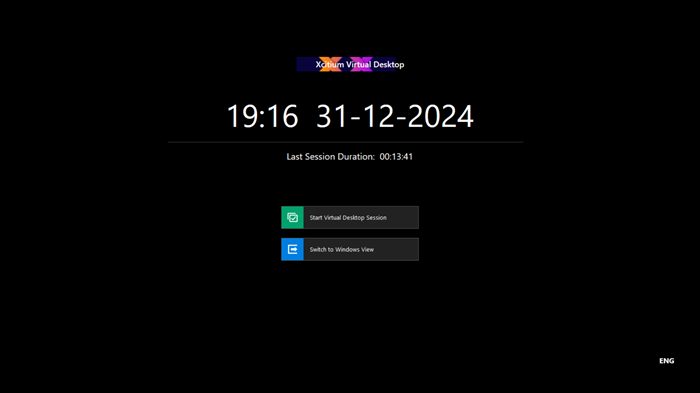
  • Click the 'Start Virtual Desktop Session' button
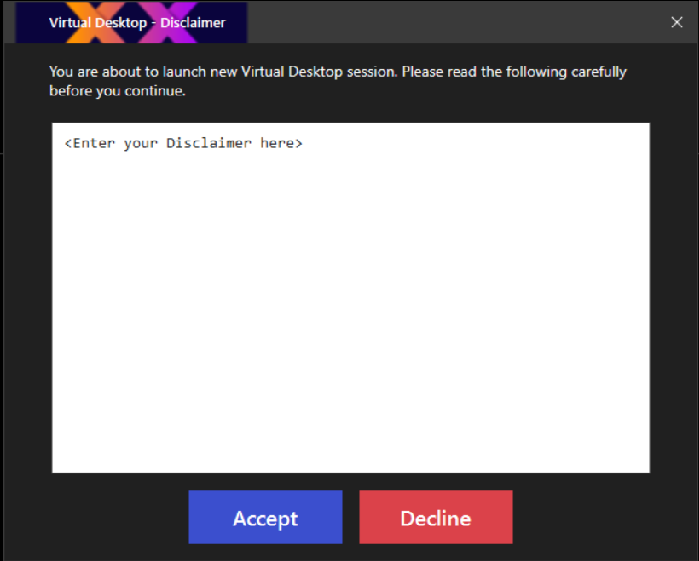
  • Click ‘Accept’ at the disclaimer screen to open the virtual desktop.


Note: This screen is only relevant for customers who white-label the interface. It can be safely ignored by most customers and end-users.


If you do want to white-label the interface, you can configure the disclaimer message at 'Settings' > 'Containment' > 'Virtual Desktop'. You can also disable the disclaimer entirely from there.


See 'Show disclaimer upon Virtual Desktop startup' to view help with this. 

  • You will see a four digit access code If session protection is enabled:


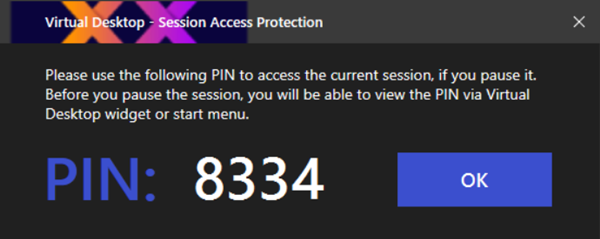
  • This feature lets you suspend a virtual desktop session and resume it later without losing any data. The PIN is required to unlock the suspended session.
  • Please make a note of the PIN number. See Pause and Resume the Virtual Desktop for more details
  • Tip: You can view the PIN at any time by clicking the 'Show PIN' icon  in the virtual desktop start menu.
Our Products
  • Free Antivirus
  • Free Internet Security
  • Website Malware Removal
  • Free Anti-Malware
  • Anti-Spam (Free Trial)
  • Windows Antivirus
  • Antivirus for Windows 7
  • Antivirus for Windows 8
  • Antivirus for Windows 10
  • Antivirus for MAC
  • Antivirus for Linux
  • Free Endpoint Security
  • Free ModSecurity
  • Free RMM
  • Free Website Malware Scanner
  • Free Device Manager for Android
  • Free Demo
  • Network Security
  • Endpoint Protection
  • Antivirus for Android
  • Comodo Antivirus
  • Wordpress Security
Cheap CDN
  • Bootstrap CDN
  • Semantic UI CDN
  • Jquery CDN
  • CDN Plans
  • CDN
  • Free CDN
Enterprise
  • Patch Management Software
  • Patch Manager
  • Service Desk
  • Website Down
  • Endpoint Protection Solutions
  • Website Security Check
  • Remote Monitoring and Management
  • Website Security
  • Device Manager
  • ITSM
  • CRM
  • MSP
  • Android Device Manager
  • MDR Services
  • Managed IT Support Services
  • Free EDR
Free SSL Certificate
Support Partners Terms and Conditions Privacy Policy

© Comodo Group, Inc. 2025. All rights reserved.