


Install Dome Firewall and Login to the Administrative Console
How
to Install the Virtual Appliance
- Download the setup file, install the appliance and activate your license.
- The virtual appliance setup file is available in two formats:
- Please ensure your PC meets the following minimum requirements:
- 1 x Intel or equivalent CPU
- 2 GB RAM
- 4 GB Storage
- 2 x 1 GbE NIC
- Download the .ova file from https://download.comodo.com/dome-repo/dome-fw-image/domefirewall.ova.
- Import the virtual appliance into a virtual server such as Virtualbox or Vmware.
- Important Note: Select 'Reinitialize the MAC address of all network cards' when importing in order to avoid conflicts between the network adapters of the firewall device and the host machine.

- Download the .iso file from https://download.comodo.com/dome-repo/dome-fw-image/domefirewall.iso.
- Create a CentOS virtual machine on a virtual server such as Virtualbox or Vmware.
- Install the firewall virtual appliance from the .iso file
Login to the management console at https://192.168.0.15:10443. The default credentials are: Username - admin and Password - comodo
The firewall
requires you to change the default password after first login. Please choose a strong password that
contains a mix of upper and lower case letters, numbers and special
characters. We also recommend regularly changing your password as
best security practice.
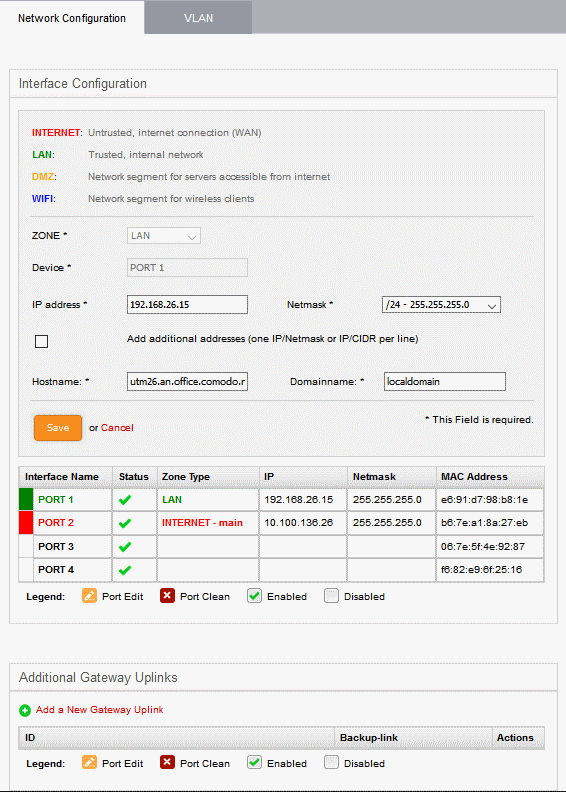
Once logged in, first configure the related ports for your network:
- To setup network settings, click on 'Network' > 'Interfaces' in the menu on the left. You will find that port 1 is already configured with IP: 192.168.0.15 and Subnet mask : 255.255.255.0
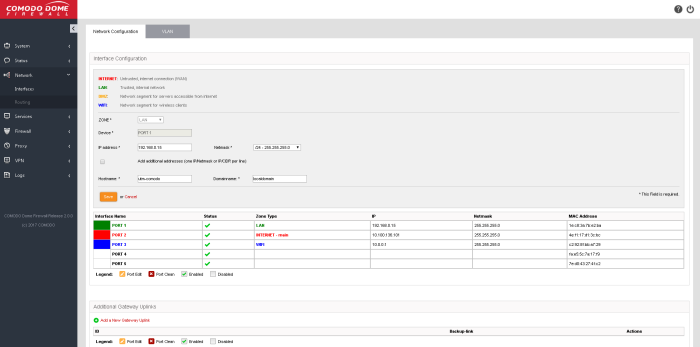
2. For your INTERNET connection please use any port other than your LAN port (port 1) with your WAN IP and subnet configuration. See Network Configuration for more details.
3. For your DMZ connection please use any port other than INTERNET and LAN ports with necessary IP and subnet information. You can find an example configuration below.
-
After configuring INTERNET and DMZ interfaces, you just have to configure your LAN interface so that it will include your own LAN subnet IP and mask.
-
You need to create a 'System Access' rule so hosts in your network zones can access basic firewall services.
- Dome Firewall Virtual Appliance ships with a set of pre-configured rules that allow hosts in different zones to access basic services like DNS (port 53), the firewall admin interface (port 10443); and DHCP (port 67).
- You need to create a system access rule to ensure that hosts in the network zones can initially access firewall services.
- You can edit the rule to restrict access from specific hosts in and services at anytime.
To add a system Access' rule to allow traffic from all network zones
- Click 'Firewall' on the left and select 'System Access'
- Click the 'Add a New System Access Rule' link in the 'Current Rules' pane
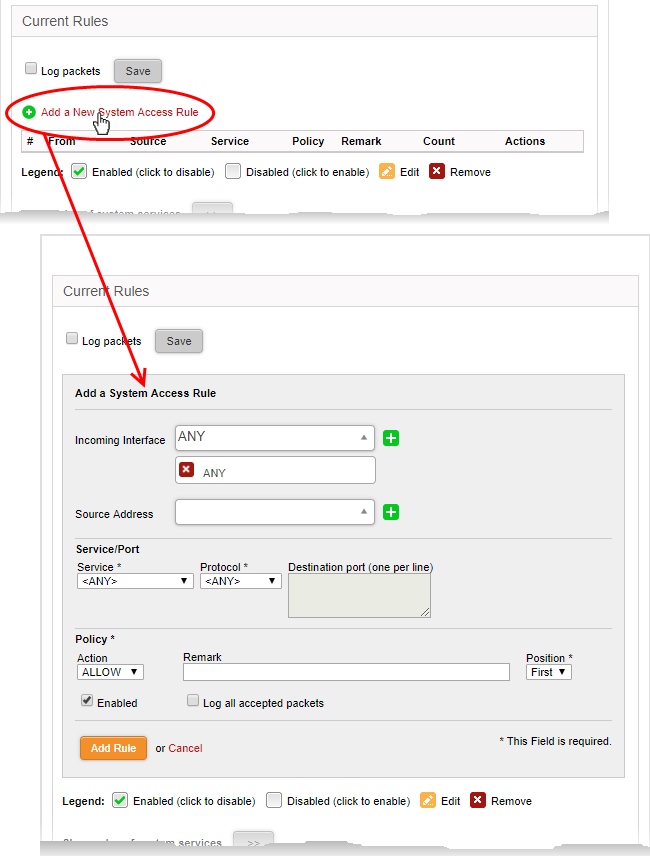
- Enter the parameters for the new rule as shown below:
- Incoming Interface - Select 'Any' from the drop-down to allow access from hosts from all network zones connected to the firewall through different ports
- Source Address - Leave the field blank
- Service/Port - Select the type or the service hosted by the source, the protocol and the port used by the service.
- Service - Choose 'Any' to allow traffic pertaining to all services
- Protocol - Choose 'Any' from the drop-down
- Destination port - Leave the field blank
- Policy - Choose 'Allow' from the drop-down, to pass the packets from the all sources to their destined ports of the firewall device.
- Enabled - Leave enabled to activate the rule after saving.
- Remark - Enter a short description of the rule.
- Position - Set the priority for the rule to 'First' in the list of 'System Access' rules list. The rules in the iptables are processed in the order they appear on the list.
- Log all accepted packets - Select if you want packets allowed by the rule to be logged. See View Logs for more details on configuring storage of logs and viewing the logs.
- Click 'Add Rule'.
- The new rule will be added and applied.
- You can edit this rule at a later time to restrict access from hosts in selected network zones to selected services as required.
6. After configuring the Interfaces and the system access rule, you have to allow any traffic from LAN zone to INTERNET zone so that you will be able to reach internet sources before applying any complex or specific firewall policies.
Firewall Policies can be configured in the 'Policy Firewall' interface.
- Click Firewall > Firewall in the left-hand navigation
- Select the 'Policy Firewall' tab.
- More
details on policy rules are available in Manage
Firewall Policy Rules.