


Manage Firewall Policy Rules
- Click 'Firewall' > 'Policy' in the left-hand menu to open the firewall policy interface.
-
The interface lets you define and manage firewall rules for incoming, outgoing and inter-zone traffic.
-
Note - You can create rules for VPN traffic also in this interface but define them in 'Firewall' > 'VPN Traffic' for easy management of FW rules for VPN traffic. See 'Manage VPN Firewall Rules' for more details.
-
Please ensure you have created firewall objects before you attempt to create rules. Firewall objects let you define source and destination addresses. See 'Firewall Objects' for help to do this.

The interface contains two panes:
-
Current Rules - The upper, 'Current Rules', pane lists all active rules and allows you to add and edit rules. See Managing Firewall Rules for more details on viewing and managing the rules.
-
Policy Firewall Settings - The lower ' Policy Firewall Settings' pane displays the current enabled/status of the policy firewall, allows the administrator to change the status and to configure the policy firewall log. See Configuring the Policy Firewall Settings for more details.
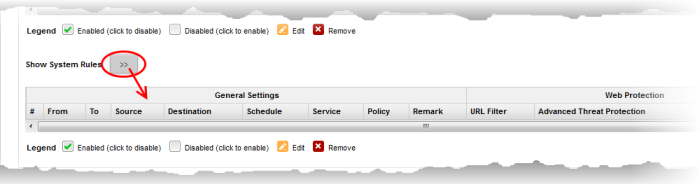
Current Rules
The 'Current Rules' pane lists all rules currently in action. Administrators can create new rules and edit/manage existing rules.
|
|
Policy Firewall Rules Table - Column Descriptions |
|
|---|---|---|
|
Category |
Column |
Description |
|
General Settings |
# |
Serial number of the rule. |
|
From |
The interface or network zone from which the traffic originates. |
|
|
To |
The interface or network zone to which the traffic is directed. |
|
|
Source |
The firewall object/object group which names the hosts from which traffic originates. |
|
|
Destination |
The firewall object/object group which names the hosts to which traffic is sent. |
|
|
Service |
Protocol and port that used by traffic affected by this rule. |
|
|
Policy |
The action taken on the data packets intercepted by the rule.
|
|
|
Remark |
A short description of the rule. |
|
|
Web Protection |
URL Filter |
Whether or not the 'Web Filter' security profile is enabled for the rule. You will see the name of the profile if it is enabled. |
|
Advanced Threat Protection |
Whether or not the 'Advanced Threat Protection' component is enabled for the rule. |
|
|
SSL Intercept |
Whether or not the 'HTTPS Intercept Web Filter security profile' is enabled for the rule. If enabled you will see the name of the profile. |
|
|
Intrusion Prevention |
IPS |
Whether or not the 'Intrusion Protection System (IPS)' security profile is enabled for the rule. |
|
AppID |
Whether or not the the 'Application Filter' rule is enabled for the policy. |
|
|
|
Count |
Indicates the number of packets and size of data intercepted by the rule. |
|
Rule ID |
Identity number of the rule. This is determined by the order in which the rules were created for the device/organization. Traffic is allowed or denied based on the first matching rule in ascending order of ID numbers. This is regardless of the order of the rules as shown in the table. |
|
|
Actions |
Controls for managing the rule.
|
|
 - Enable or disable the
rule.
- Enable or disable the
rule. - Remove the rule.
- Clicking the right arrow button beside 'Show system rules' displays a list of firewall rules auto generated by the DFW virtual appliance. These rules cannot be modified or removed.
- General
Settings - Specify source and destination addresses and the
service/protocol of packets to be intercepted by the rule. You can
specify the firewall address objects and object groups as source and
destination addresses. See Firewall
Objects for more details on adding firewall address
objects.
- Web Protection - Enable or disable URL filtering, Advanced Threat Protection (ATP) and SSL Interception. You can also choose pre-configured profiles for them. See Advanced Threat Protection, and HTTP/HTTPS Proxy Server for help to create these profiles.
- Content Flow Check - Enable or disable Intrusion Prevention and Application Detection settings for the rule. You can configure the default intrusion prevention and application detection profile to be used in the rules. See Intrusion Prevention for more details.
You can create different rules for different configurations for each of these components and specify the action to be applied on the data packets intercepted by them. The rules will be applied to the inbound and outbound packets in order.
To create a new firewall rule
- Click 'Firewall' > 'Policy' from the left hand side navigation
- Selecting the 'Firewall Policy' tab.
- Click the 'Add a new firewall rule' link at the top left. The 'Policy Firewall Rule Editor' will open.
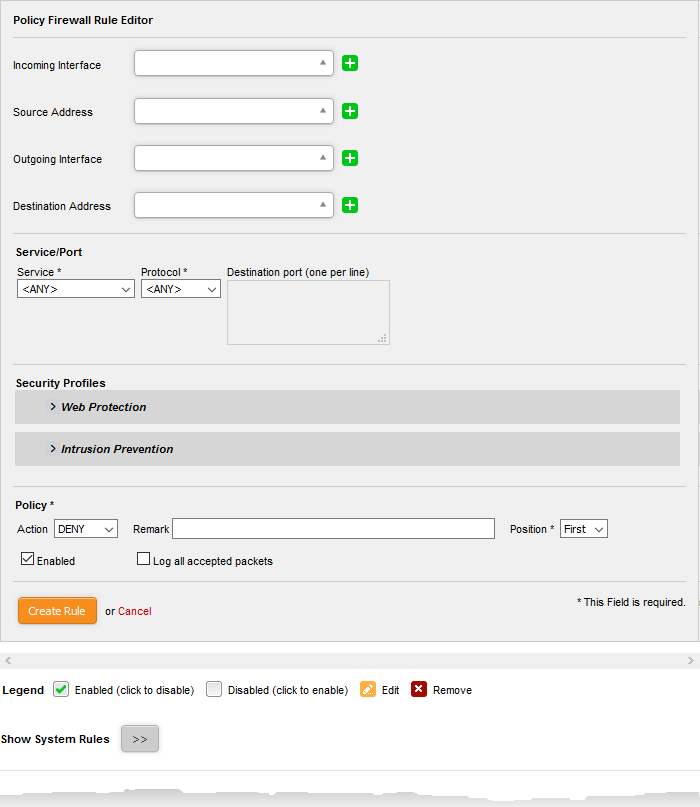
The 'Policy Firewall Rule Editor' interface is divided into four areas for specifying the different components of the rule:
|
- |
Choose the source and destination of the traffic to be intercepted by the rule. |
|
|
- |
Specify the service pertaining to the traffic to be intercepted by the rule. |
|
|
- |
Configure
settings for intrusion prevention and web protection such as URL
filtering, Advanced Threat Protection (ATP) and HTTPS intercepts. |
|
|
- |
Configure to allow or block the traffic intercepted by the rule. |
- Incoming Interface - Choose the interface device through which the traffic is received, from the drop-down.
- Source Address - Choose the firewall object or the object group that covers the IP address, IP address range or the subnet, on which the traffic to be intercepted by the rule, is received.
If a firewall object covering the IP address/IP Address range or the subnet to be specified has not been created under the Firewall Objects interface previously, you an create a new object from this interface too.
- Click the drop-down arrow and click 'Create' at the bottom of the list. A new pane for creating a new object will appear.
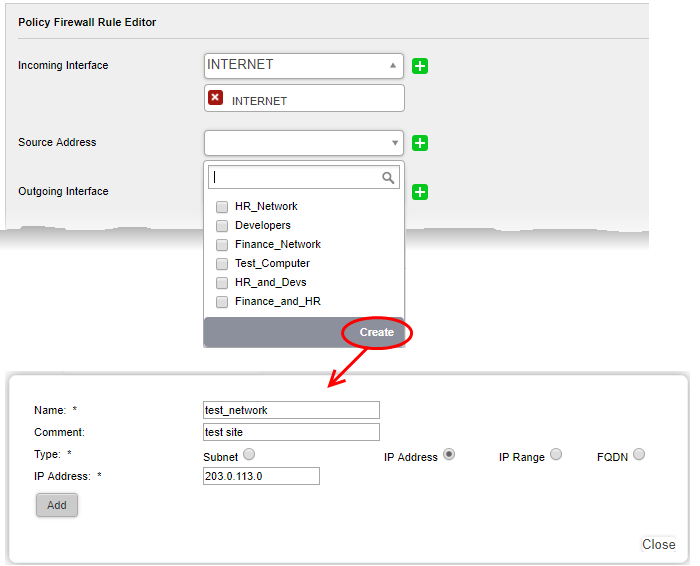
- Name - Specify a name for the object (15 characters max) representing the host(s) included in the object.
- Comment – Enter a short description of the object.
- Type - Select the type by which the hosts are to be referred in the object. The available options are:
- Subnet - Select this if a sub network of computers is to be covered by the object and enter the sub network address
- IP address - Select this if a single host is to be covered by the object and enter the IP address of the host
- IP range - Select this if more than one host is to be covered by the object and enter the IP address range of the hosts
- FQDN – Select this if you want to add domains by specifying their fully qualified domain name(s) (FQDN) is to be covered by the object
- Enter the domain name (without 'http://' or 'https://') in the FQDN Name field and click the 'Query' link.
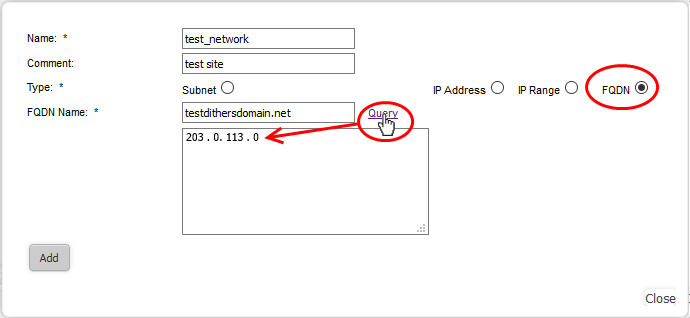
- The firewall will perform a DNS query and add the resolved IP address in the box below
- To add more domains, enter the names one by one in the FQDN Name field and click the 'Query' link.
- Click 'Add'.
The new object will be added and will be available for selection from the Select network/IPs drop-down.
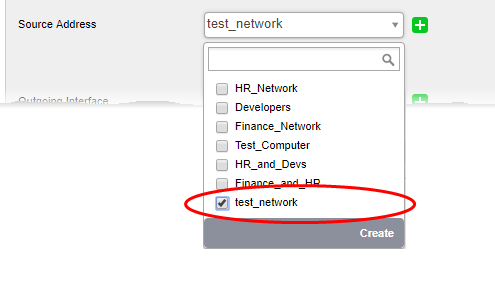
The new object will also be added to the list of objects under Firewall Objects and will be available for selection for creating other firewall rules too.
-
Outgoing Interface - Choose the interface device through which the traffic is directed, from the drop-down.
-
Destination Address - Choose the Firewall Object or Object Group containing the IP address, IP Address Range or the subnet of the host(s) to which the traffic is directed, from the drop-down.
If a firewall object covering the IP address/IP Address range or the subnet to be specified has not been created under the Firewall Objects interface previously, you an create a new object from this interface too. See explanation above for more details.
Service/Port - Select the type or the service hosted by the source, the protocol and the port used by the service.
-
Service - Choose the type of service from the drop-down
-
Protocol - Choose the protocol used by the service
-
Destination port - Specify the destination port(s) of the service one by one, in the 'Destination Port' text box.
|
Tip: The appliance is loaded with predefined combinations of service/protocol/port, like HTTP/TCP/80,[ALL] |
The Security Profiles area allows you to enable/disable various security features for Web Protection and Intrusion Prevention.
Web Protection - Clicking the down arrow in the 'Web Protection' stripe will open the security features for web protection:
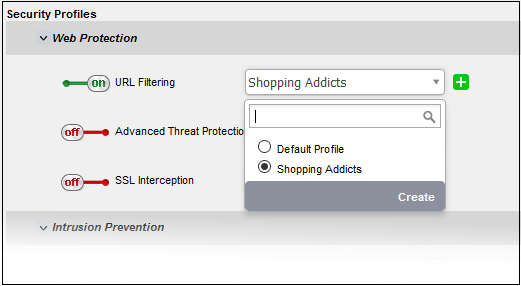
- URL Filtering - Allows you to enable/disable the URL filtering to be applied to the traffic intercepted by the rule.
- To enable Web Filtering, move the toggle switch to ON position and select the URL filter profile that covers the websites to be blocked/allowed, from the drop-down.
The rules with Web Filtering enabled and configured with a URL filter profile will be added for HTTP/HTTPS Proxy server settings. The URL Access policies for HTTP/HTTPS Proxy Server can be viewed from the 'Proxy' > 'HTTP/HTTPS' > 'URL Filter' interface. See Configuring URL and Content Filtering Policies for more details.
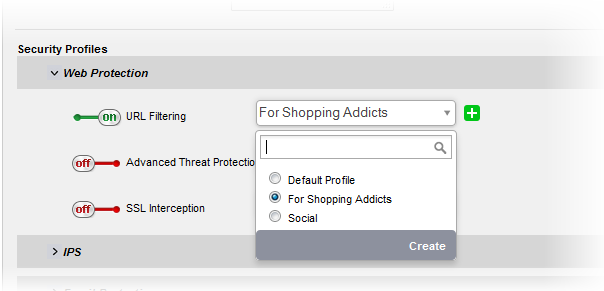
The 'URL Filtering' drop-down displays a list of profiles created and managed under the 'Proxy' > 'HTTP/HTTPS' > 'URL Filter' interface. If the profile that covers the required websites to be specified has not been created under the 'Proxy' > 'HTTP/HTTPS' > 'URL Filter' previously and hence not available in the drop-down, you can create a profile from this interface too.
- Click the drop-down arrow and click 'Create' at the bottom of the list. A new pane for creating a new profile will appear. See section Configure URL and Content Filtering for more details on creating a new profile.
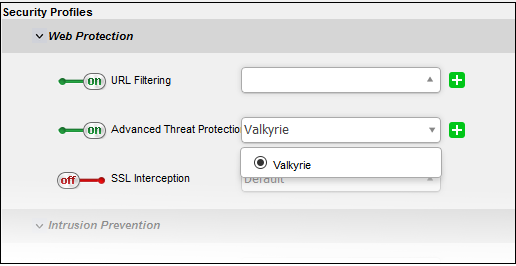
- Advanced Threat Protection - Allows you to enable/disable Advanced Threat Protection (ATP) to be applied to the traffic intercepted by the rule.
The ATP default profile can be managed from 'Services' > 'Advanced Threat Protection' > 'Profiles' interface. For more details on managing the ATP profile, see section Manage ATP Profiles.
- To enable ATP for Web Protection, move the toggle switch to ON position and select the ATP profile, from the drop-down. Please note DFW virtual appliance is configured to use Valkyrie for analysis of unknown files that is downloaded from the internet.
- SSL Interception - Allows you to enable/disable HTTPS exceptions to be applied to the traffic intercepted by the rule.
- To enable SSL Interception, move the toggle switch to ON position and select the profile, from the drop-down.
On selecting 'Default', the HTTPS Exceptions settings as configured under the 'Proxy' > 'HTTP/HTTPS' > 'HTTPS Exceptions' interface will be applied. See HTTPS Proxy for more details.
- Intrusion Prevention - Clicking the down arrow in the 'Intrusion Prevention' stripe will open the security features for intrusion prevention:
- Intrusion Prevention - Allows you to enable/disable 'Intrusion Prevention' to be applied to the traffic intercepted by the rule.
- To enable 'Intrusion Prevention', move the toggle switch to ON position and select the profile, from the drop-down.
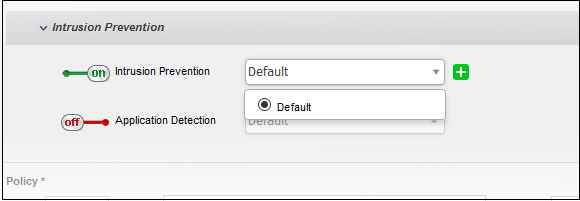
On selecting 'Default', the rules settings as configured under 'Services' > 'Intrusion Prevention' > 'IPS Rules' interface will be applied. See Intrusion Prevention for more details.
- Application Detection - Allows you to enable/disable 'Application Detection' to be applied to the traffic intercepted by the rule.
- To enable 'Application Detection', move the toggle switch to ON position and select the profile, from the drop-down.
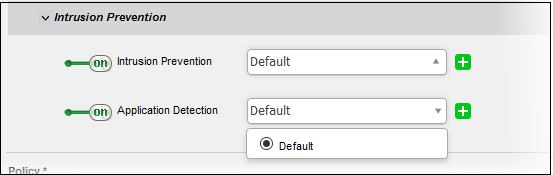
On selecting 'Default', the rules settings as configured under 'Services' > 'Intrusion Prevention' > 'Application Identification' interface will be applied. See 'Intrusion Prevention' for more details.
-
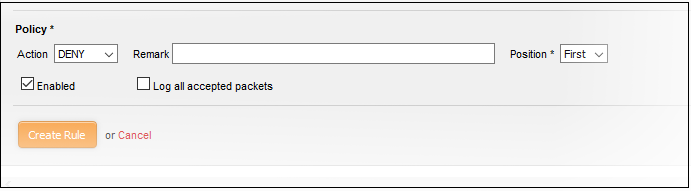
Action - Specify whether the packets matching the rule should be allowed or denied from the Policy drop-down. The options available are:
- Allow - The data packets are permitted without filtering
- Deny - The packets will be dropped
- Reject - The packets will be refused and a error packet sent in response
- Remark - Enter a short description for the rule. This description appears in the 'Remark' column of the rules table.
- Position - Set the priority of the rule. Higher position rules take precedence in the event of a conflict over settings. The rules in iptables are processed in the order they appear on the list.
-
Enabled - Leave this checkbox selected if you want the rule to be activated upon creation.
-
Log all accepted packets - Select this checkbox if you want the packets allowed by the rule are to be logged. See View Logs for more details.
-
Click 'Create Rule'. A confirmation dialog will appear.
-
Click 'Apply'. The firewall will be restarted with the new rule applied.
Configure Firewall Policy Settings
The lower pane lets you enable/disable the firewall policy, and to log all connections which get allowed by the policy.
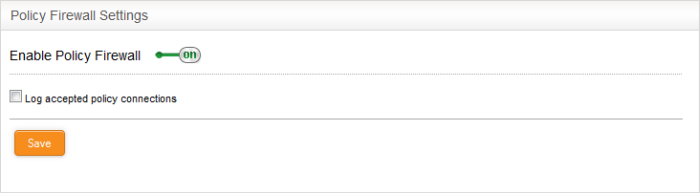
- Click 'Save' for your settings to take effect.
Logged items include date, time, type of event, subject id, component name and event outcome.