Comodo Help
Find the desired product help
Comodo Dome Firewall

Comodo Dome Firewall

Dome Firewall Virtual Appliance Admin Guide

English

Print Help Download Help
Configure DFW Virtual Appliance Services And Protection Settings > Time Server
  • Introduction To Comodo Dome Firewall - Virtual Appliance
    • Install Dome Firewall And Login To The Administrative Console
  • The Main Interface
  • The Dashboard
  • View And Modify System Status And General Configuration
    • Manage Admin Accounts
      • Add And Manage Administrators
      • Manage Administrative Roles
    • License Activation
    • SNMP Settings
    • Central Management
    • Configure SSH Access
    • High Availability
    • View And Update Firmware Version
    • Create And Schedule Backup Of DFW State
      • Manually Create A Backup
      • Schedule Backup Operations
      • Encrypt Backup Archives
      • Export A Backup
      • Import A Backup Archive From A Local Computer
      • Roll Back The Virtual Appliance To A Previous Time Point
      • Reset The Virtual Appliance To Factory Defaults
    • Shutdown Or Restart The Dome Firewall Virtual Appliance
  • View DFW Virtual Appliance Status
    • System Status
    • Network Status
    • System Usage Summaries
    • Network Traffic
    • Network Connections
    • SSLVPN Connections
  • Network Configuration
    • Configure Interface Devices, Uplinks And VLANs
      • Configure Interface Devices
      • Add And Manage Gateway Uplink Devices
      • Create VLANs
    • Routes
      • Add And Manage Static Routes
      • Add And Manage Policy Routing Rules
  • Configure DFW Virtual Appliance Services And Protection Settings
    • DHCP Server
    • Advanced Threat Protection
      • Manage The ATP Profiles
      • Comodo Antivirus
    • Time Server
    • Intrusion Prevention
      • Configure Intrusion Prevention System
      • Manage IPS Rulesets
      • Manage Application Identification Rulesets
    • Configure Wireless Hotspot
      • Configure Captive Portal Service
      • Customize The Login Page
      • Add And Manage Permanent Users
    • Internet Content Adaptation Protocol
    • Quality Of Service
  • Manage Firewall Configuration
    • Firewall Objects
      • Manage Firewall Address Objects
      • Manage Firewall Object Groups
      • Manage Firewall Schedules
      • Active Directory Integration
    • Destination Network Address Translation
    • Source Network Address Translation
    • Configure System Access
    • Configure Firewall Policy Rules
      • Manage Firewall Policy Rules
      • Manage VPN Firewall Rules
  • Configure Proxy Services
    • HTTP/HTTPS Proxy Server
      • Configure URL And Content Filtering
      • HTTPS Proxy
  • Configure Virtual Private Network Settings
    • SSL VPN Server
      • Configure General SSL VPN Server Settings
      • Manage SSL VPN Client Accounts
      • Configure Advanced SSL VPN Server Settings
      • Configure Clients To Connect To Dome Firewall
    • IPsec Configuration
    • Configure L2TP Server
    • Configure IPSec/L2TP Users
  • View Logs
    • Realtime Logs
    • Configure Log Settings
    • Generate Reports
  • Appendix - Minimum Requirements For Software Installations

Time Server


  • Click 'Services' on the left then select 'Time Server'.

The 'Time Server' interface allows you to configure system time and synchronization with internet time servers. Administrators can also manually set the date and time via this interface.


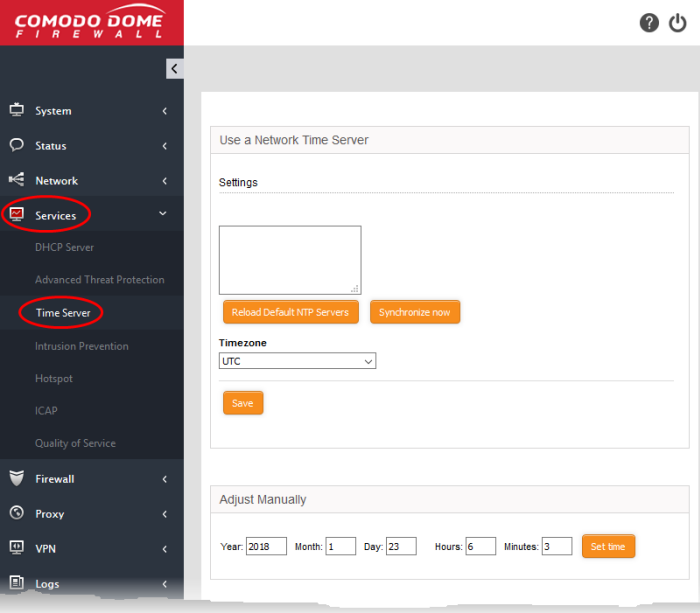
The interface has two panels:

  • Use a network time server
  • Adjust manually

Use a Network Time Server


The firewall's system time can be synchronized with the time zones of most major cities via Network Time Protocol (NTP) servers.

  • By default, the virtual appliance uses the closest NTP servers for its time synchronization
  • If required, administrators can synchronize with a manually specified time server. This is useful, for example, if the virtual appliance is used in an environment without an internet connection.

To specify custom time servers

  • Enter the URLs of custom time servers in the text field provided. Any number of servers can be added. Enter each URL on a separate line.


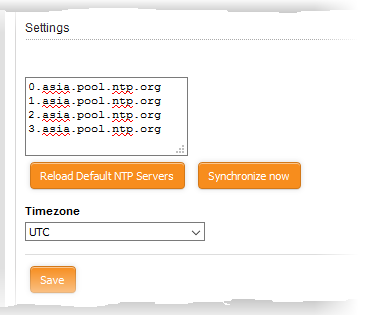
  • Time Zone - Select the time zone to which the virtual appliance should synchronize.
  • Click 'Synchronize now' to synchronize the time immediately with the specified NTP servers.
  • Click 'Reload Default NTP Servers' to restore the appliance to the default time servers.
  • Click 'Save' to save your settings.

Adjust Manually

The lower panel lets you manually set the time in system clock. This is useful if the system clock has stopped for some time and immediate time update is needed.


  • Enter the year, month, date, and the current time in hours and minutes
  • Click 'Set time'.

Tip: The time server is used to provide time-stamps for important operations like audit generation. Hence, it is important to keep it precise and accurate.


Our Products
  • Free Antivirus
  • Free Internet Security
  • Website Malware Removal
  • Free Anti-Malware
  • Anti-Spam (Free Trial)
  • Windows Antivirus
  • Antivirus for Windows 7
  • Antivirus for Windows 8
  • Antivirus for Windows 10
  • Antivirus for MAC
  • Antivirus for Linux
  • Free Endpoint Security
  • Free ModSecurity
  • Free RMM
  • Free Website Malware Scanner
  • Free Device Manager for Android
  • Free Demo
  • Network Security
  • Endpoint Protection
  • Antivirus for Android
  • Comodo Antivirus
  • Wordpress Security
Cheap CDN
  • Bootstrap CDN
  • Semantic UI CDN
  • Jquery CDN
  • CDN Plans
  • CDN
  • Free CDN
Enterprise
  • Patch Management Software
  • Patch Manager
  • Service Desk
  • Website Down
  • Endpoint Protection Solutions
  • Website Security Check
  • Remote Monitoring and Management
  • Website Security
  • Device Manager
  • ITSM
  • CRM
  • MSP
  • Android Device Manager
  • MDR Services
  • Managed IT Support Services
  • Free EDR
Free SSL Certificate
Support Partners Terms and Conditions Privacy Policy

© Comodo Group, Inc. 2025. All rights reserved.