


Configure System Access
- The 'System Access' interface lets you manage access to the appliance from hosts in internal and external networks.
- DFW has pre-configured rules that allow hosts in different zones to access the appliance for selected services.
- For example - DNS (through port 53); admin interface (through port 10443), and DHCP (through port 67).
- These rules are required for hosts and clients to receive essential services and for correct functioning of the virtual appliance.
- Whenever a new service is enabled in the virtual appliance, rules are auto-created to provide the service to hosts in the required network zones.
- You can create, view, edit or remove the rules. See Show rules of system services for more details on how to view the rules.
The system access firewall rules can be viewed and
managed from the 'System access' interface.
- Click 'Firewall' > 'System Access' from the left menu to open the interface.
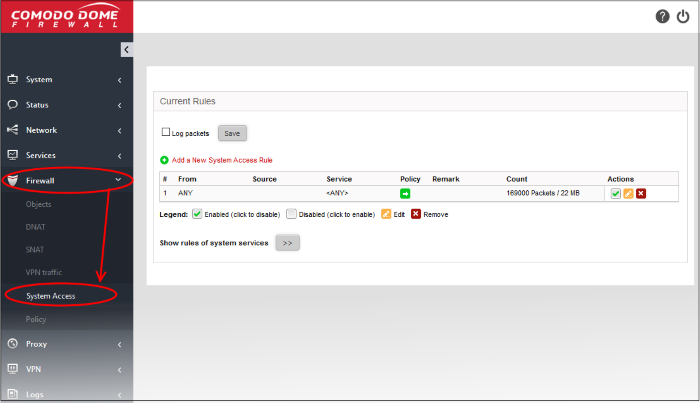
The interface displays a list of system access firewall rules and enables the administrator to create new rules.
|
System Access Firewall Rules Table - Column Descriptions |
|
|---|---|
|
Column |
Description |
|
# |
ID number of the rule. A packet is allowed or denied based on the first matching rule in the list, regardless of other matching rules that follow, hence the order of the rules play an important role in packet filtering. |
|
From |
The interface of the DFW device at which the traffic is received. |
|
Source |
The firewall object/object group containing the IP addresses or subnet address of the internal or external host(s) from which the traffic originates. |
|
Service |
The service that uses the traffic, indicated as the protocol and the port used. |
|
Policy |
Indicates the allow/block policy of the rule. |
|
Remark |
A short description of the rule. |
| Count | Indicates the number of packets and size of data intercepted by the rule. |
|
Actions |
Displays control buttons for managing the rule. |
 - The checkbox allows the administrator to switch the rule between enabled and disabled states.
 - Removes the rule.
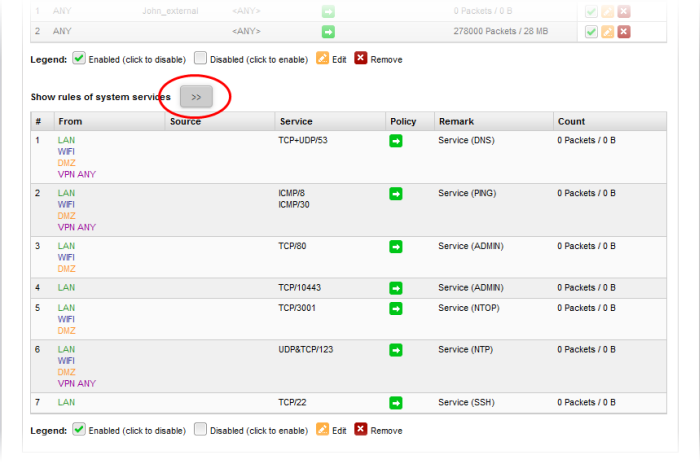
- Clicking the right arrow button beside 'Show rules of system services' displays the list of pre-configured/auto-created firewall rules for system access. These rules cannot be modified or removed.
From this interface, the administrator can:
Creating System Access Firewall rules
The system access firewall rules can be created from the 'Add a system access rule' pane by defining the source, the interface of the virtual appliance at which the traffic is received and the service.
To create a new rule
- Open the 'System access configuration' interface by clicking 'Firewall' > 'System access' from the left hand side navigation.
- Click the 'Add a new system access rule' link at the top left. The 'Add a system access rule' pane will open.
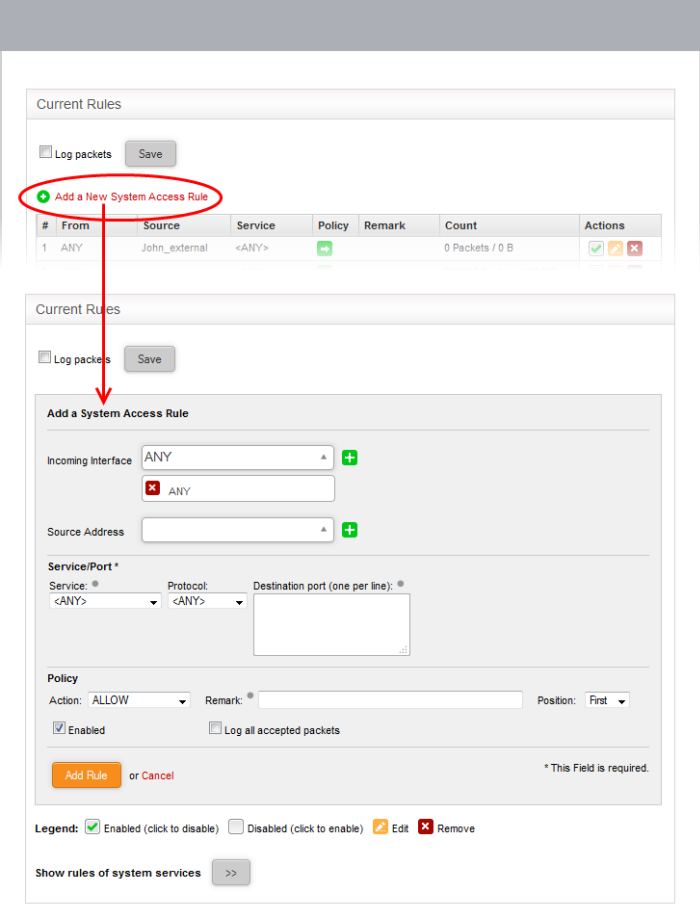
- Enter the parameters for the new rule as shown below:
Source Address - Specify the source of the traffic for which the rule is to be applied. The source can be an internal or external network or a specific IP address, added as a Firewall object.
- Choose the Firewall Object(s) or Object Group(s) containing the IP address, IP Address Range or the subnet of the host(s) from the drop-down.
If a firewall object covering the IP address/IP Address range or the subnet to be specified has not been created under the Firewall Objects interface previously, you an create a new object from this interface too.
|
Note: For security and operational efficiency, specify individual or narrow ranges of IP addresses/subnets rather than large subnets. For example, 10.100.150.150/32 or 10.100.150.0/24 instead of 10.100.150.0/8. |
To create a new firewall object
- Click the drop-down arrow and click 'Create' at the bottom of the list. A new pane for creating a new object will appear.
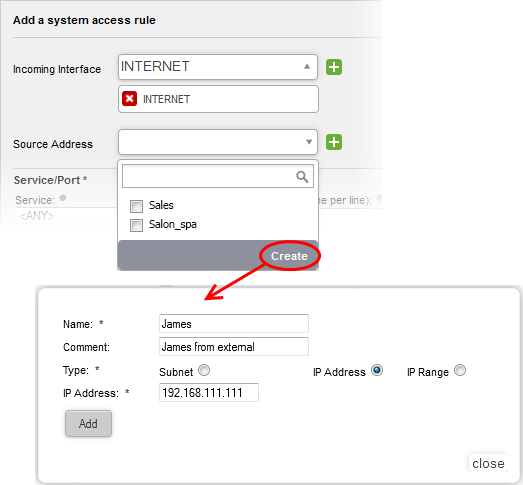
- Name - Specify a name for the object (15 characters max) representing the host(s) included in the object.
- Comment – Enter a short description of the object.
- Type - Select the type by which the hosts are to be referred in the object. The available options are:
- Subnet – Select this if a sub network of computers is to be covered by the object and enter the sub network address
- IP address – Select this if a single host is to be covered by the object and enter the IP address of the host
- IP range - Select this if more than one host is to be covered by the object and enter the IP address range of the hosts
The new object will be added and will be available for selection from the drop-down.
- Click 'Add'.
The new object will also be added to the list of objects under Firewall Objects and will be available for selection for creating other firewall rules too. System access rule activities are logged, including date, time, type of event, subject id, component name and event outcome.
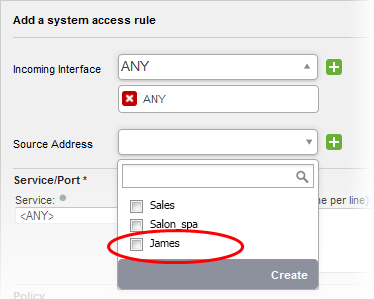
Service/Port - Select the type or the service hosted by the source, the protocol and the port used by the service.
- Service - Choose the type of service from the drop-down
- Protocol - Choose the protocol used by the service
- Destination port - Specify the destination port(s) of the service one by one, in the 'Destination Port' text box.
|
Tip: The appliance is loaded with predefined combinations of service/protocol/port, like HTTP/TCP/80,[ALL] |
Policy - Specify whether the packets matching the rule should be allowed or denied from the Policy drop-down. The options available are:
Allow - The data packets will be allowed without filtering
- Deny - The packets will be dropped
Reject - The packets will be rejected, and error packets will be sent in response
General Settings - Configure the General Settings to enable/disable the rule, enable/disable logging of packets filtered by the rule, enter a short description and select a position for the rule in the list.
- Remark - Enter a short description for the rule. The description will appear in the Remark column of the respective Rules interface (Optional)
- Position - Set the priority for the rule in the list of rules in the respective rules interface. The rules in the iptables are processed in the order they appear on the list.
- Enabled - Leave this checkbox selected if you want the rule to be activated upon creation.
- Log all accepted packets - Select this checkbox if you want the packets allowed by the rule are to be logged. See Viewing Logs for more details on configuring storage of logs and viewing the logs.
- Click 'Add Rule'. A confirmation dialog will appear.
- Click 'Apply'. The firewall will be restarted with the new rule applied.