


IPsec Configuration
The IPSec area lets you configure tunnels between different networks and sites.
- Dome Firewall supports two types of VPN protocols:
- 'Net-to-Net' VPN connections (aka 'Site-to-Site VPN') - Connect network to network via IPSec VPN.
- L2TP Host to Net VPN – Connect external devices with L2TP clients to internal networks through an IPsec VPN.
- Once configured, the IPSec connection type is available as a firewall object. This can be used in the source and destination address fields of a VPN FW rule.
Configure IPSec settings and add tunnels
- Click 'VPN' on the left then select 'IPSec'
Use this interface to create, configure and monitor IPsec connections, and to configure authentication preferences. You can implement authentication between IPsec connected devices by certificate or by pre-shared key.
Select the 'VPN' tab > 'IPsec' to access the 'IPsec' interface.
The interface contains three areas:
Global
Settings
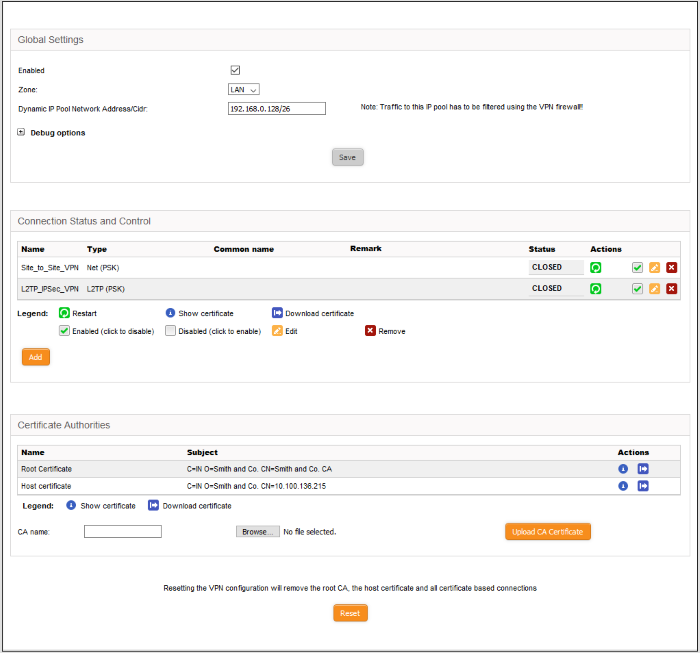
The 'Global Settings' area allows you to:
- Enable or disable the IPsec VPN service
- Configure which internal network zones can be accessed over IPsec
- Specify the dynamic IP address pool that should be used when assigning addresses to external clients.
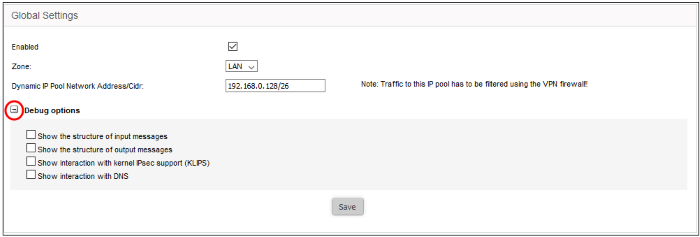
The 'Debug Options' area allows you to choose how much information is included in IPsec events in debugging logs.
- Enabled – Select the checkbox to enable the IPsec VPN service
- Zone – Choose the internal network zone to allow external clients and networks to access through the IPsec VPN
- Dynamic IP pool network address/cidr – Specify the IP addresses for dynamic assignment to the external clients in CIDR notation
- Debug options - Allows the administrator to configure the level of detail recorded for IPsec events in the debug log file in the event of connection failures. The log file is located at /var/log/messages in the internal storage of the virtual appliance. Click the '+' button to view the list of available options
- Click Save for your settings to take effect
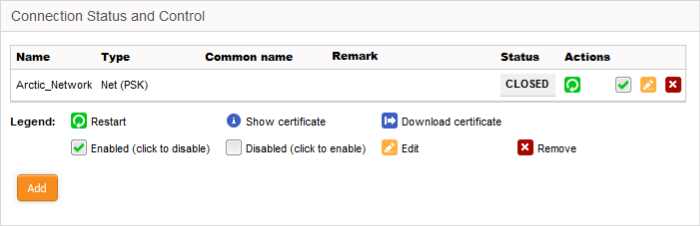
The 'Connection Status and Control' area allows you to view, edit and add IPsec tunnels.
|
IPsec Connection Status and Control table - Column Descriptions |
|
|---|---|
|
Column |
Description |
|
Name |
The label used to identify the connection. |
|
Type |
The type of the tunnel and the authentication type used. The IPsec service supports two types of authentication:
|
|
Common Name |
If certificate authentication is used, this field shows the certificate 'Common Name'. This is usually the name of the device or the name of the user. |
|
Remark |
A short description of the tunnel. |
|
Status |
Indicates the connection status of the tunnel. The possible values are:
|
|
Actions |
Displays control buttons for managing the tunnel.
|
 - Allows the administrator to switch the
connection between enabled and disabled states.
- Allows the administrator to switch the
connection between enabled and disabled states. - Enables to edit the tunnel configuration.
The pane for editing a tunnel is similar to the pane for adding a
new tunnel. See the section explaining
- Enables to edit the tunnel configuration.
The pane for editing a tunnel is similar to the pane for adding a
new tunnel. See the section explaining  - Removes the tunnel configuration.
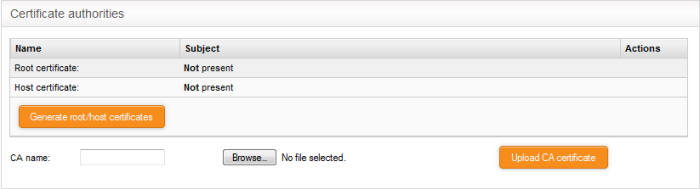
The 'Certificate authorities' area lets you manage the certificate used to authenticate clients connecting through the IPsec tunnel.
The external client/network can authenticate itself by using a client certificate:
- That was generated by the DFW virtual appliance and sent to the client ;
- Generated by the DFW appliance by signing the certificate request received from the client; or
- Obtained from an external CA.
Initially, no certificate will be
available with the DFW virtual appliance. If a new tunnel configuration is
created with certificate type authentication, the administrator
should first generate self-signed root and host certificates or
upload a server certificate obtained from an external CA for
deployment on to the DFW virtual appliance. This certificate will be used to
generate a new client certificate for the client or to sign the
certificate request received from the client.
The following sections explain on:
To generate new self-signed certificates
- Click 'Generate root/host certificates'. The 'Generate root/host certificates' pane will open. The pane allows the administrator to create a new certificate or upload a previously generated certificated stored locally in PKCS12 format.
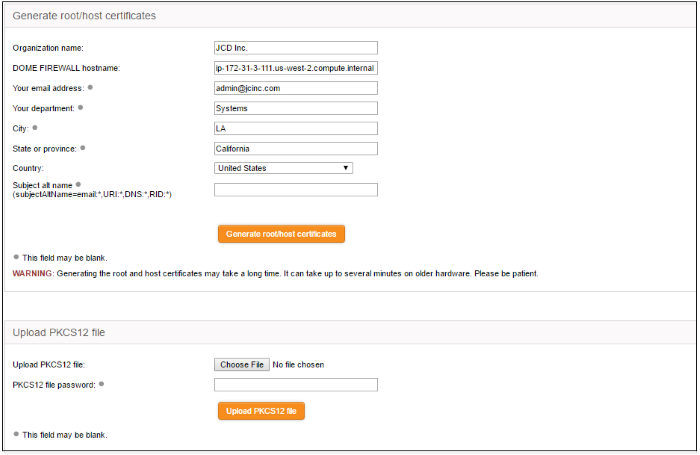
- Organization name – Enter the name of your organization. This will appear in the 'Organization' field of your certificate
- Dome Firewall hostname - Enter the IP address or host name of the Dome Firewall virtual appliance
- Your email address – Enter your email address, to be included in the certificate
- Your department – Enter your department. This will appear in the 'Organizational Unit' (OU) field of the certificate
- City – Enter your city
- State or province – Enter your state or province
- Country – Choose your country from the drop-down
- Subject alt name – Enter the alternative host names of the DFW virtual appliance, if any
- Click 'Generate root/host certificate'
Alternatively, if the administrator has any of the previously generated certificates stored in PKCS12 format, then the certificate can be uploaded to the virtual appliance, instead of creating new certificates.
Upload an existing certificate
- Click the 'Choose File' button beside 'Upload PKCS12 file' and locate the certificate you wish to upload.
- Enter the password which was specified when exporting the certificate
- Upload the PKCS12 certificate.
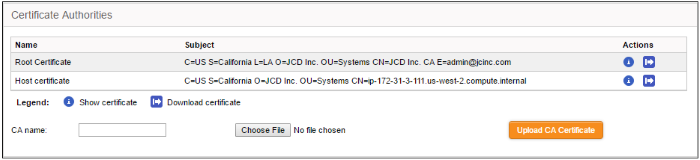
certificate and the connection
using the existing certificate can be removed by resetting the
certificate store. You can view the certificates by clicking the ![]() button or download the certificate by clicking the
button or download the certificate by clicking the ![]() button. The
downloaded certificates can then be exported to PKCS12 format for
importing into the appliance in future.
button. The
downloaded certificates can then be exported to PKCS12 format for
importing into the appliance in future.
To upload server certificate obtained from external CA
- Enter the CA name for identification in the CA name text field.
-
Click the 'Choose File' button beside the text field and navigate to the location in the local storage or the network where the certificate is stored and click 'Open'.
- Click 'Upload CA certificate'.
The certificate will be imported into the DFW virtual appliance.
Add
a New Tunnel Configuration
- Dome
Firewall allows you to create 'Net to Net' VPN to connect external
IPsec VPN servers. This enables network to network VPN connections
(also known as 'Site-to-Site VPN')
- L2TP Host to Net VPN – For connecting external clients such as mobiles and roaming devices using L2TP clients to connect to internal networks through an IPsec VPN
To create a new tunnel
- Click 'Add' from the 'Connection Status and Control' area

- Choose
the connection type and click 'Add' to configure connection and
authentication settings:
- The interface for specifying the connection configuration parameters and the authentication parameters will open.
- The interface is similar for both types of connection, except for an additional parameter 'Remote subnet' in 'Net to Net' connection type.
- The interface contains two areas – Connection Configuration and Authentication
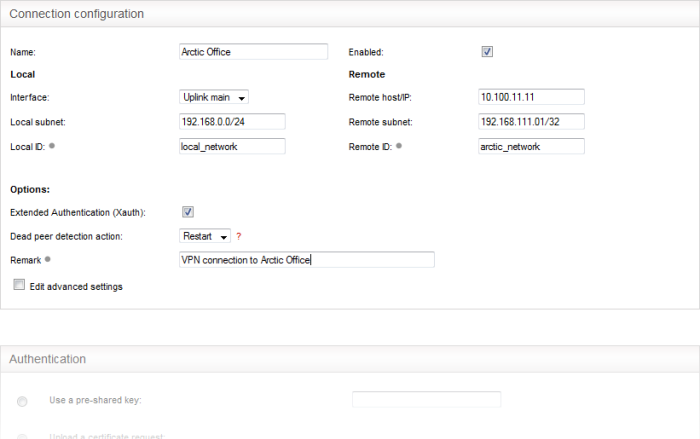
- Name – Enter a name to identify the connection tunnel
- Enabled – Select this checkbox if you wish the tunnel to be enabled upon creation. Do not select this, if you just want to create the connection this time and enable it at a later time.
Local
- Interface – Choose the uplink interface device connected to the DFW virtual appliance, through which the external client should connect to the local network infrastructure
- Local Subnet – This field is auto populated with the local sub network of LAN. If you want to specify a different subnet, enter the address in CIDR format.
- Local ID – Enter an identification string for the local network.
Remote
- Remote host/IP – Enter the IP address or hostname of the external host or network
- Remote subnet – The option is available only if you are creating 'Net to Net' connection type. Specify the sub network of the external network that can connect through the tunnel
- Remote ID - Enter an identification string for the local network.
Options
- Extended Authentication (Xauth) – Select this option if you wish to enable extended certificate based authentication for the remote client. You must install the client certificate on to the external client, if you select this option.
- Dead peer detection action – Choose the action to be taken by the DFW virtual appliance if the peer disconnects. The options available are:
- Clear – Disconnect the connection
- Hold – Wait for the peer to reconnect
- Restart – Restart the peer
- Remark – Enter a short description for the connection
- Edit advanced settings – Select this option if you wish to edit advanced configuration parameters of the tunnel. The advanced parameters can be edited only after saving the tunnel configuration. See the section explaining editing advanced parameters of IPsec tunnel configuration for more details
Authentication
Authentication
settings allow you to select the method for authenticating clients.
If certificate authentication is chosen then you can generate the
client certificate from here. The
certificate will be available for download from the Connection status
and control area.
-
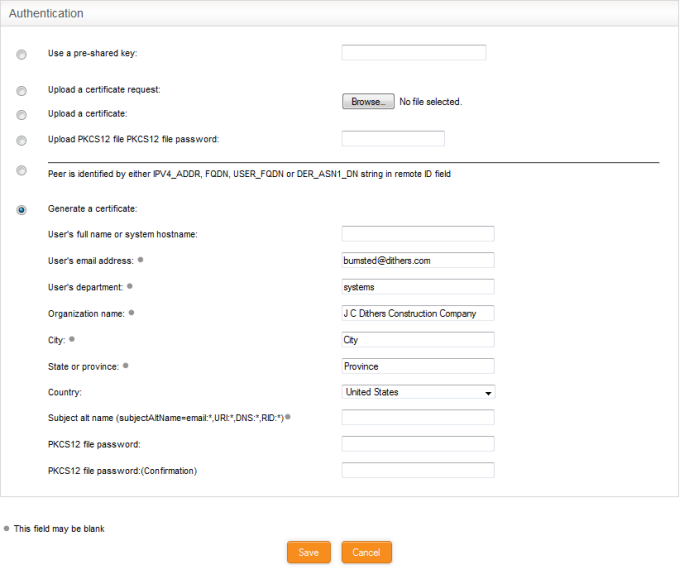
Select the authentication type from the options available in this interface:
The following options are for client certificate type authentication. They will only be available if root and host certificates have been generated, or a server certificate obtained from a CA has been uploaded to DFW for the IPsec server. See Certificate Authority for more details.
- Use a pre-shared key - Select this option if you wish to apply PSK type authentication for the remote client. Enter the password to be used for authentication by the remote client.
- Upload a certificate request – If the IPsec tunnel implementation in the remote host does not have its own CA, a certificate request, which is a partial X.509 certificate can be generated at the host. The certificate request can be transferred to the computer from which the administrative console is accessed and uploaded to the DFW virtual appliance. The virtual appliance will sign the request using its root certificate. The signed client certificate will be available from the Connection status and control area, which can then be transferred to the remote host and deployed. To upload a client certificate request, select this option and click the Browse button. Navigate to the location where the request file is stored and click 'Open.'
- Upload a certificate – If the remote host already has a client certificate in X.509 format, the certificate can be transferred to the computer from which the administrative console is accessed and uploaded to the virtual appliance. To upload the certificate, select this option and click the Browse button. Navigate to the location where the certificate file is stored and click 'Open.'
- Upload PKCS12 file PKCS12 file password – If the client certificate is exported to PKCS format from the remote host, the .p12 file can be transferred to the computer from which the administrative console is accessed and uploaded to the virtual appliance. To upload the certificate, select this option and click the Browse button. Enter the password to import the certificate to the virtual appliance.
- Peer is identified by either IPV4_ADDR, FQDN, USER_FQDN or DER_ASN1_DN string in remote ID field – Select this option if you wish the remote host is to be authenticated based on its IP Address, domain name, or by other unique information of the IPsec tunnel entered in the Remote ID field of the Connection Configuration area.
- Generate Certificate – Select this option if you wish to generate a new client certificate for the remote host signed by the Root certificate of IPsec server in the DFW virtual appliance. Enter the parameters for the certificate in the fields below. Upon generation, the client certificate will be available for download from the Connection status and control area. The certificate can be transferred to the remote host and deployed for authenticating itself to the server.
- User's full name or system hostname – Enter the username or the hostname of the remote host. This name will be included in the CN field of the certificate.
- User's email address – Enter the email address of the user of the host.
- User's department – Enter the department to which the en-user belongs.
- Organization name – Enter the name of the organization to which the end-user belongs.
- City, State or province, Country – Enter the address details of the end-user
- Subject alt name – Enter the alternative host names, if any, for the remote host.
- PKCS12 file password – Enter the password for storing the certificate file in .p12 format and re-enter it for confirmation in the next field. This password needs to be entered while importing the certificate at the remote host.
- Click 'Save'.
If
you have chosen to edit advanced settings while creating the
connection, the 'Advanced
Connection Parameters'
interface will open after clicking 'Save'. Else, the
connection will be added to the Connection
status and control area. The
certificates generated can be downloaded and imported onto the remote
host. The remote host will now be able to connect to the sub network
of the internal network specified under Connection Configuration, by
configuring the IPsec VPN connection at the host.
Editing Advanced Configuration Parameters of IPsec Tunnel Configuration
|
Warning: The Advanced connection parameters are automatically selected for optimal performance. It is recommended to leave these settings to default, unless you are an expert and understand the risk of altering encryption parameters. |
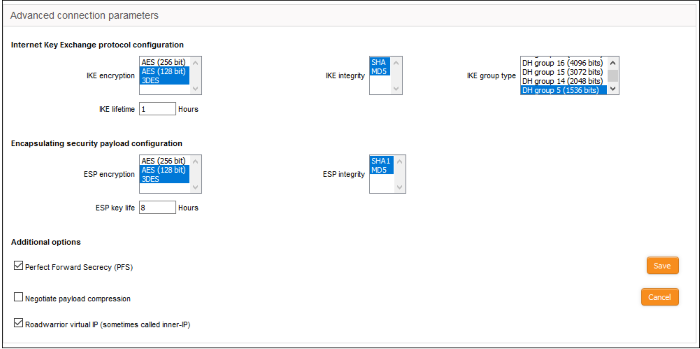
Internet Key Exchange (IKE) Protocol Configuration
- IKE Encryption – Select the encryption method(s) to be supported by IKE.
- IKE Integrity – Select the encryption algorithms to be used for checking the integrity of IKE data packets
- IKE group type – Select the group type of IKE packets
- IKE lifetime – Specify how long the IKE packets are to be valid
Encapsulating security payload configuration
- ESP Encryption – Select the encryption method(s) to be supported for encapsulation.
- ESP Integrity – Select the encryption algorithms to be used for checking the integrity of encapsulated data packets
- ESP key life – Specify how long the encapsulated data packets are to be valid
Additional options
- Perfect Forward Secrecy (PFS) – Select this option to enable perfect forward secrecy, so that the keys exchanged during long-term connection sessions are protected from being compromised.
- Negotiate payload compression – Select this option If you wish to allow compression of payload in data packets.
- Click 'Save' for your configuration to take effect.
The
connection will be added to the Connection
status and control area. The
certificates generated can be downloaded and imported onto the remote
host. The remote host will now be able to connect to the sub network
of the internal network specified under Connection Configuration, by
configuring the IPsec VPN connection at the host.