Comodo Help
Find the desired product help
Comodo Dome Firewall

Comodo Dome Firewall

Dome Firewall Virtual Appliance Admin Guide

English

Print Help Download Help
Network Configuration > Configure Interface Devices, Uplinks And VLANs > Add And Manage Gateway Uplink Devices
  • Introduction To Comodo Dome Firewall - Virtual Appliance
    • Install Dome Firewall And Login To The Administrative Console
  • The Main Interface
  • The Dashboard
  • View And Modify System Status And General Configuration
    • Manage Admin Accounts
      • Add And Manage Administrators
      • Manage Administrative Roles
    • License Activation
    • SNMP Settings
    • Central Management
    • Configure SSH Access
    • High Availability
    • View And Update Firmware Version
    • Create And Schedule Backup Of DFW State
      • Manually Create A Backup
      • Schedule Backup Operations
      • Encrypt Backup Archives
      • Export A Backup
      • Import A Backup Archive From A Local Computer
      • Roll Back The Virtual Appliance To A Previous Time Point
      • Reset The Virtual Appliance To Factory Defaults
    • Shutdown Or Restart The Dome Firewall Virtual Appliance
  • View DFW Virtual Appliance Status
    • System Status
    • Network Status
    • System Usage Summaries
    • Network Traffic
    • Network Connections
    • SSLVPN Connections
  • Network Configuration
    • Configure Interface Devices, Uplinks And VLANs
      • Configure Interface Devices
      • Add And Manage Gateway Uplink Devices
      • Create VLANs
    • Routes
      • Add And Manage Static Routes
      • Add And Manage Policy Routing Rules
  • Configure DFW Virtual Appliance Services And Protection Settings
    • DHCP Server
    • Advanced Threat Protection
      • Manage The ATP Profiles
      • Comodo Antivirus
    • Time Server
    • Intrusion Prevention
      • Configure Intrusion Prevention System
      • Manage IPS Rulesets
      • Manage Application Identification Rulesets
    • Configure Wireless Hotspot
      • Configure Captive Portal Service
      • Customize The Login Page
      • Add And Manage Permanent Users
    • Internet Content Adaptation Protocol
    • Quality Of Service
  • Manage Firewall Configuration
    • Firewall Objects
      • Manage Firewall Address Objects
      • Manage Firewall Object Groups
      • Manage Firewall Schedules
      • Active Directory Integration
    • Destination Network Address Translation
    • Source Network Address Translation
    • Configure System Access
    • Configure Firewall Policy Rules
      • Manage Firewall Policy Rules
      • Manage VPN Firewall Rules
  • Configure Proxy Services
    • HTTP/HTTPS Proxy Server
      • Configure URL And Content Filtering
      • HTTPS Proxy
  • Configure Virtual Private Network Settings
    • SSL VPN Server
      • Configure General SSL VPN Server Settings
      • Manage SSL VPN Client Accounts
      • Configure Advanced SSL VPN Server Settings
      • Configure Clients To Connect To Dome Firewall
    • IPsec Configuration
    • Configure L2TP Server
    • Configure IPSec/L2TP Users
  • View Logs
    • Realtime Logs
    • Configure Log Settings
    • Generate Reports
  • Appendix - Minimum Requirements For Software Installations

Add and Manage Gateway Uplink Devices


  • A gateway uplink has to be configured for a port so devices can connect to the internet.
  • The main uplink device, configured during initial network configuration, connects the virtual appliance to the internet. It also allows network zones like the local area network and DMZ to access the internet.
  • As a standby, you can connect more gateway uplink devices to the virtual appliance. The additional uplinks can be configured as fail-overs if the main uplink fails.

To add and manage gateway uplink devices

  • Click 'Network' > 'Interfaces' in the left-hand navigation
  • Click the 'Network Configuration' tab
  • The section underneath the table, 'Additional Gateway Uplinks', shows existing uplinks. You can add more uplinks as required.


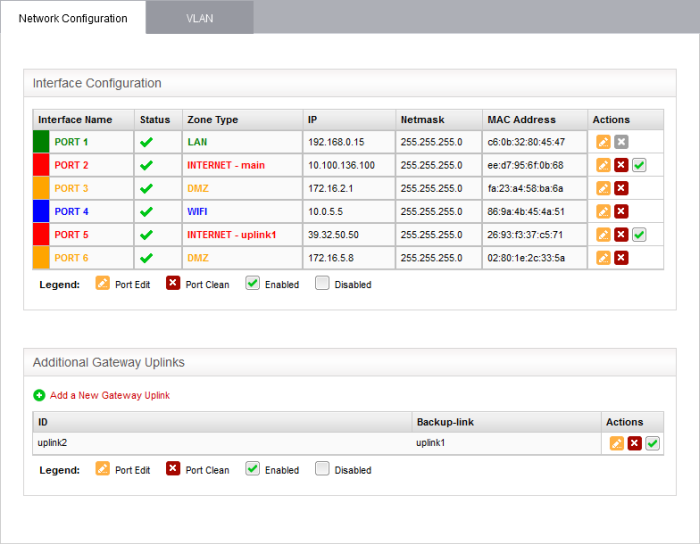
The 'Additional Gateway Uplinks' pane displays the currently connected gateway uplink devices.

Uplink Editor Table - Column Descriptions

Column

Description

ID


The name of the uplink device. This is assigned automatically by the DFW virtual appliance.

Backup-link


The backup uplink that will be activated if the primary link fails.

Actions

- Enable or disable the uplink. A tick indicates the uplink is active.

- Edit the gateway uplink device. The 'Edit' interface is similar to that used when adding a new device. See Add a Gateway Uplink Device for more details

- Removes the uplink


Add a Gateway Uplink Device


Any node in your internal network which is connected to the internet can be configured as a gateway uplink.


Note: Before configuring a new uplink, ensure that you have connected the uplink device to the DFW virtual appliance.


To add a new gateway uplink device

  • Click 'Network' > 'Interfaces' in the left-hand navigation
  • Click the 'Network Configuration' tab
  • Click the 'Add a New Gateway Uplink' link in the 'Additional Gateway Uplinks' pane:


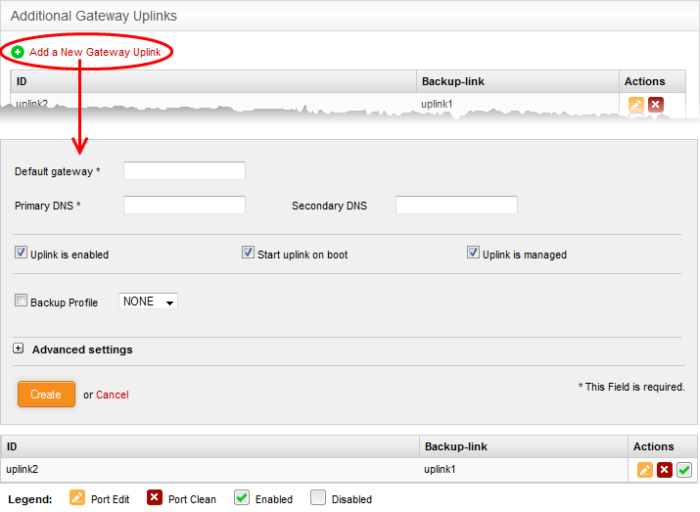
    The uplink configuration screen is divided into the following areas:

    • Device Settings - Enter IP address and DNS servers for the gateway device
    • Uplink Settings - Specify power and fail-over options for the uplink
    • Advanced Settings - Specify connection timeout period for the uplink

    Device Settings


    • Default Gateway - Enter the IP address or hostname of the default gateway device for this uplink in the 'Default Gateway' text box
    • Primary DNS and Secondary DNS - Enter the IP addresses/hostnames of the primary and secondary DNS servers to be used.


    Uplink Settings


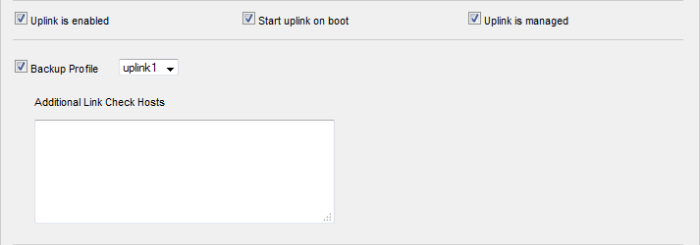
    • Uplink is Enabled - The uplink will be activated immediately after it is created. Deselect this if you don't want to enable the uplink device at this time. You can enable the uplink later in two ways:
    • Interface configuration screen – Enable the port in the Interface Configuration screen.
    • Dashboard – Enable the 'Active' checkbox beside the uplink in the 'Uplinks' box. See the section explaining the Uplinks box in the 'Dashboard' for more details. 
    • Start uplink on boot - The uplink will start automatically on every restart of the UTM appliance. Deselect this checkbox if you want to manually start the uplink only when required.
    • Uplink is managed - The uplink will be managed by Korugan and its details will be displayed in the Dashboard. Deselect this option if you do not want the uplink details to be displayed in the Dashboard. You can switch the uplink to managed state at any time by selecting the 'Managed' checkbox beside the uplink in the Dashboard. See section explaining the Uplinks box in the 'Dashboard' chapter for more details.
    • Backup Profile – Select this checkbox if you want to specify an alternative uplink connection to be activated in the event this uplink fails and choose the alternative uplink device from the drop-down.

    Advanced Settings


    The Advanced Settings pane allows administrators to configure a custom physical address for the uplink device and the reconnection time out period. These settings are only for advanced users, hence the pane is not displayed by default. To open this panel, click the '+' button next to 'Advanced Settings'.


    • Reconnection timeout - Specify the maximum time period (in seconds) that the uplink should attempt to reconnect in the event of a connection failure. The reconnection timeout period depends on the ISP configuration. If you are unsure, leave this field blank.
    • MTU - Enter the Maximum Transmission Unit (MTU) of the data packets that can be sent over the network. (Optional)
    • Click 'Create' after configuring the parameters. The uplink will be added to the Additional Gateway Uplinks interface. You can enable/disable the uplink at any time from this interface.


    Our Products
    • Free Antivirus
    • Free Internet Security
    • Website Malware Removal
    • Free Anti-Malware
    • Anti-Spam (Free Trial)
    • Windows Antivirus
    • Antivirus for Windows 7
    • Antivirus for Windows 8
    • Antivirus for Windows 10
    • Antivirus for MAC
    • Antivirus for Linux
    • Free Endpoint Security
    • Free ModSecurity
    • Free RMM
    • Free Website Malware Scanner
    • Free Device Manager for Android
    • Free Demo
    • Network Security
    • Endpoint Protection
    • Antivirus for Android
    • Comodo Antivirus
    • Wordpress Security
    Cheap CDN
    • Bootstrap CDN
    • Semantic UI CDN
    • Jquery CDN
    • CDN Plans
    • CDN
    • Free CDN
    Enterprise
    • Patch Management Software
    • Patch Manager
    • Service Desk
    • Website Down
    • Endpoint Protection Solutions
    • Website Security Check
    • Remote Monitoring and Management
    • Website Security
    • Device Manager
    • ITSM
    • CRM
    • MSP
    • Android Device Manager
    • MDR Services
    • Managed IT Support Services
    • Free EDR
    Free SSL Certificate
    Support Partners Terms and Conditions Privacy Policy

    © Comodo Group, Inc. 2025. All rights reserved.