


Add and Manage Policy Routing Rules
- The 'Policy Routing' interface shows all pre-configured static routes and policy routing rules.
- Policy routing rules can route traffic from external networks, zones, interfaces, VPN users or clients to network zones or VPN users.
- Rules can be configured to pass packets with a specific 'Type of Service' parameter.
- You can create new policy routing rules by defining source and destination networks, gateway, services and type of services and edit existing rules.
- You can covert static routes (those with only source and destination) into a routing rule by adding parameters like 'Type of Service' (TOS) and Service/Port in this interface.
- Click 'Network' > 'Routing' from the left side navigation.
- Click the 'Policy Routing' tab.

|
Policy Routing Editor Table - Column Descriptions |
|
|---|---|
|
Column |
Description |
|
Source |
The network from which traffic will originate for this rule. This can be an internal network zone or an external network. |
|
Destination |
The network to which traffic covered by this rule will be sent. This can be an external network or an internal network zone. |
|
ToS |
The 'Type of Service' parameter defined for the route to filter and to pass through. See the section 'Note on TOS' below the table for more details. |
|
Via Gateway |
The traffic between the defined source and destination networks will be passed through the gateway specified here. This can be a static gateway, an uplink connected to the virtual appliance or an SSL VPN user. |
|
Service |
The network service, protocol and the destination port defined for the rule |
|
Remark |
A shot description of the route as entered by the administrator during creation. |
|
Actions |
Displays control buttons for enabling/disabling and editing the rule.
Note: On clicking the 'Remove' button, the route entry will be immediately deleted without requesting confirmation. This is action is irreversible so if you accidentally delete an entry, you need to manually re-add it. |
 - Allows the administrator to enable or disable the rule. A tick in the checkbox indicates that the rule is enabled.
 - Removes the rule
The following sections provide detailed guidance on:
- Edit an existing static route entry or policy routing rule
To add a new policy routing rule
-
Click the 'Create a policy routing rule' link from the top left of the 'Policy Routing' interface. The 'Policy routing rule editor' pane will open.
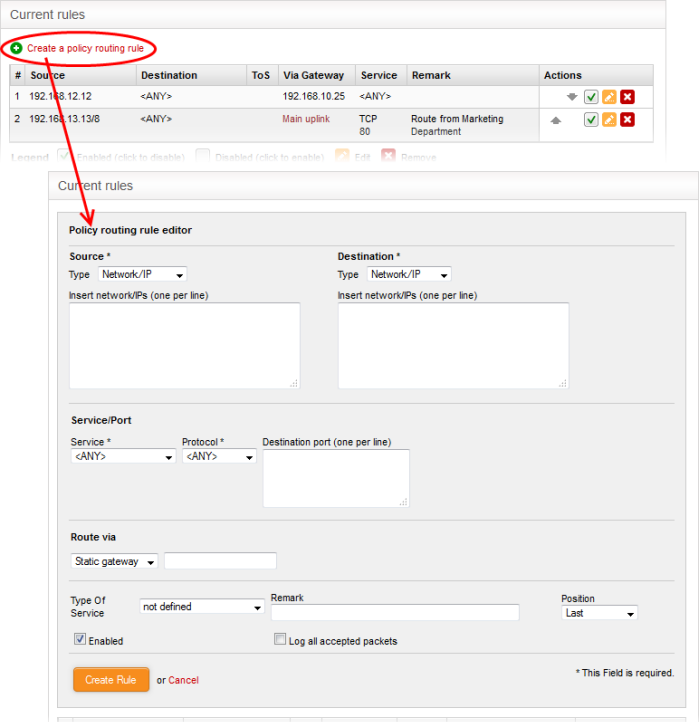
- The following parameters can be configured:
- Source - Select the type of source from the 'Type' drop-down and specify the source in the text box below it. The options available are:
- Any - The rule will be applied to traffic from any source
- Zone/Interface - Select this option if the source is a network zone or an Interface connected to the virtual appliance. Choose the network zone and/or the interface from the options listed in the text box. Press and hold the Ctrl key in the keyboard to choose multiple zones/interfaces.
- SSL VPN User - Select this option if the rule is to be applied to traffic from VPN user(s) added to the network. Choose user(s) from the list of pre-registered users displayed in the textbox. Press and hold the Ctrl key in the keyboard to choose VPN users.
- Network/IP - Select this option if the rule is to be applied to traffic from an external network or from a specific IP address. Enter the IP address of the network(s) in CIDR notation or the specific IP address(es) in the text box, as one entry per line.
- MAC - Select this option if the rule is to be applied to traffic from specific clients. Enter the MAC address(es) in the text box, with one entry per line.
- Destination - Select the type of destination for the traffic from the 'Type' drop-down and specify the actual destination in the text box below it. The options available are:
- Any - The rule will be applied to traffic going any destination
- SSL VPN User - Select this option if the rule is to be applied to traffic to VPN user(s) which have been added to the network. Choose user(s) from the list of pre-registered users displayed in the text-box. Press and hold the Ctrl key in the keyboard to choose VPN users.
- Network/IP - Select this option if the rule is to be applied to traffic to an external network or to a specific IP address. Enter the IP address of the network(s) in CIDR notation or the specific IP address(es) in the text box, as one entry per line.
- Service/Port - Specify the service, protocol and destination port for the rule when the TCP, UDP, or TCP + UDP protocols are selected.
- Service - Select the service for which the rule to be applied from the drop-down.
- Protocol - Select the protocol for the service. Usually this field will be auto selected based on the service selected.
- Destination port - Select the destination port for the service. Usually this field will be auto selected based on the service selected.
|
Tip:
The appliance is loaded with predefined combinations of
service/protocol/port, like HTTP/TCP/80,[ALL] |
- Route Via – Choose the route gate way for the traffic between the source and destination from the drop-down. The options available are:
- Static Gateway – Specify the IP address of the router in the text box at the right.
- Uplink - Choose the uplink to be used, from the uplink interfaces connected to the virtual appliance, through the drop-down at the right.
- SSL VPN User - Choose the SSL VPN client to be used from the drop-down at the right
- Type of Service – Choose the ToS parameter for the rule. For more details on ToS, see the note above.
Remark – Enter a short description for the rule. The description will appear in the Remark column in the list of rules.
- Position – Select the priority of the rule from the drop-down.
- Enabled – Unselect if you do not want the rule to be enabled upon creation. The rule can be enabled/disabled at anytime from the Policy Routing Editor interface.
- Log all accepted packets – Select the checkbox if you want all the packets passed through the routing rule.
- Click 'Create Rule' to add your new rule to the appliance.
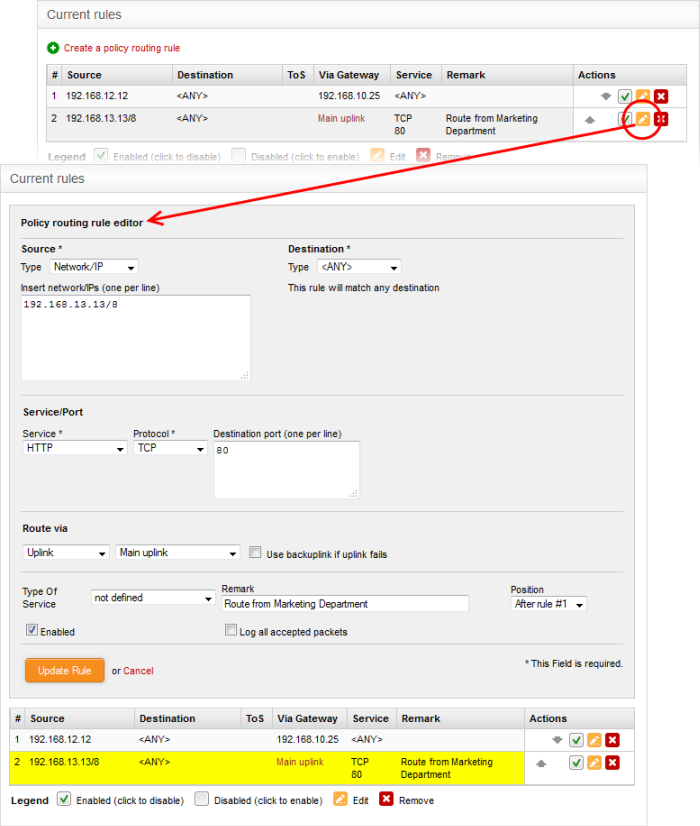
-
Click the 'Edit' button
 in the row of the rule you want to edit.
The 'Policy routing rule editor' pane will open.
in the row of the rule you want to edit.
The 'Policy routing rule editor' pane will open.
-
Edit the details as required and click 'Update Rule'. See the section above for more details
The new details will be saved and activated on the next restart of the service.