Comodo Help
Find the desired product help
Comodo Dome Firewall

Comodo Dome Firewall

Dome Firewall Virtual Appliance Admin Guide

English

Print Help Download Help
Configure DFW Virtual Appliance Services And Protection Settings > Configure Wireless Hotspot > Customize The Login Page
  • Introduction To Comodo Dome Firewall - Virtual Appliance
    • Install Dome Firewall And Login To The Administrative Console
  • The Main Interface
  • The Dashboard
  • View And Modify System Status And General Configuration
    • Manage Admin Accounts
      • Add And Manage Administrators
      • Manage Administrative Roles
    • License Activation
    • SNMP Settings
    • Central Management
    • Configure SSH Access
    • High Availability
    • View And Update Firmware Version
    • Create And Schedule Backup Of DFW State
      • Manually Create A Backup
      • Schedule Backup Operations
      • Encrypt Backup Archives
      • Export A Backup
      • Import A Backup Archive From A Local Computer
      • Roll Back The Virtual Appliance To A Previous Time Point
      • Reset The Virtual Appliance To Factory Defaults
    • Shutdown Or Restart The Dome Firewall Virtual Appliance
  • View DFW Virtual Appliance Status
    • System Status
    • Network Status
    • System Usage Summaries
    • Network Traffic
    • Network Connections
    • SSLVPN Connections
  • Network Configuration
    • Configure Interface Devices, Uplinks And VLANs
      • Configure Interface Devices
      • Add And Manage Gateway Uplink Devices
      • Create VLANs
    • Routes
      • Add And Manage Static Routes
      • Add And Manage Policy Routing Rules
  • Configure DFW Virtual Appliance Services And Protection Settings
    • DHCP Server
    • Advanced Threat Protection
      • Manage The ATP Profiles
      • Comodo Antivirus
    • Time Server
    • Intrusion Prevention
      • Configure Intrusion Prevention System
      • Manage IPS Rulesets
      • Manage Application Identification Rulesets
    • Configure Wireless Hotspot
      • Configure Captive Portal Service
      • Customize The Login Page
      • Add And Manage Permanent Users
    • Internet Content Adaptation Protocol
    • Quality Of Service
  • Manage Firewall Configuration
    • Firewall Objects
      • Manage Firewall Address Objects
      • Manage Firewall Object Groups
      • Manage Firewall Schedules
      • Active Directory Integration
    • Destination Network Address Translation
    • Source Network Address Translation
    • Configure System Access
    • Configure Firewall Policy Rules
      • Manage Firewall Policy Rules
      • Manage VPN Firewall Rules
  • Configure Proxy Services
    • HTTP/HTTPS Proxy Server
      • Configure URL And Content Filtering
      • HTTPS Proxy
  • Configure Virtual Private Network Settings
    • SSL VPN Server
      • Configure General SSL VPN Server Settings
      • Manage SSL VPN Client Accounts
      • Configure Advanced SSL VPN Server Settings
      • Configure Clients To Connect To Dome Firewall
    • IPsec Configuration
    • Configure L2TP Server
    • Configure IPSec/L2TP Users
  • View Logs
    • Realtime Logs
    • Configure Log Settings
    • Generate Reports
  • Appendix - Minimum Requirements For Software Installations

Customize the Login Page


DFW allows the administrator to choose either built-in login page that will be displayed to hotspot users or a custom built login page. The built in login page allows to customize the login page image and welcome message.

  • Customize built-in login page
  • Upload custom login page

To customize the built-in Wi-Fi login page

  • Click 'Services' > 'Hotspot' from the left hand side navigation and select the 'Login Page' tab.


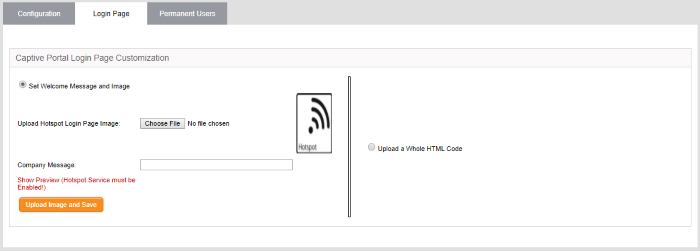
  • Select the option 'Set Welcome Message and Image'
  • To upload the logo/brand image of the organization click 'Choose File', navigate to the image file stored in the local disk of the computer and click 'Open'.
  • To display a custom message in the login screen, enter the message in the 'Company Message' text box.
  • Clicking 'Show Preview' will display the login page in a new browser window for confirmation.
  • Click 'Upload image and Save' to save your login page.


To upload the custom login page

  • Select the option 'Upload a Whole HTML Code'.


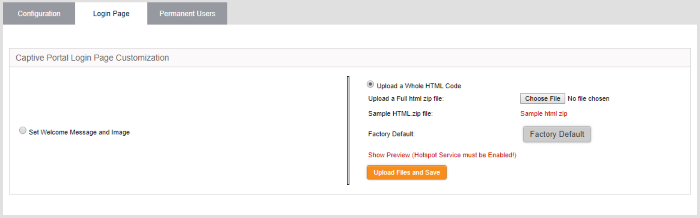
  • Click 'Sample html zip' to download and view the sample custom login page.
  • To upload your custom login page, click 'Choose File', navigate to the file stored in the local disk of the computer and click 'Open'.
  • Click 'Show Preview' to display the login page in a new browser window for confirmation.
  • Click 'Upload image and Save' to save your login page.
  • Click 'Factory Default' to reset the login page to default hotspot welcome page.
Our Products
  • Free Antivirus
  • Free Internet Security
  • Website Malware Removal
  • Free Anti-Malware
  • Anti-Spam (Free Trial)
  • Windows Antivirus
  • Antivirus for Windows 7
  • Antivirus for Windows 8
  • Antivirus for Windows 10
  • Antivirus for MAC
  • Antivirus for Linux
  • Free Endpoint Security
  • Free ModSecurity
  • Free RMM
  • Free Website Malware Scanner
  • Free Device Manager for Android
  • Free Demo
  • Network Security
  • Endpoint Protection
  • Antivirus for Android
  • Comodo Antivirus
  • Wordpress Security
Cheap CDN
  • Bootstrap CDN
  • Semantic UI CDN
  • Jquery CDN
  • CDN Plans
  • CDN
  • Free CDN
Enterprise
  • Patch Management Software
  • Patch Manager
  • Service Desk
  • Website Down
  • Endpoint Protection Solutions
  • Website Security Check
  • Remote Monitoring and Management
  • Website Security
  • Device Manager
  • ITSM
  • CRM
  • MSP
  • Android Device Manager
  • MDR Services
  • Managed IT Support Services
  • Free EDR
Free SSL Certificate
Support Partners Terms and Conditions Privacy Policy

© Comodo Group, Inc. 2025. All rights reserved.