


Destination Network Address Translation
- Destination Network Address Translation (DNAT) is used to provide access to internal applications/devices from outside of the network
- For example, you can provide access to web, ftp, mail and other services that are located inside the network
- The common use of DNAT is to redirect traffic sent to a public-facing IP address / port to an internal IP / port
- Dome Firewall lets you create DNAT rules to route traffic for any incoming IP address to devices with internal IP / port
- Appropriate DFW policies will be applied for the DNAT rules
- DNAT rules can be created and managed from the 'DNAT' interface
- Click 'Firewall' on the left then 'DNAT' to open the interface
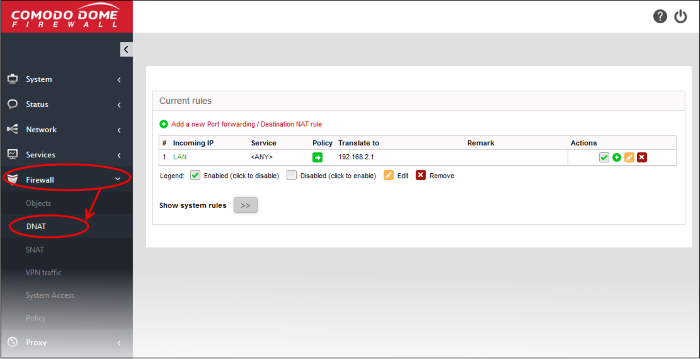
The interface displays all current DNAT rules in effect and allows you to create new rules.
|
DNAT Table - Column Descriptions |
|
|---|---|
|
Column |
Description |
|
# |
ID number of the rule. Translation is applied based on the first matching rule in the list, regardless of other matching rules that follow. |
|
Source |
The Firewall Object containing the IP address, IP address range or subnet of the host(s) from which the traffic originates. |
|
Destination |
The interface device through which the traffic is directed to external network. |
|
Service |
The service that uses the traffic, indicated as the protocol and the port used. |
|
NAT to |
The IP address of the host, to be contained in the headers of the outgoing packets. |
|
Remark |
A short description of the rule. |
|
Count |
Indicates the number of packets and size of data intercepted by the rule. |
|
Actions |
Displays control buttons for managing the rule.
|
 - Move up / down a rule.
- Show system rules - There are no system defined DNAT rules
A destination network translation rule can be created by defining the type of incoming IP details, service / port, protocol and to which internal IP address this should be forwarded to.
To create a new DNAT rule
- Click 'Firewall' > 'DNAT' on the left menu
- Click 'Add a new Port forwarding / Destination NAT Rule'
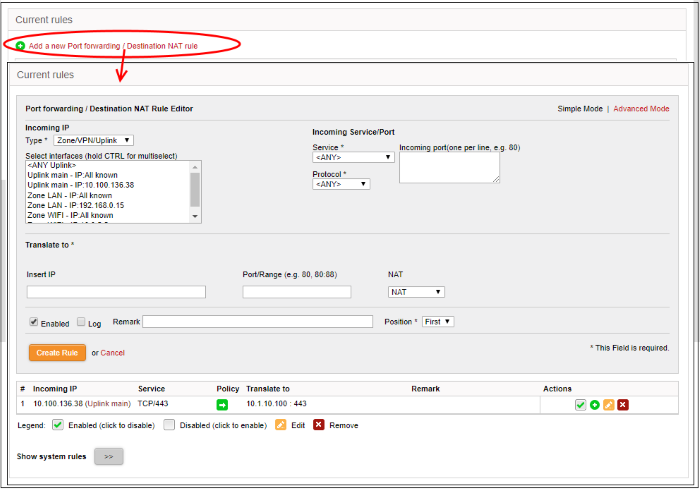
You can create a DNAT rule in either simple or advanced mode:
- Simple
Mode – Specify the incoming traffic type, incoming service / port, and the destination / port the traffic should be forwarded to. The default permission is 'Allow'.
- Advanced Mode – You can restrict how and who should use the DNAT rule. For example, you can allow only one port or a specific SSLVPN user to use the DNAT rule. You can use the filter to allow, deny or reject traffic for a matching DNAT rule from here.
The default filter policy for a DNAT rule created in this mode is to 'Allow'.
- Click 'Simple Mode' at top-right
The following parameters can be configured:
- Incoming IP - Select the type of incoming source from the 'Type' drop-down and specify the source in the text box below it. The options available are:
- Zone/VPN/Uplink – The interfaces configured in the 'Interface Configuration' screen will be available for selection. Select this option if the incoming source is a network zone or an Interface connected to the virtual appliance. Choose the network zone and/or the interface from the options listed in the text box. Press and hold the Ctrl key in the keyboard to choose multiple zones/interfaces.
- Network/IP/Range - Select this option if the rule is to be applied to incoming traffic from a network IP or from a specific IP address or address range. Enter the IP address of the network(s) in CIDR notation or the specific IP address(es) or address range in the text box, as one entry per line.
- SSL VPN User - Select this option if the rule is to be applied to traffic from VPN user(s) added to the network. Choose user(s) from the list of pre-registered users displayed in the textbox. Press and hold the Ctrl key in the keyboard to choose VPN users.
- Incoming Service / Port - Specify the service, protocol and incoming destination port for the rule.
- Service - Select the service for which the rule to be applied from the drop-down.
- Protocol - Select the protocol for the service. Usually this field will be auto selected based on the service selected.
- Incoming port - Select the destination port for the service. Usually this field will be auto selected based on the service selected.
- Translate to – Specify to which IP and port the incoming traffic should be forwarded to. Select whether network address translation should be performed or not.
- Insert IP – Enter the IP to which the traffic should be forwarded to. Note – You have to specify a single IP only.
- Port / Range – Enter the port number / port range to which the incoming traffic should be forwarded to.
- NAT – Select whether network address translation should be done or not. If you select 'Do not NAT', destination address translation will not be performed.
- General Settings - Configure the General Settings to enable/disable, enter a short description and select a position for the rule in the list.
- Enabled - Leave this checkbox selected if you want the rule to be activated upon creation.
- Log - Select this checkbox if you want the packets allowed by the rule are to be logged. See View Logs for more details on configuring storage of logs and viewing the logs.
- Remark - Enter a short description for the rule. The description will appear in the remark column of the respective rules interface
- Position - Set the priority for the rule in the list of rules in the respective rules interface. The rules are processed in the order they appear on the list.
- Click 'Create Rule' to add your new rule in simple mode.
- Click 'Apply' in the confirmation dialog.
- To add more restrictions, configure the rule in 'Advanced Mode'.
- Click 'Advanced Mode' at top-right. The screen is similar to 'Simple Mode' except you have two more restriction settings, 'Access From' and 'Filter Policy'.
In this mode, you can configure to allow traffic from specific source(s) and choose whether the traffic for a matching DNAT rule should be allowed, dropped or rejected.
- Configure 'Incoming IP', 'Incoming Service / Port' and 'Translate to' sections as explained in 'Simple Mode'
- 'Access From' and 'Filter Policy' are available when you choose 'Advanced Mode' as shown below:
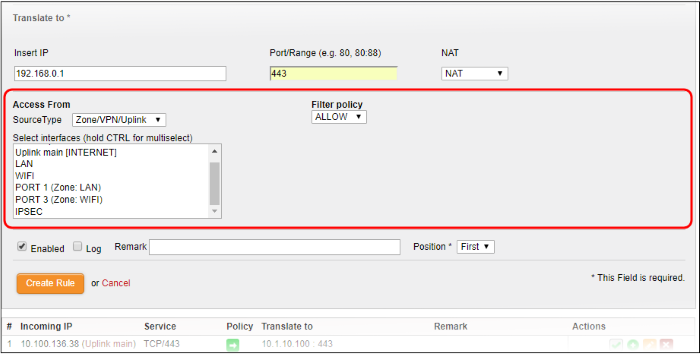
- Access From - Select the type of incoming source from the 'Source Type' drop-down and specify the source in the text box below it. The options available are:
- Any – Access allowed from all zones, 'Zone/VPN/Uplink', 'Network/IP/Range' and 'SSL VPN User'
- Zone/VPN/Uplink – The interfaces configured in the 'Interface Configuration' screen will be available for selection, including dynamic IP pool network addresses configured in 'IPSEC' section. Select this option if the incoming source is a network zone or an interface connected to the virtual appliance. Choose the network zone and/or the interface from the options listed in the text box. Press and hold the Ctrl key in the keyboard to choose multiple zones/interfaces.
- Network/IP/Range - Select this option if the rule is to be applied to incoming traffic from a network IP or from a specific IP address or address range. Enter the IP address of the network(s) in CIDR notation or the specific IP address(es) or address range in the text box, as one entry per line.
- SSL VPN User - Select this option if the rule is to be applied to traffic from VPN user(s) added to the network. Choose user(s) from the list of pre-registered users displayed in the textbox. Press and hold the Ctrl key in the keyboard to choose VPN users.
- Filter Policy – Select whether network packets from a matching rule should be allowed, dropped or rejected from the drop-down.
- Click 'Create Rule' to add your new rule in advanced mode.
- Click 'Apply' in the confirmation dialog.
Edit a DNAT Rule
- Click the edit button
 under 'Actions' in the
rule row that you want to update.
under 'Actions' in the
rule row that you want to update.
- The process is similar to creating a new DNAT rule explained above.
- Click 'Update Rule' below and 'Apply' in the confirmation dialog.
Remove a DNAT Rule
-
Click the delete button
 in the row of the rule you want to remove.
 -
Click 'Apply in the confirmation dialog.