


Firewall Settings
The Firewall Settings area lets you configure the behavior of the XCS firewall on endpoints to which the profile is applied. You can also configure network zones, portsets and traffic filtering rules.
Configure Firewall Settings and Traffic Filtering Rules
-
Click 'Assets' > 'Configuration Templates' > 'Profiles'
-
Open the Windows profile you want to work on
Click the 'Firewall' tab then 'Edit', if it has already been added to the profile
OR
Click 'Add Profile Section' > 'Firewall' if it hasn't yet been added
The Firewall settings screen is displayed. It has six tabs:
-
Firewall Settings - Configure the general firewall behavior
-
Application Rules - Define rules that determine the network access privileges of individual applications or specific types of applications at the endpoint
-
Global Rules - Define rules that apply to all traffic flowing in and out of the endpoint
-
Rulesets - Create and manage predefined collections of firewall rules that can be applied, out-of-the-box, to Internet capable applications such as browsers, email clients and FTP clients.
-
Network Zones - Create named grouping of one or more IP addresses. Once created, you can specify a zone as the target of firewall rule
-
Portsets - Define groups of regularly used ports that can used and reused when creating traffic filtering rules.

|
Firewall Configuration - Table of Parameters |
|
|---|---|
|
Form Element |
Description |
|
Enable Traffic Filtering |
Enable or disable Firewall protection at the endpoint. If enabled the following options are available:
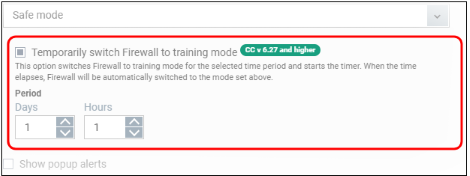
After the countdown is over, XCS will switch back to previous mode and Windows Communication Client continues to synchronize training mode configuration settings that can't change locally. For more details on the Firewall Settings, see the of XCS - Firewall Settings online help page at http://help.Xcitium.com/topic-399-1-790-10358-Firewall-Settings.html . |
|
Show popup alerts |
Whether or not firewall alerts are to be displayed at the endpoint whenever the firewall encounters a request for network access, for the user to respond. If you choose not to show the alerts, you can select the default responses from the 'Auto Action' drop-down. The available options are:
|
|
Turn traffic animation effects on |
The XCS tray icon can display a small animation whenever traffic moves to or from your computer.
You can enable or disable the animation to be displayed at the endpoint. |
|
Create rules for safe applications |
Xcitium Firewall trusts the application if:
By default, XCS does not automatically create 'allow' rules for safe applications. This saves resource usage and simplifies the rules interface by reducing the number of rules created. Enabling this option instructs XCS to learn the behavior of safe applications so it can auto-create 'Allow' rules for them. These rules are listed in 'Settings' > 'Firewall Settings' > 'Application Rules'. Advanced users can edit/modify the rules as they wish. (Default = Disabled). |
|
Set alert frequency level |
Enabling this option allows you to configure the amount of alerts that Xcitium Firewall generates, from the drop-down at the endpoint. It should be noted that this does not affect your security, which is determined by the rules you have configured (for example, in 'Application Rules' and 'Global Rules'). For the majority of users, the default setting of 'Low' is the perfect level - ensuring you are kept informed of connection attempts and suspicious behaviors whilst not overwhelming you with alert messages. (Default=Disabled) The options available are:
The Alert Frequency settings refer only to connection attempts by applications or from IP addresses that you have not (yet) decided to trust. |
|
Set new on-screen alert timeout to: |
How long the Firewall shows an alert for, without any user intervention at the endpoint. By default, the timeout is set at 120 seconds. You may adjust this setting to your own preference by selecting this option and choosing the period from the drop-down combo-box. |
|
Filter IPv6 traffic |
If enabled, the firewall component of XCS at the endpoint will filter IPv6 network traffic in addition to IPv4 traffic. Background Note: IPv6 stands for Internet Protocol Version 6 and is intended to replace Internet Protocol Version 4 (IPv4). The move is primarily driven by the anticipated exhaustion of available IP addresses. IPv4 was developed in 1981 and is still the most widely deployed version - accounting for almost all of today's Internet traffic. However, because IPv4 uses 32 bits for IP addresses, there is a physical upper limit of around 4.3 billion possible IP addresses - a figure widely viewed as inadequate to cope with the further expansion of the Internet. In simple terms, the number of devices requiring IP addresses is in danger of exceeding the number of IP addresses that are available. This hard limit has already led to the development of 'work-around' solutions such as Network Address Translation (NAT), which enable multiple hosts on private networks to access the Internet using a single IP address. IPv6 on the other hand, uses 128 bits per address (delivering 3.4×1038 unique addresses) and is viewed as the only realistic, long term solution to IP address exhaustion. IPv6 also implements numerous enhancements that are not present in IPv4 - including greater security, improved support for mobile devices and more efficient routing of data packets. |
|
Filter loopback traffic |
Loopback connections refer to the internal communications within your PC. Any data transmitted by your computer through a loopback connection is immediately received by it. This involves no connection outside your computer to the Internet or a local network. The IP address of the loopback network is 127.0.0.1, which you might have heard referred to, under its domain name of 'http://localhost', i.e. the address of your computer. Loopback channel attacks can be used to flood your computer with TCP and/or UDP requests which can smash your IP stack or crash your computer. Leaving this option enabled means the firewall will filter traffic sent through this channel at the endpoints. (Default = Enabled). |
|
Block fragmented IP traffic |
When a connection is opened between two computers, they must agree on a Maximum Transmission Unit (MTU). IP Datagram fragmentation occurs when data passes through a router with an MTU less than the MTU you are using i.e when a datagram is larger than the MTU of the network over which it must be sent, it is divided into smaller 'fragments' which are each sent separately. Fragmented IP packets can create threats similar to a DOS attack. Moreover, these fragmentations can double the amount of time it takes to send a single packet and slow down your download time. If you want the firewall component of XCS at the endpoint to block the fragmented datagrams, enable this option. (Default = Enabled0. |
|
Do Protocol Analysis |
Protocol Analysis is key to the detection of fake packets used in denial of service (DOS) attacks. If you want firewall at the endpoint to check whether every packet conforms to that protocols standards, select this option. If not, then the packets are blocked (Default = Enabled). |
|
Enable anti-ARP spoofing |
A gratuitous Address Resolution Protocol (ARP) frame is an ARP Reply that is broadcast to all machines in a network and is not in response to any ARP Request. When an ARP Reply is broadcast, all hosts are required to update their local ARP caches, whether or not the ARP Reply was in response to an ARP Request they had issued. Gratuitous ARP frames are important as they update the machine's ARP cache whenever there is a change to another machine on the network (for example, if a network card is replaced in another machine on the network, then a gratuitous ARP frame informs your machine of this change and requests to update its ARP cache so that data can be correctly routed). However, while ARP calls might be relevant to an ever shifting office network comprising many machines that need to keep each other updated , it is of far less relevance to, say, a single computer in a small network. Enabling this setting helps to block such requests at the endpoints to which the profile is applied - protecting the ARP cache from potentially malicious updates (Default = Enabled). |

Whenever an application makes a request for Internet or network access, Xcitium Firewall allows or denies this request based upon the Firewall Ruleset that has been specified for that application. Firewall Rulesets are, in turn, made up from one or more individual network access rules. Each individual network access rule contains instructions that determine whether the application should be allowed or blocked; which protocols it is allowed to use; which ports it is allowed to use and so forth.

The 'Application Rules' interface allows you to create and manage application rules for regulating network access to individual applications at the endpoints to which the profile is applied.

Although each ruleset can be defined from the ground up by individually configuring its constituent rules, this practice would be time consuming if it had to be performed for every single program on your system. For this reason, Xcitium Firewall contains a selection of predefined rulesets according to broad application category. For example, you may choose to apply the ruleset 'Web Browser' to the applications like 'Internet Explorer', 'Firefox' and 'Opera'. Each predefined ruleset has been specifically designed by Xcitium Firewall to optimize the security level of a certain type of application. Administrators can, of course, modify these predefined rulesets to suit their environment and requirements. For more details, see Predefined Rule Sets.
-
See Application Rule interface for an introduction to the rule setting interface
-
See Create and Modify Firewall Rulesets to learn how to create and edit Firewall rulesets
-
See Understanding Firewall Rules for an overview of the meaning, construction and importance of individual rules
-
See Add and Edit a Firewall Rule for an explanation of individual rule configuration.
-
Click the 'Add' button
 or 'Edit' icon
  beside a ruleset in 'Application Rules' interface to open the 'Application Rule' interface.
-
The rules in a Firewall ruleset can be added/modified/removed and re-ordered through the 'Application Rule' interface.
-
You can also create new rules or edit existing rules in the ruleset in the 'Firewall Rule' interface (Click the 'Add' button or 'Edit' icon
beside a rule in 'Application Rules' interface). See Add and Edit a Firewall Rule for guidance on this.
Xcitium Firewall applies rules on a per packet basis and applies the first rule that matches that packet type to be filtered (see Understanding Firewall Rules for more information). If there are a number of rules in the list relating to a packet type then one nearer the top of the list is applied. Administrators can re-prioritize rules by uisng the 'Move Up' or 'Move Down' buttons.
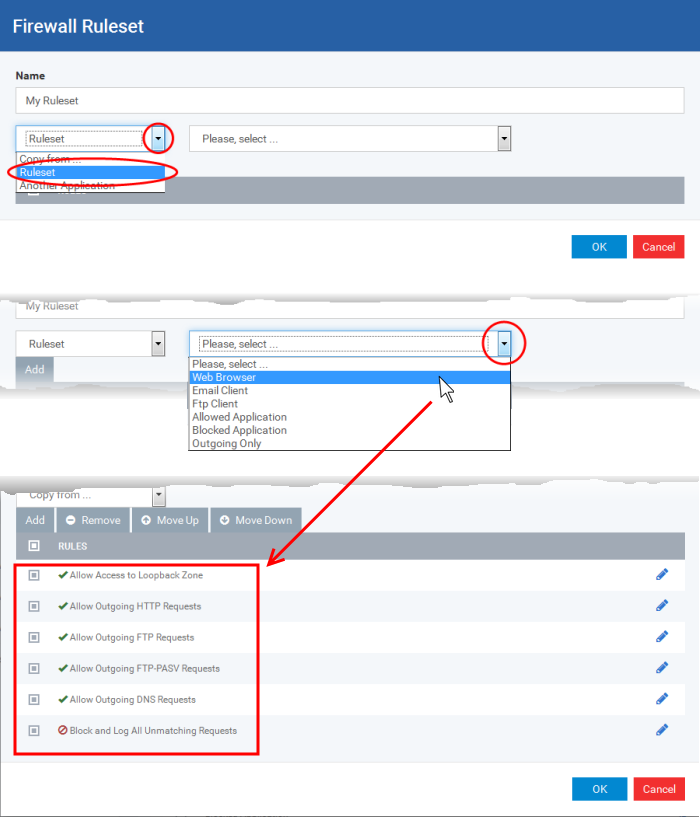
Create and Modify Firewall Rulesets
To begin defining an application's Firewall ruleset, you need take two basic steps.
Step 1 - Select the application that you wish the ruleset is to be applied
-
To define a ruleset for a new application ( i.e. one that is not already listed), click the 'Add' button
at the top of the list in the 'Application Rules' interface.
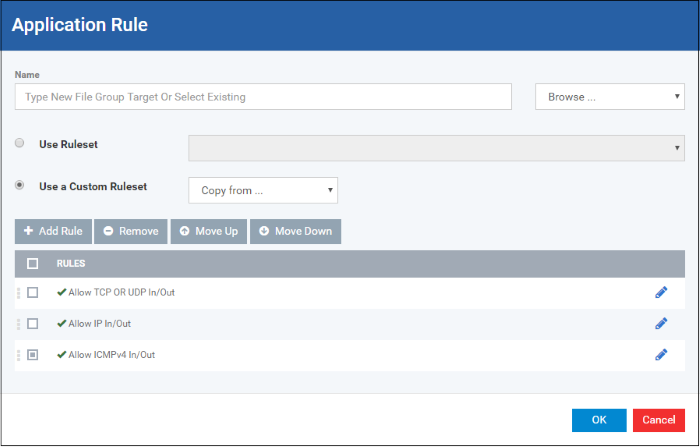
The 'Application Rule' interface will open as shown below:
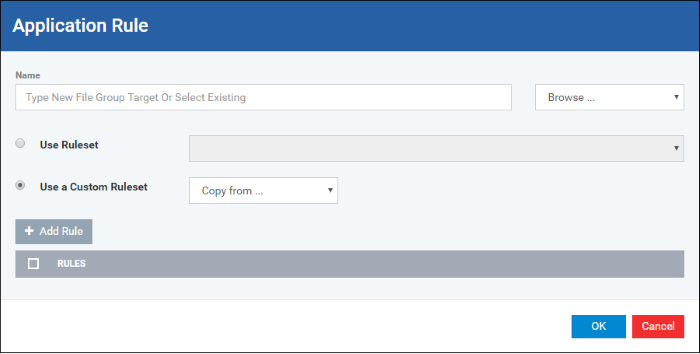
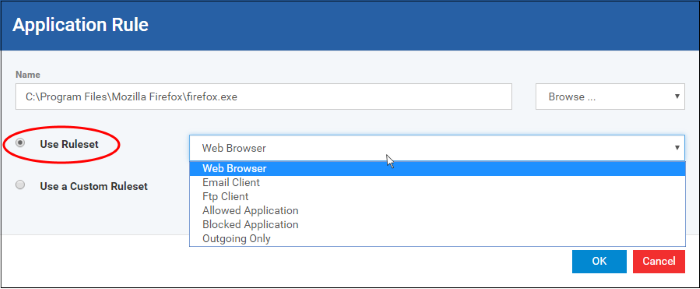
Because this is a new application, the 'Name' field is blank. (If you are modifying an existing ruleset, then this interface shows the individual rules for that application's ruleset).
You can enter the application(s) to which the rule set is to be applied in two ways:
-
Enter the installation path of the application with the application file name in the Name field (For example, 'C:Program FilesMozilla Firefoxfirefox.exe').
Or
-
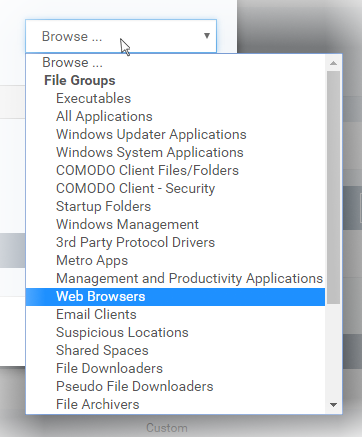
Open the drop-down beside the 'Name' field and choose the application group to which the ruleset is to be applied. Choosing a 'File Group' allows you to create firewall ruleset for a category of pre-set files or folders. For example, selecting 'Executables' would enable you to create a Firewall Ruleset for any file that attempts to connect to the Internet with the extensions .exe .dll .sys .ocx .bat .pif .scr .cpl . Other such categories available include 'Windows System Applications' , 'Windows Updater Applications' , 'Start Up Folders' etc - each of which provide a fast and convenient way to apply a generic ruleset to important files and folders.
Xcitium ships with a set of predefined 'File Groups'. If required you can add new file groups and edit existing groups ('Settings' > 'Settings' > 'System Templates' > 'File Groups Variables'). See Create and Manage File Groups for guidance on this.
Step 2 - Configure the rules for this application's ruleset
There are two broad options available for creating a ruleset that applies to an application - Use a Predefined Ruleset or Use a Custom Ruleset.
-
Use a Predefined Ruleset - Allows you to quickly deploy an existing ruleset on to the target application. Choose the ruleset you wish to use from the drop-down menu. In the example below, we have chosen 'Web Browser' because we are creating a ruleset for the 'Firefox' browser. The name of the predefined ruleset you choose is displayed in the 'Treat As ' column for that application in the 'Application Rules' interface (Default = Disabled).
|
Note: Predefined Rulesets, once chosen, cannot be modified directly from this interface - they can only be modified and defined using the Application Rule interface. If you require the ability to add or modify rules for an application then you are effectively creating a new, custom ruleset and should choose the more flexible Use Custom Ruleset option instead. |
-
Use a Custom Ruleset - Designed for more experienced administrators, the Custom Ruleset option enables full control over the configuration of Firewall Ruleset and the parameters of each rule within that ruleset (Default = Enabled).
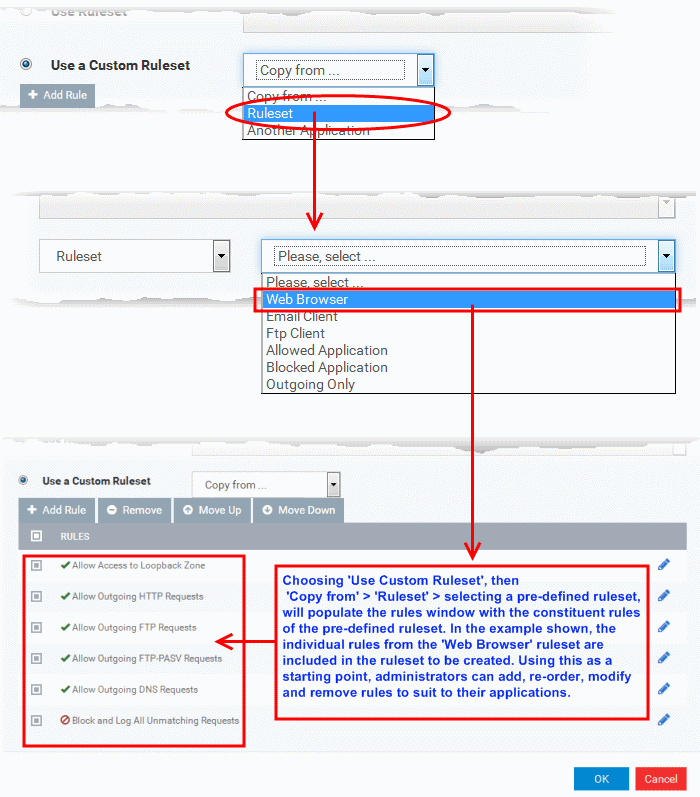
You can create an entirely new ruleset or use a predefined ruleset as a starting point by:
-
Clicking 'Add' from the topto add individual Firewall rules. See 'Add and Edit a Firewall Rule' for an overview of the process.
-
Use the 'Copy From'button to populate the list with the Firewall rules of a Predefined Firewall Rule.
-
Use the 'Copy From' button to populate the list with the Firewall rules of another application's ruleset.
|
General Tips:
|
At their core, each Firewall rule can be thought of as a simple IF THEN trigger - a set of conditions (or attributes) pertaining to a packet of data from a particular application and an action it that is enforced if those conditions are met.
As a packet filtering firewall, Xcitium Firewall analyzes the attributes of every single packet of data that attempts to enter or leave the computer. Attributes of a packet include the application that is sending or receiving the packet, the protocol it is using, the direction in which it is traveling, the source and destination IP addresses and the ports it is attempting to traverse. The firewall then tries to find a Firewall rule that matches all the conditional attributes of this packet in order to determine whether or not it should be allowed to proceed. If there is no corresponding Firewall rule, then the connection is automatically blocked until a rule is created.
The actual conditions (attributes) you see * on a particular Firewall Rule are determined by the protocol chosen in the 'Firewall Rule' interface. See Add and Edit a Firewall Rule for more details.
If you chose 'TCP' , 'UDP' or 'TCP and 'UDP', then the rule has the form: Action|Protocol|Direction|Source Address |Destination Address|Source Port|Destination Port
If you chose 'ICMP', then the rule has the form:Action|Protocol|Direction |Source Address|Destination Address|ICMP Details
If you chose 'IP', then the rule has the form:Action|Protocol|Direction |Source Address|Destination Address|IP Details
-
Action: The action the firewall takes when the conditions of the rule are met. The rule shows 'Allow', 'Block' or 'Ask'.**
-
Protocol: States the protocol that the target application must be attempting to use when sending or receiving packets of data. The rule shows 'TCP', 'UDP', 'TCP or UDP', 'ICMP' or 'IP'
-
Direction: States the direction of traffic that the data packet must be attempting to negotiate. The rule shows 'In', 'Out' or 'In/Out'
-
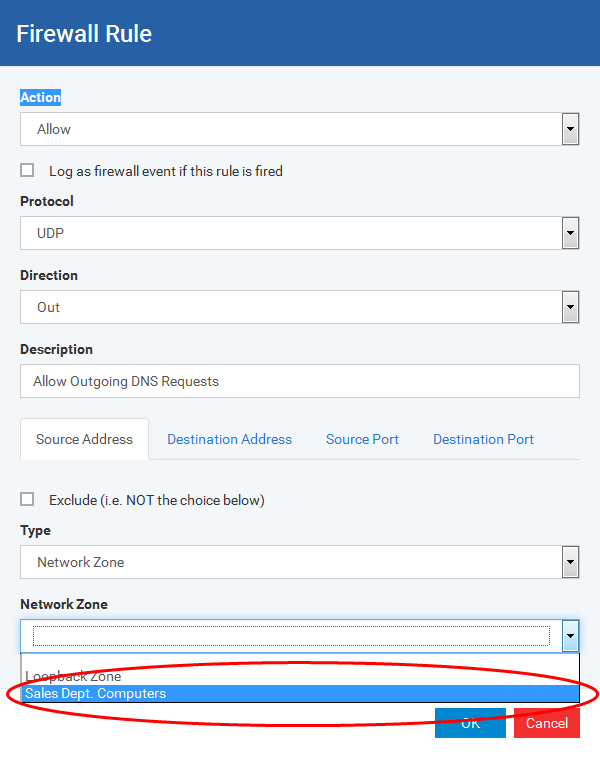
Source Address: States the source address of the connection attempt. The rule shows 'From' followed by one of the following: IP , IP range, IP Mask , Network Zone, Host Name or Mac Address
-
Destination Address: States the address of the connection attempt. The rule shows 'To' followed by one of the following: IP, IP range, IP Mask, Network Zone, Host Name or Mac Address
-
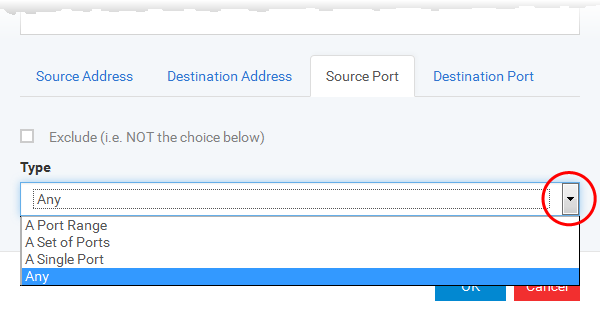
Source Port: States the port(s) that the application must be attempting to send packets of data through. Shows 'Where Source Port Is' followed by one of the following: 'Any', 'Port #', 'Port Range' or 'Port Set'
-
Destination Port: States the port(s) on the remote entity that the application must be attempting to send to. Shows 'Where Source Port Is' followed by one of the following: 'Any', 'Port #', 'Port Range' or 'Port Set'
-
ICMP Details: States the ICMP message that must be detected to trigger the action. See Add and Edit a Firewall Rule for details of available messages that can be displayed.
-
IP Details: States the type of IP protocol that must be detected to trigger the action: See Add and Edit a Firewall Rule to see the list of available IP protocols that can be displayed here.
Once a rule is applied, Xcitium Firewall monitors all network traffic relating to the chosen application and take the specified action if the conditions are met. Users should also see the section 'Global Rules' to understand the interaction between Application Rules and Global Rules.
* If you chose to add a descriptive name when creating the rule then this name is displayed here rather than it's full parameters. See the next section, 'Add and Edit a Firewall Rule', for more details.
** If you selected 'Log as a firewall event if this rule is fired' then the action is postfixed with 'Log'. (e.g. Block & Log)
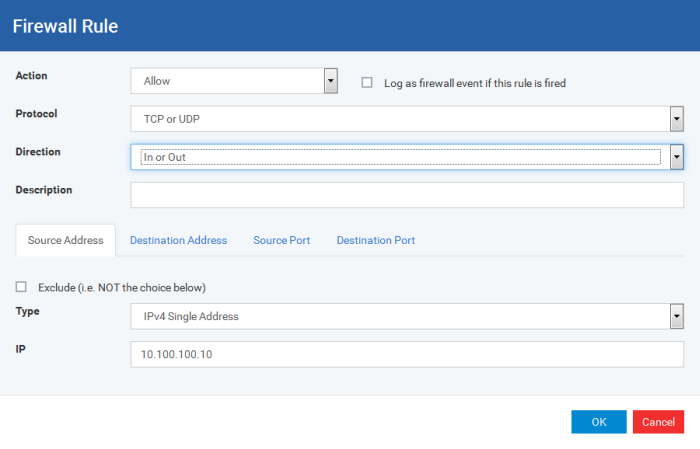
The Firewall Rule Interface is used to configure the actions and conditions of an individual Firewall rule. If you are not an experienced firewall user or are unsure about the settings in this area, we advise you first gain some background knowledge by reading the sections 'Understanding Firewall Rules', 'Overviewof Rules and Policies' and 'Create and Modify Firewall Rulesets'.
-
Action: Define the action the firewall takes when the conditions of the rule are met. Options available via the drop down menu are 'Allow' (Default), 'Block' or 'Ask'.
-
Protocol:Allows the user to specify which protocol the data packet should be using. Options available via the drop down menu are 'TCP', 'UDP', 'TCPor UDP' (Default), 'ICMP' or 'IP' .
|
Note:Your choice here alters the choices available to you in the tab structure on the lower half of the interface. |
-
Direction: Allows the user to define which direction the packets should be traveling. Options available via the drop down menu are 'In', 'Out' or 'In/Out' (Default).
-
Log as a firewall event if this rule is fired: Checking this option creates an entry in the firewall event log viewer whenever this rule is called into operation. (i.e. when ALL conditions have been met) (Default = Disabled).
-
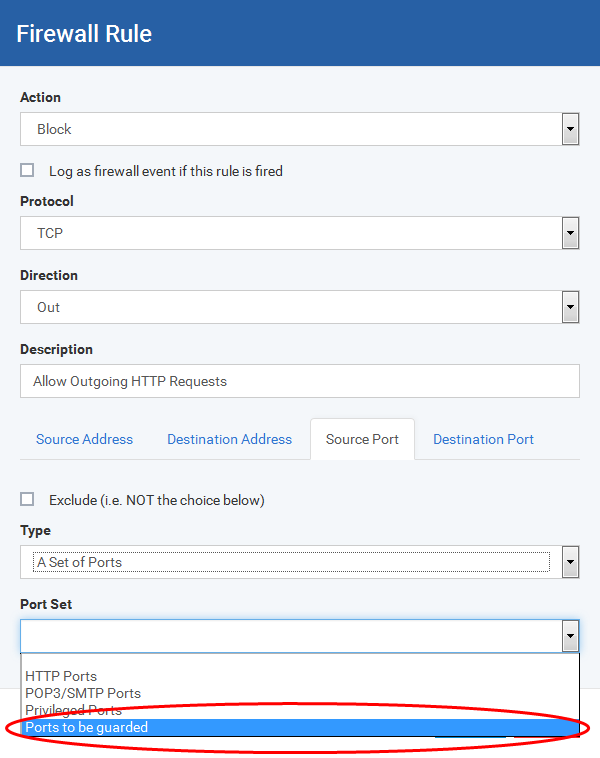
Description: Allows you to type a friendly name for the rule. Some users find it more intuitive to name a rule by it's intended purpose. ( 'Allow Outgoing HTTP requests'). If you create a friendly name, then this is displayed to represent instead of the full actions/conditions in the main Application Rules interface and the Application Rule interface.
Protocol
-
'TCP,' 'UDP' or 'TCP or UDP'
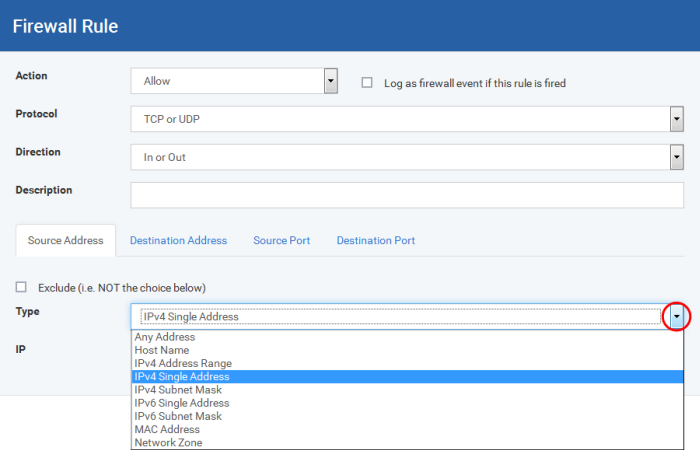
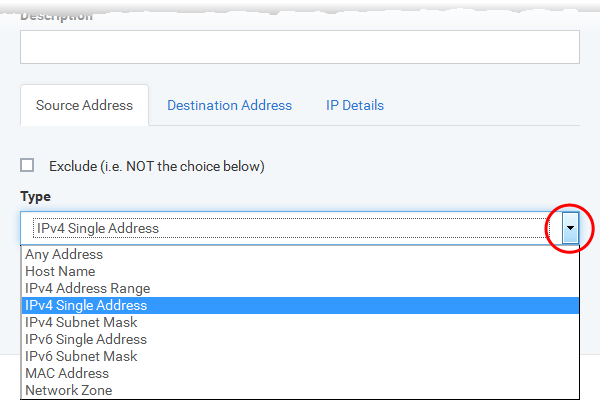
If you select 'TCP', 'UDP' or 'TCP or UDP' as the Protocol for your network, then you have to define the source and destination IP addresses and ports receiving and sending the information
-
You can choose any IP Address by selecting Any Address in the Type drop-down box. This menu defaults to an IP range of 0.0.0.0- 255.255.255.255 to allow connection from all IP addresses.
-
You can choose a named host by selecting a Host Name which denotes your IP address.
-
You can choose an IPv4 Range by selecting IPv4 Address Range - for example the range in your private network and entering the IP addresses in the Start Range and End Range text boxes.
-
You can choose a Single IPv4 address by selecting IPv4 Single Address and entering the IP address in the IP address text box, e.g., 192.168.200.113.
-
You can choose IPv4 Mask by selecting IPv4 Subnet Mask. IP networks can be divided into smaller networks called sub-networks (or subnets). An IP address/ Mask is a subnet defined by IP address and mask of the network. Enter the IP address and Mask of the network.
-
You can choose a Single IPv6 address by selecting IPv6 Single Address and entering the IP address in the IP address text box, e.g., 3ffe:1900:4545:3:200:f8ff:fe21:67cf.
-
You can choose IPv6 Mask by selecting IPv6 Subnet Mask. IP networks can be divided into smaller networks called sub-networks (or subnets). An IP address/ Mask is a subnet defined by IP address and mask of the network. Enter the IP address and Mask of the network.
-
You can choose a MAC Address by selecting MAC Address and entering the address in the address text box.
-
You can choose an entire network zone by selecting Zone .This menu defaults to Local Area Network. But you can also define your own zone by first creating a Zone through the 'Network Zones' area.
-
Exclude (i.e. NOT the choice below): The opposite of what you specify is applicable. For example, if you are creating an Allow rule and you check the Exclude box in the Source IP tab and enter values for the IP range, then that IP range is excluded. You have to create a separate Allow rule for the range of IP addresses that you DO want to use.
Source Port and Destination Port:
Enter the source and destination Port in the text box.
-
You can choose any port number by selecting Any - set by default , 0- 65535.
-
You can choose a Single Port number by selecting Single Port and selecting the single port numbers from the list.
-
You can choose a Port Range by selecting Port Range and selecting the port numbers from the From and To list.
-
You can choose a predefined Port Set by choosing A Set of Ports. If you wish to create a custom port set then please see the section 'Port Sets'.
-
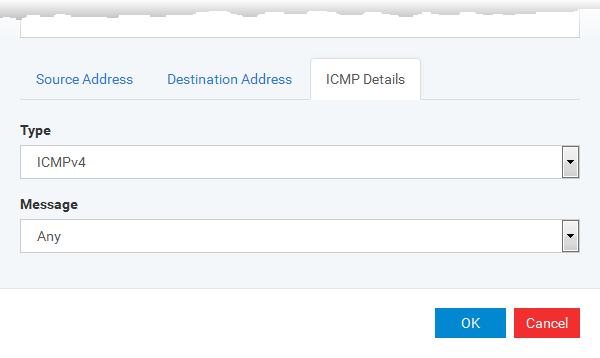
ICMP
When you select ICMP as the protocol in General Settings, you are shown a list of ICMP message types in the 'ICMP Details' tab alongside the Destination Address tabs. The last two tabs are configured identically to the explanation above. You cannot see the source and destination port tabs.
-
ICMP Details
ICMP (Internet Control Message Protocol) packets contain error and control information which is used to announce network errors, network congestion, timeouts, and to assist in troubleshooting. It is used mainly for performing traces and pings. Pinging is frequently used to perform a quick test before attempting to initiate communications. If you are using or have used a peer-to-peer file-sharing program, you might find yourself being pinged a lot. So you can create rules to allow / block specific types of ping requests. With Xcitium Firewall you can create rules to allow/ deny inbound ICMP packets that provide you with information and minimize security risk.
-
Type in the source/ destination IP address. Source IP is the IP address from which the traffic originated and destination IP is the IP address of the computer that is receiving packets of information.
-
Under the 'ICMP Details' tab, choose the ICMP version from the 'Type' drop-down.
-
Specify ICMP Message, Types and Codes. An ICMP message includes a Message that specifies the type, that is, the format of the ICMP message.

When you select a particular ICMP message , the menu defaults to set its code and type as well. If you select the ICMP message type 'Custom' then you are asked to specify the code and type.
-
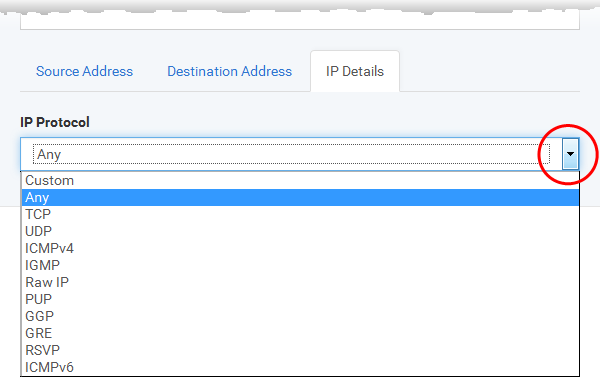
IP
When you select IP as the protocol in General Settings, you are shown a list of IP message type in the 'IP Details' tab alongside the Source Address and Destination Address tabs. The last two tabs are configured identically to the explanation above. You cannot see the source and destination port tabs.
-
IP Details
Select the types of IP protocol that you wish to allow, from the ones that are listed.
-
Click 'OK' to save the firewall rule.
Unlike Application rules, which are applied to and triggered by traffic relating to a specific application, Global Rules are applied to all traffic traveling in and out of the computers applied with this profile.
Xcitium Firewall analyzes every packet of data in and out of the computer using combination of Application and Global Rules.
-
For Outgoing connection attempts, the application rules are consulted first and then the global rules second.
-
For Incoming connection attempts, the global rules are consulted first and then the application rules second.
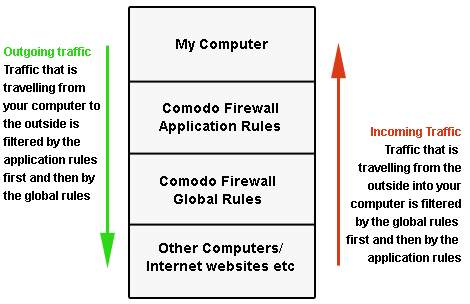
Therefore, outgoing traffic has to 'pass' both the application rule then any global rules before it is allowed out of your system. Similarly, incoming traffic has to 'pass' any global rules first then application specific rules that may apply to the packet.
Global Rules are mainly, but not exclusively, used to filter incoming traffic for protocols other than TCP or UDP.
The 'Global Rules' panel in the under 'Firewall' tab allows you to view create and manage the global firewall rules.

The configuration of Global Rules is identical to that for application rules. To add a global rule, click the 'Add' button on the top. To edit an existing global rule, click the edit icon ![]() beside it.
beside it.
-
See Application Rules for an introduction to the rule setting interface.
-
See Understanding Firewall Rules for an overview of the meaning, construction and importance of individual rules.
-
See Add and Edit a Firewall Rule for an explanation of individual rule configuration.
As the name suggests, a firewall Ruleset is a set of one or more individual Firewall rules that have been saved and which can be re-deployed on multiple applications. Xcitium ships with six predefined rulesets and allows you to create and manage custom rulesets as required. This section contains advice on the following:
The 'Rulesets' panel under the 'Firewall' tab allows you to view, create and manage the firewall rulesets.

The Rulesets panel displays a list of pre-defined and custom Firewall Rulesets.
Although each application's firewall ruleset could be defined from the ground up by individually configuring its constituent rules, this practice may prove time consuming if it had to be performed for every single program on your system. For this reason, Xcitium Firewall contains a selection of predefined rulesets according to broad application category. For example, you may choose to apply the ruleset 'Web Browser' to the applications 'Internet Explorer', 'Firefox' and 'Opera'. Each predefined ruleset has been specifically designed by Xcitium to optimize the security level of a certain type of application. Users can, of course, modify these predefined policies to suit their environment and requirements. (for example, you may wish to keep the 'Web Browsers' name but wish to redefine the parameters of it rules).
Xcitium ships with six predefined firewall rulesets for different categories of applications:
-
Web Browser
-
Email Client
-
FTP Client
-
Allowed Application
-
Blocked Application
-
Outgoing Only
These rulesets can be edited by adding new rules or reconfiguring the existing rules. For more details see the explanation of adding and editing firewall rules in the section 'Application Rules'.
You can create new rulesets with network access control rules customized as per your requirements and can roll out them to required applications while creating firewall ruleset for the applications individually.
Add a new Ruleset
-
Click the 'Add Ruleset' button
 from the top of the list of rulesets in the 'Rulesets' panel
The 'Firewall Ruleset' interface will open.
-
As this is a new ruleset, you need to name it in the 'Name' field at the top. It is advised that you choose a name that accurately describes the category/type of application you wish to define the ruleset for. Next you should add and configure the individual rules for this ruleset. See 'Add and Edit a Firewall Rule' for more advice on this.
Once created, this ruleset can be quickly called from 'Use Ruleset' when creating or modifying a Firewall ruleset.
View or edit an existing predefined Ruleset
-
Click on the 'Edit' icon
 beside Ruleset Name in the list.
-
Details of the process from this point on can be found under 'Use Custom Rule Set.'
The 'Network Zones' panel under the 'Firewall' tab allows you to:
-
Configure to detect any new network (wired or wireless) that the computer applied with this profile is trying to connect and provide alerts for the same
-
Define network zones that are trusted, and to specify access privileges to them
-
Define network zones that are untrusted, and to block access to them

The 'Network Zones' panel contains options for configuring the general network monitoring settings and lists of 'Allowed Network Zones' and 'Blocked Network Zones' under respective tabs. You can add and manage network zones to be allowed and blocked from this interface.
Network Monitoring Settings:
-
Enable automatic detection of private networks - Instructs Xcitium Firewall to keep monitoring whether the computer applied with this security profile is connected to any new wired or wireless network (Default = Enabled). Deselect this option if you do not want the new connection attempts is to be detected and/or wish to manually set-up their own trusted networks (this can be done in 'Network Zones'.
-
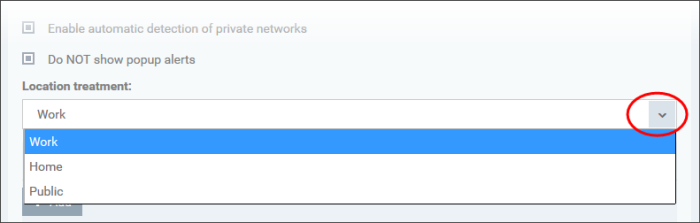
Do Not show popup alerts - By default, an alert will be displayed at the computer, if the computer attempts to connect to a new network, for the end-user to select the type of network. XCS will optimize its firewall settings for the new network, based on the selection. An example is shown below.

If you do not want the alert to be displayed to the end-user and wish the XCS at the computer to decide on the type of network by default, deselect this option and choose the network type from the drop-down under Location Treatment. The available options are:
-
Home
-
Work
-
Public
The panel has two tabs:
-
Network Zones - Allows you to define network zones and to allow access to them for applications, with the access privileges specified through Application Rule interface. Refer to 'Creating or Modifying Firewall Rules' for more details.
-
Blocked Zones - Allows you to define trusted networks that are not trustworthy and to block access to them.
A 'Network Zone' can consist of an individual machine (including a single home computer connected to Internet) or a network of thousands of machines to which access can be granted or denied.
The 'Network Zones' tab in the 'Network Zones' panel displays a list of defined network zones and allows you to define network zones, to which the computer applied with this profile can connect, with access rights as defined by the firewall rules or blocked access to.
-
Click the 'Add' button
 at the top of the list.
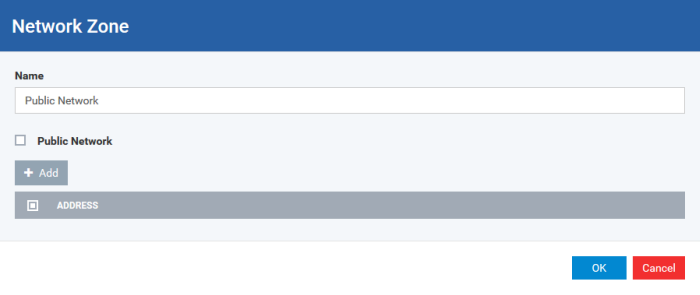
The 'Network Zone' dialog will open.
-
Enter a name for the new network zone in the 'Name' field.
-
Select the checkbox 'Public Network' if you are defining a network zone for a network in a public place, for example, when you are connecting to a Wi-Fi network at an airport, restaurant etc., so that Xcitium Firewall will optimize the configuration accordingly.
-
Click 'Add' to add the computers in the new network zone
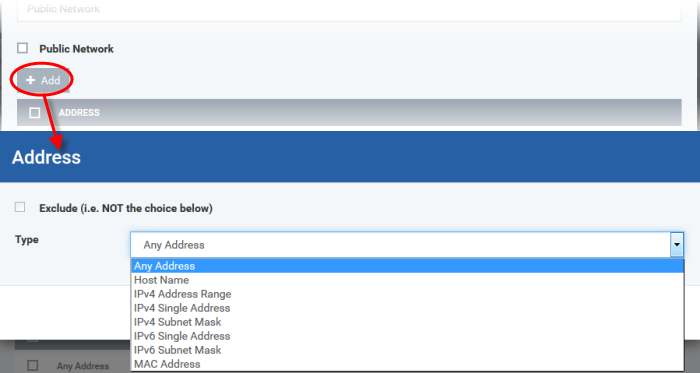
The 'Address' dialog allows you to select an address from the 'Type' drop-down box shown below (Default = Any Address). The 'Exclude' check box will be enabled only if any other choice is selected from the drop-down box.
-
Any Address - Adds all the IP addresses (0.0.0.0- 255.255.255.255) to the zone.
-
Host Name- Enter a named host which denotes an address on your network.
-
IPv4 Range - Will include all the IPv4 addresses between the values you specify in the 'Start Range' and 'End Range' text boxes.
-
IPv4 Single Address - Enter a single IP address to be added to the zone - e.g. 192.168.200.113.
-
IPv4 Subnet Mask - A subnet mask allows administrators to divide a network into two or more networks by splitting the host part of an IP address into subnet and host numbers. Enter the IP address and Mask of the network you wish to add to the defined zone.
-
IPv6 Single Address -Enter a single address to be added to the zone - e.g. 3ffe:1900:4545:3:200:f8ff:fe21:67cf.
-
IPv6 Subnet Mask. Ipv6 networks can be divided into smaller networks called sub-networks (or subnets). An IP address/ Mask is a subnet defined by IP address and mask of the network. Enter the IP address and Mask of the network.
-
MAC Address - Enter a specific MAC address to be added to the zone.
-
Select/enter the Addresses to be included in the new network zone
-
If you want to select all the other addresses to be included in the network zone, excluding those selected under the Type drop-down, select the 'Exclude' option.
-
Click 'OK' in the 'Address' dialog.
-
Click 'OK' in the 'Network Zone' dialog
The network zone will be added under Network Zones list and will be available to be quickly called as 'Zone' when creating or modifying a Firewall Ruleset or when defining a Blocked Zone.
To edit a network zone, click the 'Edit' icon beside the network zone name. The 'Network Zone' dialog will appear populated with the name and the addresses of the network zone. Edit the details as required. The process is similar to defining a new network zone as explained above.
A computer network enables users to share information and devices between computers and other users within the network. There are certain networks that you'll want to 'trust' and grant access to - for example your work network. Conversely, there may be other networks that you do not trust and want to restrict communication with - or even block entirely.
The 'Blocked Zones' section allows you to configure restrictions on network zones that you do not wish to trust and the computers applied with this profile will be blocked access to them.
The 'Blocked Zones' tab allows you to view the list of blocked network zones and add new blocked zones.

The 'Blocked Zones' tab displays a list of zones that are currently blocked and allows you to:
|
Note 1: You must create a zone before you can block it. There are two ways to do this;
Note 2: You cannot reconfigure existing zones from this interface (e.g. to add or modify IP addresses). You need to use 'Network Zones' if you want to change the settings of existing zones. |
Deny access to an existing network zone
-
Click 'Add from Network Zone' button from the top
-
Choose the particular zone you wish to block from the 'Network Zone' drop-down.

-
Click 'Add'
-
Repeat the process to add more blocked network zones for the profile
Deny access to a network by manually defining a new blocked zone
-
Click the 'Add' button from the top.

-
Select the address type you wish to block from the 'Type' drop-down. Select 'Exclude' if you want to block all IP addresses except for the ones you specify using the drop-down.
-
Any Address - Will block connections from all IP addresses (0.0.0.0- 255.255.255.255)
-
Host Name- Enter a named host which denotes an address on your network.
-
IPv4 Range - Will block access to the IPv4 addresses you specify in the 'Start Range' and 'End Range' text boxes.
-
IPv4 Single Address - Block access to a single address - e.g. 192.168.200.113.
-
IPv4 Subnet Mask - A subnet mask allows administrators to divide a network into two or more networks by splitting the host part of an IP address into subnet and host numbers. Enter the IP address and Mask of the network you wish to block.
-
IPv6 Single Address -Block access to a single address - e.g. 3ffe:1900:4545:3:200:f8ff:fe21:67cf.
-
IPv6 Subnet Mask. Ipv6 networks can be divided into smaller networks called sub-networks (or subnets). An IP address/ Mask is a subnet defined by IP address and mask of the network. Enter the IP address and Mask of the network.
-
MAC Address - Block access to a specific MAC address.
-
Select the address to be blocked and click 'OK'
The address(es) you block will appear in the 'Blocked Zones' tab. You can modify these addresses at any time by selecting the entry and clicking 'Edit'.
-
Click 'OK' in 'Network Zones' interface to confirm your choice. All traffic intended for and originating from computer or devices in this zone are now blocked.
Port Sets are handy, predefined groupings of one or more ports that can be re-used and deployed across multiple Application Rules and Global Rules. The 'Port Sets' panel under the 'Firewall' tab allows you to view and manage pre-defined port sets and to add new port sets for the profile. The name of the port set is listed above the actual port numbers that belong to that set.

The panel lists all portsets that are defined for the profile. Clicking the 'Edit' icon beside a name reveals the ports included in the set.
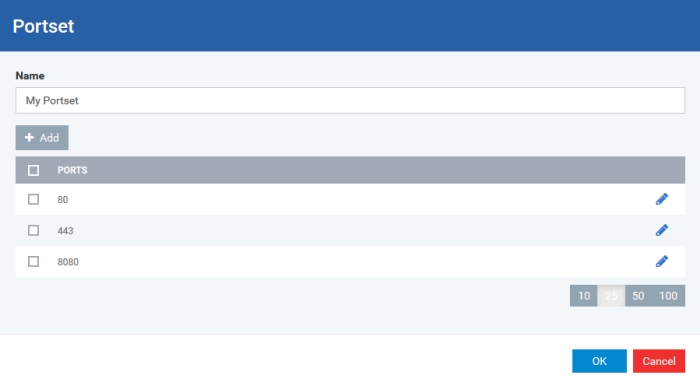
Xcitium ships with three default portsets:
-
HTTP Ports: 80, 443 and 8080. These are the default ports for http traffic. Your internet browser uses these ports to connect to the internet and other networks.
-
POP3/SMTP Ports: 110, 25, 143, 995, 465 and 587. These ports are typically used for email communication by mail clients like Outlook and Thunderbird.
-
Privileged Ports: 0-1023. This set can be deployed if you wish to create a rule that allows or blocks access to the privileged port range of 0-1023. Privileged ports are so called because it is usually desirable to prevent users from running services on these ports. Network admins usually reserve or prohibit the use of these ports.
Define a new Port Set
You can create new portsets and allow access to them for applications, with the access privileges specified through Application Rule interface. See 'Create or Modify Firewall Rules' for more details.
-
Click the 'Add' button from the top.
The 'Portset' dialog will open.
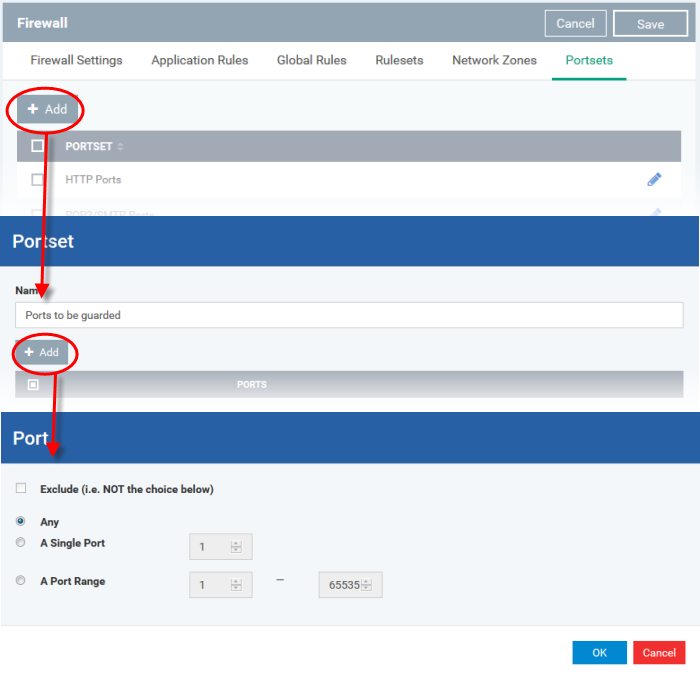
-
Enter a name for the new portset in the 'Name' field.
-
To add ports to the new portset, click the 'Add' button above the list of ports.
-
Specify the ports to be included in the new portset:
-
Any - to choose all ports;
-
A single port - Define the port number in the combo box beside;
-
A port range - Enter the start and end port numbers in the respective combo boxes.
-
Exclude (i.e. NOT the choice below): The opposite of what you specify is applicable.
-
Click 'OK' in the 'Port' dialog. The ports will be added to the new portset in the 'Edit Portset' interface.
-
Click 'OK' in the 'Portset' dialog to create the new portset.
Once created, a Portset can be:
-
Quickly called as 'A Set of Ports' when creating or modifying a Firewall Ruleset
Edit an existing port set
-
Click the 'Edit' icon
beside the name of the portset. The 'Portset' dialog will appear with a list of port numbers in the port set.
-
The editing procedure is similar to adding the portset explained above.
-
Click the 'Save' button at the top of 'Firewall' interface to sane your settings for the profile.
The saved 'Firewall' settings screen will be displayed with options to edit the settings or delete the section. See Edit Configuration Profiles for more details.