Comodo Help
Find the desired product help
Endpoint Manager

Endpoint Manager

Endpoint Manager Administrator Guide 7.2

English

Print Help Download Help
Network Management > Create And Run Network Discovery Tasks
  • Introduction To Endpoint Manager
    • Key Concepts
    • Best Practices
    • Quick Start
    • Login Into The Admin Console
  • The Admin Console
  • The Dashboard
  • Devices And Device Groups
    • Manage Device Groups
      • Create Device Groups
      • Edit A Device Group
      • Assign Configuration Profiles To A Device Group
      • Remove A Device Group
      • Run Procedures On Customer Groups
    • Manage Devices
      • Add New Devices
      • Manage Windows Devices
        • View And Edit Device Name
        • View Summary Information
        • View Hardware Information
        • View Network Information
        • View Maintenance Windows Associated With Device
        • View And Manage Profiles Associated With A Device
        • View And Manage Applications Installed On A Device
        • View The Files On A Device
        • View Exported Configurations And Import Profiles
        • View MSI Files Installed On A Device Through Endpoint Manager
        • View And Manage Patches For Windows And 3rd Party Applications
        • View Antivirus Scan History
        • View And Manage Device Group Memberships
        • View Device Logs
      • Manage Mac OS Devices
        • View And Edit Mac OS Device Name
        • Summary Information Of Mac Device
        • View Installed Applications
        • View Quarantined Files On Mac OS Device
        • View And Manage Profiles Associated With A Device
        • View Packages Installed On A Device Through Endpoint Manager
        • View And Manage Device Group Memberships
        • View Mac Device Logs
      • Manage Linux Devices
        • View And Edit Linux Device Name
        • Summary Information Of Linux Device
        • View Network Information Of A Linux Device
        • View And Manage Profiles Associated With A Linux Device
        • View Linux Packages Installed On A Device Through Endpoint Manager
        • View And Manage Device Group Memberships
      • Manage Android Devices
        • View And Edit Device Name
        • View Summary Information
        • Manage Installed Applications
        • View And Manage Profiles Associated With A Device
        • View Sneak Peek Pictures To Locate Lost Devices
        • View The Location Of The Device
        • View And Manage Device Group Memberships
      • Manage IOS Devices
        • View And Edit Device Name Of An IOS Device
        • View Summary Information Of An IOS Device
        • View Applications Installed On An IOS Device
        • View And Manage Profiles Associated With An IOS Device
        • View The Location Of An IOS Device
        • View And Manage Group Memberships Of An IOS Device
      • View User Information
      • Remove A Device
      • Remote Management Of Windows And Mac OS Devices
        • Transfer Items To / From The Remote Computer
      • Remotely Manage Folders And Files On Windows Devices
      • Manage Processes On Remote Windows Devices
      • Manage Services On Remote Windows Devices
      • Use The Command Prompt On Remote Windows Devices
      • Apply Procedures To Windows And Mac Devices
      • Remotely Install And Manage Packages On Windows Devices
      • Remotely Install Packages On Mac OS Devices
      • Remotely Install Packages On Linux Devices
      • Send Enrollment Link To IOS Devices
      • Install Apps On Android/iOS Devices
      • Generate An Alarm On Android Devices
      • Remotely Lock Mobile And Mac OS Devices
      • Wipe Selected Mobile And Mac Devices
      • Assign Configuration Profiles To Selected Devices
      • Set / Reset Screen Lock Password For Mobile Devices
      • Update Device Information
      • Send Text Messages To Mobile Devices
      • Restart Selected Windows Devices
      • Shutdown Windows Devices
      • Wake Offline Device
      • Change A Devices Owner
      • Change The Ownership Status Of A Device
      • Add Custom Notes And Tags On Devices
      • Generate Device List Report
    • Bulk Enrollment Of Devices
      • Enroll Windows, Mac OS And Linux Devices By Installing The Communication Client
        • Enroll Windows Devices Via AD Group Policy
        • Enroll Windows, Mac OS And Linux Devices By Offline Installation Of Agent
        • Enroll Windows Devices Using Auto Discovery And Deployment Tool
      • Enroll The Android And IOS Devices Of AD Users
    • Download And Install The Remote Control Tool
  • Users And User Groups
    • Manage Users
      • Create New User Accounts
        • Manually Add Users
        • Import Users From A CSV File
      • Enroll User Devices For Management
        • Enroll Android Devices
        • Enroll IOS Devices
        • Enroll Windows Endpoints
        • Enroll Mac OS Endpoints
        • Enroll Linux OS Endpoints
      • View User Details
        • Update The Details Of A User
      • Assign Configuration Profiles To A Users Devices
      • Remove A User
      • Generate New Password For A User
      • Reset Two Factor Authentication Token For A User
      • Run Procedures On User Devices
    • Manage User Groups
      • Create A New User Group
      • Edit A User Group
      • Assign Configuration Profiles To A User Group
      • Remove A User Group
      • Run Procedures On Group Devices
    • Configure Role Based Access Control For Users
      • Create A New Role
      • Manage Permissions And Users Assigned To A Role
      • Remove A Role
      • Manage Roles Assigned To A User
  • Configuration Templates
    • Create Configuration Profiles
      • Profiles For Android Devices
      • Profiles For IOS Devices
      • Profiles For Windows Devices
        • Create Windows Profiles
          • Associated Devices Settings
          • Antivirus Settings
          • Communication Client And Xcitium Client - Security Application Update Settings
          • File Rating Settings
          • Firewall Settings
          • HIPS Settings
          • Containment Settings
          • Maintenance Window Settings
          • VirusScope Settings
          • Global Proxy Settings
          • Client Proxy Settings
          • Agent Discovery Settings
          • Communication Client And Xcitium Client - Security Application UI Settings
          • Logging Settings
          • Client Access Control
          • External Devices Control Settings
          • Monitors
          • Procedure Settings
          • Remote Control Settings
          • Remote Tools Settings
          • Miscellaneous Settings
          • Script Analysis Settings
          • Data Loss Prevention Settings
          • Patch Management Settings
          • Performance Settings
        • Import Windows Profiles
      • Profiles For Mac OS Devices
        • Create A Mac OS Profile
          • Antivirus Settings For Mac OS Profile
          • Certificate Settings For Mac OS Profile
          • Restrictions Settings For Mac OS Profile
          • VPN Settings For Mac OS Profile
          • Wi-Fi Settings For Mac OS Profile
          • Remote Control Settings For Mac OS Profile
          • External Device Control Settings For Mac OS Profile
          • Valkyrie Settings For MacOS Profile
          • Procedure Settings For Mac Profiles
          • Monitor Settings For Mac OS Profile
      • Profiles For Linux Devices
        • Create A Linux Profile
          • Antivirus Settings For Linux Profile
          • Communication Client And Comodo Client - Security Application Update Settings For Linux Profile
          • User Interface Settings For Linux Profile
          • Logging Settings For Linux Profile
          • Clients Access Control Settings For Linux Profile
          • Valkyrie Settings For Linux Profile
    • View And Manage Profiles
      • Export And Import Configuration Profiles
      • Clone A Profile
    • Edit Configuration Profiles
    • Manage Default Profiles
    • Manage Alerts
      • Create A New Alert
      • Edit / Delete An Alert
    • Manage Procedures
      • View And Manage Procedures
      • Create A Custom Procedure
      • Combine Procedures To Build Broader Procedures
      • Review / Approve / Decline New Procedures
      • Add A Procedure To A Profile / Procedure Schedules
      • Import / Export / Clone Procedures
      • Change Alert Settings
      • Apply Procedures To Devices
      • Edit / Delete Procedures
      • View Procedure Results
    • Manage Monitors
      • Create Monitors And Add Them To Profiles
        • Monitors For Windows Devices
        • Monitors For Mac OS Devices
      • View And Edit Monitors
    • Data Loss Prevention Rules
      • Create DLP Discovery Rules And Add Them To Profiles
      • View And Edit DLP Discovery Rules
      • Create DLP Monitoring Rules And Add Them To Profiles
      • View And Edit DLP Monitoring Rules
  • Security
    • Endpoint Security Status
      • Run Antivirus And/or File Rating Scans On Devices
      • Handle Malware On Scanned Devices
      • Update Virus Signature Database On Windows, Mac OS And Linux Devices
    • Security Events
      • View Security Events By Time
      • View Security Events By Files
      • View Security Events By Device
      • View Android Threat History
    • View And Manage Blocked Threats
    • View And Manage Quarantined Threats
    • View Contained Threats
    • HIPS Events
    • Firewall Events
    • View And Manage Autorun Alerts
    • Manage File Trust Ratings On Windows Devices
      • File Ratings Explained
    • View List Of File Verdicts
    • View History Of External Device Connection Attempts
    • Data Loss Prevention Scans
      • DLP Logs
      • DLP Quarantined Files
  • Network Management
    • Create And Run Network Discovery Tasks
    • Manage Profiles For Network SNMP Devices
    • Manage Network Devices
      • Manage SNMP Devices
        • SNMP Device Details Interface
      • Discovered Devices
    • Manage Network Monitors
  • Application Store
    • IOS Apps
      • Add IOS Apps And Install Them On Devices
      • Manage IOS Apps
    • Android Apps
      • Add Android Apps And Install Them On Devices
      • Manage Android Apps
    • Windows Apps
      • Install Windows Apps On Devices
  • Applications
    • View Applications Installed On Android And IOS Devices
      • Blacklist And Whitelist Applications
    • Patch Management
      • Manage OS Patches On Windows Endpoints
      • Install 3rd Party Application Patches On Windows Endpoints
        • EM Supported 3rd Party Applications
    • View And Manage Applications Installed On Windows Devices
      • Uninstall A Windows Application From Selected Devices
      • Uninstall A Windows Application From All Devices
    • Vulnerability Management
  • License Management
    • Manage Your Licenses
    • Manage License Allocation
    • Bill Forecast
  • Configure Endpoint Manager
    • Email Notifications, Templates And Custom Variables
      • Configure Email Templates
      • Configure Email Notifications
      • Create And Manage Custom Variables
      • Create And Manage Registry Groups
      • Create And Manage COM Groups
      • Create And Manage File Groups
      • View And Manage Pattern Variables
      • View And Manage Keyword Groups
    • Endpoint Manager Portal Configuration
      • Import User Groups From LDAP
      • Configure Communication And Security Client Settings
      • Configure The EM Android Client
        • Configure Android Client General Settings
        • Configure Android Client Antivirus Settings
      • Add Apple Push Notification Certificate
      • Configure Windows Clients
        • Configure Communication Client Settings
        • Configure Client Security Settings
      • Manage Endpoint Manager Extensions
      • Configure Endpoint Manager Reports
      • Device Removal Settings
      • Account Security Settings
      • Set-up Administrators Time Zone And Language
      • Configure Audit Log Settings
    • Integrate Apple Business Manager With Endpoint Manager
      • Link Endpoint Manager With Apple Business Manager
      • Manage Apple Business Manager Devices
      • Manage Apple Business Manager Profiles
      • Configure Apple Business Manager Notifications
    • View Version And Support Information
  • Appendix 1a - Endpoint Manager Services - IP Nos, Host Names And Port Details - EU Customers
  • Appendix 1b - Endpoint Manager Services - IP Nos, Host Names And Port Details - US Customers
  • Appendix 2 - Endpoint Manager License Types
  • Appendix 3 - Pre-configured Profiles
  • About Comodo Security Solutions

Create and Run Network Discovery Tasks


  • Click 
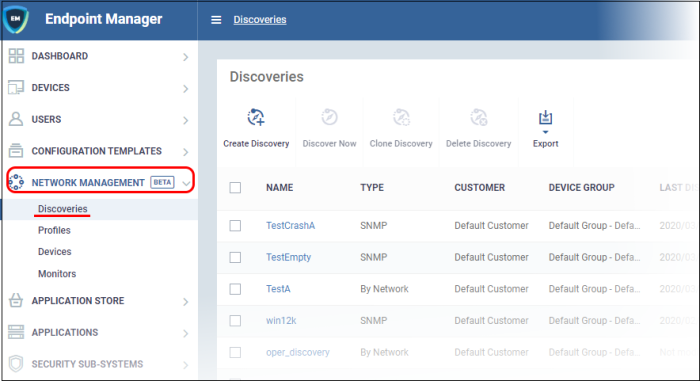
'Network Management' > 'Discoveries' in the left menu

Discovery scans consist of the IP range you want to scan, a probe device, and a destination group for discovered devices.

  • The Discoveries Area
  • Example Deployment Process
  • Create a Discovery Task
  • Run a Discovery Task
  • View Discovery Logs
  • Manage a Discovery Task
  • Remove Discovery Tasks
  • Export Discovery Tasks

    The Discoveries Area


    The discoveries area lets you manage, create and run discovery scans:


    Column Heading

    Description

    Name

    The label of the discovery task.


    Ideally, the label should help you identify the target or purpose of the task in future. For example, ‘Discovery Task on Company X network'.


    Click the discovery name to open its configuration screen. See Create a Discovery Task for more details

    Type

    The kind of scan used to audit the network. The three possible types are:

    • Active Directory
    • Network
    • SNMP

    You enable SNMP scans within the network scan type. They run simultaneously with the network scan. SNMP results are reported separately to Endpoint Manager and may find additional devices.

    Customer

    The company that owns/controls the target network.

    Device Group

    The group to which identified devices are assigned. You can specify the target device group when you configure the scan.

    Last Discovery Date

    Date and time the scan was most recently run.

    Last Updated Date

    Date and time the scan task was most recently edited.

    Created by

    The admin who created the discovery task.

    • Click the admin name to view their details. See View User Details if you need help with this.

    Controls

    Create Discovery

    Add a new discovery task.

    • See Create a Discovery Task for more details

    Discover Now

    Run an on-demand scan to identify all devices connected to the target network.

    • See Run a Discovery Task for more details.

    Clone Discovery

    Create a new scan by copying an existing scan and modifying its settings as required.

    • See Create a Discovery Task for more details.

    Delete Discovery

    Remove selected discovery tasks. The control will appear only if a discovery task is selected.

    • See Remove Discovery Tasks for more details.

    Export

    Save the discovery tasks as a CSV file.

    • See Export Discovery Tasks for more details.


    Example Deployment Process


      Optional - Make sure your probe device is in place. The probe is required for network and SNMP scans, but is optional for Active Directory scans.
        • Create a new group for discovered devices under the company of your choice: 'Devices' > 'Device List' > 'Group Management' > 'Create Group'.
        • Name the groupю For example, 'Discovered Devices – Company X'.
        • Leave this group empty as it is purely to segment the discovered devices. You can move the devices to different groups after they have been enrolled.
        • Click 'Network Management' > 'Discoveries' > 'Create Discovery' > 'Discovery by Network' > create a name for the discovery task. E.g 'Discovery Task on Company X network'.
        • Click 'OK' to open the task configuration screen. Click 'Edit' to actually configure the scan.
        • Specify the customer / target device group.
        • See Network discovery scan if you need help to configure a network/snmp scan
        • See AD discovery scan for help to configure an AD scan
        • Save your task then select it in the 'Discoveries' screen. Click 'Discover Now' to run the scan.
        • The scan will take around 10 minutes. All discovered devices will go into your new group. You can view discovered devices in 'Network Management' > 'Devices' > 'Discovered Devices'.
        • Auto-enrolled Windows devices can be viewed in 'Devices' > 'Device List'
        • Next, we will create a package to install the communication client on Windows devices, then use the auto-deployment tool to deploy the package.
        • Click 'Devices' > 'Device List' > 'Bulk Installation Package'. Configure the package as required.
        • Remember to specify the correct company and the group you just created.
        • Do not change the filename of the .msi. It is unique to this deployment.
        • Click 'Download Installer' and save the file to your local machine.
        • Next, download and install the 'Auto Discovery and Deployment Tool' (ADDT). You can do this at the prompt, or download it from the Comodo Dragon / Comodo One portal (click 'Tools' in the top-menu).
        • In ADDT, choose the .msi you just created as the 'Deployment Package'.
        • Deployment options – Choose 'Network Addresses' then enter the same IP range as you used in your discovery scan.
        • Click 'Start Deployment' to install the .msi on the target devices. This will enroll the devices to Endpoint Manager in the customer/group you created earlier.
        • See the ADDT user guide at https://help.comodo.com/topic-289-1-851-11045-Deploy-Applications---Packages-.html if you want help with the utility
        • In Endpoint Manager, click 'Devices' 'Device List' > 'Group Management' > Company/Group to view the enrolled devices.
        • You can now assign the devices to new users, or move them to new groups, as required.
        • See 'Bulk Enrollment of Devices' for more information about enrolling Windows, Mac and Linux devices.
        Create a Discovery Task


        There are two ways you can create a discovery task:

        • Create new discovery task
        • Clone an existing task and edit it as required

        Create a new discovery task


        There are two types of discovery task:

        • Network - Scan an IP range using a probe device. The probe must be a managed Windows device connected to the network. You can run a concurrent SNMP scan when you run a network scan.
        • Active Directory - Scan an Active Directory domain for devices. You can configure the scan with or without a probe device. If not specified, EM will directly scan the AD server.

        Network discovery scan

        • Click 'Network Management' > 'Discoveries'
        • Click 'Create Discovery'


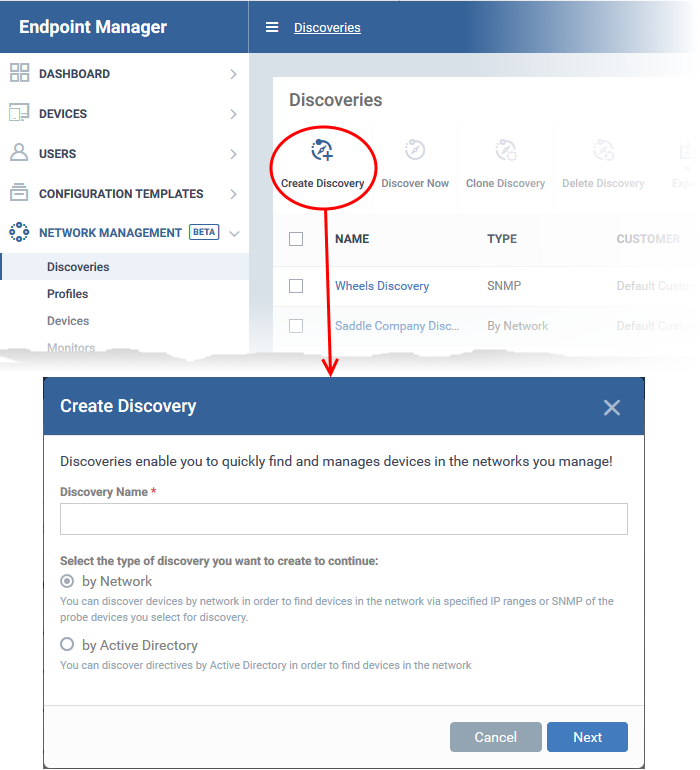
        • Discovery Name - Create a label for the discovery task. Ideally, the label should help you identify the target or purpose of the task in future.
        • Select 'by Network'
        • Click 'Next' to add probe devices.


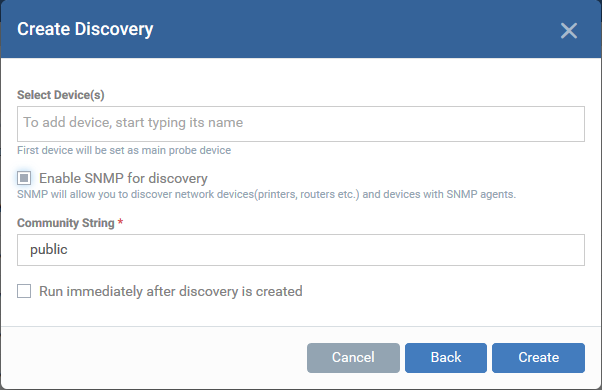
        • Select Device(s) - Start typing the name of the device you want to use as probe and select from the suggestions.
        • A probe device is a managed Windows endpoint inside the network that you want to scan. The device must already be enrolled to Endpoint Manager and have communication client (CC) 6.32 or higher installed. This device will launch the scans you request on the target network.
        • You can also add additional devices for fail-over. The device added first will be used as the probe. If the first device is offline then EM will use the next device for the scan.
        • Enable SNMP for discovery – Run a simple network management protocol (SNMP) scan alongside the network scan.
        • If enabled, the SNMP scan will run simultaneously with the IP range scan.
        • The SNMP results are shown as separate row in the 'Network Management' > 'Devices' > 'Discovered Devices' interface.
        • Community String - This is a passcode sent with each SNMP Get-Request to authenticate access to a router or other device. If the community string is correct, then the device responds with the requested information.
        • Run immediately after discovery is created - The discovery scan will start after it is saved.
          Click 'Create’ when finished. This opens the discovery config screen:


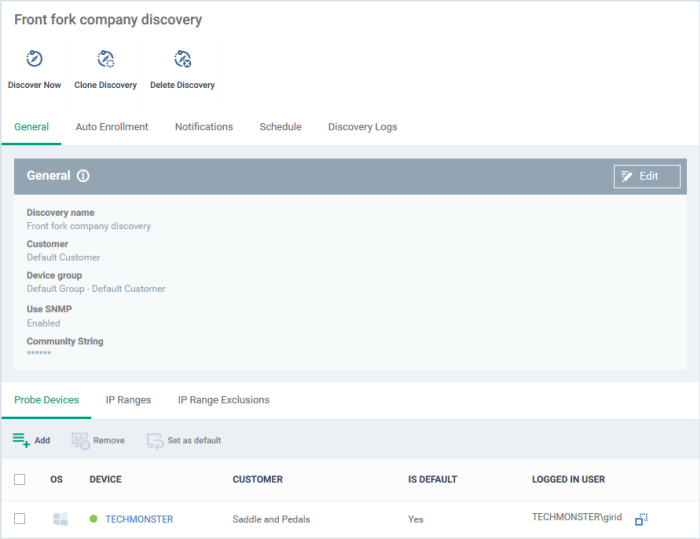
              Next, click 'Edit' on the right to configure scan targets and options. Click the following sub-headers if you need help with a particular tab:

              • General - Specify the IP addresses you want to scan. Set the customer and device group to which new devices should be assigned. Choose your probe device.
              • Auto Enrollment - Windows devices only. Set the customer and device group to which you want to assign discovered Windows devices. Complete the instructions in the ‘Auto Enrollment’ tab on the probe and target devices.
              • Notifications - Select which events you want to be notified about. Events include when the scan ends, when a new device is found, and when a new IP is found.
              • Schedule - You can automate the discovery scans by scheduling them to run daily, weekly or monthly.
              • Discovery Logs - View the results of previous scans run under this task. You can see the date, type and other general details about a scan. Click 'Details' then 'Click Here' to view a list of devices found by the scan.

              General Settings


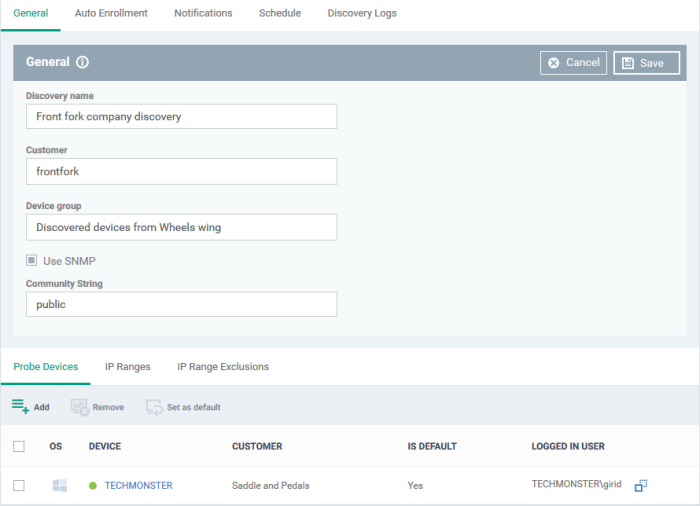
                Discovery name - This is pre-populated with the label you created in the previous step. Edit the name, if required.
                • Customer - Specify the company that owns/controls the target network.
                • Enter first few letters of a company name and select from the suggestions.
                • Device group - Specify the group to which discovered devices should be assigned. The device group must belong the 'Customer' named in the previous row.
                • Enter the first few letters of the device group and select from the suggestions. 
                • SNMP - Pre-populated with the choice you made in the previous step. Change the choice if required.
                • If enabled, the SNMP scan will run simultaneously with the IP range scan.
                • SNMP results are shown as a separate row in 'Network Management' > 'Devices' > 'Discovered Devices'.
                • Community String - This is a passcode sent with each SNMP Get-Request to authenticate access to a router or other device. If the community string is correct, then the device responds with the requested information.
                Most network vendors ship their equipment with a default password of "public". This is the so-called "default public community string".
                • Probe Devices - Pre-populated with the list of devices you specified in the previous step. You can add a new probe as follows:
                • Click 'Add' at top-left:


                • Start typing the name of the device you want to use as probe. Select from the suggestions.
                • You can add multiple devices for fail-over, if required. You must choose a default probe if you add multiple probes. The other probes are only used if the default is not available.
                • IP Ranges - Specify the IP address range that you want to scan for connected devices. You can add any number of IP ranges within the network for a single discovery task. You can also specify addresses you want to exclude.
                Leave this blank if you want to scan the entire network to which the probe is connected.


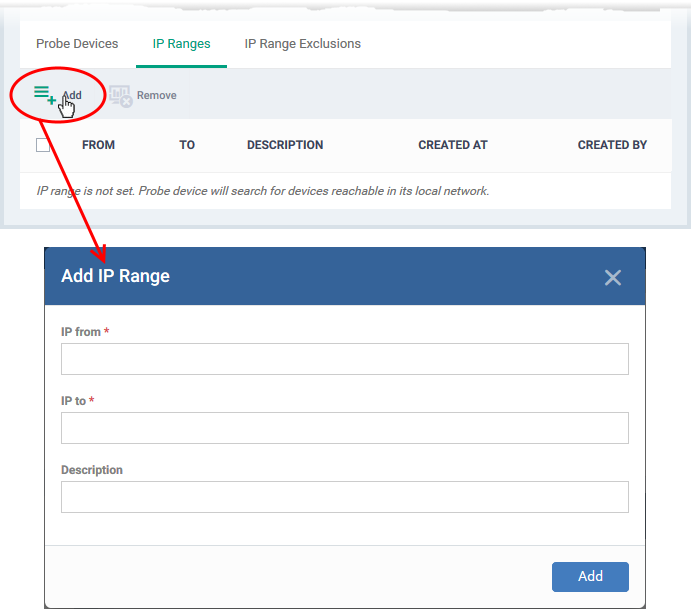
                  IP from - Start address of the IP range

                  IP to - End address of the IP range

                  Description - Add any brief comments about of the IP range (optional). Use this if there are different IP segments which you want to identify. You can enable or disable ranges as required in any scan task. Click 'Add' to add the IP range to the list. Repeat the process to add more IP address ranges
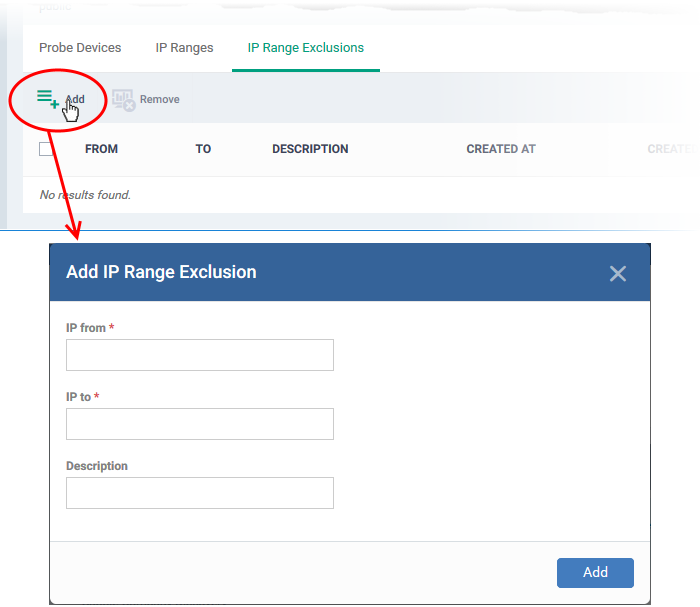
                  • IP Range Exclusions - Specify IP addresses that should not be scanned.


                    Next:

                    • Click the 'Auto Enrollment' tab to configure the scan to auto-enroll Windows devices. See Auto Enrollment for help with this.
                    • Click the 'Notifications' tab to configure alerts. See Notification Settings for help with this.
                    • Click the 'Schedule' to run the scan at a set time. See Schedule the discovery task for help with this.

                    AD discovery scan

                    • Click 'Network Management' > 'Discoveries'
                    • Click 'Create Discovery'

                    The 'Create Discovery' wizard starts:


                    • Discovery Name - Enter a label for the new discovery task. Ideally, the label should help you identify the target or purpose of the task in future.
                    • Select 'by Active Directory'
                    • Click 'Next'.


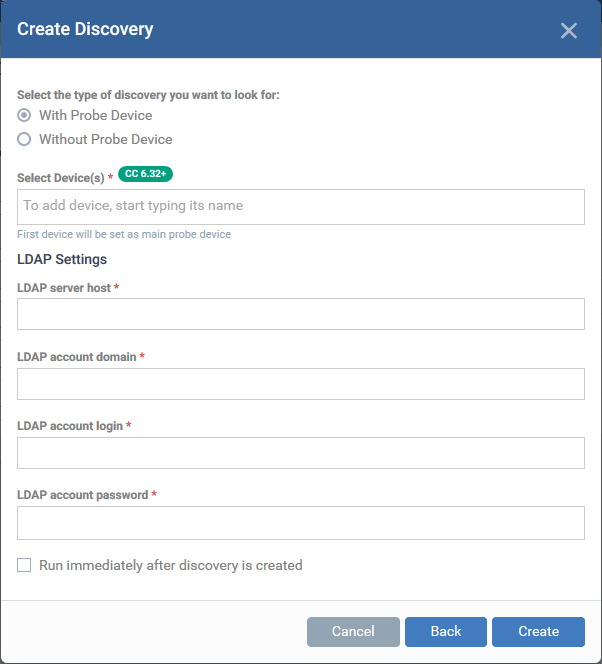
                    Select discovery type:

                    • With Probe Device - Specify a probe device to run the discovery scan on the AD domain.
                    • Choose this option if the AD server is not directly accessible over the internet.
                    • A probe device is a managed Windows endpoint on the same network to which the AD server is connected.
                    • The device must already be enrolled to Endpoint Manager and have communication client (CC) version 6.32+ installed. This device will launch the scans you request on the target network.
                    • The probe device need not be a member of the AD domain
                    • Choose your probe device in the 'Select Devices' field
                    • Without Probe Device - The discovery scan will be run directly by EM
                    • Select this option if the AD server is accessible through the internet.
                    • You need not specify a probe device to run the scan.
                    Select Device(s) - Applies only if 'With Probe Device' is chosen.
                    • Start typing the name of the probe device you want to use and select from the suggestions.
                    • You can also add additional devices for fail-over. The device added first will be used as the probe. If the first device is offline at the time of discovery, EM will use the next device and so on.
                    LDAP Settings:
                    • LDAP server host - Enter the IP address or hostname of the AD server that hosts the AD domain
                    • LDAP account domain - Enter the domain name of the AD domain
                    • LDAP account login and LDAP account password - The admin username and password required to access the AD server.
                    Run immediately after discovery is created - The discovery scan will start right after it is saved.
                    • Click 'Create'
                    • The discovery task configuration screen opens:


                    Click 'Edit' on the right to get started. Click the following sub-headers if you need help with a particular tab:

                    • General - Edit the LDAP details of the AD server you want to scan. Set the customer and device group to which new devices should be assigned. Choose your probe device.
                    • Notifications - Select which events you want to be notified about. Events include when the scan ends and when a new device is found.
                    • Schedule - You can automate the discovery scans by scheduling them to run daily, weekly or monthly.
                    • Discovery Logs - View the results of previous scans run under this task. You can see the date, type and other general details about a scan. Click 'Details' then 'Click Here' to view a list of devices found by the scan.

                    General Settings

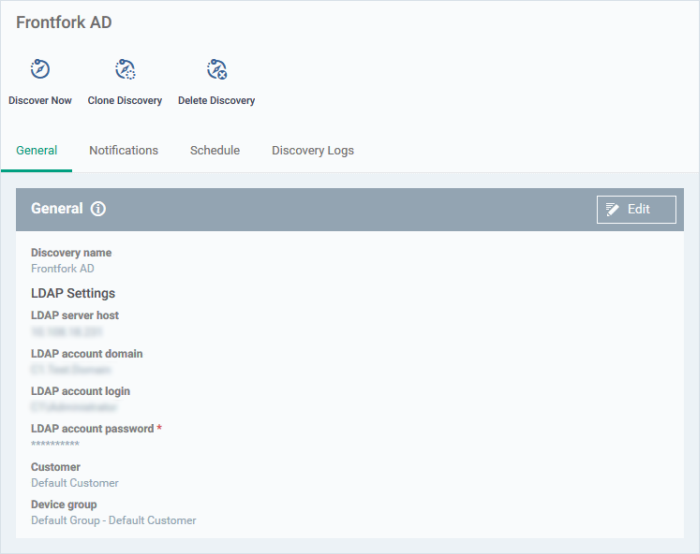
                    • Click the 'General' tab (if it is not already open)
                    • Click the 'Edit' button at the top-right 


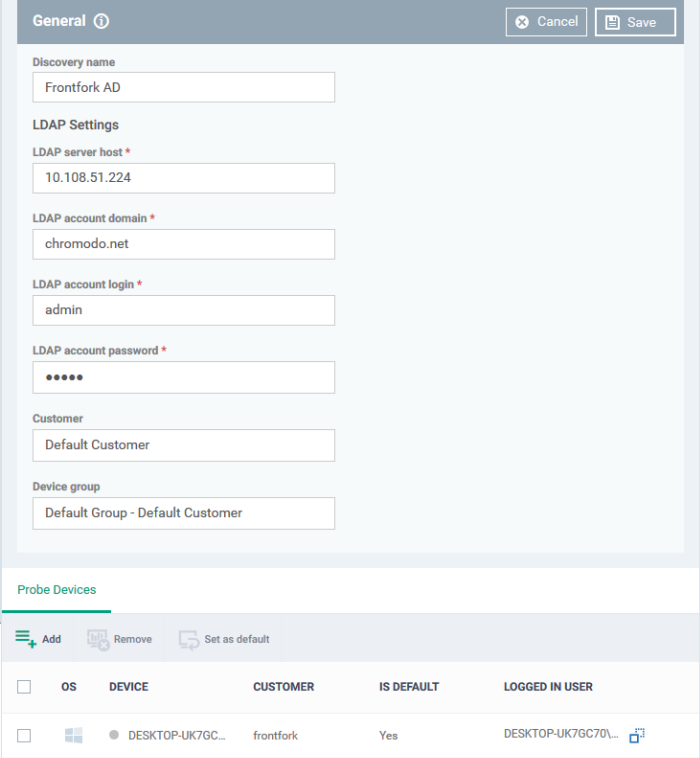
                    • Discovery name - This field is pre-populated with the label you created in the previous step. Edit the name, if required.
                    • LDAP Settings - The hostname of the AD server, AD domain name, AD admin username and password are pre-populated from the details you entered in the previous step. Modify them if required.
                      • Customer - Specify the company that owns/controls the target AD network.
                      • Enter first few letters of a company name and select from the suggestions.
                      • Device group - Specify the device group to which identified devices will be assigned. The device group must belong the 'Customer' named in the previous row.
                        • Enter the first few letters of the device group and select from the suggestions.
                        • Probe Devices – Applies only if you have chosen 'With Probe Devices' in the previous step. The list is pre-populated with the probe devices you specified in the previous step. You can add or remove devices if required.

                          Add a probe device:

                          • Click 'Add' at the top-left:


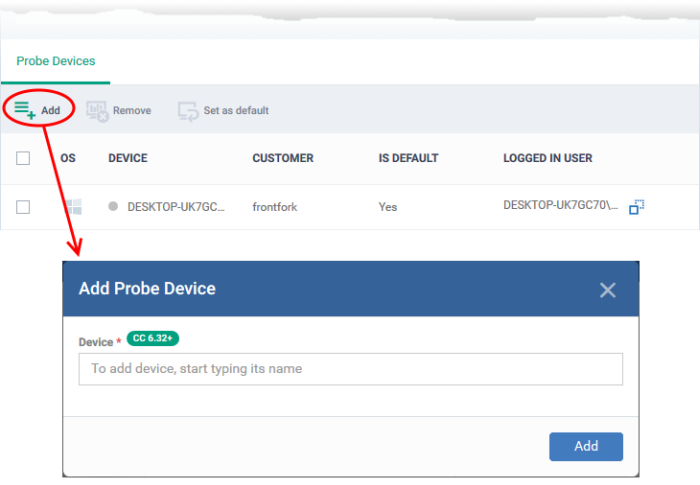
                            • Start typing the name of the device you want to use as the probe then select from the suggestions
                            • You can also add additional devices for fail-over. The device added first will be used as the probe. if the first device is offline at the time of discovery, EM will use the next device and so on
                            • Click 'Add'
                            • Repeat the process to add more probes. Multiple probes act as fail-overs for each other.
                            • You must select a default probe for scans if you add multiple probes. The other probes will only run the scan if the default probe is not available
                            • Click 'Save'.

                              Next:

                              • Click the 'Notifications' tab to configure the alerts. See Notification Settings for help with this.
                              • Click the 'Schedule' tab to create a schedule to periodically run the scans. See Schedule the discovery task for help with this.

                                Auto Enrollment

                                • You must download and install PsTools on the probe device before you can use the auto-enrollment feature.
                                • You also need to enable NetBIOS over TCP/IP on target devices.
                                • Read the full instructions on the ‘Auto Enrollment’ page and complete the steps therein.

                                Auto-enroll devices:

                                • Click the 'Auto Enrollment' tab
                                • Click the 'Edit' button at the top-right


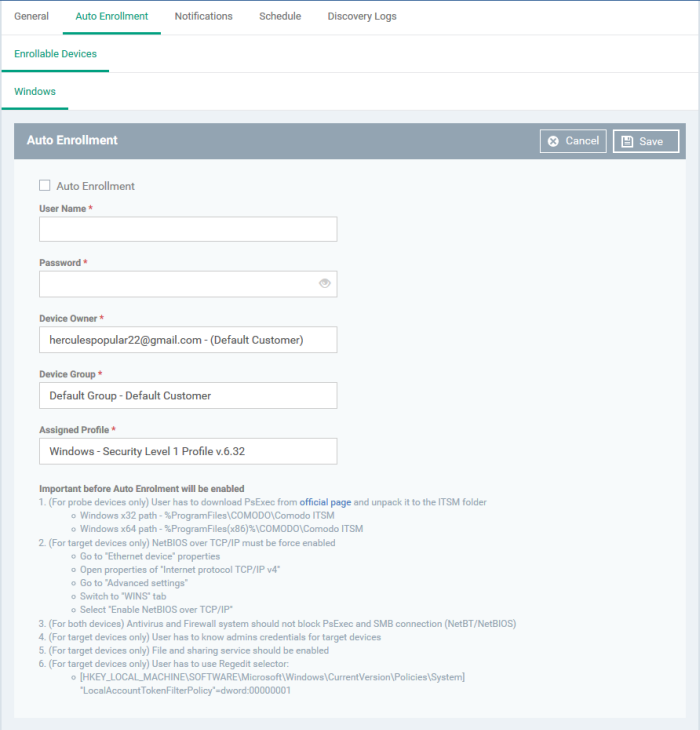
                                • Auto Enrollment – Enable this to auto-enroll discovered Windows devices to EM
                                • User Name / Password - Admin credentials for the target devices
                                • Device Owner - Select the admin of the customer that you selected in the general tab. The devices are assigned to this admin after enrollment. You can assign the device to the appropriate user later. Start typing a name and select from the suggestions
                                • Device Group - Choose the group to which you want to assign auto-enrolled devices. Start typing the group name and select from the suggestions
                                • Assigned Profile - Choose the profile you want to apply to discovered devices. Start typing a profile name and select from the suggestions. Note – The security client has to be installed for the profile to take effect
                                • Click 'Save' to apply your changes

                                Notification Settings

                                • Click the 'Notifications' tab
                                • Click the 'Edit' button at the top-right


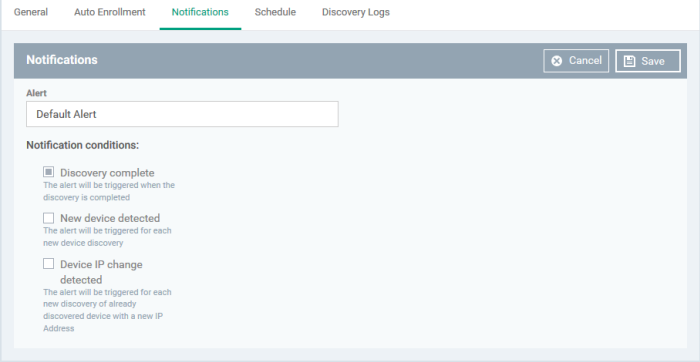
                                  • Alert - Choose the alert template for your notification. An alert template contains general settings of your alert and specifies its recipients. Alert templates are configured in 'Configuration Templates' > 'Alerts'. See Manage Alerts for more details.
                                  • Select which events generate an alert:
                                  • Discovery complete - Get an alert when a discovery scan finishes
                                    • New device detected - Get an alert when a device is identified for the first time
                                    • Device IP change detected - Get an alert if the IP address of a device changes
                                      • Click 'Save' for your settings to take effect


                                        Schedule the discovery task


                                        The 'Schedule' tab lets you configure daily, weekly or monthly scans to run at specific times.

                                        • Click the 'Schedule' tab
                                        • Click 'Add' to create a schedule


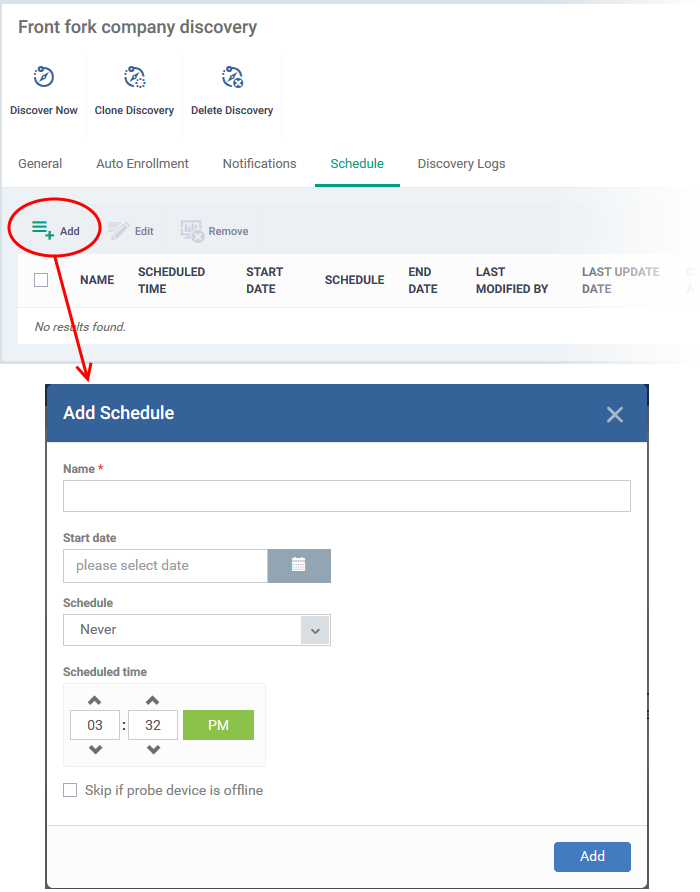
                                        • Name - Enter a label for the discovery scan schedule
                                        • Start date - Select what date the scan should start
                                        • Schedule – Specify whether the scan should run daily, weekly, monthly, or never.
                                        • For weekly, specify the days of the week
                                        • For monthly, specify the days of the month
                                        • Scheduled time - Specify the scan start time
                                        • Finish date - The options are:
                                        • No end date
                                        • End date - Select the date on which the schedule will end.
                                        • Skip if probe device is offline – The scan will be aborted if all probe devices are offline at the scheduled time. If disabled, the scan will be queued until the device comes online.
                                        • Click 'Add'
                                        The schedule will be saved and added to the list.


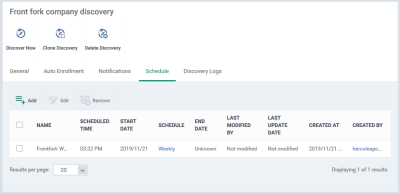
                                        • Repeat the process to add more schedules
                                        • Select a schedule and click the Edit button on the top to modify it
                                        • Select a schedule and click the 'Remove' button at the top to delete it

                                        Create a new discovery task by cloning an existing task

                                        • Click 'Network Management' > 'Discoveries'
                                        • Select the discovery task you want to use as the base and click 'Clone Discovery'
                                        • Alternatively, click the name of the discovery scan task and click 'Clone Discovery' on the top of the configuration screen.


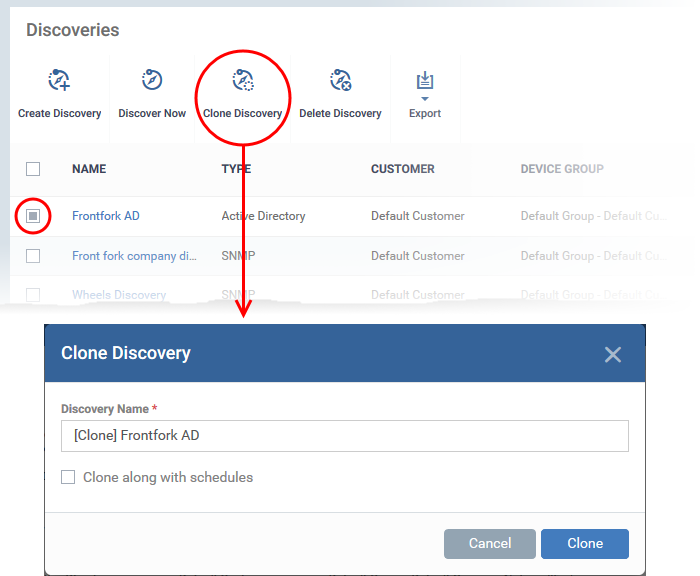
                                        • Discovery Name – The label of the discovery task. This is auto-populated with the name of the source discovery task wit the prefix '[Clone]'. Create a new name for the task, if required.
                                        • Clone along with schedules - Select if you want to use the same schedule as the source task.
                                        • Click 'Clone'.

                                        The new discovery scan task is created with the parameters of the source task.

                                        • Edit the task as required in the confirmation screen. See above if you need help.
                                        • Click 'Save' to apply your changes

                                        Run a Discovery Task


                                        There are two ways you can run a discovery task:

                                        • From 'Network Management' > 'Discoveries'
                                        • From 'Network Management' > 'Devices'

                                        The following section explains how to run a scan from the 'Discoveries' interface.


                                        Run an on-demand network discovery scan

                                        • Click 'Network Management' > 'Discoveries'
                                        • Select the discovery scan task from the list and click 'Discover Now' on the top
                                        • Alternatively click the name of the discovery task and click 'Discover Now':


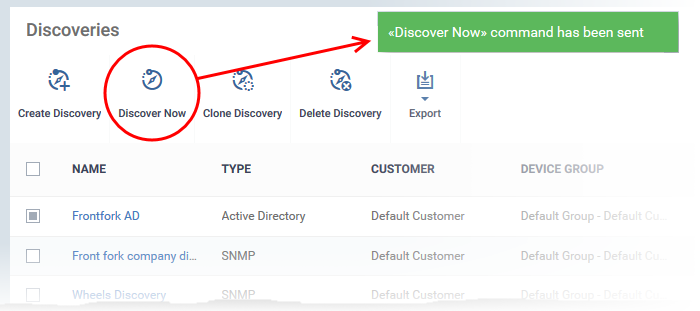
                                        • The scan will start and will run for ten minutes. Any SNMP scans will start simultaneously.
                                        • All discovered devices will appear in 'Network Management' >'Devices' > 'Discovered Devices'
                                        • See Discovered Devices for more details.

                                        View Discovery Logs

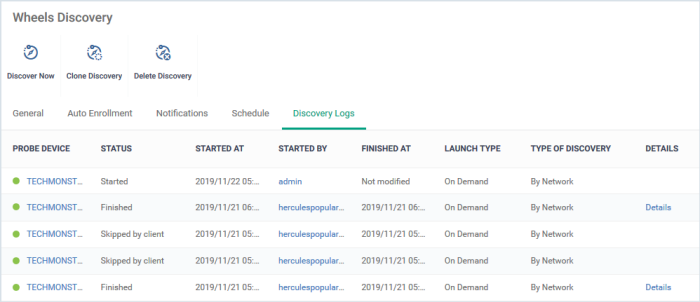
                                        The 'Discovery Logs' tab in the discovery scan task configuration screen lets you view the history of scans run by the task and their details.

                                        • Click 'Network Management' > 'Discoveries'
                                        • Click the name of a discovery scan task to open its configuration interface
                                        • Click the 'Discovery Logs' tab


                                        Discovery Scan Logs - Table of Column Descriptions

                                        Column Heading

                                        Description

                                        Probe Device

                                        The Windows device that ran the scan. Shown only for network discovery scans and AD discovery scans configured with a probe device.

                                        • Click the device name to view device’s details.

                                        Status

                                         Current progress of the scan. The possible values are:

                                        • Queued
                                        • Started
                                        • Skipped
                                        • Finished

                                        Started At

                                         Date and time when the scan commenced.

                                        Started By

                                         Email address of the admin who launched the scan.

                                        • Click the email address to view the details of the admin. See View User Details if you need help with this.

                                        Finished At

                                         Date and time the scan completed.

                                        Launch Type

                                         Whether the scan was scheduled or started manually.

                                        Type of Discovery

                                        The kind of the scan. The possible types are:

                                        • Active Directory
                                        • SNMP
                                        • Network

                                        Details

                                        • Click the 'Details' link to view information such as the names and number of devices found.
                                        • See View Details of a Discovery Scan for more info on the details screen.

                                        View Discovery Scan Details

                                        • Click 'Details' in the row of a scan to view additional information:


                                        • Click the 'Click here' link to view the devices found by the scan. See Discovered Devices for more details.
                                        Edit a Discovery Task
                                        • Click 'Network Management' > 'Discoveries'
                                        • Click the name of a discovery scan task to open its configuration interface
                                        • Click the 'Edit' button on the right
                                        • You can edit settings in the 'General', 'Auto Enrollment', 'Notifications' and 'Schedule' areas 
                                        • Edit the parameters as required. See the explanations of configuration screens of network discovery task and AD discovery task for more details. 
                                        • Click 'Save' to apply your changes.


                                        Remove Discovery Tasks


                                        Discovery scan tasks that are no longer required can be removed from Endpoint Manager.

                                        • Click 'Network Management' > 'Discoveries'
                                        • Select the discovery task to be removed and click 'Delete Discovery' on the top
                                        • Alternatively click the name of the discovery task and click 'Delete Discovery' on the top of the configuration screen


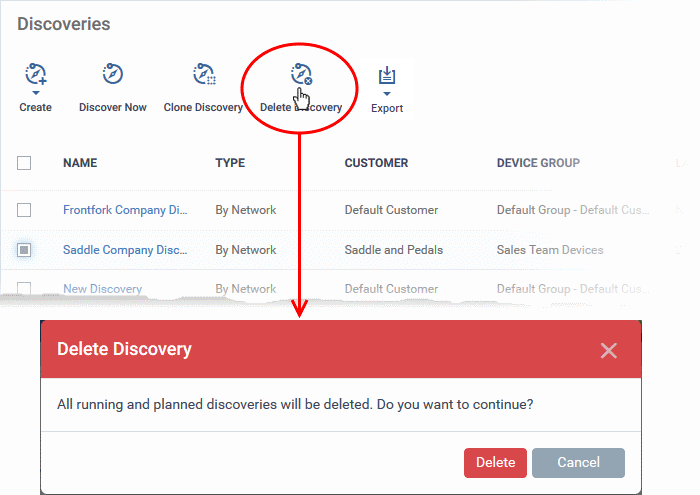
                                        • Click 'Delete' in the confirmation dialog to remove the task.

                                        Export discovery tasks to CSV

                                        • Click 'Network Management' > 'Discoveries'
                                        • Click the 'Export' button above the table then choose 'Export to CSV':


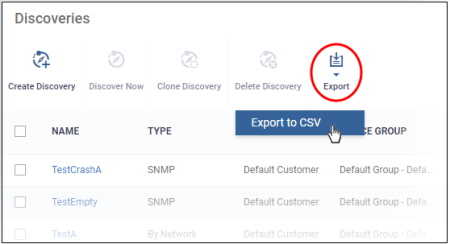
                                        • You can find the CSV file at 'Dashboard' > 'Reports'
                                        • See Reports in The Dashboard for more details.
                                        Our Products
                                        • Free Antivirus
                                        • Free Internet Security
                                        • Website Malware Removal
                                        • Free Anti-Malware
                                        • Anti-Spam (Free Trial)
                                        • Windows Antivirus
                                        • Antivirus for Windows 7
                                        • Antivirus for Windows 8
                                        • Antivirus for Windows 10
                                        • Antivirus for MAC
                                        • Antivirus for Linux
                                        • Free Endpoint Security
                                        • Free ModSecurity
                                        • Free RMM
                                        • Free Website Malware Scanner
                                        • Free Device Manager for Android
                                        • Free Demo
                                        • Network Security
                                        • Endpoint Protection
                                        • Antivirus for Android
                                        • Comodo Antivirus
                                        • Wordpress Security
                                        Cheap CDN
                                        • Bootstrap CDN
                                        • Semantic UI CDN
                                        • Jquery CDN
                                        • CDN Plans
                                        • CDN
                                        • Free CDN
                                        Enterprise
                                        • Patch Management Software
                                        • Patch Manager
                                        • Service Desk
                                        • Website Down
                                        • Endpoint Protection Solutions
                                        • Website Security Check
                                        • Remote Monitoring and Management
                                        • Website Security
                                        • Device Manager
                                        • ITSM
                                        • CRM
                                        • MSP
                                        • Android Device Manager
                                        • MDR Services
                                        • Managed IT Support Services
                                        • Free EDR
                                        Free SSL Certificate
                                        Support Partners Terms and Conditions Privacy Policy

                                        © Comodo Group, Inc. 2025. All rights reserved.