


Manage SSL VPN Client Accounts
- The 'Accounts' interface lets you add and manage user accounts for external clients to connect to the VPN server.
- Please note that user details should be configured before their endpoints are configured to connect to DFW
- See 'Configure Clients to Connect to DFW' for more details on how to connect clients to DFW.
- 'SSL VPN' server is available as a firewall object. This object can be used as a source or destination when creating VPN FW rules for that user.
To manage
user accounts
- Click 'VPN' > 'SSLVPN Server' in the left-hand side navigation
- Click the 'Accounts' tab.
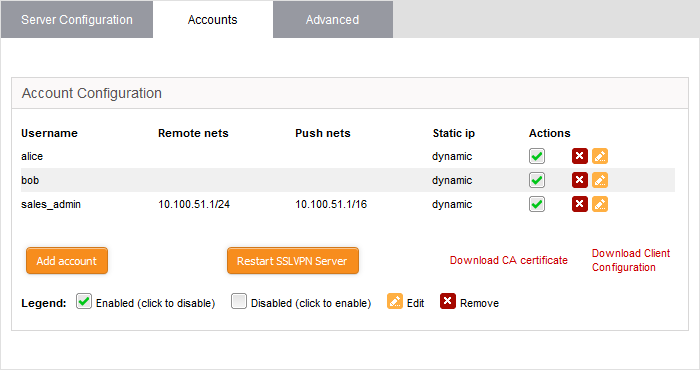
A list of existing user accounts will be displayed.
|
SSL VPN Server Account Configuration table - Column Descriptions |
|
|---|---|
|
Column |
Description |
|
Username |
The user account authorized to log-in to the server via the external client. |
|
Remote nets |
The subnet address of the network behind to the client once it connected. |
|
Push nets |
The network(s) whose routes will be pushed to the client, once it is connected. |
|
Static ip |
The static IP address of the remote client, if assigned. |
|
Actions |
Displays controls for enabling, editing and deleting the account.
|
 - Enable or disable access for the account.
 - Edit account configuration. The interface for editing an account is similar to that for adding an account
  - Removes the entry.
To add a new user account
- Click the 'Add account' button to open the 'Add User' screen:
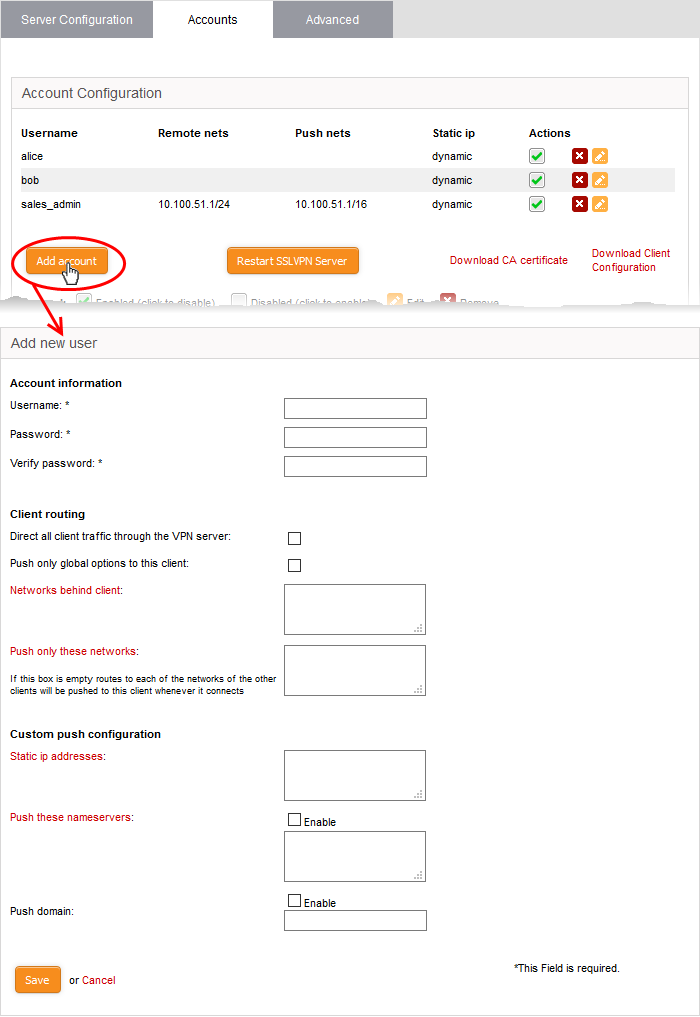
Account information
Specify the username and password of the account. These credentials are needed to authenticate the SSL VPN client to the server.
- Username - Enter a username for the account
- Password - Enter a password for the account
- Verify password - re-enter the password for confirmation
Client routing
Configure traffic routing to the client.
- Direct all client traffic through the VPN server - Select if you want all incoming and outgoing client traffic to pass through the VPN server, regardless of the destination. If not selected, traffic from the client to any external networks will pass directly through the uplink of the client.
- Push only global options to this client - The server will only provide network routes, name servers and domains which have been added to 'Advanced Settings' > 'Global Push Options'. It will not update the routing tables of the client. See Configure Advanced SSL VPN Server Settings for more details.
|
Note: By default, the routing tables of the client are automatically added with the tunneled routes to network zones accessible through the VPN server. This enables the client to connect to various network zones connected to the Dome Firewall. Select 'Push only global options to this client' only if you do not want the routing tables to be automatically updated. If chosen, the routing tables of the client are to be manually updated for the client to connect to the internal network zones. |
- Push route to WIFI zone - Instructs the server to communicate the route to the internal Wi-Fi zone, so that the client can connect to hosts in the Wi-Fi zone in the local network infrastructure.(Available only if Wi-Fi network zone is configured in the DFW device)
- Push route to DMZ zone - Instructs the server to push the route to the internal DMZ zone, so that the client can connect to the hosts in the DMZ zone in the local network infrastructure. (Available only if DMZ network zone is configured in the DFW device)
- Networks behind client - If the client is to be connected to the VPN server in Gateway-to-Gateway setup, enter the subnet address of the network behind the client.
- Push only these networks - Specify the local network routes to be pushed the client. Leave this blank if you wish to push all available routes.
Custom push configuration
You can download the server certificate and the SSL VPN client configuration file from the 'Accounts' interface. The certificates can be installed on remote workstations to enable clients to connect. The server certificate type for authentication can be configured in the 'Advanced' tab > Authentication Settings.
- Static IP addresses - If you wish to assign static IP addresses for clients using this account, enter the IP addresses in CIDR format. To avoid IP address clashes, we advise you specify static IP addresses outside the dynamic IP address pool specified in the Server Configuration tab.
- Push these name servers - If you want clients to use specific name servers for DNS resolution, enter the IP addresses of the name servers in the text field.
- Push domain - If you want clients on this account to use a specific search domain then enter it here. The search domain is used to identify servers and resources in the VPN network.
- Click 'Save'. The SSL VPN server must be restarted for the account to become active.
- Click 'Restart SSL VPN server' to instantly restart the server.
- Click the 'Download CA certificate' link to download the server certificate.
- Click the 'Download Client Configuration' link to download the SSL VPN client configuration file in .ovpn format.
During the configuration of the client to connect to DFW, the username and password specified for the account should be provided. By default, only one client is allowed to connect to the server per account. Select 'Allow multiple connections from one account' to enable several clients at different locations to share a single account (under the 'Advanced' tab.
See 'Configure Clients to Connect to DFW' for more details about how to connect individual clients to DFW.