Configure Virtual IP for Destination Network Address Translation
DCF allows you to redirect service-specific traffic from a port on a host or interface to another host/port combination. Virtual IP rules can be used to limit access from untrusted external networks to the hosts in the network infrastructure
Examples:
1. Virtual IP rules can be used to publish services on a private host through a public IP address. For example, If a service is hosted on a server within the LAN, it can be made accessible at the IP address/port combination of an uplink device connected to the appliance.
2. DCF blocks SSH connection requests from untrusted external IP addresses to any host within the DMZ zone by default. If required, rules can be created to allow SSH access to a specific host in the DMZ.
Virtual IP rules can also be created for:
- Load distribution - Distribute traffic directed to a single host to a range of IP addresses to avoid bottlenecks and overloading a single IP.
- Network Mapping - Translate incoming traffic to a different sub-network. The network translation statically maps the addresses of a whole network onto addresses of another network.
Virtual IP rules can be created and managed from the 'Virtual IP' interface.
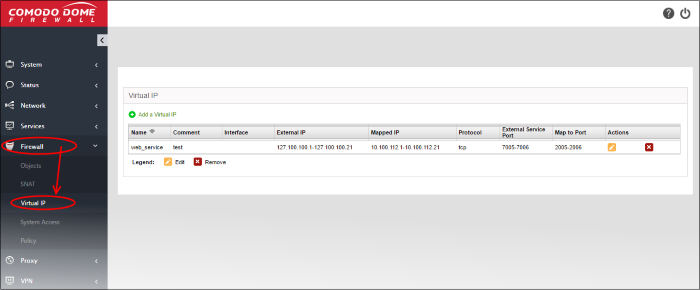
- To open interface, click 'Firewall' > 'Virtual IP' on the left.

The 'Virtual IP' interface displays a list of the Virtual IP rules and allows the administrator to create new rules.
|
DNAT Table - Column Descriptions |
|
|---|---|
|
Column |
Description |
|
Name |
Name to identify the rule. |
|
Comment |
A short description of the rule. |
|
Interface |
The interface through which the traffic is received. |
|
External IP |
The external IP address to which traffic is sent. |
|
Mapped IP |
The IP address/IP range of the destination host/device to which traffic is redirected. |
|
Protocol |
The protocol used by the service. |
|
External Service Port |
The port or port range on the host(s)/device(s) to which the traffic is directed. |
|
Map to Port |
The port or port range on the destination host to which traffic is redirected. |
|
Actions |
Displays control buttons for managing the rule.
|
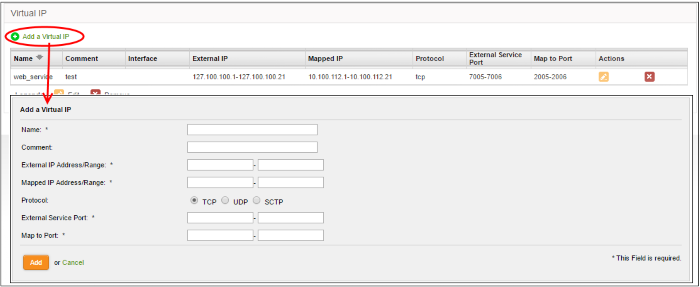
Virtual IP rules can be created from the 'Add a Virtual IP' pane.
To create a DNAT rule
- Open the 'Virtual IP' interface by clicking the 'Firewall' >
'Virtual IP' from the left hand side navigation
- Click the 'Add a Virtual IP' link at the top left
The 'Add a Virtual IP' pane will
open.

- Enter the parameters for the new rule as shown below:
Comment – Enter a short description of the rule.
Interface – Specify the interface through which the traffic is forwarded.
External IP Address/Range - Specify the External IP address(es) to which the connection request is received. You can enter a single IP address or a range.
- If the traffic is directed to a single IP address, enter the address in both the fields.
- If the traffic is directed to a range of IP addresses, enter the start and end addresses in the respective fields.
Mapped IP Address/Range - Specify the IP address(es) of the destination to which the traffic has to be redirected. You can enter a single IP address or a range.
- If the traffic is to be redirected to a single IP address, enter the address in both the fields.
- If the traffic is to be redirected to a range of IP addresses, enter the start and end addresses in the respective fields.
Protocol - Choose the protocol used by the service
External Service Port - Specify the port/port range to which the traffic is directed.
- If the traffic is directed to a single port, enter the port number in both the fields.
- If the traffic is directed to a port range, enter the start and end port numbers in the respective fields.
Map to Port - Specify the port/port range to which the traffic is to be redirected.
- If the traffic is to be redirected to a single port, enter the port number in both the fields.
- If the traffic is to be redirected to a port range, enter the start and end port numbers in the respective fields.
- Click 'Add' to save the rule. The rule will take effect immediately.


