


Manage VPN Firewall Rules
VPN firewall rules allow you to set traffic limits for users and hosts who are connected through SSL VPN and IPsec tunnels.
- See SSL VPN Server and SSL VPN Client if you need help to configure VPN connections and SSL VPN accounts.
- See IPsec Configuration if you need help to configure secure IPsec tunnel connections between external networks/sites and internal networks,
- The VPN firewall is disabled by default, allowing both incoming and outgoing traffic between hosts without filtering. Traffic from hosts is not subject to filtering by the outgoing traffic firewall or the Inter-Zone traffic firewall rules.
- The VPN firewall can be enabled in the 'VPN policy' interface. You can also create and manage VPN traffic rules from this interface.
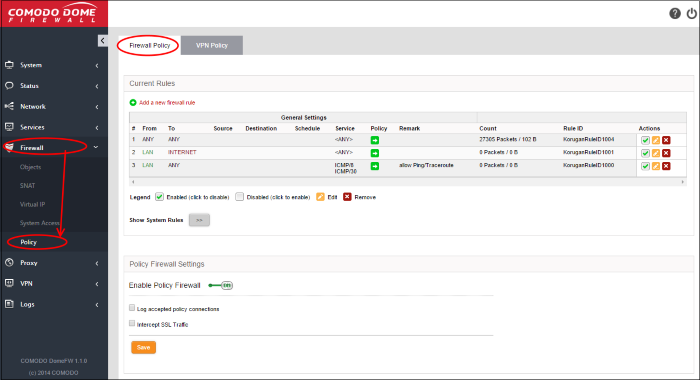
- Click 'Firewall' > 'Policy' > 'VPN Policy' to open the settings interface:
By default, the VPN firewall is
disabled.
- Use the 'Enable VPN firewall' switch to turn the firewall on or off.
Enabling the rule will reveal the VPN firewall rules interface:
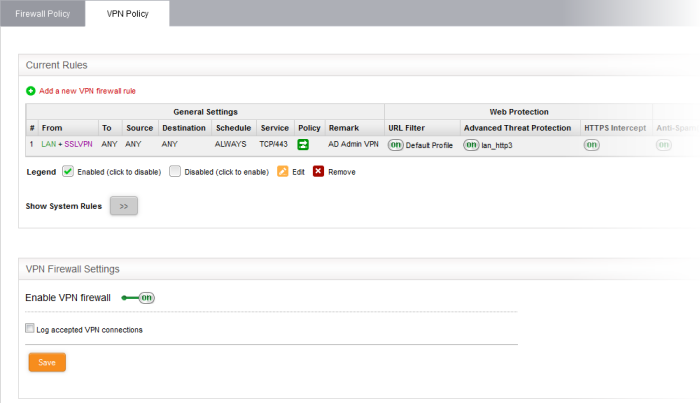
- Current Rules - Displays a list of existing rules and allows you to add/edit rules. See Managing VPN Traffic Rules for more details. See Managing
VPN Traffic Rules for more details
- VPN Firewall Settings - Displays the current status of the VPN firewall and allows you to change configure the firewall logging. See Configuring the VPN Firewall Settings for more details.
The 'Current Rules' pane displays a list of existing rules. You can add, edit and manage rules from this interface.
|
|
VPN Firewall Rules Table - Column Descriptions |
|
|---|---|---|
|
Category |
Column |
Description |
|
General Settings |
# |
Serial number of the rule. |
|
From |
The interface device, the VPN tunnel or the network zone from which the traffic originates. |
|
|
To |
The interface device, the VPN tunnel or the network zone to which the traffic is directed. |
|
|
Source |
The Firewall Object or Object Group containing the IP address, IP Address Range, the subnet of the host(s) or VPN user(s) from which the traffic originates. |
|
|
Destination |
The Firewall Object or Object Group containing the IP address, IP Address Range, the subnet of the host(s) or the VPN user(s) to which the traffic is directed. |
|
|
Schedule |
The schedule object that covers the time period for which the rule is active |
|
|
Service |
The service that uses the traffic, indicated as the protocol and the port used. |
|
|
Policy |
Indicates the allow/block policy of the rule. |
|
|
Remark |
A short description of the rule. |
|
| Actions |
Displays rule controls: |
|
 - Enabled or disable the rule.
 - Edit the rule. The edit
interface is similar to the 'Add Rule' interface. See
- Edit the rule. The edit
interface is similar to the 'Add Rule' interface. See  - Removes the rule.
-
Clicking the right arrow button beside 'Show system rules' displays a list of firewall rules auto generated by DCF. These rules cannot be modified or removed.
Creating
Firewall rules for VPN Traffic
The firewall rules for VPN traffic can be created from the 'VPN firewall rule editor' pane by defining the source, destination, the service used by the traffic, selecting security profiles and the action to be taken on the traffic.
To create a new firewall rule
- Open the 'VPN Firewall' interface by clicking 'Firewall' > 'Policy' from the left hand side navigation and selecting the 'VPN Policy' tab.
- Click the 'Add a new VPN firewall rule' link at the top left. The 'VPN firewall rule editor' will open.
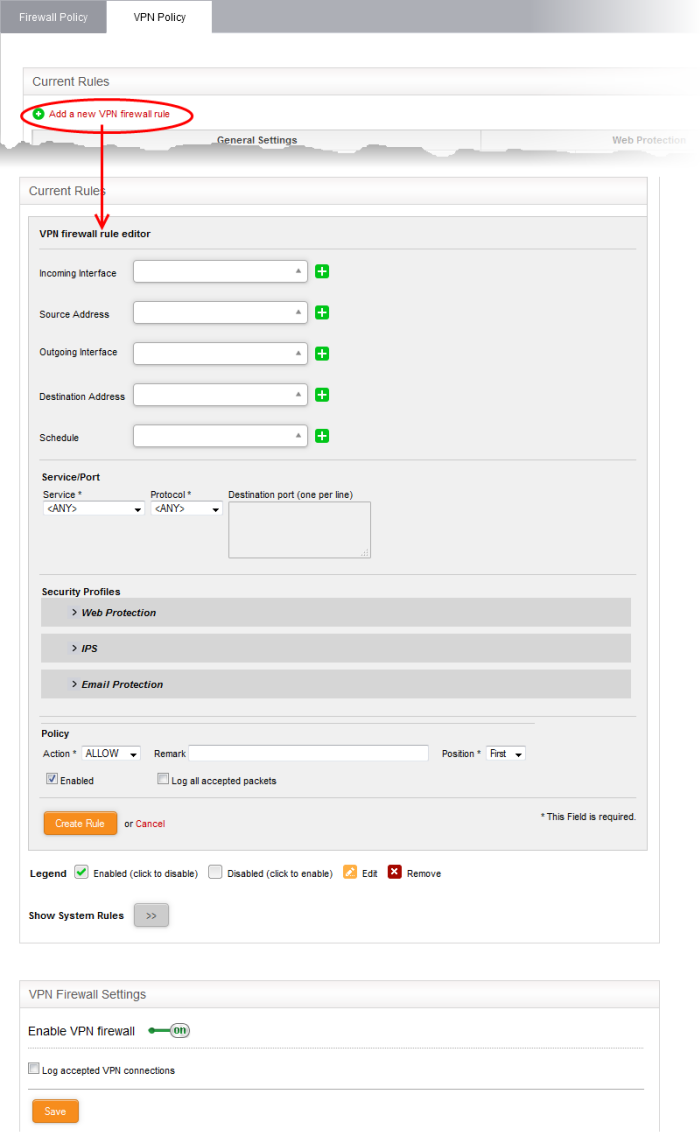
The 'VPN Firewall Rule
Editor' interface is divided into four areas for specifying the
different components of the rule:
|
- |
Choose the source and destination of the traffic and set a schedule for the rule to be active. |
|
|
- |
Specify the service pertaining to the traffic to be intercepted by the rule. |
|
|
- |
Configure to allow or block the traffic intercepted by the rule. |
- Incoming Interface - Choose the interface device, VPN tunnel or the physical port at which the traffic is received, from the drop-down.
- Source Address - Choose the firewall object or the object group that covers the IP address, IP address range, the subnet or the VPN user(s), at which the traffic to be intercepted by the rule, is received.
If a firewall object covering the IP address/IP Address range or the subnet to be specified has not been created under the Firewall Objects interface previously, you can create a new object from this interface too.
To create a new firewall object
-
Click the drop-down arrow and click 'Create' at the bottom of the list. A new pane for creating a new object will appear.
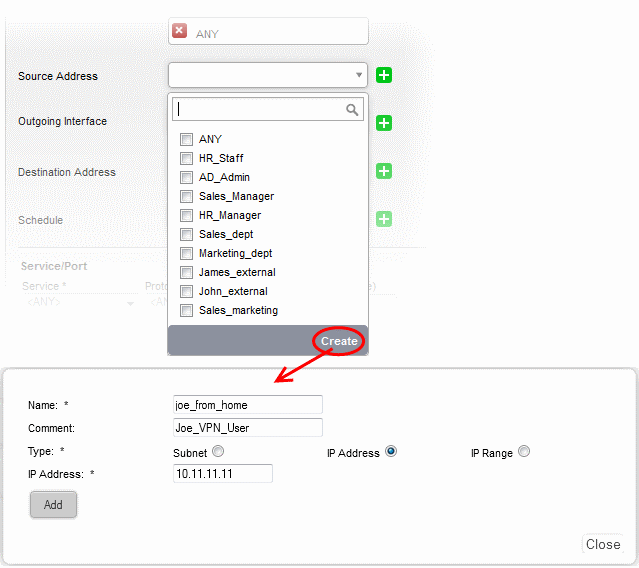
- Name - Specify a name for the object (15 characters max) representing the host(s) included in the object.
- Comment - Enter a short description of the object.
- Type - Select the type by which the hosts are to be referred in the object. The available options are:
- Subnet - Select this if a sub network of computers is to be covered by the object and enter the sub network address
- IP address - Select this if a single host is to be covered by the object and enter the IP address of the host
- IP range - Select this if more than one host is to be covered by the object and enter the IP address range of the hosts
- Click 'Add'.
The new object will be added and will be available for selection from the Select network/IPs drop-down.
The new object will also be added to the list of objects under Firewall Objects and will be available for selection for creating other firewall rules too.
- Outgoing Interface - Choose the interface device or the physical port to which the traffic is directed, from the drop-down.
- Destination Address - Choose the Firewall Object or Object Group containing the IP address, IP Address Range or the subnet of the host(s) to which the traffic is directed, from the drop-down.
If a firewall object covering the IP address/IP Address range or the subnet to be specified has not been created under the Firewall Objects interface previously, you an create a new object from this interface too. See explanation above for more details.
-
Schedule - The Schedule Objects added to the Firewall Objects > Schedule interface will be available in the drop-down. Choose the schedule object(s) that cover the time period(s) for which the rule needs to be active from the drop-down.
If the schedule object covering the required time period P to be specified has not been created under the Firewall Objects > Schedule previously and hence not available in the drop-down, you can create a new object from this interface too.
To create a new schedule object
-
Click the drop-down arrow and click 'Create' at the bottom of the list. A new pane for creating a new object will appear.
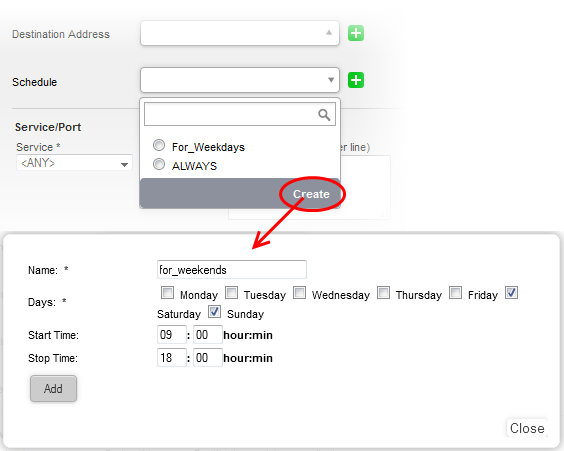
- Name - Specify a name for the schedule.
- Days - Select the days of the week at which the firewall should be active.
- Start Time and Stop Time - Enter a time at which the firewall should be started and stopped at the selected days in 24 Hrs time format.
- Click 'Add' for the new schedule to be created.
The new schedule object will also be available for selection in the drop-down and also will be added to the list of schedule objects under Firewall Objects > Schedule interface. The new object will be available for selection for creating other firewall rules too.
Service/Port - Select the type or the service hosted by the source, the protocol and the port used by the service.
- Service - Choose the type of service from the drop-down
- Protocol - Choose the protocol used by the service
- Destination port - Specify the destination port(s) of the service one by one, in the 'Destination Port' text box.
|
Tip:
The appliance is loaded with predefined combinations of
service/protocol/port, like HTTP/TCP/80,[ALL] |
- Action - Specify whether the packets matching the rule should be allowed or denied from the Policy drop-down. The options available are:
- Allow - The data packets will be allowed without filtering
- Deny - The packets will be dropped
- Reject - The packets will be rejected, and error packets will be sent in response
- Remark - Enter a short description for the rule. The description will appear in the Remark column of the Rules table.
- Position - Set the priority for the rule in the list of rules in the respective rules interface. The rules in the iptables are processed in the order they appear on the list.
- Enabled - Leave this checkbox selected if you want the rule to be activated upon creation.
- Log all accepted packets - Select this checkbox if you want the packets allowed by the rule are to be logged. See View Logs for more details on viewing the logs.
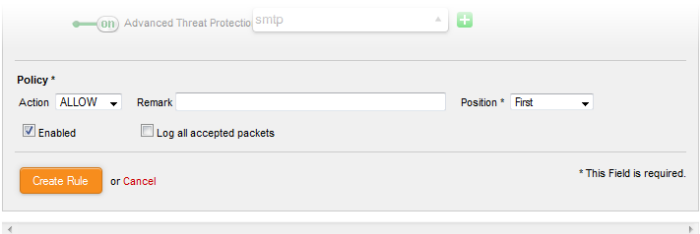
- Click 'Create Rule'. A confirmation dialog will appear.
Configuring
the VPN Firewall Settings
The lower 'VPN Firewall Settings' pane allows the administrator to enable/disable the VPN firewall rule and to opt for logging the packets that pass the rule.
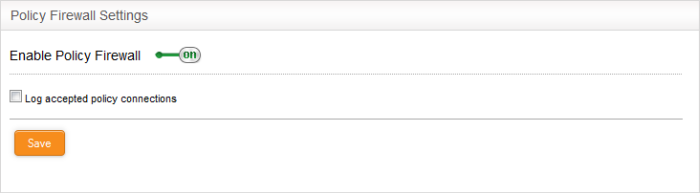
- Use the 'Enable VPN firewall' toggle switch to switch the state of the VPN firewall
- Select the 'Log accepted VPN connections' checkbox to log the packets that has passed the VPN Policy. See View Logs for more details on viewing the logs
- Click 'Save' for your settings to take effect.