Manage Firewall Schedules
The 'Schedule' tab in 'Firewall' > 'Objects' allows you to specify the days and times when a firewall rule should be active. For example, it could be that a more restrictive firewall rule is applied on weekends and non-working hours than the one during working hours (when greater flexibility may be required).
Once a schedule object has been
created in this interface, it can be applied it to a particular rule
when creating or editing a rule in the 'Firewall' section. If the
schedule of a rule needs to be changed, it is sufficient to edit the
schedule object in this interface. The change will be propagated to
all the rules to which the schedule object is applied.
DCF ships with a default and recommended schedule of 'Always' to keep the firewall activated at all times. Administrators may edit and create new schedules using the controls in the 'Actions' column.
To access the Schedule interface
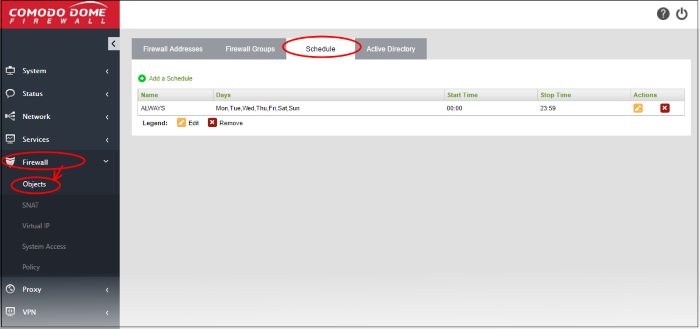
- Click 'Firewall' > 'Objects' from the left hand side navigation
- Click the 'Schedule' tab

The 'Schedule' interface displays a list of
existing schedule objects. Each schedule displays the days and times
when the firewall will be active.
|
Schedules Table - Column Descriptions |
|
|---|---|
|
Column |
Description |
|
Name |
Name of the schedule. |
|
Days |
The days of the week at which the rule is activated. |
|
Start Time |
The time at which the rule is started on the days listed in the 'Days' column. |
|
Stop Time |
The time at which the rule is disabled on the days listed in the 'Days' column. |
|
Actions |
Displays controls for managing the schedule. |
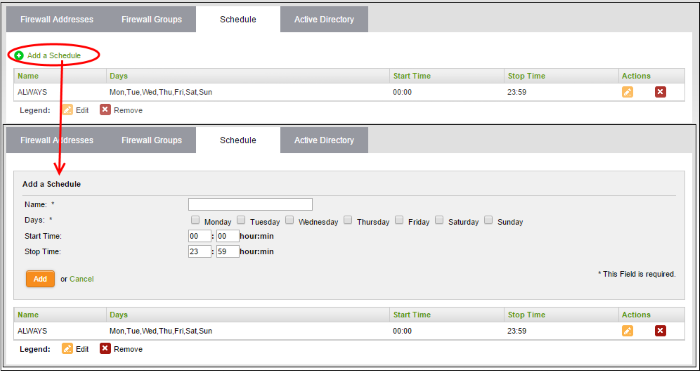
A new firewall schedule can be created from the 'Add a Schedule' pane by specifying the days and start/stop times for the rule.
To create a new schedule
- Open the 'Schedule' interface by clicking the 'Schedule' tab under 'Firewall' > 'Objects'
- Click 'Add a Schedule' at top left

- Enter the parameters for the new schedule as shown below:
- Name - Specify a name for the schedule.
- Days - Select the days of the week at which the firewall should be active.
- Start Time and Stop Time - Enter a time at which the firewall should be started and stopped at the selected days in 24 Hrs time format.
- Click 'Add' for the new schedule to be created.
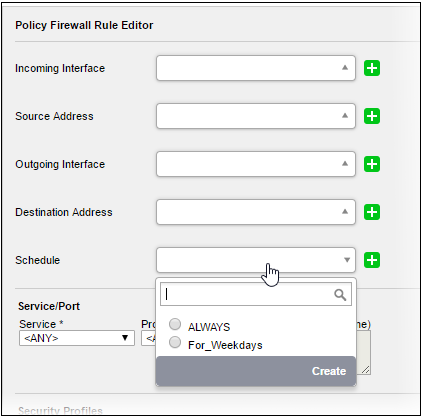
The schedule will be available for selection while creating and editing individual firewall rules from the 'Policy Firewall' interface.


 - Removes the schedule.