Containment Settings
- Xcitium Client Security (XCS) can run all unknown files in a security hardened environment known as the 'container'.
- Files in the container are prevented from causing damage because they are isolated from the OS, file system and user data.
- The containment settings area lets you configure the container and the virtual desktop.
- You can create rules to define what types of files should be contained and at what restriction level.
Restriction levels include:
- Run Virtually. The file is completely isolated from your operating system and files on your computer
- Run Restricted. The file is contained but has limited access to operating system resources
- Block. The file is completely prevented from running
- Ignore. The file is run outside the container without restrictions
- See Auto-Containment Rules for more information about rules.
- You can also block contained applications from accessing specific files, folders and registry keys.
- The virtual desktop is separate, sandbox environment in which you can run Windows programs and internet browsers. Programs in the virtual desktop are isolated from the rest of the host, preventing them from potentially causing damage.
- Modifications to containment settings are automatically logged. You can view the old and new values in the 'Dashboard' > 'Audit Logs' screen. See 'Audit Logs' in the 'Dashboard' section for more information.
Restriction levels include:
- Run Virtually. The file is completely isolated from your operating system and files on your computer
- Run Restricted. The file is contained but has limited access to operating system resources
- Block. The file is completely prevented from running
- Ignore. The file is run outside the container without restrictions
- See Auto-Containment Rules for more information about rules.
Configure the container
- Click 'Configuration Templates' > 'Profiles'
- Open the Windows profile you want to work on
- Click 'Add Profile Section' > 'Containment'
You can use the default settings or import them from a predefined profile:
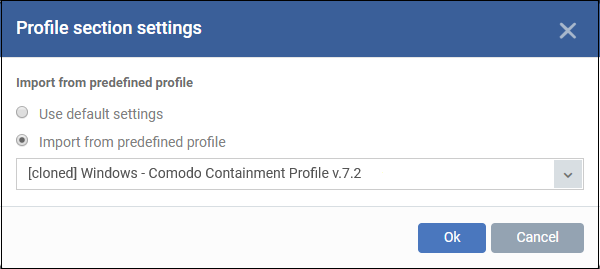
- The default settings differ slightly from those in the various profiles. For example, auto-containment is enabled in the security level 1 profile but disabled in the default settings.
- In either case, you can always modify the containment settings later as required.
- Make your selection then click ‘Ok’.
The containment section has six tabs:
- Open the ‘Containment’ section of a profile
- Click the 'Settings' tab:
.png)
|
Containment Settings - Table of Parameters |
|
|---|---|
|
Form Element |
Description |
|
Enable Auto-Containment |
Activate or deactivate auto-containment on the endpoint. If enabled, XCS will automatically run unknown applications inside the container. You can also create rules to fine-tune exactly which types of files are contained. See Configure Rules for Auto-Containment if you want to read more on containment rules. (Default = Disabled) |
|
Enable file source tracking |
If enabled, XCS will consider the origin of a file when deciding whether to contain it or not. For example, if you only want to auto-contain files downloaded from the internet, then 'internet' is your source. If this setting is disabled then the source is disregarded. Only the reputation and location of the file itself are considered.
(Default = Disabled) |
|
Do not virtualize access to the specified files/folders |
Note - This setting determines whether or not a contained application can access specific files/folders on your local system. It does not determine whether or not an application should run in the container in the first place. If you wish to exclude applications in their entirety from the container, see 'Configure Rules for Auto-Containment' instead. |
|
Do not virtualize access to the specified registry keys/values |
(Default = Disabled) See exclusions for registry keys/values (below this table) to find out how to add exclusions. |
|
Do not virtualize access to the removable media |
Allow contained applications to write to external storage devices like USB sticks and external hard disk drives. (Default = Disabled) By default, applications in the container can only save data to a folder called 'Shared Space'. Users can save data to this folder if they want to access it from the host system. This setting provides another way to export data from the container or virtual desktop. |
|
Do not restrict access to COM/DCOM for apps |
By default, contained applications cannot access the COM and DCOM components running on a Windows device. This setting lets you specify applications that can access COM / DCOM components, even if the app is in the container. (Default = Disabled) See Allow selected applications to access COM / DCOM components when run in container to find out how to add applications. |
| Do not restrict remote SQL query execution via virtualized SQLCMD or OSQL for apps | The SQL script execution via virtualized osql and sqlcmd should be blocked. This option should be disabled by default for all predefined profiles. Exclusions should act the same as all other exclusions.
(Default = Disabled)
|
|
Enable automatic startup for services installed in the Containment |
By default, XCS does not permit contained services to run at Windows startup. Select this check-box to allow them to do so on target endpoints. (Default = Disabled) |
|
Shows a green border around programs running in the container. (Default = Disabled) |
|
|
Detect programs which require elevated privileges e.g. installers or updates |
XCS proactively tracks programs that require admin privileges to run. (Default = Disabled) |
|
Do not show privilege elevation alerts |
If 'Detect...' is enabled (see setting above) then an alert is shown to the end-user when a new or unrecognized program requires admin or elevated privileges to run. If you do not want these alerts to be shown, select this option and choose the action to be taken for unrecognized programs:
(Default = Disabled) |
|
Do not show internal Containment services among the contained applications |
Any processes started by CCC/XCS will not be shown in the 'Active Process List' in XCS. You can view contained processes in XCS by clicking:
(Default = Enabled) |
|
Do not report to Endpoint Manager about internal Containment services |
Info about Xcitium client processes which are running in the container is not sent to Xcitium. Client processes are those started by XCC or XCS themselves. Click 'Security' > 'Endpoint Security' > 'Containment' in Xcitium console to view a history of contained applications and processes. (Default = Enabled) |
Define exclusions for files and folders
|
Note. This section explains how to create an exclusion which allows an application in the container to access specific files and folders on the local system. If you want to entirely exclude an application from the container, then please see 'Configure Rules for Auto-Containment' instead. |
-
Contained applications write to a virtual file system, preventing them from potentially damaging files on the host. This setting lets you define exceptions to that rule. You can specify folders or files on the host system which contained applications are allowed to access.
Access scope if enabled:
-
Data files (.doc, .txt etc) - Read/Write/Rename/Delete. Useful, for example, if you want MS Word in the container to save changes to a .doc file on the host file system.
-
Executable files (.exe, .msi etc) - Rename/Delete only.
-
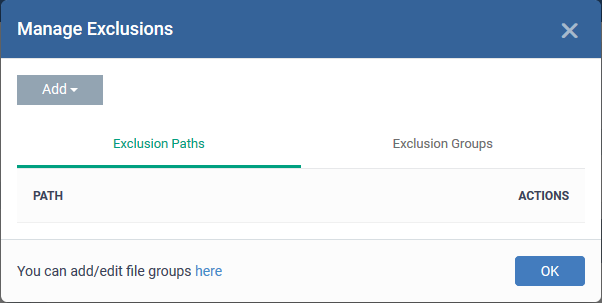
Enable 'Do not virtualize access to the specified files/folders', then click 'Exclusions':
-
The 'Manage Exclusions' dialog will appear with a list of defined exclusions under two tabs:
-
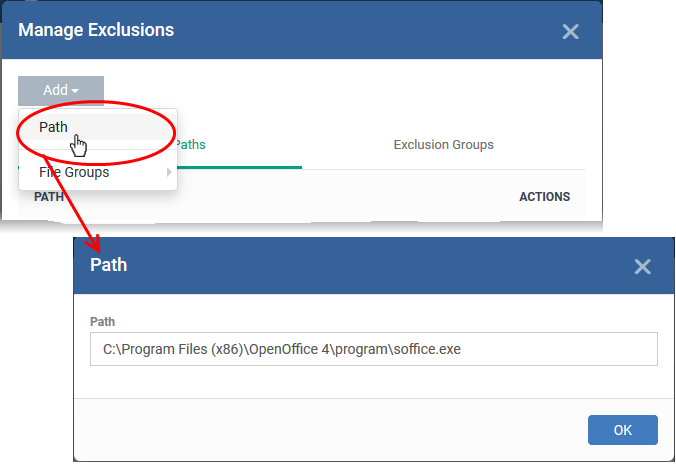
Exclusion Paths - Enter the location of an individual item that you want to exclude. Contained files can write to the files/folders you specify here. You can add multiple files by clicking 'Add' again.
-
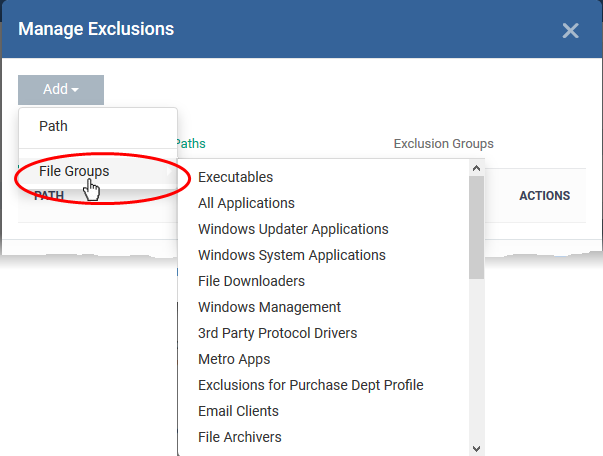
Exclusion Groups - Allow contained apps to access apps and files in a particular group. A file group is a collection of file types which have similar attributes, scope, or functionality. For example, 'Executables', 'Metro Apps', or 'Windows System Applications'. Xcitium ships with a set of pre-defined file groups. You can create custom file groups from the 'Settings' > 'Settings' > 'System Templates' > 'File Groups Variables' interface. See Create and Manage File Groups for more details.
-
Click 'Add' then 'Path' or 'File Group' as required:
-
Click 'OK' to save your settings.
-
You can edit or remove the exclusions using the respective buttons in the 'Action' column in the File/Folders interface.
Define exclusions for specific Registry keys and values
-
Contained applications can access registry keys and values on the local system but cannot save any changes to them. This setting lets you define exceptions to that rule. Contained applications will be able to access and save changes to registry items.
-
Enable 'Do not virtualize access to specified registry keys/values' and click 'Exclusions' beside it:
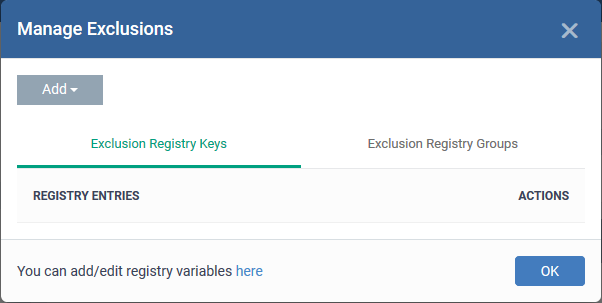
-
Exclusion Registry Keys- Enter the location of an individual key that you want to exclude. Contained files can write to the keys you specify here. You can add multiple keys by clicking 'Add' again.
-
Exclusion Registry Groups- Allow contained applications to access all keys in a particular group. A registry group is a collection keys with similar scope or functionality. Xcitium ships with a set of registry groups. You can create custom registry groups from the 'Settings' > 'Settings' > 'System Templates' > 'Registry Variables' interface. See Create and Manage Registry Groups for more details.
-
Click 'Add' then 'Registry Entry' or 'Registry Group' as required:
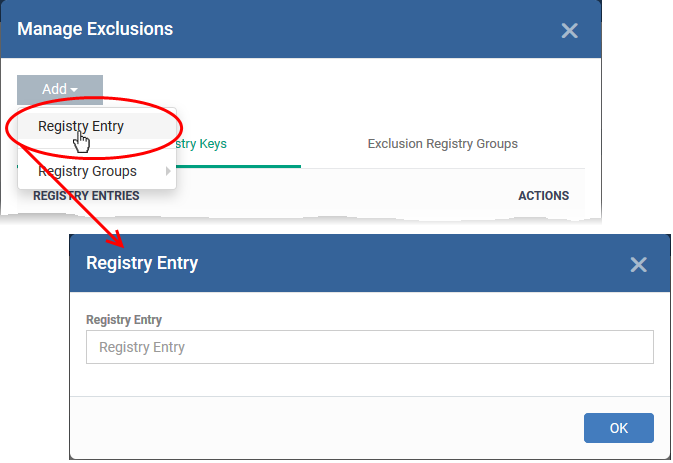
-
Click 'OK' to save your settings.
-
You can remove the exclusions using the trash can buttons in the 'Action' column in the 'Manage Exclusions' interface.
Allow selected applications to access COM / DCOM components when run in container
-
Component Object Model (COM) is Microsoft's object-oriented programming model that defines how objects interact within a single application or between applications - specifying how components work together and inter-operate. COM is used as the basis for Active X and OLE - two favorite targets of hackers and malicious programs to launch attacks on a computer.
-
By default, contained applications are prohibited from accessing the COM or Distributed COM (DCOM) components currently running on a device.
-
If required, you can create a list of applications, that can access the COM and DCOM components, even if the application is run inside the container.
-
Enable 'Do not restrict access to COM/DCOM for apps' and click 'Exclusions' beside it:
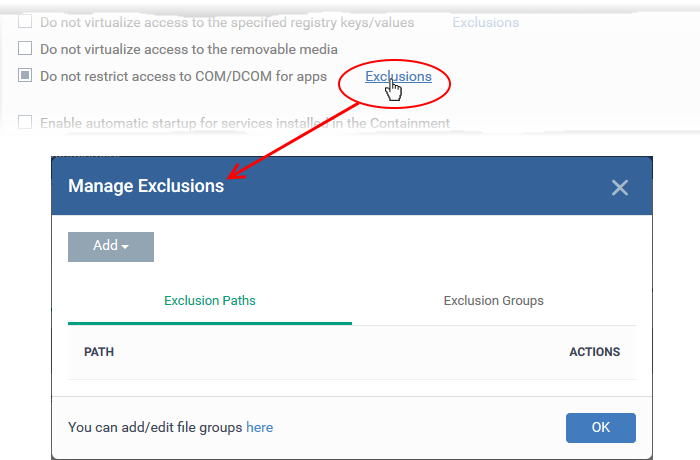

-
The 'Manage Exclusions' dialog will appear with a list of defined exclusions under two tabs:
-
Exclusion Paths - Enter the location of an individual item that you want to add. The application you specify here can access COM / DCOM components, when run inside the containment.
-
Exclusion Groups - Allow applications in a particular group to access COM / DCOM interfaces. A file group is a collection of file types which have similar attributes, scope, or functionality. For example, 'Executables', 'Metro Apps', or 'Windows System Applications'. Xcitium ships with a set of pre-defined file groups. You can create custom file groups from the 'Settings' 'Settings' > 'System Templates' > 'File Groups Variables' interface. See Create and Manage File Groups for more details.
-
Click 'Add' then 'Path' or 'File Group' as required:

-
Click 'OK' to save your settings.
You can edit or remove the exclusions using the respective buttons in the 'Action' column in the Manage Exclusions interface.
-
Click the 'Save' button.
- The SQL script execution via virtualized osql and sqlcmd should be blocked. This option should be disabled by default for all predefined profiles.
- If required, you can create a list of paths and filegroups that exclude from this list which can access the SQL script execution.
- Enable 'Do not restrict remote SQL query execution via virtualized SQLCMD or OSQL for apps' and click 'Exclusions' beside it:
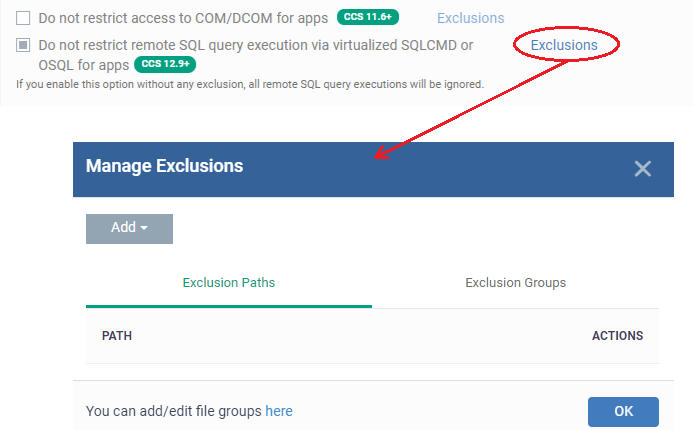
- The 'Manage Exclusions' dialog will appear with a list of defined exclusions under two tabs:
- Exclusion Paths - Enter the location of an individual item that you want to add. The application you specify here can access SQL query execution via virtualized SQLCMD or OSQL for apps, when run inside the containment.
- Click ‘Add’ > Select 'Path’
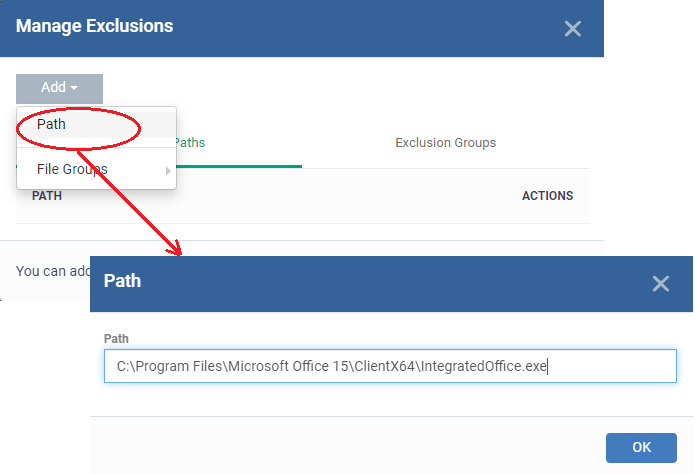
- Click 'Ok'
- Exclusion Groups - Allow applications in a particular group to access the interfaces. A file group is a collection of file types which have similar attributes, scope, or functionality. For example, ‘Executables’, ‘Metro Apps’, or ‘Windows System Applications’.
- Click 'Add' > Select ' File Groups'
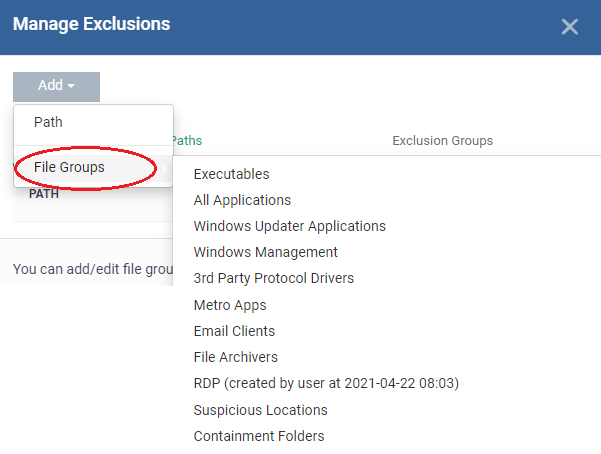
- Click 'OK' to save your settings.
- You can remove the exclusions using the trash can buttons in the 'Action' column in the 'Manage Exclusions' interface.
- Click the 'Save' button.
Configure Auto-Containment Rules
-
Containment rules determine whether a program should run as normal, run with restrictions, or run in the virtual environment. XCS consults these rules every time a program is opened on the endpoint.
-
A contained application has much less opportunity to damage the endpoint because it is isolated from the operating system, system files and personal data.
-
XCS shows a green border around contained programs if so configured in containment settings.
Open the rules interface:
-
Click 'Assets' > 'Configuration Templates' > 'Profiles'
-
Open the profile you wish to work on
-
Click the 'Containment' tab (click 'Add Profile Section' > 'Containment' if you haven't added it yet)
-
Click the 'Rules' tab to view and manage auto-containment rules:
.png)
-
The table lists all rules configured for the profile.
-
Rules at the top of the table have a higher priority than those at the bottom. The setting in the rule nearer the top will prevail in the event of a conflict between rules.
|
Containment Rules - Column Descriptions |
|
|---|---|
|
Column Heading |
Description |
|
Target |
The file, file group, or location on which the rule should run. |
|
Reputation |
The trust status of the files to which the rule should apply. The possible values are:
|
|
Behavior |
The action that will be taken on the targets if the rule criteria are met. Possible actions are:
|
-
Use the slider to enable/disable a rule.
-
Click the trash icon to remove a rule.
-
Click the edit icon to modify a rule.
Target(s) can be filtered by numerous criteria. These are, however, optional, so admins can create a very simple rule to run an application in the container just by specifying the action and the target application.
|
Example: Run an application outside the container
|
-
Open the profile you wish to add the rule to
-
Click the 'Containment' tab. Click 'Add Profile Section' > 'Containment' if you haven't added it yet.
-
Click the 'Rules' tab
-
Click the 'Add Rule' button

-
The 'Manage Contained Program' dialog will open:
.png)
The dialog shows the action at the top and contains two tabs:
-
Criteria - Define conditions upon which the rule should be applied.
-
Options - Configure additional actions like logging, memory allowance and execution time restrictions.
Creating a new containment rule involves the following steps:
-
The setting in the 'Action' drop-down, and the restriction in the 'Options' tab, determine the privileges of an auto-contained application.
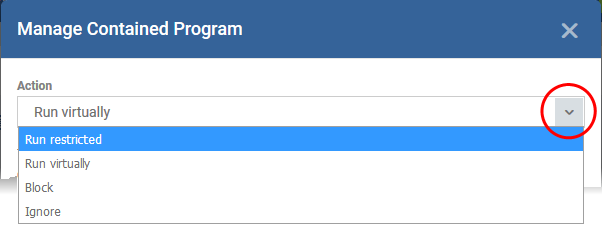
-
Run Restricted - The application is allowed to access very few operating system resources. The application is not allowed to execute more than 10 processes at a time and is run with very limited access rights. Some applications, like computer games, may not work properly under this setting.
-
Run Virtually - The application will be run in a virtual environment completely isolated from your operating system and files on the rest of your computer.
-
Block - The application is not allowed to run at all.
-
Ignore - The application will not be contained and allowed to run with all privileges.
-
Choose the action from the options.
Step 2 - Select the target file/group and set the filter criteria
-
The next step is to select the target files and configure filters.
-
You can filter a rule so it applies to specific files.
For example, you can choose 'All executables' as the target, then add a filter so it only affects executables from the internet.
Another example is if you want to allow unrecognized files created by a certain user to run outside the container. You would create an 'Ignore' rule with 'All Applications' as the target, then add 'Files created by a specific user' as the filter.
Select the target and set filters
-
Click the 'Criteria' tab.
The target and the filter criteria, if any, configured for the rule will be displayed.
-
Click the 'Edit' button at the far right to add new target and filter criteria
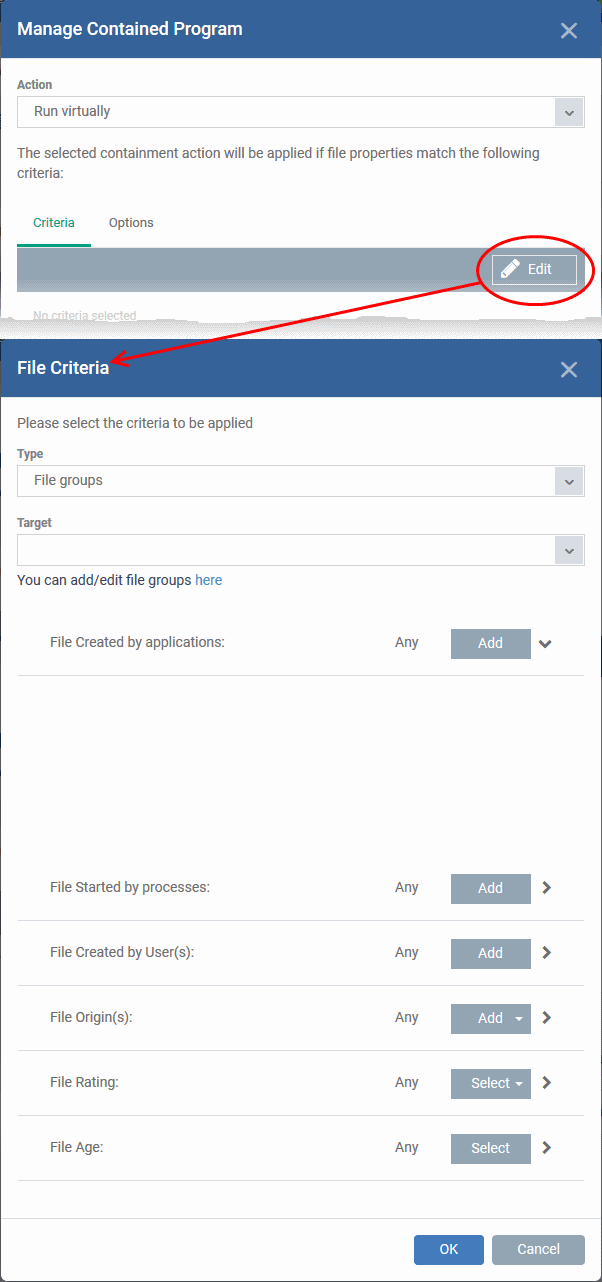
The 'File Criteria' dialog will open. The file criteria dialog allows you:
-
Select the type of target item from the 'Type' drop-down. You can choose an application, file group, hash, or folder as your target:
Files - Apply the rule to a specific file.
Add an executable as the target by entering its installation path + file name.
File Groups - Apply the rule to predefined file groups.
File groups are handy, predefined groupings of one or more file types.
For example, selecting 'Executables' would include all files with the extensions .exe .dll .sys .ocx .bat .pif .scr. Other predefined categories include 'Windows System Applications' , 'Windows Updater Applications' and 'Start Up Folders'.
You can also create custom file groups in 'Settings' > 'Settings' > 'System Templates' > 'File Groups Variables'. See 'Create and Manage File Groups' for more details.
Select a predefined or custom file-group as required.
Folder - Apply the rule to all files in a folder or drive
Enter the path to the folder that contains the target files in the field provided.
File Hash - Apply the rule to all files that have a specific SHA1 hash value.
A hash value is a large number which is generated by passing the file through a hashing algorithm. The number uniquely identifies the file, and it is extremely unlikely that two files will ever generate the same hash value. The benefit of using a file hash is that the rule will still work even if the file name changes.
Enter the SHA1 hash value of the target executable file in the 'Target' field.
Process Hash - Apply the rule to files whose processes have a specific SHA1 hash value. Please see description above if required.
Enter the SHA1 hash value of the process created by the target file in the 'Target' field.
Configure the Filter Criteria and File Rating
Filter criteria let you further refine which files are caught by the rule. The available filters are:
Auto-contain a file if it was created by a specific application
-
Create a filter to apply an action to a file based on its parent application.
-
You can also specify the file rating of the source application. The rule will then only contain a file if its parent has a certain trust rating.
Specify source applications
-
Click the 'Add' button in the 'File Created by applications' stripe.
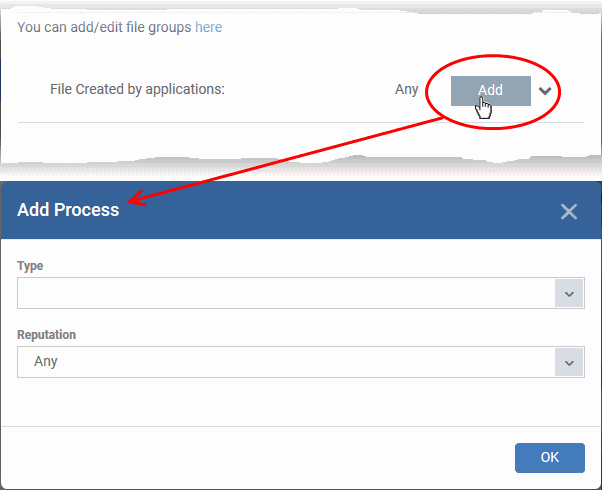
The 'Action' you specified earlier will be applied to files matching the type and reputation you choose here:
-
Type - See target types above for more details.
-
Reputation - Choose the file rating of the source you specified in the 'Type' drop-down.
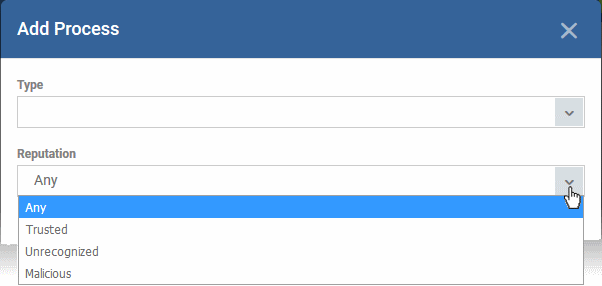
-
Click 'OK' to save your settings
-
Repeat the process to add more source applications
-
To edit the source application items in the list, click the 'Edit' at the right of the item
-
To remove an item, click 'Delete' at the right of the item
Auto-contain a file if it was created by a specific process
-
Create a filter to apply an action to a file based on its parent process.
-
Optionally, you can also specify:
The file rating of the source. The rule will then only contain a file if its parent process has a certain trust rating.
The number of levels in the process chain that should be inspected.
Specify source processes
-
Click the 'Add' button in the 'File Created by Process(es)' stripe:
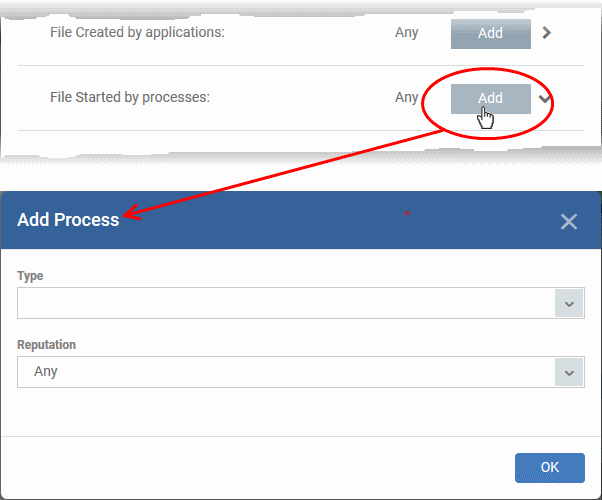
The 'Action' you chose earlier will be applied to files matching the type and reputation you pick here:
-
Type - See target types above for more details.
-
Reputation - Choose the file rating of the source you specified in the 'Type' drop-down.

-
Click 'OK'
The source process type will be added.
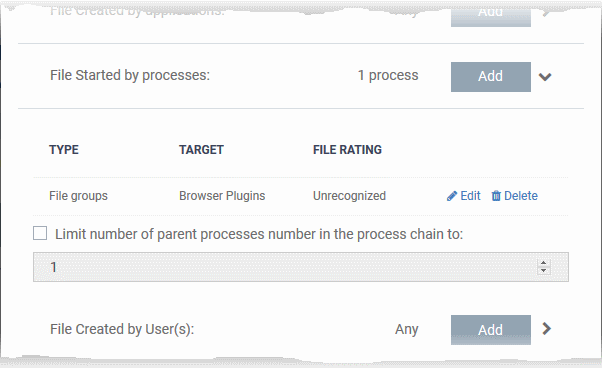
'Limit number of parent processes in the process chain to' - Specify how far up the process tree XCS should check when inspecting the file's sources. 1 = will only check the file's parent process. 2 = will check the parent process and the grand-parent process, etc., etc.
-
Repeat the process to add more source processes
-
Click the 'Edit' if you want to modify the source process items.
Auto-contain a file created by specific user(s)
-
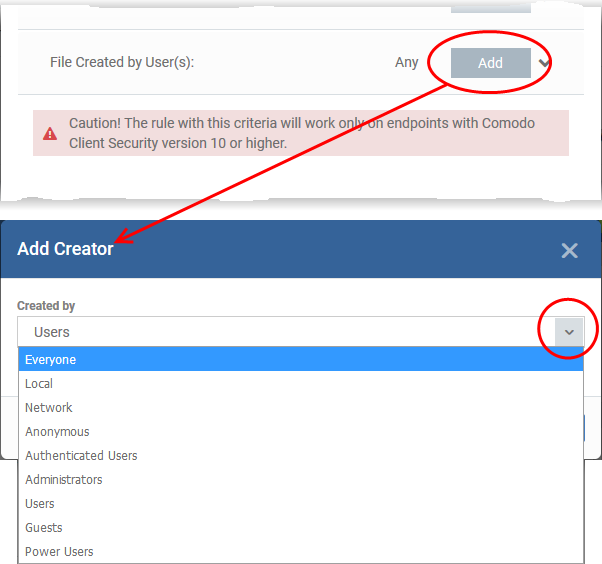
Click the 'Add' button in the 'File Created by User(s)' stripe.
-
The 'Add Creator' dialog will appear.
-
Choose the pre-defined user group from the 'Created by' drop-down
The User Group will be added to the list of creators.
-
Repeat the process to add more user groups
-
Click 'X' at the right end of the user name to remove a group
Auto-contain a file downloaded/copied from a specific source
-
Click the 'Add' button in the 'File Origin(s)' stripe.
-
Choose the source from the options:
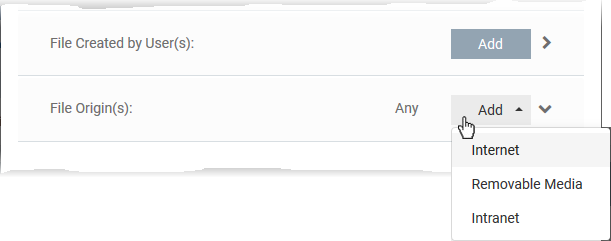
Internet - The rule will only apply to files that were downloaded from the internet.
Removable Media - The rule will only apply to items copied to the computer from removable devices. For example, from a USB drive, CD/DVD, or external storage.
Intranet - The rule will only apply to files that were downloaded from the local intranet.
-
Repeat the process to add more sources
-
To remove a source added by mistake or no longer needed in the list, click 'X' at the right end of the item
Select the file rating as filter criteria
-
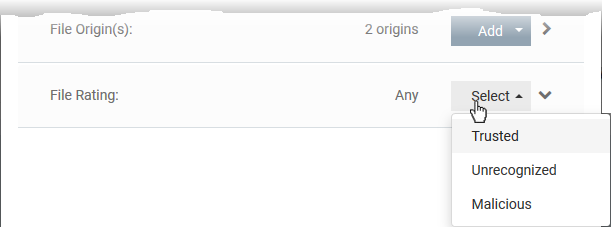
Click the 'Select' button in the 'File Rating' stripe
-
This will apply the rule to files which match the trust rating you set. You can choose from the following trust ratings:
-
Trusted - Applications are categorized as 'Trusted' if:
The file is on the global whitelist of safe files
The file is signed by a trusted vendor
The file was installed by a trusted installer
The file was given a trusted rating by an admin ('Security' > 'Endpoint Security' > 'Application Control')
See Manage File Trust Ratings on Windows Devices for more information.
-
Unrecognized - Files that do not have a current trust rating. The file is on neither the blacklist nor the safelist, so is given an 'unknown' trust rating.
-
Malicious - Malware files - those that are on the blacklist of known harmful files.
Set the file age as filter criteria
-
Click the 'Select' button in the 'File age' stripe.
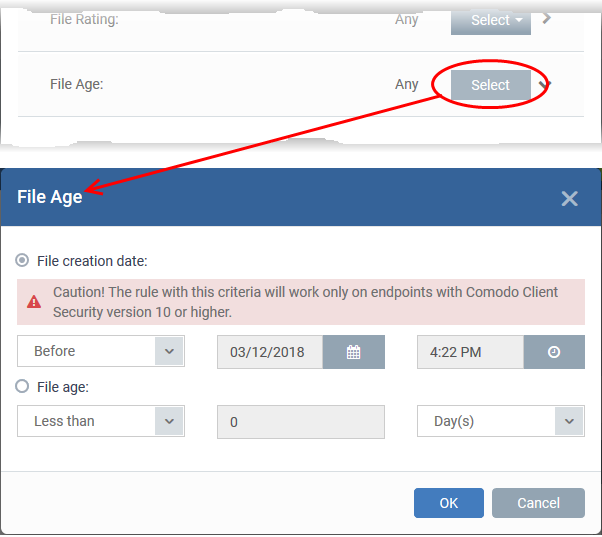
The 'File Age' dialog will appear. You can set the file age in two ways:
-
File Creation Date - To set a threshold date to include the files created before or after that date, choose this option, choose 'Before'/'After' from the first drop-down and set the threshold date and time in the respective combo-boxes.
-
File age - To select the files whose age is less than or more than a certain period, choose this option and specify the period.
Less Than - XCS will check the reputation of a file if it is younger than the age you set here.
More Than - XCS will check the reputation of a file if it is older than the age you set here.
-
Click 'OK' in the 'File Criteria' dialog after selecting the filters to save your settings to the rule. The list of criteria will be displayed under the Criteria tab in the 'Manage Contained Program' dialog.
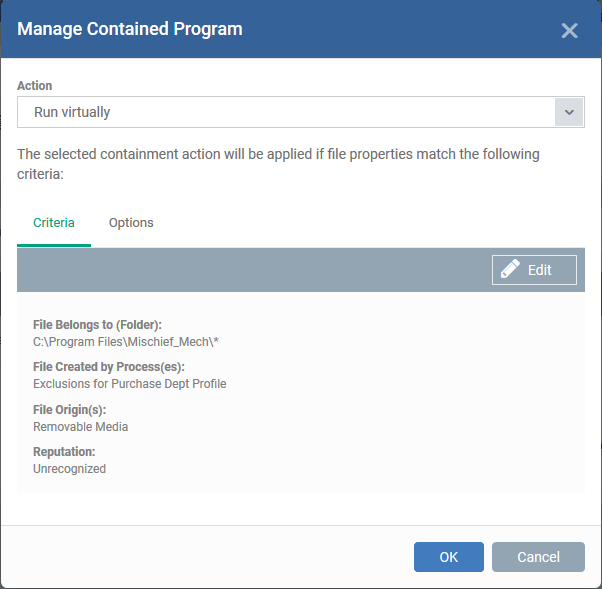
The next step is to choose additional options and restrictions on items contained by the rule.
-
Click the 'Options' tab.
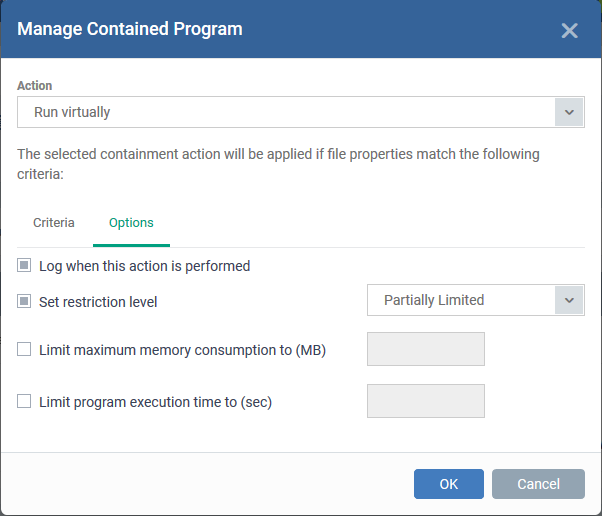
The options available depend on the 'Action' chosen in Step 1.
The 'Ignore' action has the following options:
-
Log when this action is performed - Creates a containment log in XCS on the endpoint when the rule is triggered.
-
Don't apply the selected action to child processes - Child processes are those started by the target application.
This option is disabled by default, so the ignore rule also applies to child processes.
If enabled, the ignore rule does not apply to child processes. Each child process will be inspected individually and all relevant rules applied.
The 'Run Restricted' and 'Run Virtually' actions have the following options:
-
Log when this action is performed - Creates a containment log in XCS on the endpoint when the rule is triggered.
-
Set Restriction Level - If the rule is triggered, XCS runs the file at the restriction level you set.
You can choose from the following levels:
Partially Limited - The application is allowed to access all operating system files and resources like the clipboard. Modification of protected files/registry keys is not allowed. Privileged operations like loading drivers or debugging other applications are also not allowed.(Default)
Limited - Only selected operating system resources can be accessed by the application. The application is not allowed to execute more than 10 processes at a time and is run without Administrator account privileges.
Restricted - The application is allowed to access very few operating system resources. The application is not allowed to execute more than 10 processes at a time and is run with very limited access rights. Some applications, like computer games, may not work properly under this setting.
Untrusted - The application is not allowed to access any operating system resources. The application is not allowed to execute more than 10 processes at a time and is run with very limited access rights. Some applications that require user interaction may not work properly under this setting.
Note. You must choose a restriction level if 'Run Restricted' is the action. However, you can disable 'Set Restriction Level' if the action is 'Run Virtually'.
-
Limit maximum memory consumption to - Enter the maximum amount of memory that the application is allowed to use (in MB).
-
Limit program execution time to - Specify how long the application is allowed to run. Enter the maximum time in seconds. The program is automatically terminated when the time limit expires.
The 'Block' action has the following options:
-
Log when this action is performed - Creates a containment log in XCS on the endpoint when the rule is triggered.
-
Quarantine program - Applications satisfying the rule will be automatically quarantined. See View and Manage Quarantined Items on Windows Devices if you want to read more about the quarantine area.
Click 'OK' to save your choices. The rule will be added to the list of rules.
-
Repeat the process to add more rules
-
You can drag-and-drop the rules to re-prioritize them. Rules at the top of the table have a higher priority than those at the bottom. The setting in the rule nearer the top will prevail in the event of a conflict between rules.
-
You can edit or remove rules at any time using the options at the right.
-
A baseline period is a window of time during which all unknown files are submitted to Valkyrie for analysis.
- Unknown files are not auto-contained during the baseline. This feature is best used during the initial setup period when, typically, many unknown files are discovered.
-
You must enable 'Stop Baseline and enable...' if you want the baseline to last a specific length of time. If you don't then the baseline period runs indefinitely.
-
During this time period, all the unknown files are ignored and malicious files are blocked. Safe files are allowed to run as normal on the host in future, while malicious files are quarantined.
-
The system lets admins quickly whitelist all ‘unknown-but-safe’ files on their network, leading to a smoother roll-out.
-
After the baseline period is over, auto-containment should be re-enabled. All unknown files going forward will be run in the container.
-
Windows Communication Client continues to synchronize baseline mode for containment which can not be changed locally.
Configure baseline settings
-
Open the 'Containment' section of a profile
-
Click the 'Baseline' tab:
|
Baseline Settings - Table of Parameters |
|
|---|---|
|
Form Element |
Description |
|
Enable Baseline |
A baseline is a period of time during which unknown files discovered on your network are sent to Valkyrie. Unknown files are not run in the container during the baseline period. This can be useful if you want to create a whitelist of existing files on your network. (Default = Disabled) |
|
Stop Baseline and Enable Auto-Containment after countdown |
Enabled - Baselining will last the length of time you set in the fields. Auto-containment will resume when this period expires. Disabled - Baselining will continue until you disable it in the setting at the top. The timer begins after you apply the profile to your network. (Default = Disabled) |
-
Click 'Save' to apply your changes.
-
The 'Virtual Desktop' is a sandbox environment in which users can run programs and browse the internet without fear those activities will damage their computer.
-
Applications in the virtual desktop are isolated from other processes, write to a virtual file system, and cannot access user data.
-
This makes it ideal for risk-free internet surfing, beta-software, and general computer use. From the users point-of-view, programs in the virtual desktop run exactly as they would under Windows.
-
Virtual desktop settings let you configure the behavior of the feature on endpoints.
Configure virtual desktop settings
-
Open the 'Containment' section of a profile
-
Click the 'Virtual Desktop' tab:
-
Automatically reset Virtual Desktop when session is terminated - All data saved in the virtual desktop is deleted when the desktop is closed. All changes are reversed. This includes any files downloaded from the internet and any system changes.
Please use the 'Shared Space' folder to store files you want to keep. You can also enable external storage devices for use with the virtual desktop in Containment Settings.
-
Protect paused Virtual Desktop session with PIN- Generates a session specific PIN number at virtual desktop startup. The PIN is required to resume the session from a paused state. This is useful on shared computers as it prevents other users from accessing the session.
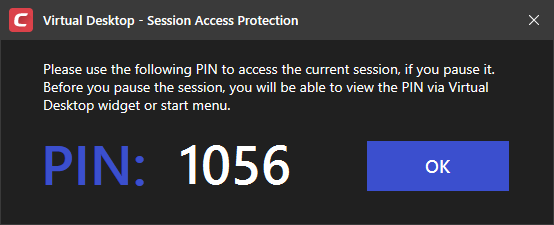
-
Duration of inactive Virtual Desktop session before it is automatic paused - Set the maximum time to auto-pause the Virtual Desktop session if the session is not activated in the given time period. The session gets automatically auto-pause when this period elapses.
-
Duration of paused Virtual Desktop session before its automatic termination - Set the maximum time that a virtual desktop session can be left in a paused state. The session gets automatically terminated when this period elapses.
-
Request password when exiting Virtual Desktop - Create an 'exit' password for the virtual desktop. Users need to enter the password in order to close the virtual desktop.
-
This prevent users from closing the virtual desktop and accessing the host, potentially exposing the computer to danger.
-
Type a password that cannot easily be guessed. Passwords must be 8-16 characters and contain a mix of upper case letters, lower case letters, numbers, and special characters.
-
Re-enter the password for confirmation.
-
Show disclaimer upon Virtual Desktop startup - Create a disclaimer which is shown when the virtual desktop starts. Users must accept the disclaimer before they can access the virtual desktop.
- Note - This setting is only of value if you are rebranding the Xcitium clients. You can safely ignore this setting if you do not plan to rebrand.
-
Enter the disclaimer message
-
The message is shown when the virtual desktop starts.
-
Users should read the disclaimer and click 'Accept'. An example is shown below:
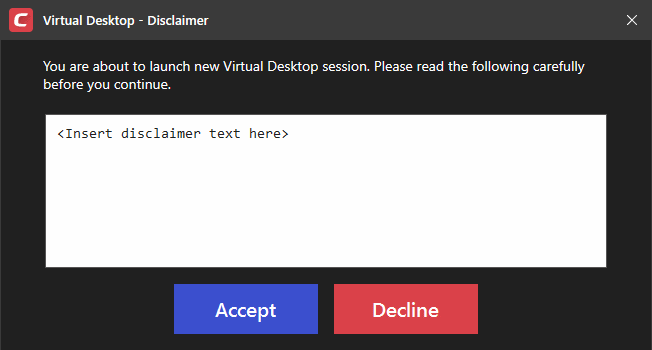
- Virtual desktop password and disclaimer options to be not modifiable by the user - Ability to disable the virtual desktop password and disclaimer options in XCS when “Allow user to override Virtual Desktop settings” is disabled on the portal.
- End-user would not able to disable the password and disclaimer options on the virtual desktop. They will be able to change the password if they know the original password. User can edit the disclaimer text. But won't be able to disable the Disclaimer option.
-
Allow user to override Virtual Desktop settings - Changes to virtual desktop settings at the endpoint are not reversed by Xcitium.
-
By default, Xcitium checks devices to see if the local XCS settings match those in the profile. It will re-implement the profile settings if it detects any deviation.
-
Enabling this option stops the process described above. The Xcitium profile does not apply any virtual desktop settings. Only the virtual desktop settings in XCS on the endpoint are applied to the device.
Note 1. This option complements the existing override option in the 'Client Access Control' section of a profile, which allows local changes to *every* XCS setting. You can allow local override of just the virtual desktop settings, while preventing changes to other XCS settings. See Client Access Control for help with this.
Note 2. If you enable this option, you effectively cancel all Virtual Desktop settings that come from the profile. For example, 'Exit Password', 'Reset Virtual Desktop' and 'Duration' settings will not get applied.
-
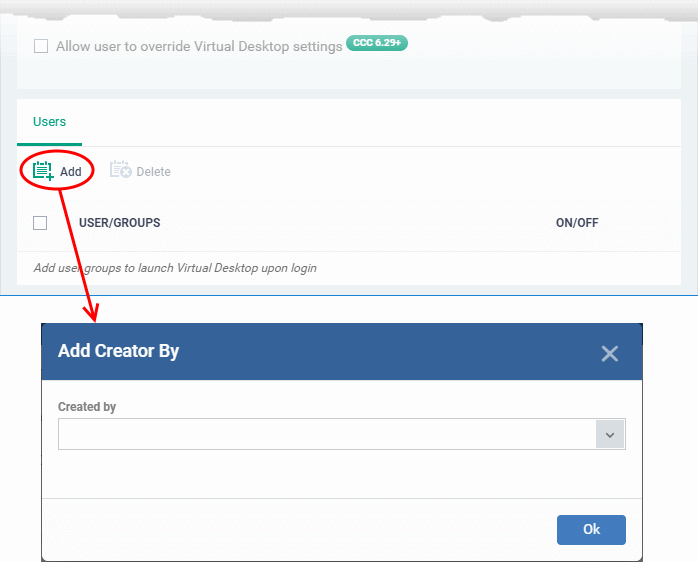
Users
Specify user groups for whom the virtual desktop should start automatically after login. This means the virtual desktop is the users' default environment, instead of the host operating system. This setting is especially useful for guest users and for public computers in libraries / class-rooms etc.
-
Click 'Add' under the 'Users' section:
-
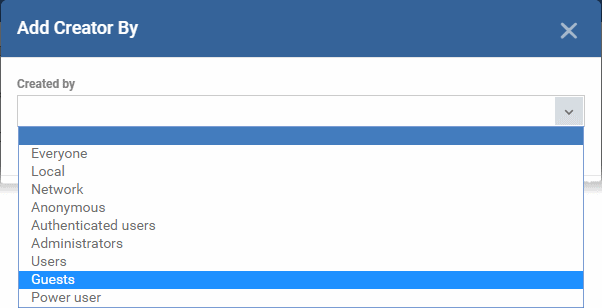
Select a user group from the 'Created by' drop-down and click 'OK'.
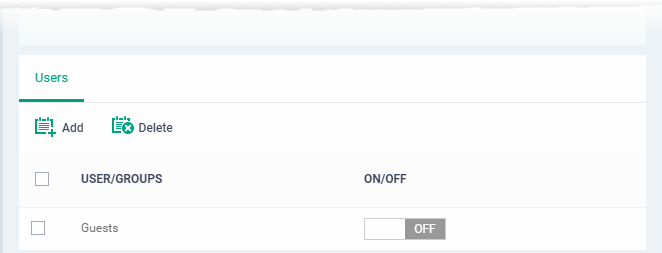
The selected user group is added to the list:
-
Use 'ON/OFF' switches to enable or disable the feature for a particular group.
-
Repeat the process to add more user groups
-
Click 'Save' to apply your changes to the profile.
-
The 'Protected Data' tab lets you define files, folders and files in a file group that are to be denied access to the contained applications on the managed devices.
-
Items in 'Protected Data' cannot be seen, accessed or modified by applications running in the container.
-
This fortifies files containing sensitive data from unrecognized and potentially malicious programs.
|
Protected Files and Protected Data
|
Add and manage protected data
-
Open the 'Containment' section of a profile
-
Click the 'Protected Data' tab.
-
Click 'Add'
You add items in two ways:
-
File path - Add individual files, applications, programs executables or folders
-
File groups - Add a pre-defined group of files so that all member files in the group are blocked form contained applications
-
Choose 'File path' from the 'Add' drop-down
-
Enter the installation path / storage location of the file to add an application or a file
-
Enter the folder path to add a folder
-
Click 'OK'
-
Repeat the process to add more items
A file group is a collection of file types which have similar attributes, scope, or functionality. For example, 'Executables', 'Metro Apps', or 'Windows System Applications'. Xcitium ships with a set of pre-defined file groups. You can create custom file groups from the 'Settings' > 'Settings' > 'System Templates' > 'File Groups Variables' interface. See Create and Manage File Groups for more details.
-
Choose 'File groups' from the 'Add' drop-down
-
Select the file group from the drop-down
-
Repeat the process to add more file groups
The items added are shown as a list under the 'Protected Data' tab.
-
You can edit or remove the items using the respective buttons in the 'Action' column in the 'Protected Data' interface.
-
Click 'Save' for your settings to take effect.
-
The 'Protected Keys' tab lets you define Windows registry keys and key groups to be denied access to the contained applications on the managed devices.
-
Adding important registry keys to this area will protect them from unknown and potentially malicious programs.
Add and manage protected registry keys
-
Open the 'Containment' section of a profile
-
Click the 'Protected Data' tab.
-
Click 'Add'
You add items in two ways:
-
Registry Entry - Add individual keys
-
Registry Groups - Add a pre-defined group of registry keys so that all member keys in the group are blocked form contained applications
-
Choose 'Registry Entry' from the 'Add' drop-down
-
Enter the location of an individual key that you want to protect and click 'OK'.
-
Repeat the process to add more items
A registry group is a collection keys with similar scope or functionality. Xcitium ships with a set of registry groups. You can create custom registry groups from the 'Settings' > 'Settings' > 'System Templates' > Registry Variables' interface. See Create and Manage Registry Groups for more details.
-
Choose 'Registry Group' from the 'Ádd' drop-down
-
Choose a group to be protected
-
Repeat the process to add more groups
The items added are shown as a list under the 'Protected Keys' tab.
-
You can edit or remove the items using the respective buttons in the 'Action' column in the 'Protected Keys' interface.
-
Click 'Save' for your settings to take effect.


