Create DLP Monitoring Rules and Add Them to Profiles
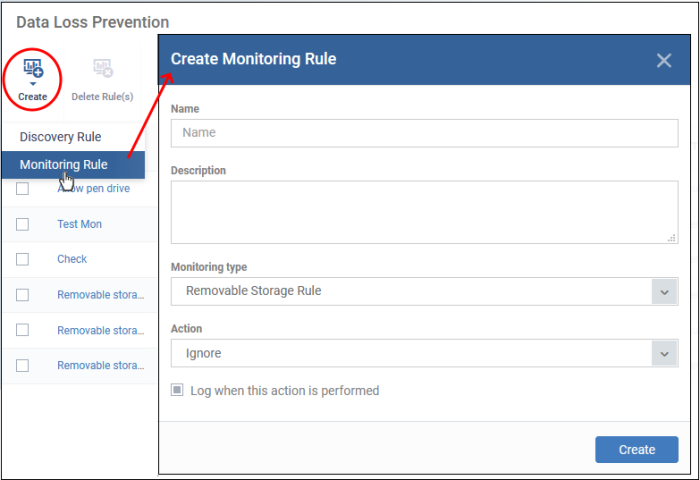
Click 'Configuration Templates' > 'Data Loss Prevention' then the ‘Create’ button > ‘Create Monitoring Rule'
- DLP monitoring rules let you prevent sensitive information from being copied to external devices like USB keys, block screenshots of running applications, documents and so on.
- After creating a monitoring rule, you can then add the rule to a profile, which in turn is applied to target devices or users.
-
EM currently supports removable storage monitoring rule and screenshot rule.
Create a DLP monitoring rule
- Click 'Configuration Templates' > 'Data Loss Prevention'
- Click 'Create’ then ‘Create Monitoring Rule'

You can create the following monitoring rules:
Removable Storage Rule
- Set up rules which block or allow copy/move operations to USB data devices
Create a removable storage monitoring rule
- Click 'Configuration Templates' > 'Data Loss Prevention'
- Click 'Create’ then ‘Create Monitoring Rule'

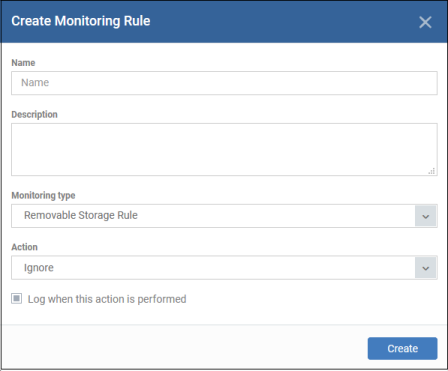
- Name – Enter an appropriate label for the rule
- Description – Enter short notes for the rule
- Monitoring type – Select ‘Removable Storage Rule’ from the drop-down
- Action - What EM should do if it detects data being moved from the target devices:
- Ignore – Data transfers to the device are allowed.
- Block – The storage device is set to ‘Read-only’ mode. Users cannot copy data to / from the storage device.
- Log when this action is performed - Choose whether you want to create an event log whenever the rule is enforced. Click ‘Security Sub-Systems’ > ‘Data Loss Prevention’ > ‘Logs’ to view DLP logs.
- Click ‘Create’.
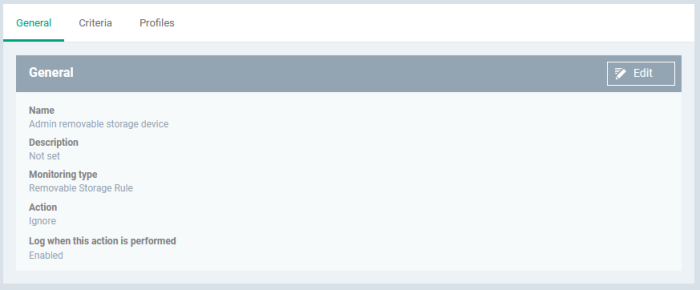
The rule is saved and the rule configuration screen opens:

General
- Click ‘Edit’ at top-right
- Update the fields if required.
- Click ‘Save’
Criteria
- Click ‘Edit’ at top-right

- USB Data Devices – Enable / disable the removal storage device for USB devices. If disabled, the monitoring rule for USB devices becomes inactive.

- Supported USB devices include external HDDs / SSDs, SD cards, SDXC-SDHC cards, eSata removable drives and devices using MTP protocol
- Click ‘Save’.
The Screenshot Rule can be used to prevent screenshot captures when a certain defined process is running. If the admin adds this rule and assigns it to any device profile, the associated devices should not be able to take a screenshot while the defined processes are running.
- Click 'Configuration Templates' > 'Data Loss
Prevention'
- Click 'Create' > 'Monitoring Rule' > Select ‘Monitoring Type’ > ‘Screenshot Rule’

- Name - Enter an appropriate label
for the rule
- Description -
Enter short notes for the rule
- Monitoring
type - Select 'Screenshot Rule' from the drop-down
- Reputation - The admin should be able
to select a rating for the application created, these rating block the user to
take a screenshot while the process is running. The available ratings are
‘Any’, ‘Trusted’, ‘Malicious’ or ‘Unrecognized’.
- If
none of these is selected, the device should be blocked to take a screenshot
for all. The default rating is ‘Any’.
- Action – The screenshot actions
while selected applications are running.
- Ignore –
The screenshot is allowed. The default action will be "Ignore
- Block - The device is set to 'Read-only'
mode. Block the users to take a screenshot in this mode.
- Log when this action is performed - Choose whether you want to create an event log. You can view the logs in the 'Security Sub-systems' > 'Data Loss Prevention' > 'Logs' interface in EM.
Click 'Create’
The rule is saved. The rule configuration screen opens:

General
The general tab shows the name, description, monitoring type, reputation, and action you chose for the rule in the previous step.
- Click
'Edit' at top-right .Update
the fields if required.
- Click 'Save
Criteria
The screenshot rule shows the list of all criteria types. You can set the preference criteria accordingly, the option is ‘File groups’, File’, ‘File hash’, ’Folder’,’ Process hash’.
- Click
Criteria > Add
- Select
the criteria type from the drop-down button you want to add.

- Filegroups - Exclude a specific
set of file types
- Click
'Settings' > 'Data Protection Templates' > 'File Groups
Variables' to view and manage file groups or click the ‘You can add/edit
file groups here’ option
- See this page if
you need help to create and manage file groups.
- File – Enter the file path
you need to exclude from the rule.
- File
Hash –
The file hash allows you to locate files by their SHA-1 hash value.
Visibility, execution trend, file history and executive summary are listed
for each file. It should be the SHA 1 checksum of a file.
- Folder – Add the folder path
for the rule
- Process
Hash –
Add the SHA1 checksum of the process to exclude the screenshot rule.
- Click save
The screenshot rule
is now created

- Repeat
the process to add more rules.
- To delete a rule, select the rule > click the ‘Delete’ tab
You can now add the
rule to the profile
- Shows the profile(s) that are using this monitoring rule.

- Profile Name – Click the profile name to open the profile configuration screen
- Created By – Click the user name to open the user details screen
You can now add the rule to the 'Data Loss Prevention' section of a Windows profile.
-
See Data Loss Prevention Settings for help to add a DLP monitoring rule to a profile.


