Create DLP Discovery Rules and Add them to Profiles
Process in brief
Step 1 – Add keywords to keyword groups. See View and Manage Keyword Groups for more details.
Step 2 – Create custom data patterns, if required. See View and Manage Pattern Variables for more details.
Step 3 – Create a DLP discovery rule using the predefined and custom data patterns and keyword groups. See this section.
Step 4 – Add the DLP rule to profiles. See Data Loss Prevention Settings for more details.
Step 5 – Deploy profiles on devices. See View and Manage Profiles Associated with Device for more details.
- Click 'Configuration Templates' > 'Data Loss Prevention' > 'Create’ button > ‘Discovery Rule'
DLP discovery rules allow you to identify sensitive information in files on managed devices, including card numbers, social security numbers, bank routing numbers and more.
- Location - The folders or drives that you want to scan on the target devices. For example, ‘C:/Users/’.
- File types - The file extensions you want to inspect. For example, .doc., .xls., .txt.
- Search pattern - The type of data you want to search for. For example, card numbers, bank account numbers, social security numbers, dates-of-birth, etc.
- Action - The response Endpoint Manager should take when the rule conditions are met. The options are ‘ignore’ and ‘quarantine’.
You can then add the discovery rule to a profile, which is in turn applied to target devices or users.
Create a DLP discovery rule
- Click 'Configuration Templates' > 'Data Loss Prevention'
- Click 'Create' button then ‘Discovery Rule’
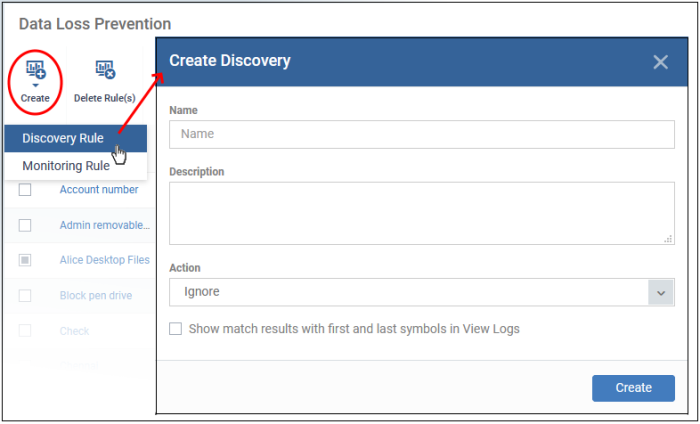
Complete the following fields:
Name - Enter a label for the rule
Description - Add a short note for your reference.
Action - The response Endpoint Manager should take on files which meet the rule conditions. The options are:
- Ignore - Take no action on the file. You can still review the files at ‘Security Sub-systems’ > ‘Data Loss Prevention’ > ‘Logs’.
- Quarantine - The file is moved from its original location on the endpoint and placed in a secure holding area. Users cannot open quarantined files. You can review quarantined files as follows:
- Local Endpoint - Open Comodo Client Security > Click ‘Tasks’ > ‘DLP Tasks’ > ‘Data Loss Prevention Quarantine’. You can restore the files to original location from here if required.
- Endpoint Manager - Click ‘Security Sub-Systems’ > ‘Data Loss Prevention’ > ‘Logs’.
Show match
results with first and last symbols in view logs - If
enabled, the log file shows the actual data discovered in the file.
Only the first and last characters of the record are shown. For
example, a name with seven digit account number would be shown as
J**e S***h 1*****7.
Click 'Create’ to move to the rule configuration screen:
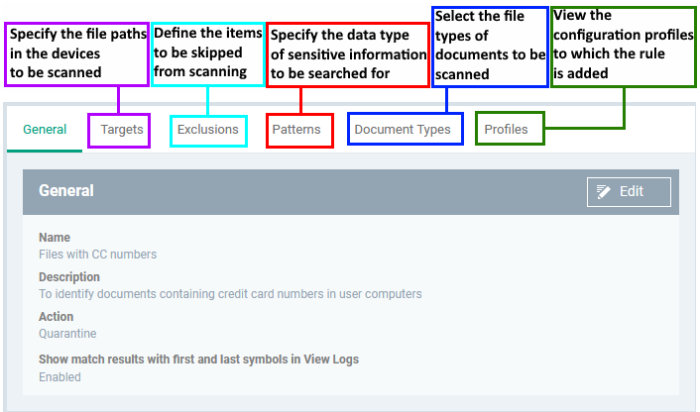
Targets /scan locations
- Click the 'Targets' tab > 'Edit'
- The path 'C:/Users' is included by default.
- Click
'Add' > 'File Path' to add a new scan location:
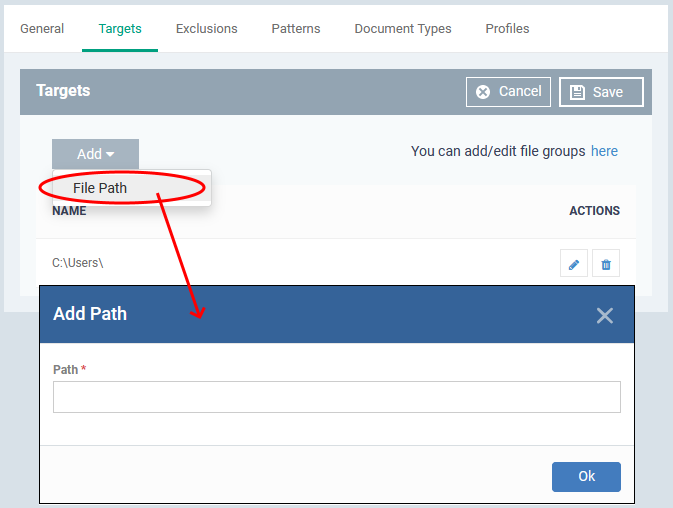
- Enter the location you want to scan then click 'Ok'
- Repeat the process to add more locations
- Click the pencil icon in the 'Action' column to edit a location
- Click 'Save'
Exclusions
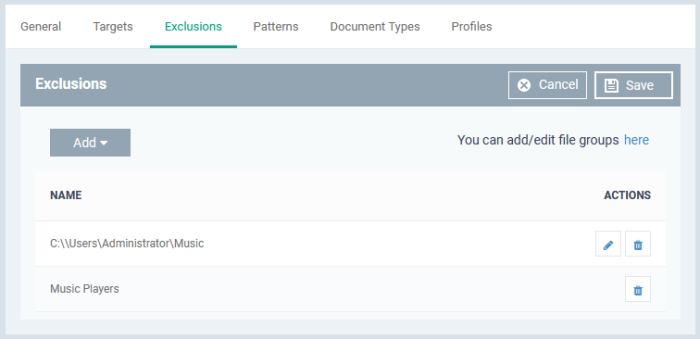
You can omit specific locations and/or file types from your discovery scan.
- Click the 'Edit' tab, then click'Edit'
- Click 'Add'
- File path - Exclude a folder or file
- File Groups - Exclude a specific set of file types:
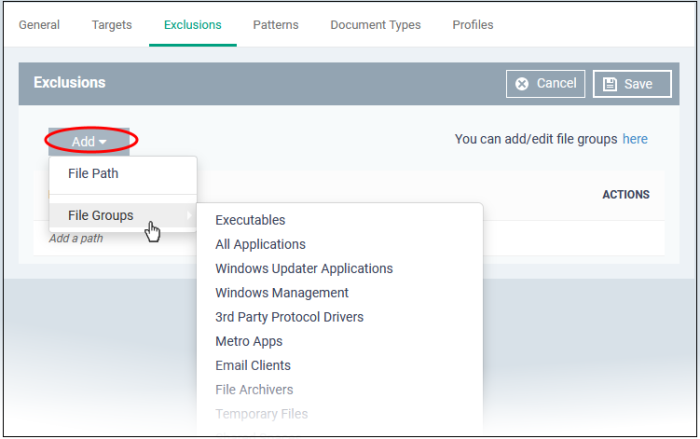
File groups make it easy to exclude an entire class of file. Choose the group you want to exclude then click ‘Save’.
- Click 'Settings' > 'System Templates' > 'File Group Variables' if you want to view and manage file groups
- See File Groups if you want help with them.
Repeat the process to add more exclusions.
Patterns
The patterns tab is where you tell the scan what types of data you want to search for.
- A 'pattern' is the format used by the type of data you want to find. Each pattern is a combination of a keyword group and information format.
- For example, the ‘Name with SSN’ pattern consists of:
- Keyword group = ‘Names’ group.
- Information format = 9 digit number in a 3-2-4 format, like '123-45-6789'.
- Endpoint Manager ships with a number of patterns which you can use to search for sensitive data.
- You can also create custom patterns to search for specific data.
- Click 'Settings' > 'System Templates' > 'Pattern Variables' to view all available patterns and create custom patterns.
- See View and Manage Patterns Variables if you need more help on patterns.
Add patterns
- Click the 'Patterns' tab then 'Edit'
- Click 'Add Pattern'
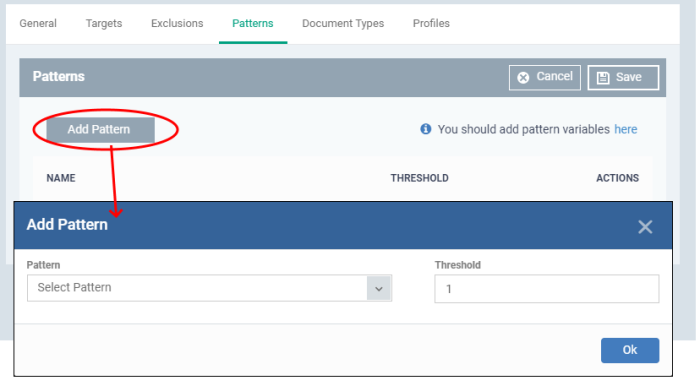
- Select Pattern - Choose the type of information that you want to search for in scanned locations. For example, credit card numbers, social security numbers and more. You can also select custom pattern that you created in pattern variables screen.
- Threshold - The number of times that data matching the pattern must be found in a document. Endpoint Manager will flag a document if it contains the threshold quantity of pattern examples.
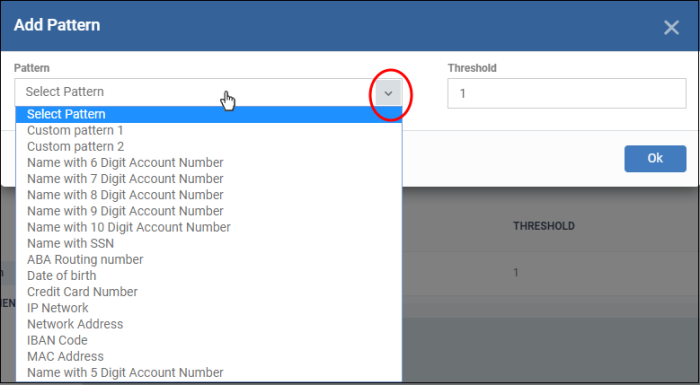
- Note - You MUST add keywords to the keyword group or the search will not work.
- You can add keywords to keyword groups at 'Settings' > 'System Templates' > 'Keyword Variables'
- See View and Manage Keyword Groups for help to manage keyword groups.
|
Predefined Pattern |
Description |
|---|---|
|
Name with 5 Digit Account Number |
Consists of Keyword Group 'Names' and 5 digit bank account number. |
|
Name with 6 Digit Account Number |
Consists of Keyword Group 'Names' and 6 digit bank account number. |
|
Name with 7 Digit Account Number |
Consists of Keyword Group 'Names' and 7 digit bank account number. |
|
Name with 8 Digit Account Number |
Consists of Keyword Group 'Names' and 8 digit bank account number. |
|
Name with 9 Digit Account Number |
Consists of Keyword Group 'Names' and 9 digit bank account number. |
|
Name with 10 Digit Account Number |
Consists of Keyword Group 'Names' and 10 digit bank account number. |
|
Name with SSN |
Consists of Social Security Number and Keyword Group 'Names'. |
|
ABA Routing number |
Consists of American Bankers Association (ABA) routing number. This is the nine digit bank code printed in negotiable instruments in the US. |
|
Date of birth |
Consists of Birth Date. |
|
Credit Card Number |
Consists of Credit Card Number. |
|
IP Network |
Consists of IPv4 and IPv6 IP Addresses. Examples: 192.0.2.0/24 198.51.100.0 2001:0db8:85a3:0000:0000:8a2e:0370:7334 2001:db8:1234::/48 |
|
Network Address |
Consists of URLs, and domain names. Examples: http://domain.name https://domain.name www.domain.name domain.com local.net |
|
IBAN Code |
Bank account number in International Bank Account Number (IBAN) format. |
|
MAC Address |
Searches for mac addresses, the unique identifier assigned to network cards. |
- Click 'Ok'
The pattern configuration dialog depends on the selected pattern. The image below is shown for ‘Name with 5 digit account number’:
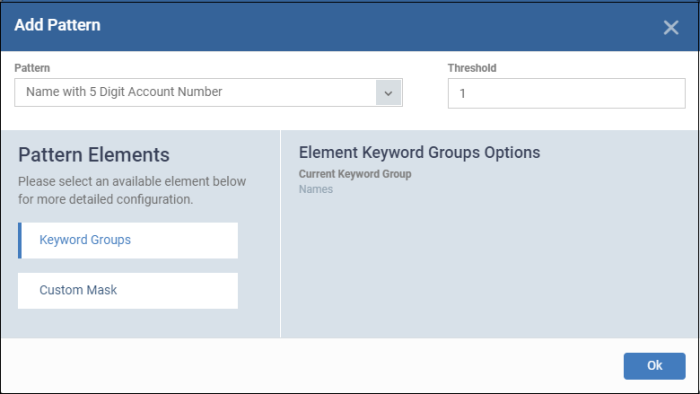
Pattern Elements – Available for ‘name with account numbers’ predefined patterns
- Keyword Groups – ‘Names’ keyword group is added by default for ‘name with account numbers’ predefined patterns. You cannot edit this.
- Custom Mask – (optional) Specify the number(s) that you want to scan and identify. The number of digit fields shown here depends on the selected pattern. For example, six fields are shown if you select ‘name with 6 digit account number’.
Click ‘Custom Mask’.
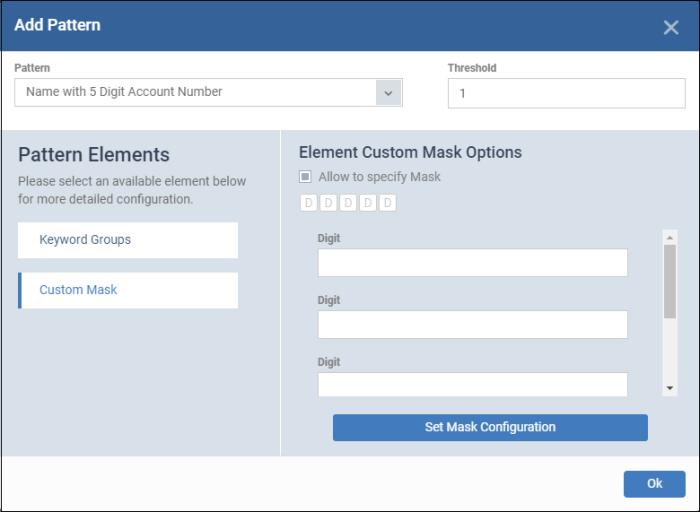
- Allow to specify Mask – Enable this if you want to search for specific numbers.
- Enter the number in each field. For example if you want to search for account numbers ending with 345, then leave the first two fields blank and enter 3, 4 and 5 in third, fourth and fifth fields.
- Click ‘Set Mask Configuration’ then ‘Ok’.
The pattern type is added to the list.
- Repeat the process to add more patterns
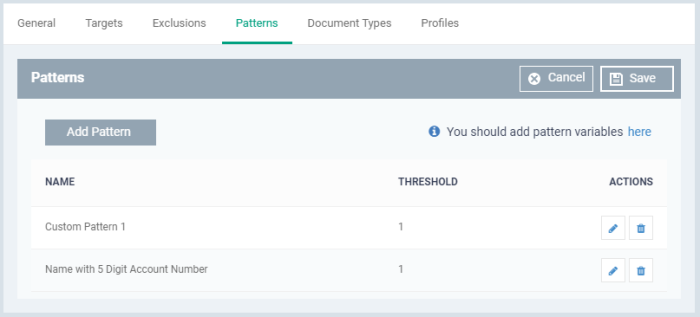
- Click the pencil icon in the 'Action' column to edit a pattern selection and / or its threshold.
- Click 'Save'.
Document types
- This tab lets you choose which types of file you want to scan for sensitive data.
- You can choose PDFs, Word documents, HTML files, text files and/or ZIP files.
- The scan will search the content of all files which have a matching file extension in the locations you specified.
Click the 'Document Types' tab then 'Edit':
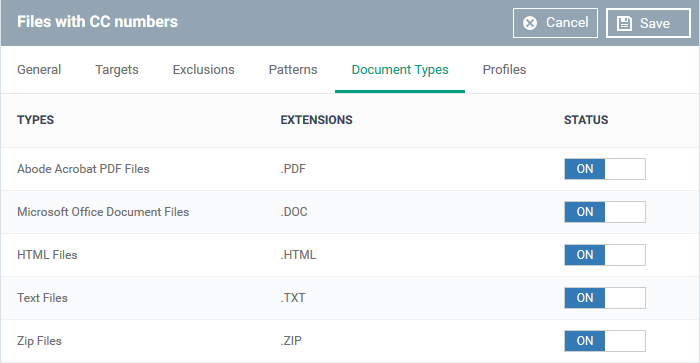
- Use the switches in the status column to choose which types of files you want to scan
- Click 'Save'
- See Data Loss Prevention Settings for help to add a DLP scan to a profile.


