Create an Antivirus Scan Schedule
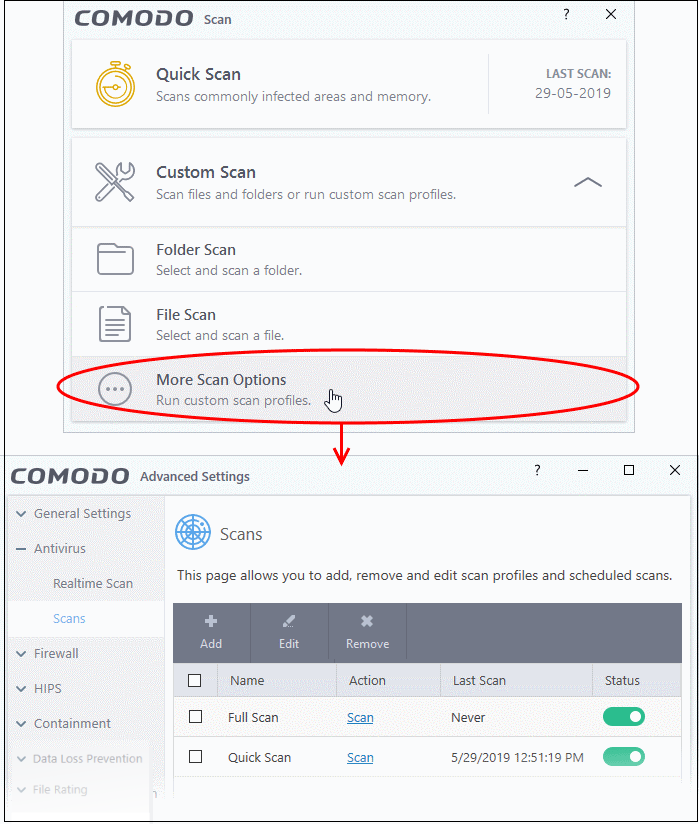
- Click 'Tasks' > 'General Tasks' > 'Scan' > 'Custom Scan' > 'More Scan Options'
- A custom scan profile lets you configure your own scan with your own scan settings.
- You can define exactly which files and folders to scan, what time they should be scanned, and configure scan settings.
Create a scan schedule
- Click 'Tasks' > 'General Tasks' > 'Scan'
- Select 'Custom Scan' then 'More Scan Options'
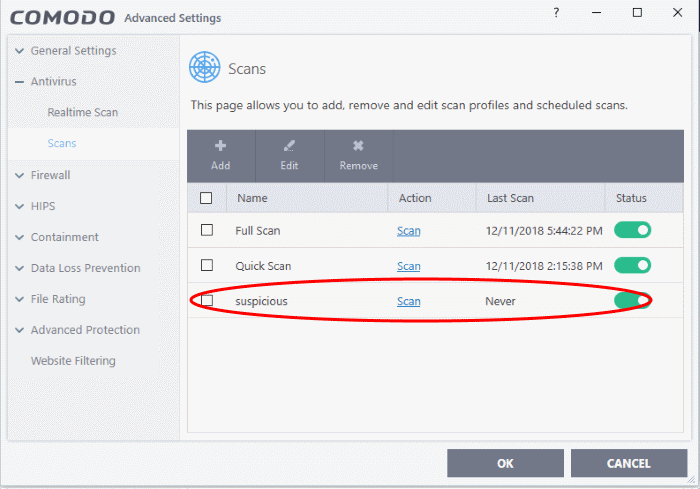
The 'Scans' page shows pre-defined and user created scan profiles. You can create and manage new profiles in this page:
|
Tip: You can also get to this screen by clicking 'Settings' > 'Antivirus' > 'Scans'. |
- Click 'Add' to create a new custom scan profile.
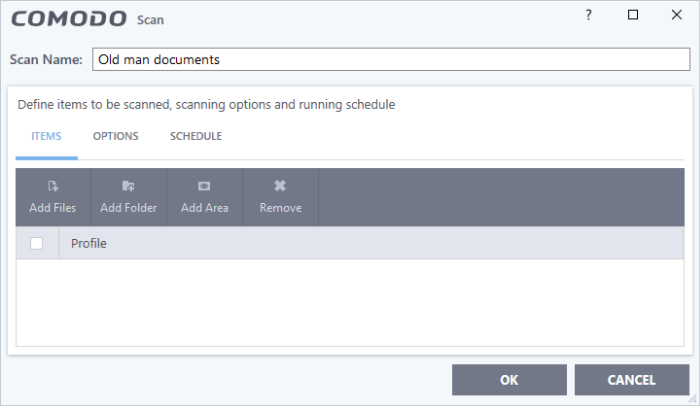
First, create a name for the profile. The next steps are:
- Click the 'Items' button at the top of the scan interface.
You can add items as follows:
- Add File - Add individual files to the profile. Click the 'Add Files' button and browse to the file you want to include.
- Add Folder - Add entire folders to the profile. Click the 'Add Folder' button and choose the folder you want to include. All files in the folder are covered by the scan.
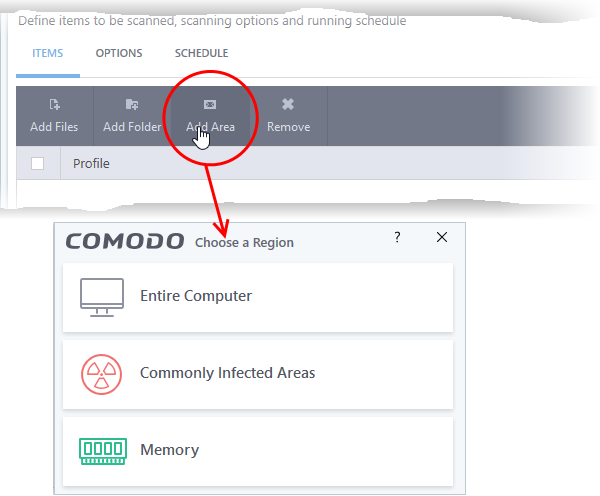
- Add Area – Scan a specific region. The choices are 'Full Computer', 'Commonly Infected Areas' and 'System Memory'. See screenshot below:
- Repeat the process to add more items to the profile. You can mix-and-match files, folders and areas in your custom scan.
- Click 'Options' at the top of the 'Scan' interface
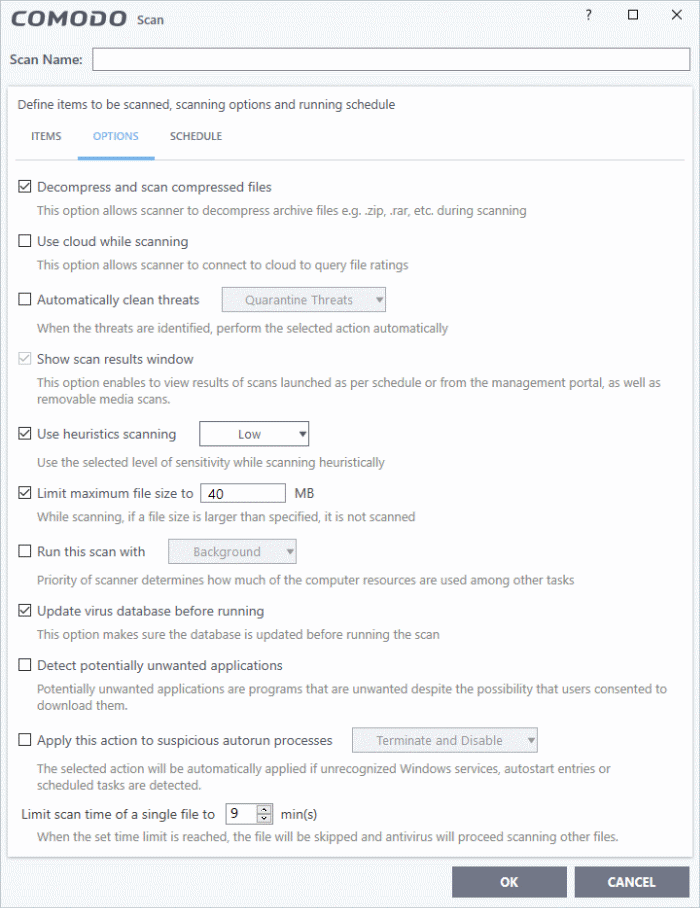
Decompress and scan compressed files- The scan will include archive files such as .ZIP and .RAR files. Supported formats include RAR, WinRAR, ZIP, WinZIP ARJ, WinARJ and CAB archives (Default = Enabled).
Use cloud while scanning- Improves accuracy by augmenting the local scan with an online look-up of Comodo's latest virus database. This means CCS can detect the latest malware even if your virus database is out-dated. (Default = Disabled).
Automatically clean threats - Select whether or not CCS should automatically remove any malware found by the scan. (Default = Enabled).
- Disabled = Results are shown at the end of the scan with a list of any identified threats. You can manually deal with each threat in the results screen. See Process Infected Files for guidance on manually handling detected threats.
- Enabled = Threats are handled automatically. Choose the action that CCS should automatically take:
- Quarantine Threats - Malicious items will be moved to quarantine. You can review quarantined items and delete them permanently or restore them. See 'Manage Quarantined Items' for more details.
- Disinfect Threats - If a disinfection routine exists, CCS will remove the virus and keep the original file. If not, the file will be quarantined. (Default)
Show scan results window - You will see a summary of results at the end of the scan. This includes the number of objects scanned and the number of threats found.
Use heuristic scanning - Select whether or not heuristic techniques should be used in scans on this profile. You can also set the heuristic sensitivity level. (Default = Enabled).
Background. Heuristics is a technology that analyzes a file to see if it contains code typical of a virus. It is about detecting 'virus-like' attributes rather than looking for a signature which exactly matches a signature on the blacklist. This means CCS can detect brand new threats that are not even in the virus database.
If enabled, please select a sensitivity level. The sensitivity level determines how likely it is that heuristics will decide a file is malware:
- Low - Least likely to decide that an unknown file is malware. Generates the fewest alerts.
Despite the name, this setting combines a very high level of protection with a low rate of false positives. Comodo recommends this setting for most users. (Default)
- Medium - Detects unknown threats with greater sensitivity than the low setting, but with a corresponding rise in possible false positives.
- High - Highest sensitivity to detecting unknown threats. This also raises the possibility of more alerts and false positives.
Limit maximum file size to - Specify the largest file size that the antivirus should scan. CCS will not scan files bigger than the size specified here. (Default = 40 MB).
Run this scan with - If enabled, you can set the priority of scans on this profile The available options are:
- High
- Normal
- Low
- Background
If you disable this option then the scan runs in the background (Default).
Update
virus database before running - CCS checks for and downloads the
latest virus signatures before starting a scan. (Default =
Enabled).
Detect
potentially unwanted applications - The antivirus also scans for
applications that (i) a user may or may not be aware is installed on
their computer and (ii) may contain functionality and objectives that
are not clear to the user. Example PUA's include adware and browser
toolbars. PUA's are often bundled as an additional utility when
installing another piece of software. Unlike malware, many PUA's are
legitimate pieces of software with their own EULA agreements.
However, the true functionality of the utility might not have been
made clear to the end-user at the time of installation. For example,
a browser toolbar may also contain code that tracks your activity on
the internet. (Default = Enabled).
Apply this action to suspicious autorun processes - Specify how CCS should handle unrecognized auto-run items, Windows services, and scheduled tasks.
- Ignore - The item is allowed to run (Default)
- Terminate - CCS stops the process / service
- Terminate and Disable - Auto-run processes are stopped and the corresponding auto-run entry removed. In the case of a service, CCS disables the service.
- Quarantine and Disable - Auto-run processes are quarantined and the corresponding auto-run entry removed. In the case of a service, CCS disables the service.
Note 1 - This setting only protects the registry during the on-demand scan itself. To monitor the registry at all times, go to 'Advanced Settings' > 'Advanced Protection' > 'Miscellaneous'.
- See Miscellaneous Settings for more details
Note 2 - CCS runs script analysis on certain applications to protect their registry records. You can manage these applications in 'Advanced Settings' > 'Advanced Protection' > 'Script Analysis' > 'Autorun Scans'.
-
See 'Autorun Scans' in Script Analysis Settings for more details.
Limit scan time of a single file to - Set the maximum time allowed to scan an individual file. CCS will skip files that take longer to scan than the specified time. Omitted files are shown in the 'Skipped Files' tab in the results screen.
Click 'Schedule' at the top of the 'Scan' interface.
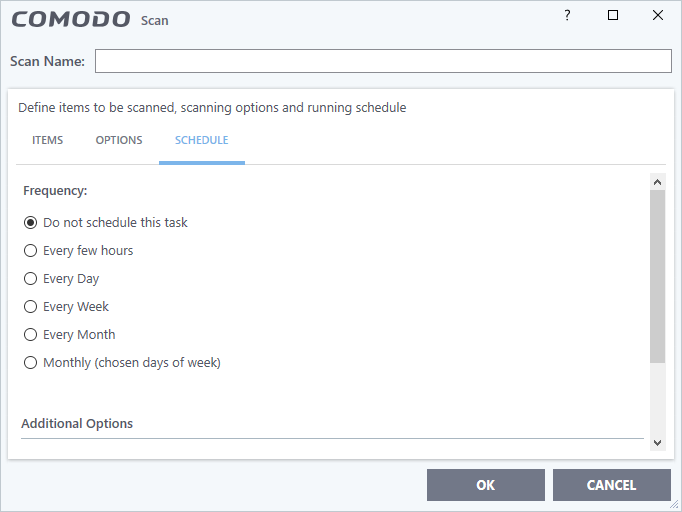
Do not schedule this task - The scan profile is created but not run automatically. The profile will be available for on-demand scans.
Every few hours - Run the scan at the frequency set in 'Repeat scan every NN hour(s)'.
Every Day- Run the scan every day at the time specified in the 'Start Time'
field.
Every Week- Run the scan on the days specified in 'Days of the Week', at the
time specified in the 'Start Time' field. You can select the days of
the week by clicking on them.
Every
Month - Run the scan on the dates specified in 'Days of the
month', at the time specified in the 'Start Time' field. You can
select the dates of the month by clicking on them.
Monthly (chosen days of the week) – Run the scan on a specific week, or weeks, in a month. Select the weeks in from the menus.
Additional Options
- Run only when computer is not running on battery - The scan only runs when the computer is plugged into the power supply. This is useful when you are using a laptop or other mobile device.
- Run only when computer is IDLE - The scan only runs if the computer is in an idle state at the scheduled time. Select this option if you do not want the scan to disturb you while you are using your computer.
- Turn off computer if no threats are found at the end of the scan - Will turn off your computer if no threats are found during the scan. This is useful when you are scheduling scans to run at nights.
- Run during Windows Automatic Maintenance - Only available for Windows 8 and later. Select this option if you want the scan to run when Windows enters into automatic maintenance mode. The scan will run at maintenance time in addition to the configured schedule.
- The option 'Run during Windows Maintenance' will be available only if 'Automatically Clean Threats' is enabled for the scan profile under the 'Options' tab. See Automatically Clean Threats above.
|
Note: Scheduled scans will run only if the scan profile is enabled. Use the switch in the 'Status' column to toggle a profile on or off. |
- Click 'OK' to save the profile.
The profile will be available for deployment in future.
