Scan Exclusions
- Click 'Settings' > 'Advanced Protection' > 'Scan Exclusions'
- The 'Scan Exclusions' panel shows files and paths which you have chosen to skip during a virus scan.
- CCS will not generate an alert for an excluded item, even if the item is rated as malicious in the global blacklist.
- Items may have been added to this list because you selected 'Ignore' at the scan results window, or because you added them to exclusions at an alert.
Open the 'Scan Exclusions' panel
- Click 'Settings' on the CCS home screen
- Click 'Advanced Protection' > 'Scan Exclusions'
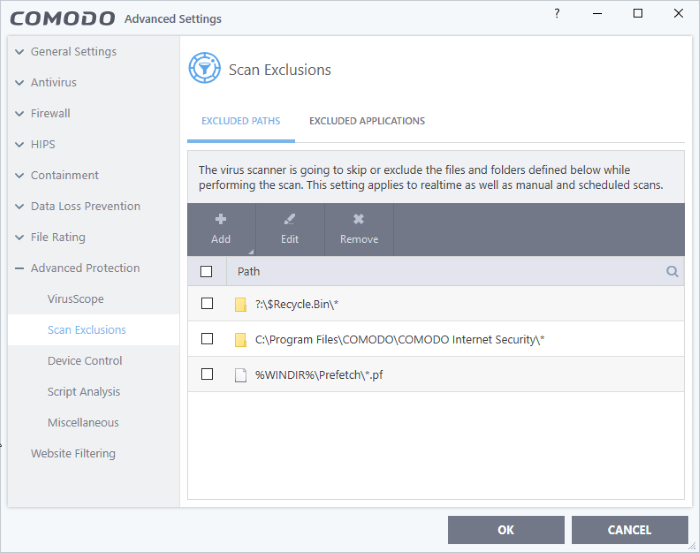
The 'Scan Exclusions' panel has two tabs:
- Excluded Paths - A list of paths/folders/files on your computer which are excluded from real-time, on-demand and scheduled antivirus scans. See 'Exclude
Drives/Folders/Files from all types of scans' for more details.
- Excluded Applications - A list of applications which are excluded from real-time antivirus scans. Items can be excluded by clicking 'Ignore' in the virus 'Scan Results', or by clicking 'Ignore' at an Antivirus Alerts, or by clicking 'Ignore' at an Antivirus Alert, or by excluding it manually. Note - excluded items are skipped by the real-time scanner but will be scanned during on-demand scans. See 'Exclude Programs/Applications from real-time scans' for more details.
Exclude Drives/Folders/Files from all types of scans
- Click 'Settings' on the CCS home screen
- Click 'Advanced Protection' > 'Scan Exclusions'
- Open the 'Excluded Paths' tab
- Click
the 'Add' button:
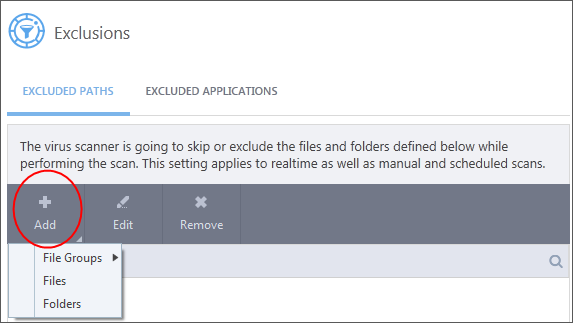
You can add a:
or
- Choose 'File Groups' to exclude a pre-set category of files or folders. This provides a convenient way to apply a generic ruleset to important files and folders.
- For example, selecting 'Executables' allows you to exclude all files with the extensions .exe .dll .sys .ocx .bat .pif .scr .cpl */cmd.exe, *.bat, *.cmd.
- Other categories include 'Windows System Applications', 'Windows Updater Applications' and 'Start Up Folders'.
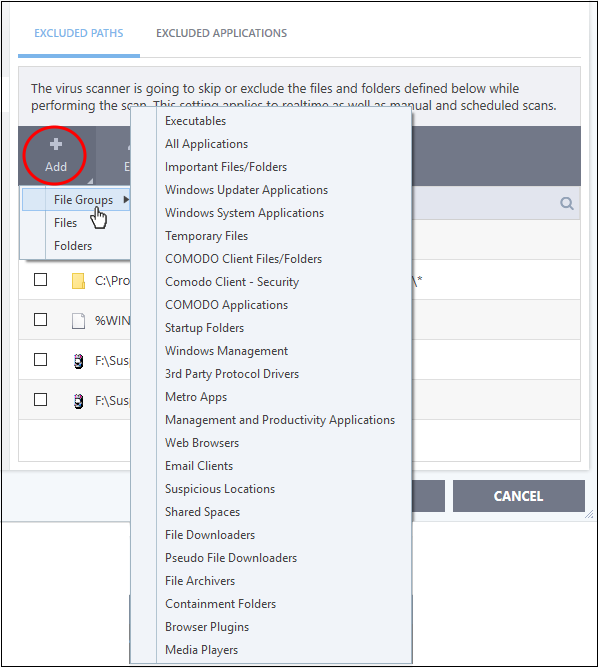
- CCS ships with a set of predefined file groups which can be viewed in 'Advanced Settings' > 'File Rating' > 'File Groups'.
- You can also add new file groups as required. See File Groups for more details.
Add new file groups to exclusions
- Click 'Settings' on the CCS home screen
- Click 'Advanced Protection' > 'Scan Exclusions'
- Click 'Add' > 'File Groups'
- Select the target file group from the list:
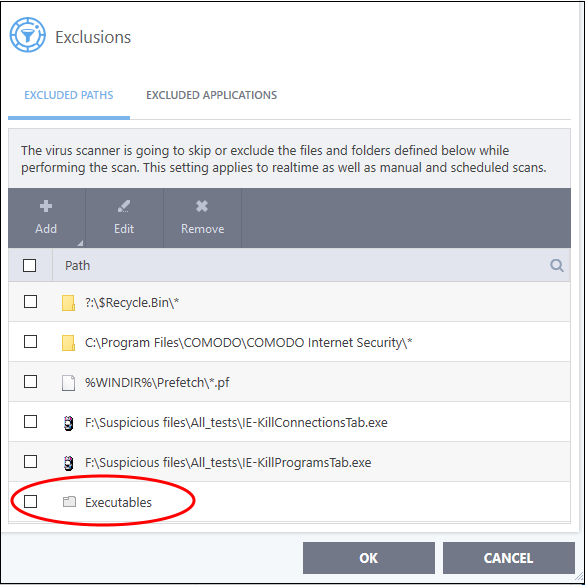
- Repeat the process to add more file groups.
- Items added to the 'Excluded Paths' will be omitted from all types of future Antivirus scans.
- Click 'Settings' on the CCS home screen
- Click 'Advanced Protection' > 'Scan Exclusions' on the left
- Select 'Excluded Paths'
- Click 'Add' > 'Folders'
- Navigate to the drive partition or folder you want to add to excluded paths and click 'OK'.
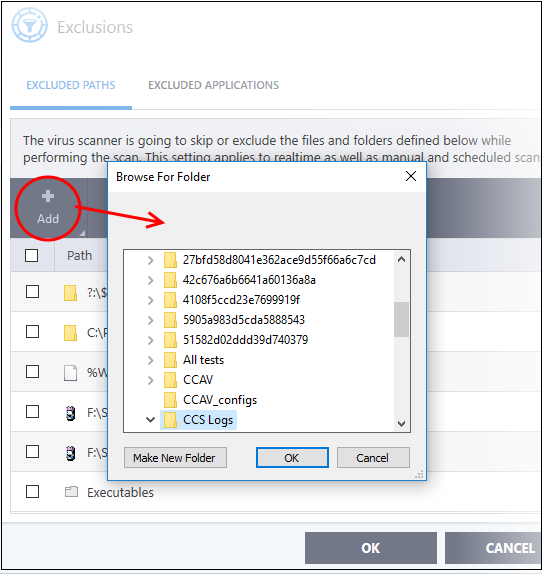
The folder/partition will be added to the list of excluded items:
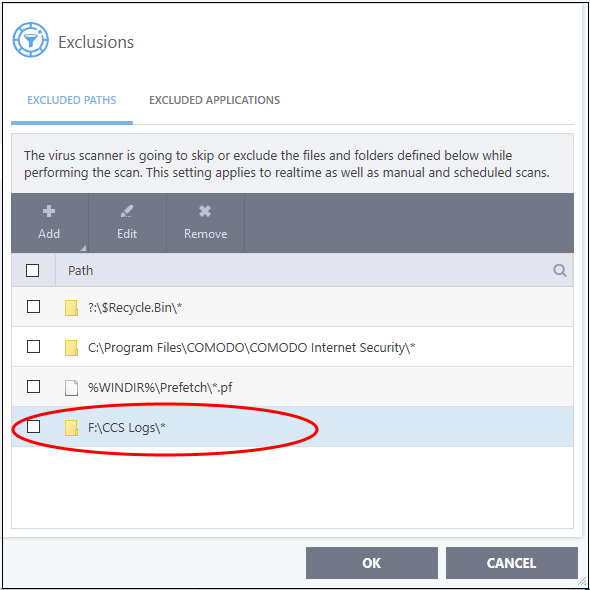
- Repeat the process to add more folders. Items added to 'Excluded Paths' will be omitted from all types of antivirus scans in future.
You can specify individual files as excluded path.
- Click 'Settings' on the CCS home screen
- Click
'Advanced Protection' > 'Scan Exclusions'
- Open the 'Excluded Paths'
- Click 'Add' > 'Files'
- Navigate to the file you want to add to excluded paths and click 'OK'.
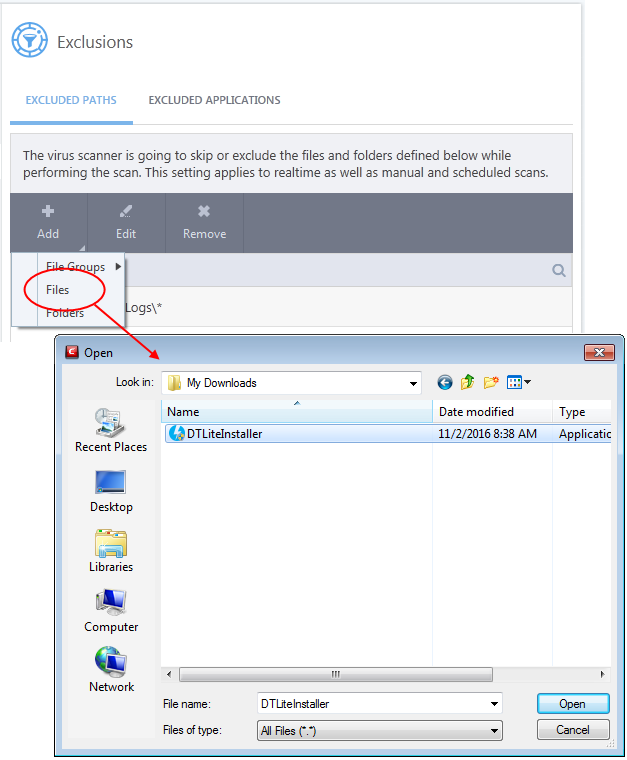
- The file will be added to excluded paths:
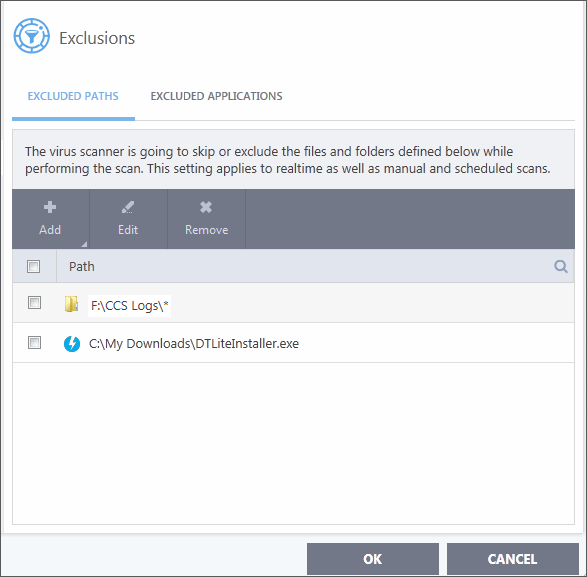
- Repeat the process to add more paths.
- The items added to 'Excluded Paths' will be omitted from all types of virus scan in the future.
Edit the path of an added item
- Click 'Settings' on the CCS home screen
- Click 'Advanced Protection' > 'Scan Exclusions'
- Open the 'Excluded Paths' tab
- Select the target item and click 'Edit':
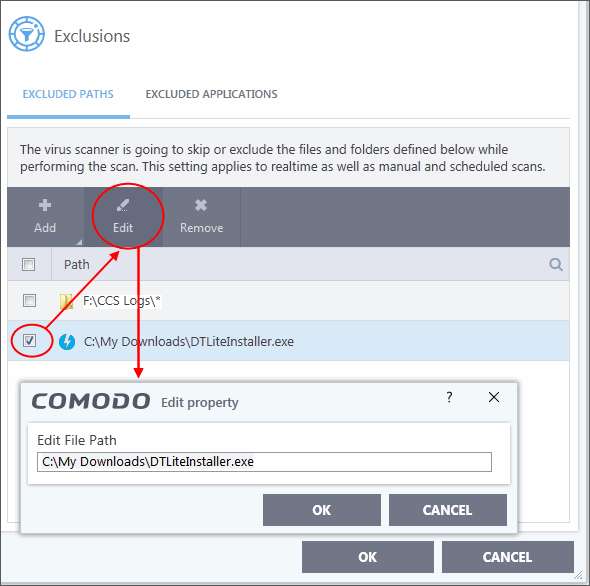
- Modify the file-path as required and click 'OK'.
Remove an item from 'Excluded Paths'
- Click 'Settings' on the CCS home screen
- Click 'Advanced Protection' > 'Scan Exclusions'
- Open the 'Excluded Paths' tab
- Select the target item and click 'Remove':
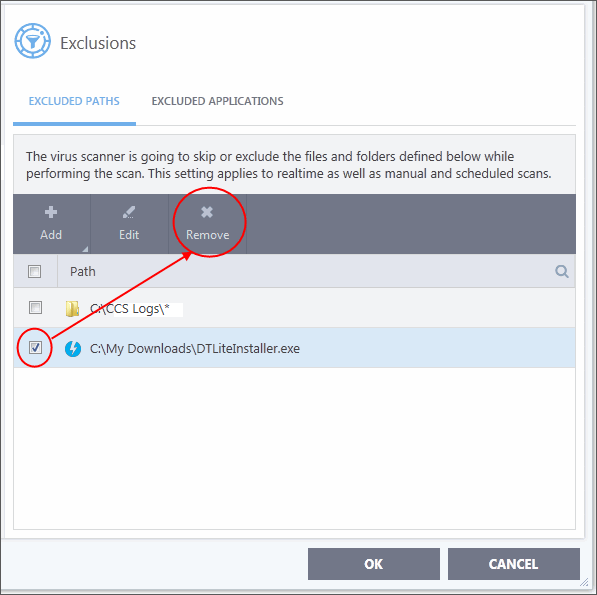
- Click 'OK' for your settings to take effect.
Exclude Programs/Applications from Real-time Scans
- The 'Excluded Applications' screen lets you specify programs which should be skipped by real-time virus scans.
- Applications which you chose to 'Ignore' in an antivirus alert or in the Scan Results window are automatically added to this list.
- You can manually add and remove programs to/from the list as required
Open 'Excluded Applications' pane
- Click 'Settings' on the CCS home screen
- Click
'Advanced Protection' > 'Scan Exclusions'
- Select
the 'Excluded Applications' tab:
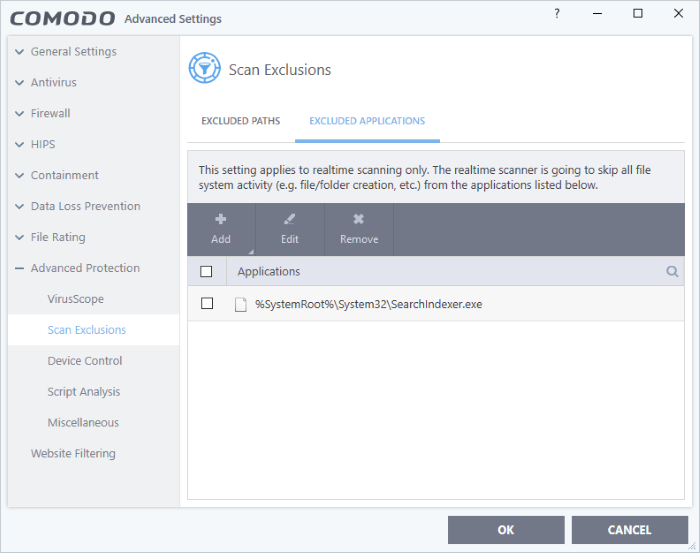
Add an item to Excluded Applications
- Click 'Settings' on the CCS home screen
- Click 'Advanced Protection' > 'Scan Exclusions'
- Open the 'Excluded Applications' tab
- Click 'Add' at the top of the 'Excluded Applications' pane.
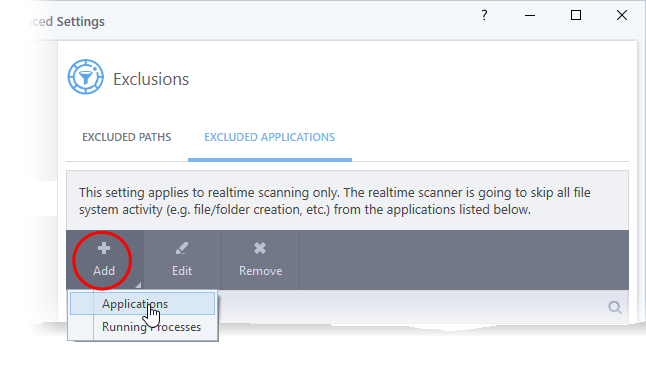
You can choose to add an application by:
- Selecting it from the running processes - This option allows you to choose the target application from the list of processes that are currently running on your PC.
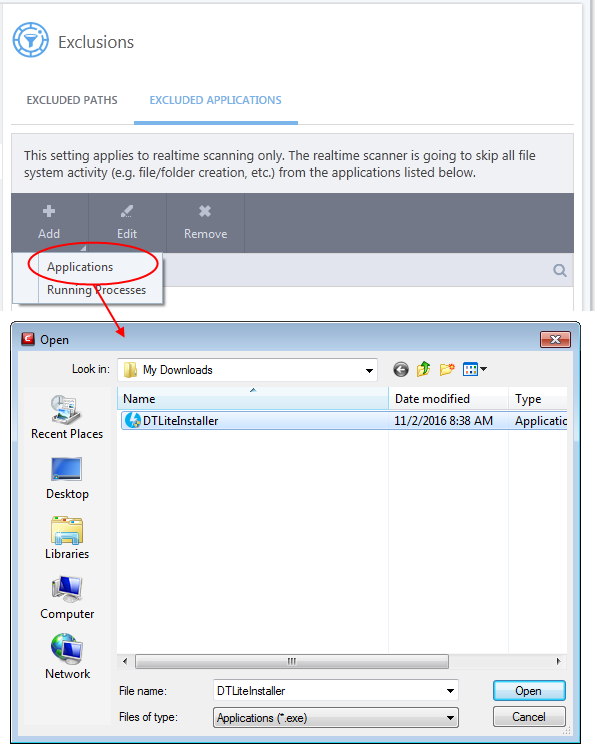
- Browsing your computer for the application - This option is the easiest for most users and simply allows you to browse to the files which you want to exclude.
Add an application from running processes
-
Choose 'Running Processes' from the 'Add' drop-down
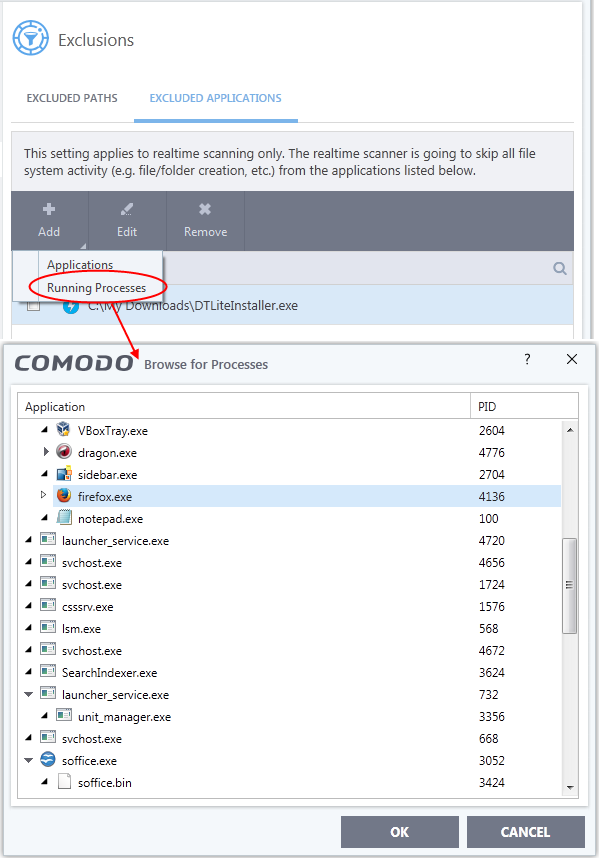
A list of currently running processes in your computer will be displayed:
-
Select the process whose target application you wish to exclude and click 'OK':
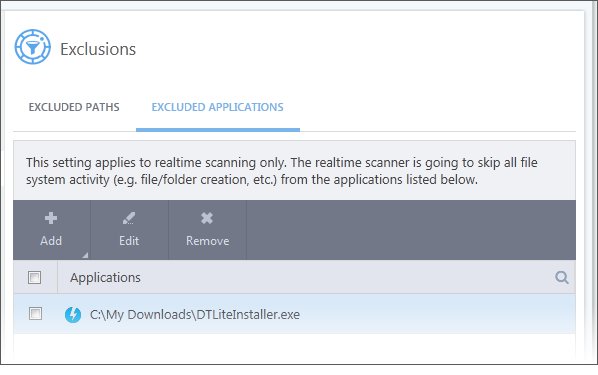
The application will be added to 'Excluded Applications'.
-
Choose 'Applications' from the 'Add' drop-down
-
Navigate to the file you want to exclude and click 'Open'.
-
Repeat the process to add more items. Excluded items will be skipped from future real-time scans.
Edit the path of the application added to 'Excluded Applications'
- Click 'Settings' on the CCS home screen
- Click 'Advanced Protection' > 'Scan Exclusions'
- Open the 'Excluded Applications' tab
- Select the application and click 'Edit' at the top
- Make required changes for the file path in the 'Edit Property' dialog.
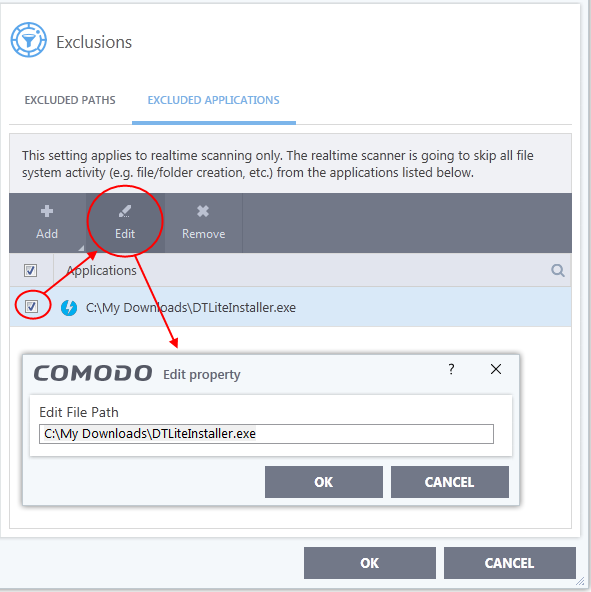
- Click 'OK' to save your changes
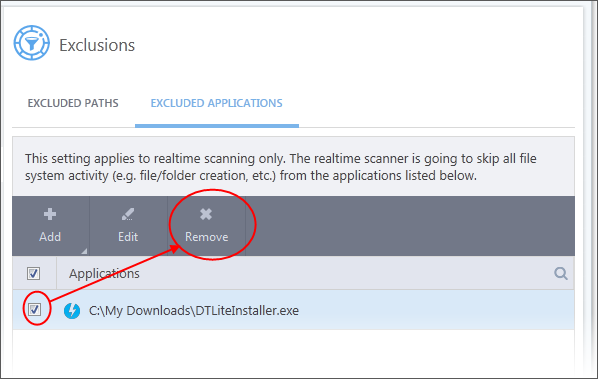
Remove an item from the Excluded Applications
- Click 'Settings' on the CCS home screen
- Click 'Advanced Protection' > 'Scan Exclusions'
- Open the 'Excluded Applications' tab
- Select the item and click 'Remove' at the top:
-
Click 'OK' in the 'Advanced Settings' dialog for your settings to take effect.


