


Application Rules
Application rules let you manage network access rights forspecific applications .
Whenever an application makes a request for network access, CCS allowsor denies the request based on the ruleset applied to the application.
Firewall rulesets are made up of one or more application rules. Eachrule outlines an application's permissions regarding a specific typeof traffic .

- Application -
Programs or file groups for which a firewall ruleset has been created. Inthe case of file groups, all member applications will use the rulesetof the group.
- Click '+' next to the name to view the rules which apply to the application/group.
Treat as -Name of the ruleset assigned to the application or group.- Status - Appication rules can now be turned off, which will allow users to temporarily or permanently disable rule without deletion.Click the 'Enable Rule' button to enable/disable the required rules.
The controls above the table let you manage the rule sets:
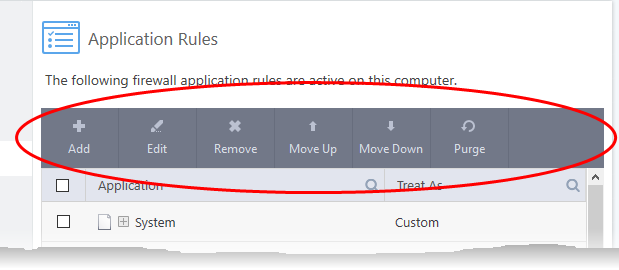
- Add - Add a new application/application group then create a ruleset for it.
- Edit - Modify an application rule/ruleset.
- Remove - Delete a selected rule.
- Purge – Check that all applications mentioned in a ruleset are
still installed at the paths specified. If not, the rule is removedfrom the list.
- Move Up and Move Down - Rules are prioritized top-to-bottom,
with those at the top havingthe higher priority. The 'Move Up' and 'Move Down' buttons let you change the priority of a selected rule.
Predefined rulesets
Although you could create a ruleset from the ground-up by configuringits individual rules, this practice would betime consuming ifperformed for every program on your system.
For this reason, Comodoprovide a selection of rulesets accordingto application category. For example, the 'Web Browser'broad ruleset is designed for applications like 'Internet Explorer', 'Firefox' and 'Chrome'.
Each predefined ruleset optimizes security for a certain typeof application . Users can, of course, modify these predefined rulesets to suittheir environment and requirements. For more details, see Predefined Rule Sets.
Step 1 - Select the target application or group
- Click 'Settings' on the CCS home screen
- Click 'Firewall' > 'Application Rules'
- Click the 'Add' button
The 'Application Rule' interface appears:
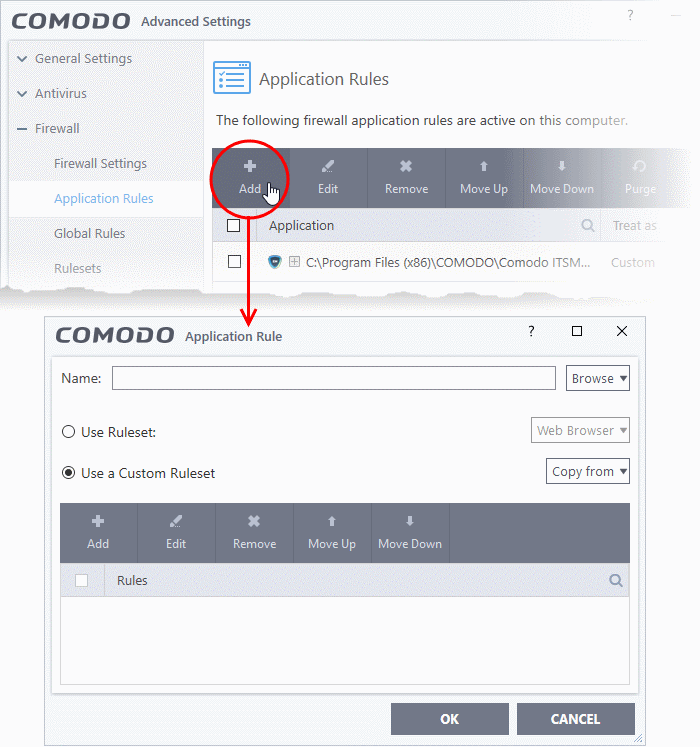
- Click the 'Browse' button beside the 'Name' field:

There are three types of target you can add:
- File Groups -
Apply the ruleset to a predefinedfile group . All members of the groupare covered by the rule. See File Groups if you need help with file groups.
- Files - Apply the ruleset to a specific application.
- Running Processes - Apply the ruleset to an application by selecting its running process.
Add a File Group
A
-
Choose 'File Groups' from the 'Browse' drop-down.
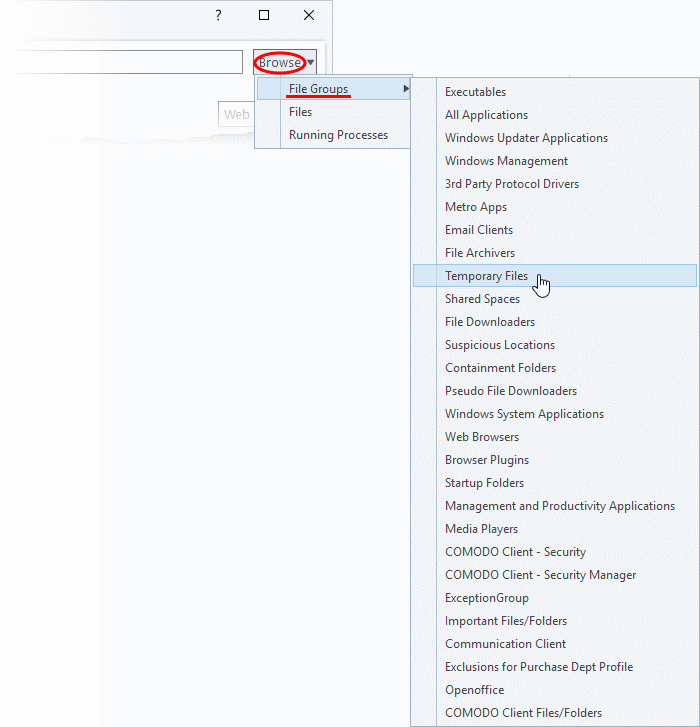
-
Select a file group from the drop-down. The ruleset will apply toall executable files in the group.
- Go to Step 2 - Configure the rules for the selected file group.
Add an individual File
- Choose 'Files' from the 'Browse' drop-down:
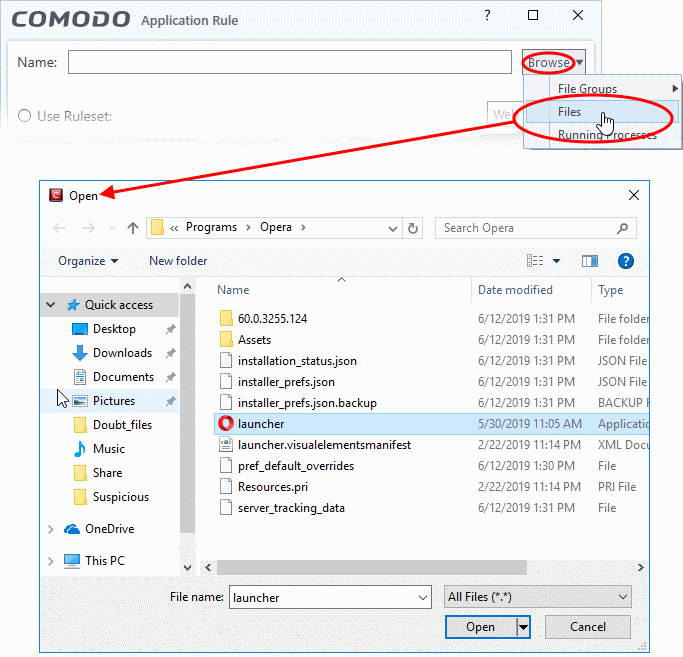
Navigate to the file you want to add as target and click 'Open'. Therule will apply only to the specific application.
- The next stage is Step 2 - Configure the rules for the selected application.
Add a currently running application by choosing its process
- Choose 'Running Processes' from the 'Browse' drop-down.
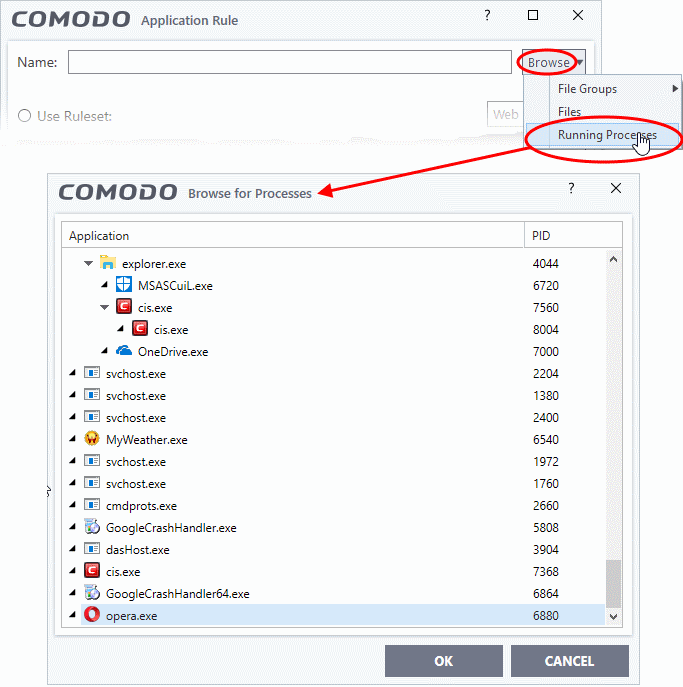
Select the target process and click 'OK'. The parent application ofthe process will be added as the target.
- The next stage is Step 2 - Configure the rules for the selected application.
Step 2 - Configure the rules in the ruleset
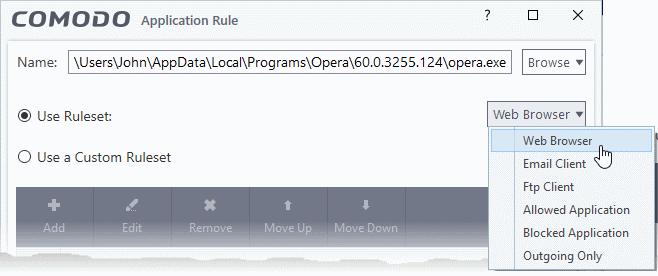
There are two broad options for creating a ruleset - Use a Predefined Ruleset or Use a Custom Ruleset.
- A ruleset is a collection of rules designed to implement optimum security on a specific type of application. You can manage and create rulesets in 'Settings' > 'Firewall Configuration' > 'Firewall Rule Sets'.
- Comodo provides a range of curated rulesets for popular types of application. These include 'Web browser', 'FTP client' and 'Email client'.
- The example below shows us applying the 'Web Browser' ruleset to the Opera browser:
Understand Firewall Rules
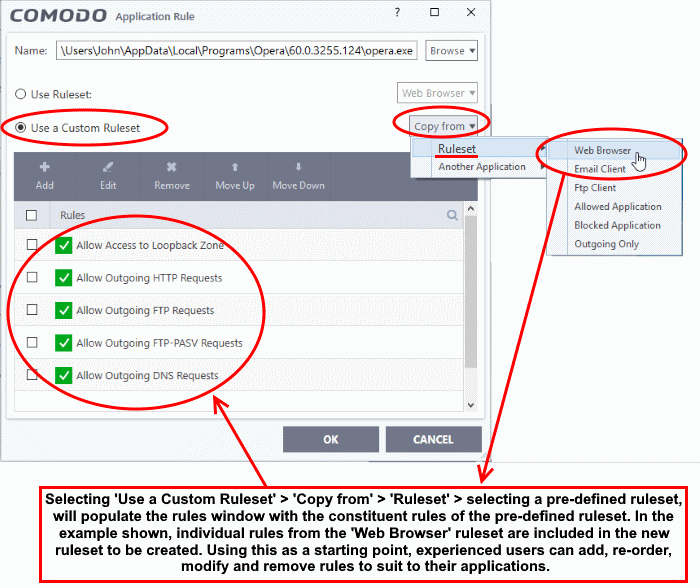
- Select the 'Use custom ruleset' radio button.
- Add - Create individual rules for the set. See 'Add and Edit a Firewall Rule' for an overview of the process.
- Copy From - Populate the list with the rules of a Predefined Firewall Rule. Edit/add/remove rules to create your custom ruleset.
At their core, each Firewall rule can be thought of as a simple
As a packet filtering firewall, Comodo firewall analyzes the attributes of every packet of data that attempts to enter or leave your computer. Attributes of a packet include the application that is sending or receiving the packet, the protocol it is using, the direction in which it is traveling, the source and destination IP addresses and the ports it is attempting to traverse. The firewall then tries to find a firewall rule that matches all the conditional attributes of this packet in order to determine whether or not it should be allowed to proceed. If there is no corresponding firewall rule, then the connection is automatically blocked until a rule is created.

The actual conditions (attributes)* you see on a particular firewall rule are determined by the protocol chosen in add and edit a firewall rule
If you chose 'TCP' , 'UDP' or 'TCP and 'UDP', then the rule has the form: Action|Protocol|Direction|Source Address | Destination Address| Source Port|Destination Port
If you chose 'ICMP', then the rule has the form: Action|Protocol|Direction |Source Address |Destination Address| ICMP Details
If you chose 'IP', then the rule has the form: Action|Protocol|Direction | Source Address|Destination Address|IP Details
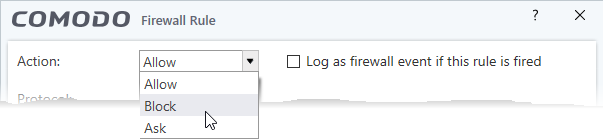
- Action: The action the firewall takes when the conditions of the rule are met. The rule shows 'Allow', 'Block' or 'Ask'.**
- Protocol: States the protocol that the target application must be attempting to use when sending or receiving packets of data. The rule shows 'TCP', 'UDP', 'TCP or UDP', 'ICMP' or 'IP'
- Direction: States the direction of traffic that the data packet must be attempting to negotiate. The rule shows 'In', 'Out' or 'In/Out'
- Source Address: States the source address of the connection attempt. The rule shows 'From' followed by one of the following:
IP , IP range, IPMask , Network Zone, Host Name or Mac Address
- Destination Address: States the address of the connection attempt. The rule shows 'To' followed by one of the following: IP, IP range, IP Mask, Network Zone, Host Name or Mac Address
- Source Port: States the port(s) that the application must be attempting to send packets of data through. Shows 'Where Source Port Is' followed by one of the following: 'Any', 'Port #', 'Port Range' or 'Port Set'
- Destination Port: States the port(s) on the remote entity that the application must be attempting to send to. Shows 'Where Source Port Is' followed by one of the following: 'Any', 'Port #', 'Port Range' or 'Port Set'
- ICMP Details: States the ICMP message that must be detected to trigger the action. See Add and Edit a Firewall Rule for details of available messages that can be displayed.
- IP Details: States the type of IP protocol that must be detected to trigger the action: See Add and Edit a Firewall Rule to see the list of available IP protocols that can be displayed here.
Once a rule is applied, the firewall monitors all traffic relating to the application and takes the specified action if the conditions are met. Users should also see the section 'Global Rules' to understand the interaction between 'Application Rules' and 'Global Rules'.
*If you chose to add a descriptive name when creating the rule then this name is displayed here rather than it's full parameters. See the next section, 'Add and Edit a Firewall Rule', for more details.
**If you selected 'Log as a firewall event if this rule is fired' then the action is postfixed with 'Log'. (e.g. Block & Log)
- Click 'Add' in the 'Application Rule' interface to create a new rule
- Double click on an existing rule or select a rule and click 'Edit' to edit an existing rule
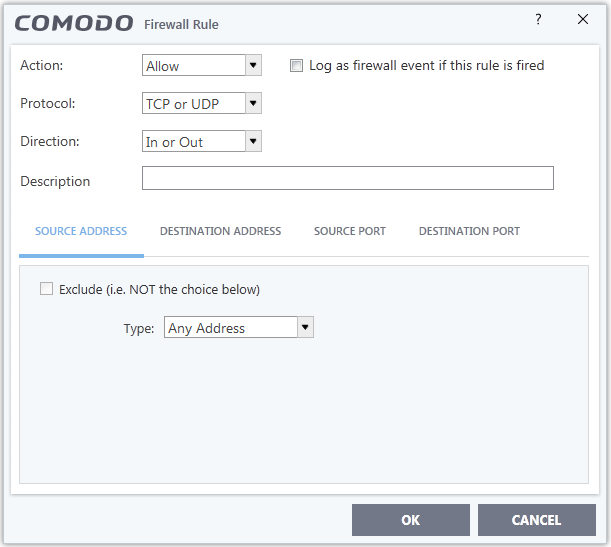
- Action: Specify how
firewall should handlethe connection request when the conditions of the rule are met. Options available are 'Allow' (Default), 'Block' or 'Ask'.
- Protocol: Specify which protocol the data packet should be using. Options available are 'TCP', 'UDP', '
TCP or UDP' (Default), 'ICMP' or 'IP'.
|
Note: Your choice here alters the choices available to you in the tab structure on the lower half of the interface. |
- Direction: Define whether the rule should intercept inbound or outbound traffic. Options available are 'In', 'Out' or 'In/Out' (Default).
- Log as a firewall event if this rule is fired: Creates an entry in the firewall event log viewer whenever this rule is triggered. (i.e. when ALL conditions have been met) (Default = Disabled).
- Description: Enter a friendly
name for the rule. For example, 'Allow Outgoing HTTP requests'.The friendly name is shown in the Application Rules interface.
-
TCP', 'UPD' or 'TCP or UDP'
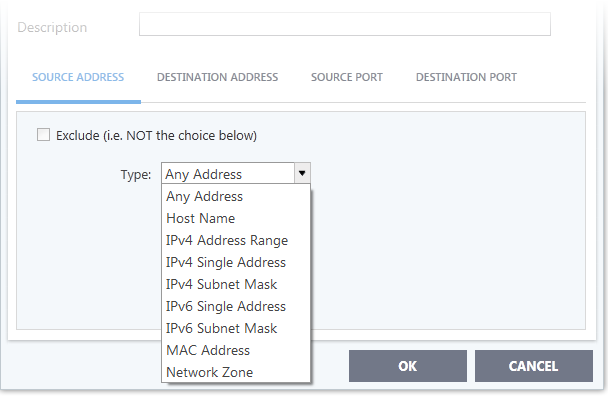
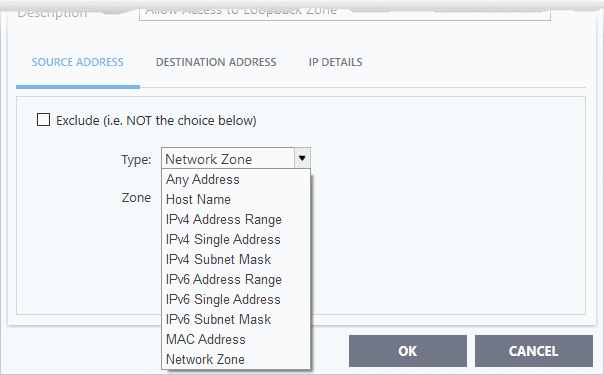
If you select 'TCP', 'UPD' or 'TCP or UDP' as the protocol, then you also have to set the source and destinations:
-
Any - Defaults to an IP range of 0.0.0.0- 255.255.255.255 to allow connection from all IP addresses.
-
Host Name - Choose a named host
which denotes your IP address. Enter the name in the 'Host Name' text field -
IPv4 Address Range – Choose all IP addresses covered by a range - for
example a range in your private network.
Enter the first and last IP addresses in the 'Start IP' and 'End IP' text boxes.
-
IPv4 Single Address - Choose a single IPv4 address
Enter the IP address in the 'IP' text box, e.g., 192.168.200.113.
-
IPv4 Subnet mask - Choose an IPv4 network. IP networks can
be divided into smaller networks called sub-networks (or subnets). An IP address/ Mask is a subnet defined byIP address and mask ofthe network .
Enter the IP address and Mask of the network.
-
IPv6 Address Range - Choose all IPv6 addresses covered by a range - for
example a segment in your private network
Enter the first and last IPv6 addresses in the 'Start IP' and 'End IP' text boxes.
-
Single IPv6 Address - Choose an IPv6 address
- Enter the IP address in the 'IP' text box, e.g., 3ffe:1900:4545:3:200:f8ff:fe21:67cf.
-
IPv6 Subnet Mask – Choose
a IPv6 network. IP networks can be divided into smaller networks called sub-networks (or subnets). An IP address/ Mask is a subnet defined byIP address and mask ofthe network .
- Enter the IP address and 'Mask' of the network in the respective fields
-
MAC Address - Choose a single source/destination by specifying its physical address
Enter the physical address in the 'MAC Address' text box.
-
Network Zone - Choose an entire network. This menu defaults to
Local Area Network. But you can also define your own zone by first creating a 'Network Zone' through the 'Network Zones' area.
- Exclude (i.e. NOT the choice below) – Applies the action to all items except the one you specify.
For example , you create a block rule, specify an IP address, then select 'Exclude'. The rule will block traffic for every address except the one you specified.
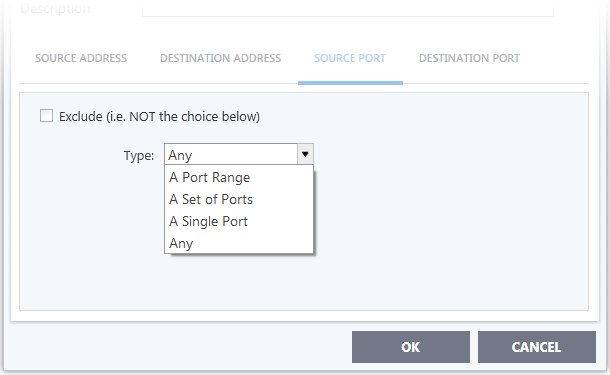
Source Port and Destination Port:
-
Any – Apply the rule to any port number - set by default, 0- 65535.
-
A Single Port – Specify a one port number
Enter the single port number in the 'Port' drop-downcombo-box .
-
A Port Range – Specify a set of ports covered by a range.
- Enter the first port number and last port number in the respective fields
-
A Set of Ports - Choose a predefined Port Sets. If you wish to create a custom port set then please see the section 'Port Sets'.
II. ICMP
When you select ICMP as the protocol in General Settings, you are shown a list of ICMP message types in the 'ICMP Details' tab alongside the Destination Address tabs. The last two tabs are configured identically to the explanation above. You cannot see the source and destination port tabs.
- ICMP Details
ICMP (Internet Control Message Protocol) packets contain error and control information which is used to announce network errors, network congestion, timeouts, and to assist in troubleshooting. It is used mainly for performing traces and pings. Pinging is frequently used to perform a quick test before attempting to initiate communications. If you are using or have used a peer-to-peer file-sharing program, you might find yourself being pinged a lot. So you can create rules to allow / block specific types of ping requests. With Comodo Firewall you can create rules to allow/ deny inbound ICMP packets that provide you with information and minimize security risk.
1. 'Source' and 'Destination' addresses - Enter the source/ destination IP address. Source IP is the IP address from which the traffic originated and destination IP is the IP address of the computer that is receiving packets of information.
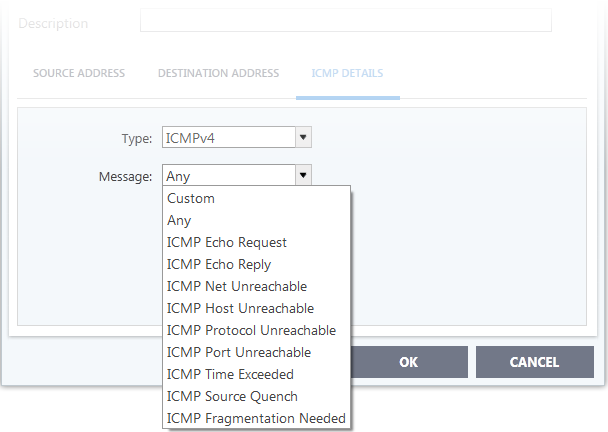
2.Type - Choose the ICMP version.When you select a particular ICMP3. Message - Specify the type of the ICMP Message.
-
IP
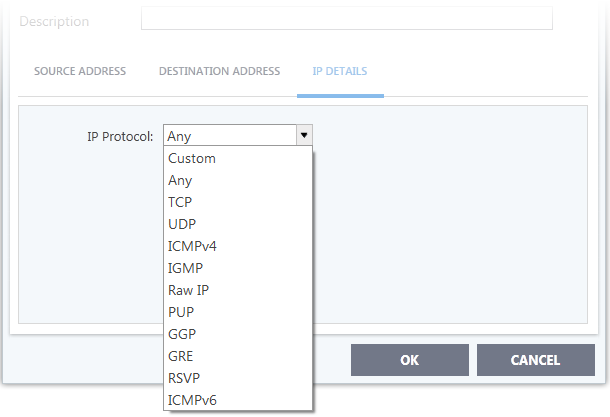
When you select IP as the protocol in General Settings, you are shown a list of IP message type in the 'IP Details' tab alongside the Source Address and Destination Address tabs. The last two tabs are configured identically to the explanation above. You cannot see the source and destination port tabs.
- IP Details
Select the types of IP protocol that you wish to allow, from the ones that are listed.
-
Click 'OK' to save the firewall rule.