Comodo Help
Find the desired product help
Comodo Internet Security

Comodo Internet Security

Version 12.2

English

Print Help Download Help
CIS Settings > Firewall Configuration > Network Zones > Network Zones
  • Introduction To Comodo Internet Security
    • Special Features
    • Download, Installation And Activation
    • Start Comodo Internet Security
    • The Main Interface
      • The Home Screen
      • The Tasks Interface
      • The Widget
      • The System Tray Icon
    • Understand Security Alerts
  • General Tasks – Introduction
    • Scan And Clean Your Computer
      • Run A Quick Scan
      • Run A Full Computer Scan
      • Run A Rating Scan
      • Run A Custom Scan
        • Scan A Folder
        • Scan A File
        • Create, Schedule And Run A Custom Scan
    • Secure Shopping Settings
    • Manage Virus Database And Program Updates
    • Get Live Support
    • Manage Blocked Items
    • Instantly Scan Files And Folders
    • Process Infected Files
  • Firewall Tasks - Introduction
    • Configure Internet Access Rights For Applications
    • Manage Network Connections
    • Stop All Network Activities
    • Stealth Your Computer Ports
    • View Active Internet Connections
  • Containment Tasks - Introduction
    • Run An Application In The Container
    • Reset The Container
    • Identify And Kill Unsafe Running Processes
    • View Active Process List
    • The Virtual Desktop
      • Start The Virtual Desktop
      • The Main Interface
      • Run Browsers Inside The Virtual Desktop
      • Open Files And Run Applications Inside The Virtual Desktop
      • Configure The Virtual Desktop
      • Close The Virtual Desktop
  • Advanced Tasks – Introduction
    • Create A Rescue Disk
      • Download And Burn Comodo Rescue Disk
    • Remove Deeply Hidden Malware
    • Manage CIS Tasks
    • Manage Quarantined Items
    • View CIS Logs
      • Antivirus Logs
      • VirusScope Logs
      • Firewall Logs
      • HIPS Logs
      • Containment Logs
      • Website Filtering Logs
      • Device Control Logs
      • Autorun Event Logs
      • Alerts Logs
      • CIS Tasks Logs
      • File List Changes Logs
      • Vendor List Changes Logs
      • Trusted Certificate Authority Change Logs
      • Configuration Change Logs
      • Secure Shopping Activity Logs
      • Search And Filter Logs
    • Submit Files For Analysis To Comodo
  • CIS Settings
    • General Settings
      • Customize User Interface
      • Configure Program And Virus Database Updates
      • Log Settings
      • Manage CIS Configurations
        • Comodo Preset Configurations
        • Personal Configurations
    • Antivirus Configurations
      • Real-time Scan Settings
      • Scan Profiles
    • Firewall Configuration
      • General Firewall Settings
      • Application Rules
      • Global Rules
      • Firewall Rule Sets
      • Network Zones
        • Network Zones
        • Blocked Zones
      • Port Sets
    • HIPS Configuration
      • HIPS Settings
      • Active HIPS Rules
      • HIPS Rule Sets
      • Protected Objects
        • Protected Files
        • Blocked Files
        • Protected Registry Keys
        • Protected COM Interfaces
        • Protected Data Files And Folders
      • HIPS Groups
        • Registry Groups
        • COM Groups
    • Containment Configuration
      • Containment Settings
      • Auto-Containment Rules
      • Containment - An Overview
      • Unknown Files - The Scanning Processes
    • File Rating Configuration
      • File Rating Settings
      • File Groups
      • Submitted Files
    • Advanced Protection Configuration
      • VirusScope Settings
      • Scan Exclusions
      • Device Control Settings
      • Script Analysis Settings
      • Miscellaneous Settings
      • Comodo Secure Shopping
    • Website Filtering Configuration
      • Website Filtering Rules
      • Website Categories
  • Comodo GeekBuddy
    • Download And Install GeekBuddy
    • Overview Of Services
    • Activation Of Service
    • Launch The Client And Use The Service
    • Accept Remote Desktop Requests
    • Uninstall Comodo GeekBuddy
  • TrustConnect Overview
  • Dragon Browser
  • Comodo Backup
  • Comodo Internet Security Essentials
    • What Is Comodo Internet Security Essentials
    • What Is A Man-in-the-middle Attack
    • How Does Comodo Internet Security Essentials Protect Me From A Man-in-the-middle Attack
    • What Is The Install Location Of Comodo Internet Security Essentials
    • How Do I Update CISE
    • Understand Alerts And Configure Exceptions
    • How Do I View CISE Help
    • How Do I View The Version Number And Release Notes
    • How Do I Remove Comodo Internet Security Essentials
  • Appendix 1 CIS How To... Tutorials
    • Enable / Disable AV, Firewall, Auto-Containment, VirusScope And Website Filter Easily
    • Set Up The Firewall For Maximum Security And Usability
    • Block Internet Access While Allowing Local Area Network (LAN) Access
    • Block/Allow Specific Websites To Specific Users
    • Set Up HIPS For Maximum Security And Usability
    • Create Rules To Auto-Contain Applications
    • Password Protect Your CIS Settings
    • Reset Forgotten Password (Advanced)
    • Run An Instant Antivirus Scan On Selected Items
    • Create An Antivirus Scan Schedule
    • Run Untrusted Programs In The Container
    • Run Browsers In The Container
    • Run Untrusted Programs In The Virtual Desktop
    • Run Browsers In The Virtual Desktop
    • Restore Incorrectly Blocked Items
    • Restore Incorrectly Quarantined Items
    • Submit Quarantined Items To Comodo For Analysis
    • Enable File Sharing Applications Like BitTorrent And Emule
    • Block Any Downloads Of A Specific File Type
    • Switch Between Complete CIS Suite And Individual Components (just AV Or FW)
    • Switch Off Automatic Antivirus And Software Updates
    • Suppress CIS Alerts Temporarily While Playing Games
    • Renew Or Upgrade Your License
    • Use CIS Protocol Handlers
    • Configure Secure Shopping
    • Comodo Cloud Backup
    • Give Contained Applications Write Access To Local Folders
    • Use The Comodo Uninstaller Tool
  • Appendix 2 - Comodo Secure DNS Service
    • Router - Enable Comodo Secure DNS Service
    • Windows - Enable Comodo Secure DNS
  • Appendix 3 - Glossary Of Terms
  • Appendix 4 - CIS Versions
  • About Comodo Security Solutions

Network Zones

     
Click 'Settings' > 'Firewall' > 'Network Zones' > 'Network Zones'
  • A 'Network Zone' can consist of an individual machine (like a home computer connected to the internet) or a network of thousands of machines. You can grant or deny access to a network zone as required.

Background Note:

  • A computer network is a connection between computers through a cabled or wireless connection.
  • A network allows users to share information and resources with other computers/users on the network.
  • There are some networks which you trust and want to grant access to, including your home or work network.
  • Conversely, there may be other networks with which you want to restrict communication, or even block entirely.

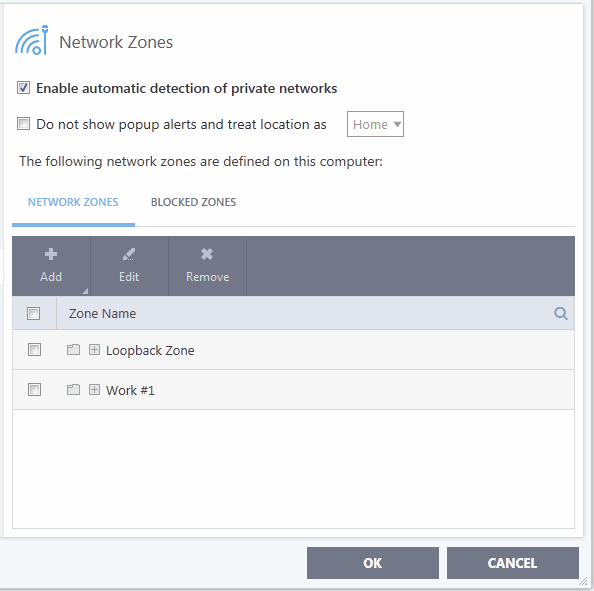
  • The network zones panel lets you configure trusted and untrusted networks.

Add and manage network zones

  • Click 'Settings' on the CIS home screen
  • Click 'Firewall' > 'Network Zones'
  • Click the 'Network Zones' tab


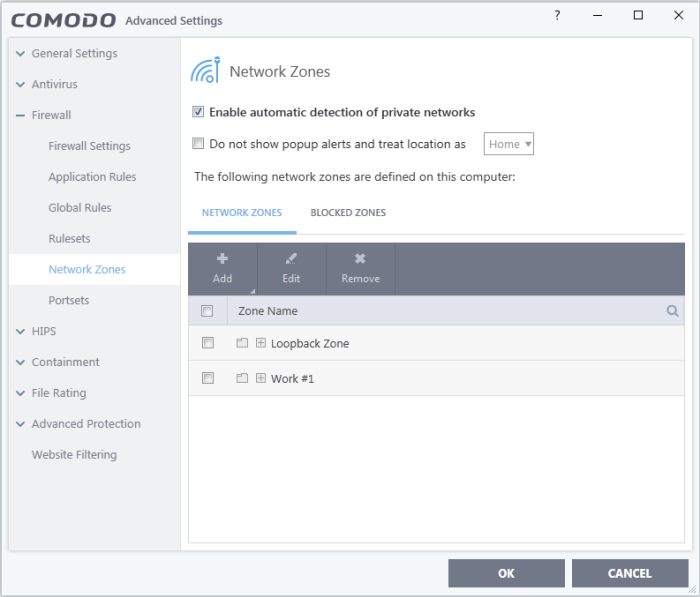
The network zones tab shows zones that have already been added to CIS. You can add new zones and manage existing zones.


Note 1: Adding a zone to this area does not, by itself, define any permissions or access rights to the zone. This area lets you define the zones so you can assign such permissions in other areas of the firewall.


Note 2: A network zone can be designated as 'Trusted' and allowed access from the 'Manage Network Connections' interface. An example would be your home computer or network.


Note 3: A network zone can be designated as 'Blocked' and denied access by using the 'Blocked Zones' interface.


Note 4: An application can be assigned specific access rights to and from a network zone when defining an Application Rule. Similarly, a custom Global Rules assigned to a zone will inspect all traffic to/from a zone.


Note 5: By default, Comodo Firewall automatically detects any new networks (LAN, Wireless etc) once you connect to them. This can be disabled by deselecting the option 'Enable automatic detection of private networks' in the Firewall Settings panel.


You can use search for a specific zone by clicking the search icon and entering the name of the zone in part or full.


Define a new Network Zone

  • Step 1 - Define a name for the zone
  • Step 2 - Select the addresses to be included in this zone

    Step 1 - Define a name for the zone

    • Click 'Settings' on CIS home screen
    • Click 'Firewall' > 'Network Zones'
    • Click the 'Network Zones' tab
    • Click the 'Add' button at the top of the list and choose 'New Network Zone' from the options


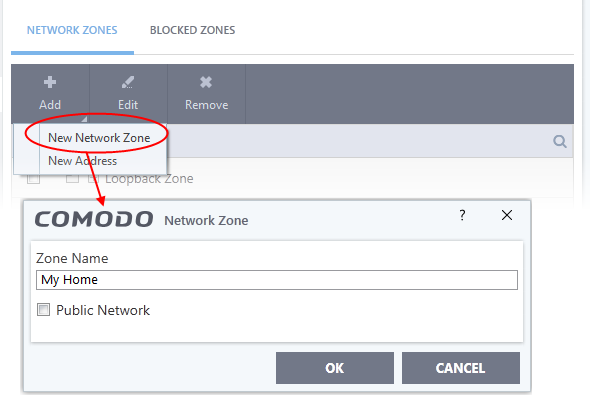
    • Choose a name that accurately describes the network zone you are creating.
    • Select 'Public Network' if you are defining a network zone for a network in a public place. For example, when you are connecting to a Wi-Fi network at an airport, restaurant etc. The firewall will optimize the connection accordingly.
    • Click 'OK' to confirm your zone name.

    This adds your new zone to the 'Network Zones' list:


    Step 2 - Select the addresses to be included in this zone

    • Select the network zone name then click the 'Add' button at the top
    • Choose 'New Address' from the options
    • Alternatively, right click on the network zone and choose 'Add' > 'New Address' from the context sensitive menu

    The 'Address' dialog allows you to select an address from the 'Type' drop-down box shown below (Default = Any Address).


    The 'Exclude' check box will become active if you select anything other than 'Any Address'.
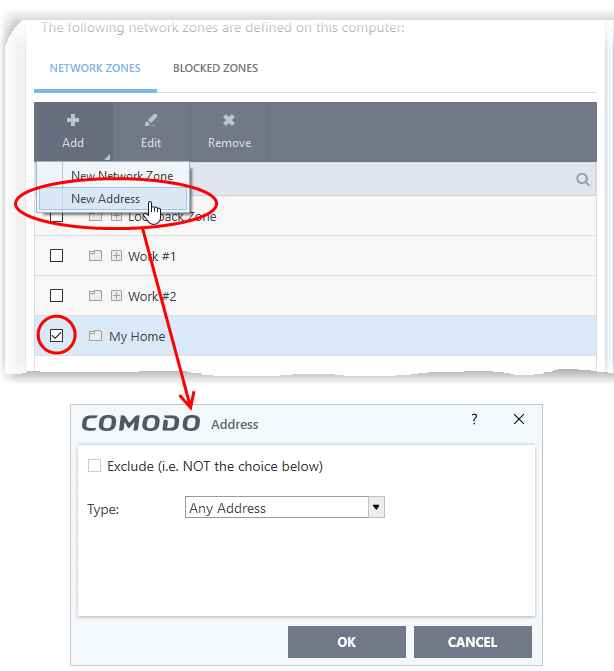


    Address Types:

    1. Any - Defaults to an IP range of 0.0.0.0- 255.255.255.255 to block connection from all IP addresses.

    2. Host Name - Choose a named host which denotes your IP address. Enter the name in the 'Host Name' text field

    3. IPv4 Address Range – Choose all IP addresses covered by a range - for example a range in your private network.

    • Enter the first and last IP addresses in the 'Start IP' and 'End IP' text boxes.
    1. IPv4 Single Address - Choose a single IPv4 address

    • Enter the IP address in the 'IP' text box, e.g., 192.168.200.113.
    1. IPv4 Subnet mask - Choose an IPv4 network. IP networks can be divided into smaller networks called sub-networks (or subnets). An IP address/ Mask is a subnet defined by IP address and mask of the network.

    • Enter the IP address and Mask of the network.
    1. IPv6 Address Range - Choose all IPv6 addresses covered by a range - for example a segment in your private network

    Enter the first and last IPv6 addresses in the 'Start IP' and 'End IP' text boxes.

    1. Single IPv6 Address - Choose an IPv6 address

    • Enter the IP address in the 'IP' text box, e.g., 3ffe:1900:4545:3:200:f8ff:fe21:67cf.
    1. IPv6 Subnet Mask – Choose a IPv6 network. IP networks can be divided into smaller networks called sub-networks (or subnets). An IP address/ Mask is a subnet defined by IP address and mask of the network.

    • Enter the IP address and 'Mask' of the network in the respective fields
    1. MAC Address - Choose a single source/destination by specifying its physical address

    • Enter the physical address in the 'MAC Address' text box.
    • Exclude (i.e. NOT the choice below) - The opposite of what you specify is applicable.
    • Click 'OK' to confirm your choice.
    • Click 'OK' in the 'Network Zones' interface.

    The new zone now appears in the main list along with the addresses you assigned to it.

    Once created, a network zone can be:

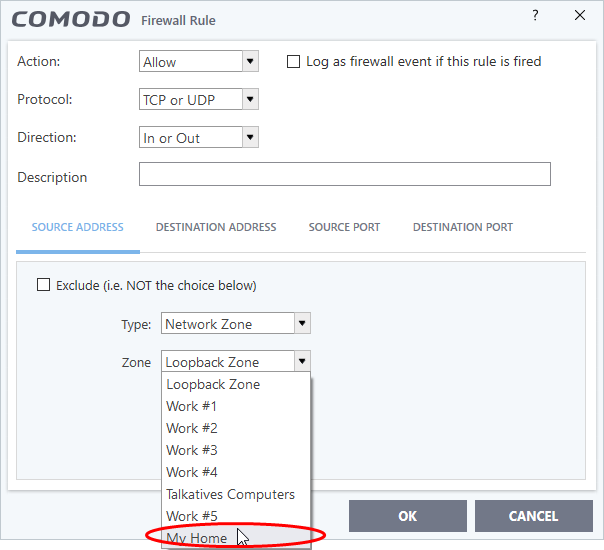
    • Quickly called as 'Zone' when creating or modifying a Firewall Ruleset


    • Quickly called and designated as a blocked zone from the 'Blocked Zones' interface.

    Edit the name of an existing Network Zone

    • Click 'Settings' on the CIS home screen
    • Click 'Firewall' > 'Network Zones'
    • Click the 'Network Zones' tab
    • Select the zone from the list (e.g., My Home) and click the 'Edit' button from the top or double click on the network zone name.


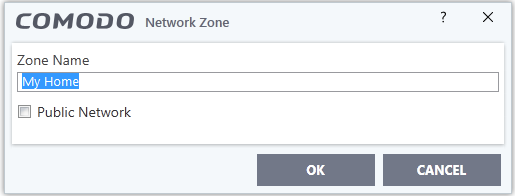
    • Change the name of the zone and click 'OK'.


    Add more addresses to an existing Network Zone  

    • Select the network name, click the 'Add' > 'New Address' from the top
    • Add new address from the 'Address' interface. 
     

    Modify or change the existing address in a zone

    • Click the arrow button beside the network zone name to expand the addresses
    • Double click on the address to be edited or select the address, click 'Edit' at the top
      • Edit the address from the 'Address' interface.
      Remove an existing address in a zone
      • Click the '+' button beside the network zone name to expand the addresses
      • Select the address and click 'Remove' from the top.

      Our Products
      • Free Antivirus
      • Free Internet Security
      • Website Malware Removal
      • Free Anti-Malware
      • Anti-Spam (Free Trial)
      • Windows Antivirus
      • Antivirus for Windows 7
      • Antivirus for Windows 8
      • Antivirus for Windows 10
      • Antivirus for MAC
      • Antivirus for Linux
      • Free Endpoint Security
      • Free ModSecurity
      • Free RMM
      • Free Website Malware Scanner
      • Free Device Manager for Android
      • Free Demo
      • Network Security
      • Endpoint Protection
      • Antivirus for Android
      • Comodo Antivirus
      • Wordpress Security
      Cheap CDN
      • Bootstrap CDN
      • Semantic UI CDN
      • Jquery CDN
      • CDN Plans
      • CDN
      • Free CDN
      Enterprise
      • Patch Management Software
      • Patch Manager
      • Service Desk
      • Website Down
      • Endpoint Protection Solutions
      • Website Security Check
      • Remote Monitoring and Management
      • Website Security
      • Device Manager
      • ITSM
      • CRM
      • MSP
      • Android Device Manager
      • MDR Services
      • Managed IT Support Services
      • Free EDR
      Free SSL Certificate
      Support Partners Terms and Conditions Privacy Policy

      © Comodo Group, Inc. 2025. All rights reserved.