Protected Data Files and Folders
Click
'Settings' > 'HIPS' > 'Protected Objects' > 'Protected
Data'
- Items in 'Protected Data' cannot be seen, accessed or modified by applications running in the container
- This fortifies files containing sensitive data from unrecognized and potentially malicious programs
|
Protected Files and Protected Data
|
Add and manage protected data
- Click 'Settings' on the CIS home screen.
- Click 'HIPS' > 'Protected Objects'
- Select the 'Protected Data' tab
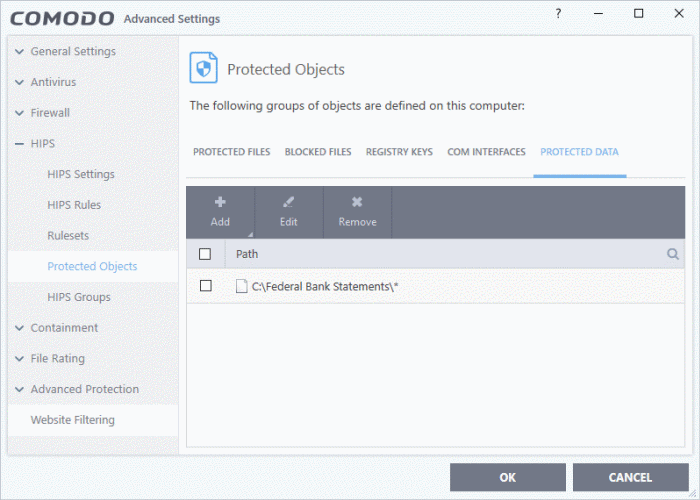
The interface allows you to:
Search Option:
- Click the search icon at upper-right and enter the name of a file or folder in full or part.
Controls:
The buttons at the top provide the following options:
- Add - Add files, folders or file groups to protected data
- Edit - Change the file path of protected items
- Remove - Delete items that you no longer want to hide from contained programs
Add a file, folder or file group to be protected
- Click 'Settings' on the CIS home screen
- Click 'HIPS' > 'Protected Objects'
- Open the 'Protected Data' tab
- Click the 'Add' button:
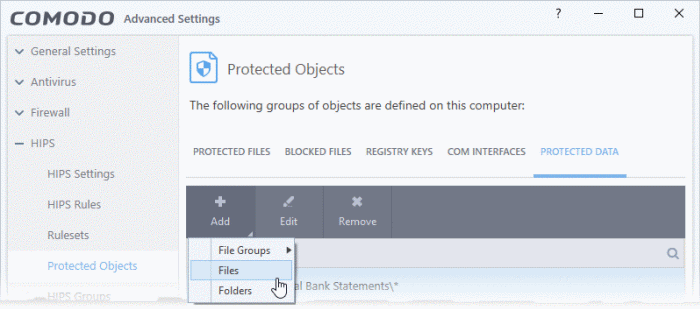
You can add:
OR
- Choose 'File Groups' to include a pre-set category of files or folders. This is a convenient way to protect an entire category of important files and folder.
- For example, selecting 'Executables' will protect all files with the extensions .exe .dll .sys .ocx .bat .pif .scr .cpl, cmd.exe, .bat, and .cmd.
- Other categories include 'Windows System Applications', 'Windows Updater Applications' and 'Start Up Folders'.
- CIS ships with a set of predefined file groups which can be viewed in 'Advanced Settings' > 'File Rating' > 'File Groups'.
- You can also create your own file groups. All files in that group will be covered, including files added to the group after adding it to 'Protected Data'. See File Groups for more details.
Add a file group to be protected
- Click 'Settings' on the CIS home screen
- Click 'HIPS' > 'Protected Objects'
- Open the 'Protected Data' tab
- Click 'Add' > 'File Groups'
- Select the target file group from the list:
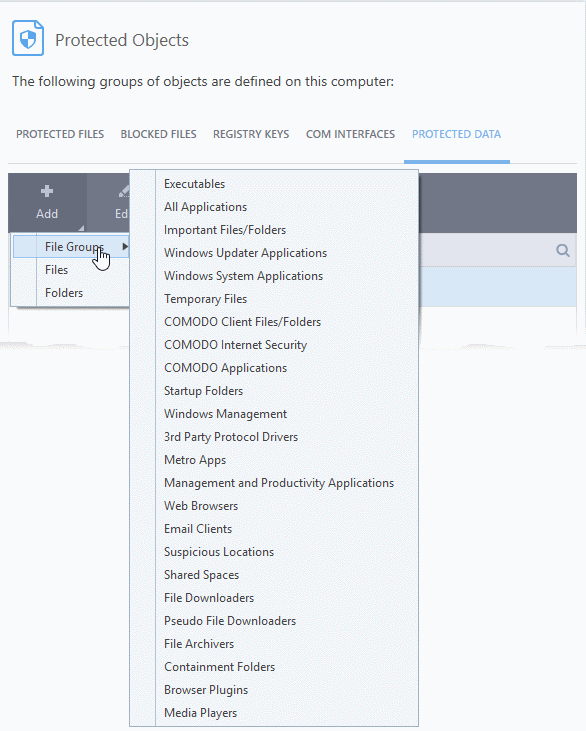
- Repeat the process to add more file groups.
- Click 'OK' in the 'Advanced Settings' interface to save your settings
Add drive partitions / folders
- You an add disk drive partitions and data folders containing sensitive files to protected data
- All sub-folders and files included in the folder/drive will be covered by the protection. This includes items added after the folder was added to 'Protected Data'.
Add a drive / folder to be protected
- Click 'Settings' on the CIS home screen
- Click 'HIPS' > 'Protected Objects'
- Open the 'Protected Data' tab
- Click 'Add' > 'Folders'
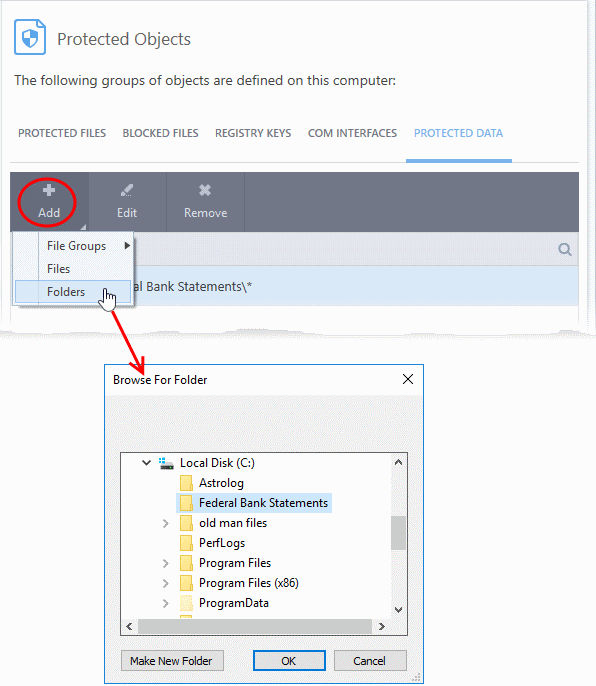
- Navigate to the drive partition or folder you want to add to protected data list and click 'OK'
- Repeat the process to add more folders
- Click 'OK' in the 'Advanced Settings' interface to save your settings
Add individual files to be protected
- Click 'Settings' on the CIS home screen
- Click 'HIPS' > 'Protected Objects'
- Open the 'Protected Data' tab
- Click 'Add' > 'Files'
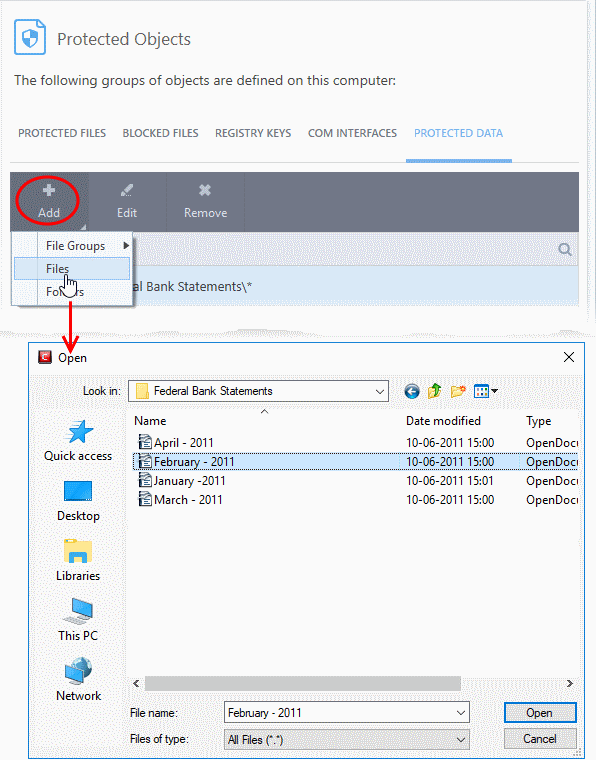
- Navigate to and select the files you want to add to protected data and click 'Open'.
- Repeat the process to add more files.
- Click 'OK' in the 'Advanced Settings' interface to save your settings
- Click 'Settings' on the CIS home screen
- Click 'HIPS' > 'Protected Objects'
- Open the 'Protected Data' tab
- Select the item to be edited and click the 'Edit' button
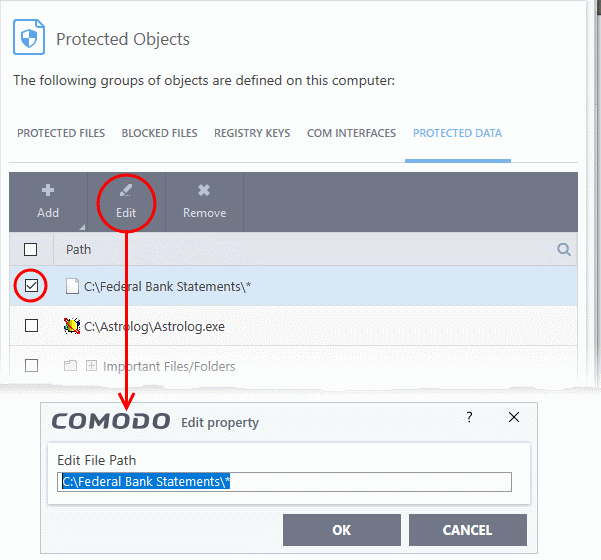
- Modify the file-path as required and click 'OK'
- Click 'OK' in the 'Advanced Settings' interface to save your settings
Remove protection for files and folders
You can remove items you no longer want to protect:
- Click 'Settings' on the CIS home screen
- Click 'HIPS' > 'Protected Objects'
- Open the 'Protected Data' tab
- Select the item to be remove and click the 'Remove' button
- Click 'OK' in the 'Advanced Settings' interface to save your settings
The selected item will be removed from the protected data list. CIS will not generate an alert if the item is accessed.


